文章
Miss Chen
2017年08月09日

Agaves (Agave spp.) are drought-tolerant succulents that have long, sword-shaped leaves that open in a rosette form. While some agaves feature smooth sides, many species have hardened, needle-like tips and curled, hardened teeth along the leaf edges. Agaves with sharp spines should be kept a minimum of 6 feet away from walking areas in the yard because the spines can easily puncture skin and cause serious injury. If you have small children or pets, removing the spines is the safest option. The spines won't grow back and cutting the spines won't kill the plant.

Step 1
Wear heavy protective clothing and eyewear, such as long-sleeved shirt, gloves, pants and safety glasses or goggles to prevent skin and eye contact with the agave plant spines and sap. While the sap of some agaves is consumed, some plant saps can cause irritation upon contact.
Step 2
Cut straight across the hardened leaf tips just above the point where the fleshy leaves transition to hardened spines, using a pair of bypass pruners. Cut just above the thick, fleshy portion of the leaves, but do not cut through this flesh because this can attract pests such as the agave snout weevil that lay their eggs in damaged sections of the plant. The weevil larvae burrow into the soft tissue of the plant, introducing a harmful bacteria that rots the plant cells, decomposing the plant from the inside out.

Step 3
Cut the curled, spiny teeth from the margins of the agave plant leaves, using bypass pruners or a pair of fingernail clippers. Clip off the sharp point, leaving a dull, flat surface at each spine. Do not cut into the fleshy portion of the leaf. Start from the spines closest to the leaf tip and work your way down to the base.
Step 4
Cut the straight, pointed spines from the tips and the curled spines from the leaf margins as new leaves emerge from the terminal bud in the center of the plant. The outermost leaves of an agave are the oldest leaves; new leaves grow straight up from the center and fan out into the rosette to make room for the next series of new leaves.

Step 1
Wear heavy protective clothing and eyewear, such as long-sleeved shirt, gloves, pants and safety glasses or goggles to prevent skin and eye contact with the agave plant spines and sap. While the sap of some agaves is consumed, some plant saps can cause irritation upon contact.
Step 2
Cut straight across the hardened leaf tips just above the point where the fleshy leaves transition to hardened spines, using a pair of bypass pruners. Cut just above the thick, fleshy portion of the leaves, but do not cut through this flesh because this can attract pests such as the agave snout weevil that lay their eggs in damaged sections of the plant. The weevil larvae burrow into the soft tissue of the plant, introducing a harmful bacteria that rots the plant cells, decomposing the plant from the inside out.

Step 3
Cut the curled, spiny teeth from the margins of the agave plant leaves, using bypass pruners or a pair of fingernail clippers. Clip off the sharp point, leaving a dull, flat surface at each spine. Do not cut into the fleshy portion of the leaf. Start from the spines closest to the leaf tip and work your way down to the base.
Step 4
Cut the straight, pointed spines from the tips and the curled spines from the leaf margins as new leaves emerge from the terminal bud in the center of the plant. The outermost leaves of an agave are the oldest leaves; new leaves grow straight up from the center and fan out into the rosette to make room for the next series of new leaves.
0
0
成长记
Lucky Coyote
2017年08月09日

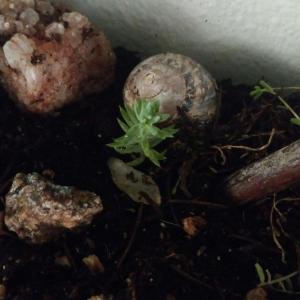
I have these two tiny spiny (lol) succulents that I was given. Names would be much appreciated

2
0
成长记
Lucky Coyote
2017年08月09日

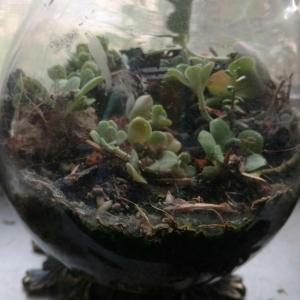
These little bros are resilient, despite most of my succulents taking a downward spiral 👻

2
0
成长记
Lucky Coyote
2017年08月09日

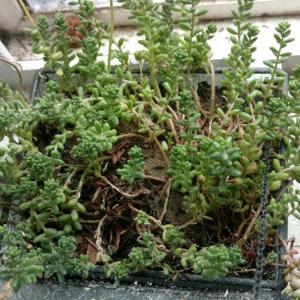
The only one of my Coral Carpet that hasn't taken a downward turn 😭 Happy it's alive, but also kind of sad, all my hard work into my succulents has gone mostly to waste because of recent happenings

2
0
文章
Miss Chen
2017年08月08日

Succulents are often exotic-looking plants with thick, fleshy leaves and stems designed to store water and help the plants thrive in warm, dry areas. Succulents grow throughout the world and include such diverse plants as jade (Crassula argentea), which grows as a perennial outdoors in U.S. Department of Agriculture plant hardiness zones 10 through 11, and greenii hens and chicks (Sempervivum tectorum subspecies greenii), which is hardy in USDA zones 4 through 9. Although certain succulents must be moved indoors during the winter months in some U.S. locations, many thrive outdoors in even very cold temperatures when they receive proper care.

Plant Winter-Hardy Varieties
Choose winter-hardy succulents for the easiest winter care. Those plants include greenii hens and chicks, hardy ice plant (Delosperma cooperi, USDA zones 5 through 11) and 'Golden Sword' yucca (Yucca filamentosa 'Golden Sword', USDA zones 4 through 9). Although these succulents may wither or change color during cold weather, that is normal, and you will not have to provide them with winter protection.
Keep the Soil Dry
In northern U.S. states, succulents need far less water during the winter months than they do in summer. Stop fertilizing and watering succulents in late fall to prevent hydrated plants from freezing during winter. During cold months, keep their soil as dry as possible, and ensure your succulents receive enough air circulation to prevent dampness. If the soil around your succulents appears wet, then add sand to the soil to keep the plants' roots dry. A mixture that is one-third loam, one-third sand and one-third peat moss is reliable.
Protect Them from Frost
If freezing temperatures are expected, cover the succulents with fabric, such as an old bed sheet, or with a frost cloth, which is available from plant nurseries. Completely cover the succulents with the material, and place cinder blocks or other heavy objects on the material's edges to keep it in place. Avoid using a plastic cover, which prevents air circulation and makes sunlight too intense for plants.

As soon as the danger of frost passes, remove the material to encourage air circulation and provide sunlight.
Relocate Them as Needed
If your succulents are in pots, then place them in the most ideal conditions possible for cold weather. For example, put the potted plants in a sunny location under a porch or eaves if winters in your area are rainy. If temperatures become cooler than normal, place the container succulents near boulders, shrubs or walls that face south or west; those structures and plants retain heat.
Another option is to move potted succulents indoors to help them thrive during frosty weeks or months. Place them in front of a bright, sunny window, and water their soil to prevent the plants from withering; water thoroughly, until water comes out the pots' bottom drain holes. Allow the soil to dry out completely before you water again.
Do not fertilize the succulents during the winter months.

Plant Winter-Hardy Varieties
Choose winter-hardy succulents for the easiest winter care. Those plants include greenii hens and chicks, hardy ice plant (Delosperma cooperi, USDA zones 5 through 11) and 'Golden Sword' yucca (Yucca filamentosa 'Golden Sword', USDA zones 4 through 9). Although these succulents may wither or change color during cold weather, that is normal, and you will not have to provide them with winter protection.
Keep the Soil Dry
In northern U.S. states, succulents need far less water during the winter months than they do in summer. Stop fertilizing and watering succulents in late fall to prevent hydrated plants from freezing during winter. During cold months, keep their soil as dry as possible, and ensure your succulents receive enough air circulation to prevent dampness. If the soil around your succulents appears wet, then add sand to the soil to keep the plants' roots dry. A mixture that is one-third loam, one-third sand and one-third peat moss is reliable.
Protect Them from Frost
If freezing temperatures are expected, cover the succulents with fabric, such as an old bed sheet, or with a frost cloth, which is available from plant nurseries. Completely cover the succulents with the material, and place cinder blocks or other heavy objects on the material's edges to keep it in place. Avoid using a plastic cover, which prevents air circulation and makes sunlight too intense for plants.

As soon as the danger of frost passes, remove the material to encourage air circulation and provide sunlight.
Relocate Them as Needed
If your succulents are in pots, then place them in the most ideal conditions possible for cold weather. For example, put the potted plants in a sunny location under a porch or eaves if winters in your area are rainy. If temperatures become cooler than normal, place the container succulents near boulders, shrubs or walls that face south or west; those structures and plants retain heat.
Another option is to move potted succulents indoors to help them thrive during frosty weeks or months. Place them in front of a bright, sunny window, and water their soil to prevent the plants from withering; water thoroughly, until water comes out the pots' bottom drain holes. Allow the soil to dry out completely before you water again.
Do not fertilize the succulents during the winter months.
3
4
文章
Miss Chen
2017年08月08日


Jade plants (Crassula ovata) can be grown from a single leaf and end up over 5 feet tall. They have fleshy branches and rounded, glossy leaves. As succulents, they require little water but grow best in bright light with some direct sunshine. Jade plants lose older leaves naturally but an increase in the rate of leaf loss is often the first sign of a problem.
Underwatering
Jade plants that are not receiving enough water often shed their older leaves. If the lower leaves on your plant are shriveling up and then falling off, check its soil. If it is completely dry, water your plant thoroughly. Water a jade plant every time the top inch of its soil is completely dry. Jade plants add leaves and shoots during the summer and need more water during the hot summer months.
Overwatering
Succulent jade plants are vulnerable to rot and must never be left with their pot standing in water. Check your plant's soil if its leaves turn yellow and start to drop off. Do not apply any more water until it has dried out completely. Remove the plant from its pot if you notice any soft sections on the trunk or branches. Wash all the soil off the roots and place it on a windowsill for a week. Cut off any branches or roots that are soft and repot in cactus potting mix.
Light
If your jade is losing its lower leaves at the beginning of winter this is likely to be because of low light. Move your plant closer to a window to increase light levels. Jade plants that are kept close to a window will shed leaves if they touch the glass on very hot or very cold days. Keep the plant a few inches back from the glass.
Temperature
Keep jade plants above 50 degrees Fahrenheit during the winter as cold temperatures will damage the leaves. Frost will kill your jade plant completely. Jade plants will shed leaves if they are placed in a cold draft or close to a radiator. A sudden change in temperature caused by a move will also cause leaf drop. The leaves will grow back once your plant has adapted to its new surroundings.

Leaf Shine
Never use leaf shine products on jade plants as it will cause all their leaves to turn yellow and fall off. Household chemicals and cleaners have a similar effect if they touch the leaves. Jade plant leaves shine naturally if they are dust free and the plant is healthy.
Pests
Jade plants are vulnerable to infestations of mealy bugs and scale insect. Mealies and scale make jade leaves sticky and can encourage the growth of molds. They also cause leaf drop and deformed leaves. Treat mealies and scale by dabbing them with a paintbrush dipped in a 70 percent solution of rubbing alcohol.
0
0
文章
Miss Chen
2017年08月08日


Discovering succulents is like snorkeling for the first time: Gardeners are plunged into a new world of life forms in shapes and colors that seem to belong in a dream or fantasy. Succulents offer more than variety; they are also undemanding, low-maintenance plants. But think low-care, not no-care, so pruning remains a possibility.
Variety of Shapes
Succulents have leaves like: a) pancakes, b) donkey tails, c) zinnias, d) blue pieces of chalk or e) all of the above and a thousand other weird and beautiful designs. You guessed it, succulents come in many shapes and sizes. The thick leaves of the paddle plant (Kalanchoe thyrsiflora), in U.S. Department of Agriculture plant hardiness zones 10 through 11, look like pancakes, while tree aeonium (Aeonium arboreum and cvs.) resemble zinnias, albeit enormous ones, up to 24 inches wide in zones 9 through 11. You'll have to live in a warm clime to grow donkey's tail (Sedum morganianum) or blue chalk sticks (Senecio mandraliscae) since they thrive in zone 11 and zones 10 through 11, respectively.
Tender Loving Low-Care
You don't have to pamper succulents like you do fussy, flowering prima donnas, but you shouldn't go off to Europe for a year and leave them on their own either. Succulents are famously drought-resistant. Their fat leaves serve as individual water reservoirs, so they don't need to be watered until their soil is dry. But in times of minimal irrigation, your succulents will die just like any other plant without water. Water thoroughly when you do water, and be sure the excess runs out through well-draining soil to prevent wet feet. Every now and again, get out the pruners.

To Prune or Not to Prune
To prune or not to prune, that is the question, and the answer is: sometimes, carefully. Obviously, you're not going to top a magnificent saguaro (Carnegiea gigantea, zones 9 through 11), and many types of yucca, such as mound-lily yucca agave (Yucca gloriosa, zones 9 through 11), are happiest if they spend their lives far from the clippers. But generally, don't hesitate to remove dead, diseased or broken leaves or branches from your succulents. Sterilize the cutting tool before using by wiping thoroughly with a clean rag soaked in denatured alcohol, and remove each damaged section several inches into healthy wood.
Neat Succulents
It will take you by surprise when long flower stalks emerge from succulents in spring, producing bold, bright flowers. But once the flowers and stems have faded, prune these back, close to their point of origin. You can also prune back hanging or branching succulents to make them more compact. Often plants with inadequate light get leggy as they rise on thin stems to search for more sun, so decapitate these, making each cut just above the point the stem veers off from the main branch. Since succulents propagate vegetatively, you can obtain new plants by planting the cut bits in well-draining soil after the pruning wounds dry for a few days.
Just Say No to Pineapples
Some gardeners enjoy shaping succulents like Queen Victoria agave (Agave victoriae-reginae, zones 9 through 11) into pineapple shapes, but this is not a good idea, according to the Arizona Municipal Water Users Association. This kind of pruning leaves open wounds that allow pests to enter the plant.
3
4
文章
Miss Chen
2017年08月08日

If a cactus breaks off, don't throw the broken piece away. Put it into cactus soil and start a new plant. Cacti, also known as succulents, are slow-
growing plants native to the Americas, and grow well without needing water. By following a few steps, it is possible to plant the broken section of the cactus that will take root and grow for years to come.
Step 1
Check the broken end of the cactus. If the break is crooked or uneven, make a fresh cut to even it out.
Step 2
Set the cactus piece aside allowing the cut end to callous over. The end must be dry and sealed over. The length of time it takes for the end to be calloused over varies. It depends on the humidity in the air and the thickness of the cut.
Step 3
Fill a pot with cactus mix. Leave the drainage holes uncovered -- because you want the water to drain through the soil quickly. The size of the pot depends on the type of cactus you are trying to root. If the cactus is tall, then you will need a bigger pot than if it is just a small button-type cactus.
Step 4
Insert the calloused end into the soil approximately 1 to 2 inches deep. Firm the soil down with your fingers to hold the cutting in place.

Step 5
Place the pot in a warm, sunny window.
Step 6
Water the soil thoroughly, two to four weeks later. Wait another two to four weeks before watering again. It takes two to six weeks for the roots to form.

growing plants native to the Americas, and grow well without needing water. By following a few steps, it is possible to plant the broken section of the cactus that will take root and grow for years to come.
Step 1
Check the broken end of the cactus. If the break is crooked or uneven, make a fresh cut to even it out.
Step 2
Set the cactus piece aside allowing the cut end to callous over. The end must be dry and sealed over. The length of time it takes for the end to be calloused over varies. It depends on the humidity in the air and the thickness of the cut.
Step 3
Fill a pot with cactus mix. Leave the drainage holes uncovered -- because you want the water to drain through the soil quickly. The size of the pot depends on the type of cactus you are trying to root. If the cactus is tall, then you will need a bigger pot than if it is just a small button-type cactus.
Step 4
Insert the calloused end into the soil approximately 1 to 2 inches deep. Firm the soil down with your fingers to hold the cutting in place.

Step 5
Place the pot in a warm, sunny window.
Step 6
Water the soil thoroughly, two to four weeks later. Wait another two to four weeks before watering again. It takes two to six weeks for the roots to form.
0
1
文章
Miss Chen
2017年08月08日


Schlumbergera, commonly referred to as Christmas cactus, derives its common name from its winter bloom period. Each of the six Christmas cactus species produces a different colored bloom, with red being the most common. As with all cacti and succulents, the Christmas cactus is susceptible to disease. Fungal leaf spots, sooty mold, botrytis and basal stem rot are common diseases associated with this plant. The effects of pests are often mistaken for disease, but pests can often be eradicated. In some cases a diseased plant can be treated. In others, the plant cannot be salvaged.
Fungal Leaf Spots
Step 1
Cut away any infected leaves with a clean razor blade. Unfortunately, the infected leaves cannot be rejuvenated. Fungal leaf spots are typically circular or elliptical in shape and develop along the leaves of the plant. The spots are typically black or gray in color.
Step 2
Move the plant to a well-ventilated area.
Step 3
Water the plant at the ground level and only after the soil is allowed to dry completely. Fungal leaf spots develop from water that rests on the leaves and stems for long periods. It is for this reason that you should avoid pouring water directly over Christmas cactus, particularly if the plant is exposed to shade for long periods of time.
Sooty Mold and Botrytis
Step 4
Remove as much soil from the roots as you reasonably can without damaging the root system.
Step 5
Repot the plant with new soil specifically formulated for cactus and succulents.
Step 6
Treat the blackened areas with a systemic fungicide if treating sooty mold and with methylated spirits if treating botrytis.
Step 7
Move the plant to a well-ventilated area if treating botrytis.
Step 8
Allow the soil to dry completely between waterings.
Basal Stem Rot
Step 9
Cut away any leaves not yet infected with a clean razor blade. Unfortunately, a Christmas cactus suffering from basal stem rot cannot be rejuvenated, but healthy leaves can be repotted.
Step 10
Plant the healthy leaves in new soil specifically formulated for cacti and succulents.
Step 11
Apply copper sulfate to the healthy cuttings to guard against basal stem rot.
Pests
Step 12
Identify the type of pest attacking the plant. Mealybugs are identified by their white woolly nests and waxy appearance. The bugs are very small and a gray-white color. Spider mites are red in color and feed on the leaves of the plant. They are very hard to see without a magnifying glass. Look for spider webs with small dots. The dots are the spider mites. Whiteflies closely resemble mealybugs, but do not build nests. Whiteflies excrete honeydew, which can lead to sooty mold.

Step 13
Move the plant to an area where temperatures exceed 70 degrees F for all pest types. It may be necessary to invest in a small greenhouse if temperatures in direct sunlight do not reach at least 70 degrees. Moving the plant to a warmer environment should eliminate the spider mites.
Step 14
Spray the plant with soapy contact insecticide if treating a plant with mealybugs.
Step 15
Increase the humidity level if the spider mite infestation is extensive and they survive the warmer temperature.
Step 16
Spray whiteflies with an insecticidal spray.
0
0
文章
Miss Chen
2017年08月08日


Succulent plants have thick, fleshy leaves that store water. Some varieties flower while others only produce attractive foliage and stems. Most succulents thrive in dry conditions because too much moisture can cause the plants to rot. Rocky soil that drains quickly works well for most succulent varieties. You can grow them indoors in a dish filled with gravel, which provides adequate moisture drainage, although some soil is still necessary to provide nutrients and a medium for the succulent roots.
Step 1
Fill a 3- to 5-inch-deep pot or dish with a one inch layer of gravel. Use a dish with no bottom drainage holes.
Step 2
Sprinkle a tablespoon of powdered activated charcoal over the top of the gravel layer. Charcoal prevents odors from developing in the moisture trapped within the the gravel layer.
Step 3
Place a peat-based potting soil on top the gravel, filling the dish to within 1/2 inch of the rim. Alternatively, make your own mix by combining two parts peat with one part compost.
Step 4
Water the soil layer until it is evenly moistened throughout. Stick your finger into the soil mixture to judge the moisture level.

Step 5
Plant the succulents in the potting soil. Set them so their roots are buried to the same depth. Spacing requirements depend on the specific plant type, but generally a 2- to 4-inch spacing is sufficient.
Step 6
Water the succulents when the potting soil layer is completely dry. Provide only enough moisture to slightly dampen the soil. The excess moisture drains into the gravel bed beneath the soil.
0
1
文章
Miss Chen
2017年08月08日


Agave plants are succulents that feature thick, water-filled leaves. They thrive in dry, hot conditions and can live for long periods without water. If the weather is too harsh, agave plants becomes dormant, shedding leaves until they take in water again. Agave plants can also suffer from a variety of diseases and pest infestations. Examining your agave plant's symptoms is the best way to determine the best treatment to nurse the plant back to health.
Freezing
Step 1
Examine the leaves of the agave plant for black areas. Freezing causes the agave leaves to turn black, eventually drying and falling off. Usually the agave plant recovers from external freeze damage when freezing temperatures only last a few hours.
Step 2
Transplant the agave near the house or in a patio area that receives warmth from the house. Carefully remove the agave plant from the soil using a garden shovel.
Step 3
Choose a well-drained area and plant the agave so that the agave tissue remains above the soil. Succulents planted too deeply cannot establish roots and eventually die.
Sun Damage
Step 4
Examine the agave for yellowing leaves and dropping leaves. Excessive sunlight causes these symptoms.
Step 5
Transplant the agave to an area with partial shade following the instructions in Section 1, Steps 2 and 3.
Step 6
Choose areas for transplanting where pine and oaks give partial shade or in an area protected from direct sunlight.
Anthracnose
Step 7
Examine your agave plant for orange or red spores or lesions on the leaves and leaf tops. Lesions form as a result of the spores. Wet weather is the cause of anthracnose, causing spores to spread over the plant from wind and rain.
Step 8
Remove the leaf and avoid watering the plant with a sprinkler if you find spores or lesions.

Step 9
Protect the agave from the rain with a plastic covering until the lesions disappear.
Helminthosporium
Step 10
Check for soft, dark spots on the upper area of your agave plant. A fungus from the Helminthosporium species forms spores that infect the agave when carried by wind and rain, resulting in leaf rotting.
Step 11
Apply fungicides to diminish the spread of the fungus by spraying both the upper and lower portions of the leaves. Spray fungicides around the agave base also.
Step 12
Remove excessively infected plants to prevent spreading the spores to other plants.
Insects
Step 13
Examine the agave plant for wilted or yellow, scarred leaves. Female weevils lay eggs inside the base of the plant, causing wilting leaves and plant collapse from surface wounds, while the agave plant bug causes yellow leaves.
Step 14
Apply broad-spectrum insecticides in the spring to control the agave weevil and plant bugs.
Step 15
Spray the insecticides around the plant base to thoroughly destroy any weevils living in the soil. Spray the insecticide on the upper and lower surfaces of all leaves to prevent agave bug plant infestation.
0
0
求助
Ueca
2017年08月04日

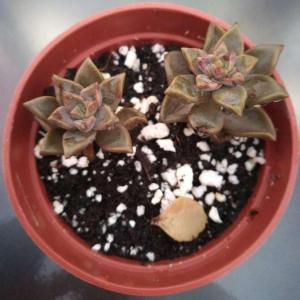
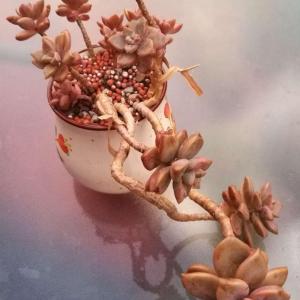
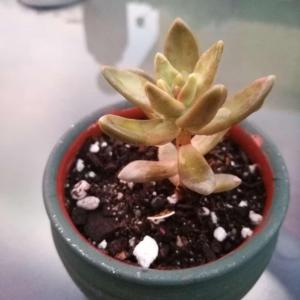
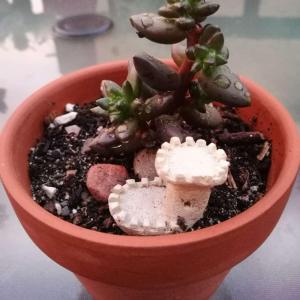
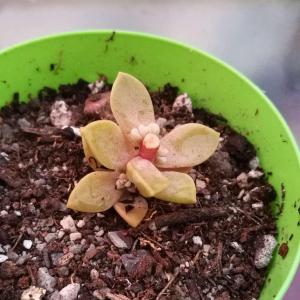
What are these succulents? 3 looks like Graptopetalum but I've never seen them so red.



1
0
Ueca:I suspect 4 is Sedum adolphii, also in poor health.
Ueca:I suspect 1 is Echeveria agavoides, in poor health.
文章
Dummer. ゛☀
2017年08月04日

Haworthia are delightful little succulents that form very attractive and singular small houseplants. Generally easy to grow, the same best practices that yield healthy aloe and echeveria plants will also produce beautiful Haworthia.
In terms of appeal, these small, low growing plants form rosettes of fleshy green leaves that are generously covered with white, pearly warts or bands, giving them a distinctive appearance.
Just like other succulents, these plants appreciate bright light, adequate moisture in the summer, and relatively drier conditions in the winter. Don't overwater, but don’t also let them dry out too much.
Growing Conditions
Light: Bright light, but not direct sunlight. These grow in similar conditions to other succulents. White or yellow leaves usually signify too much sun.
Water: Water evenly and generously in the summer, letting the soil media dry out between waterings. In the winter, reduce watering to every other month. Never allow water to collect in the rosette.
Temperature: Warmer summers but cool in the winter (down to 50 degrees F).
Soil: Use a cactus mix or very fast-draining potting soil mixed with sand.
Fertilizer: Fertilize during the summer growing season with a cactus fertilizer. Don't feed during the winter.
Propagation
Haworthia can be propagated at repotting time using offsets from the mother plant.
When taking offsets, use a sharp knife or snippers and cut as close to the mother stem as possible to including as many roots as possible, then allow the offset to dry briefly before repotting it (similar to cuttings from other succulents). Pot the offsets in a small pot, using the same soil as the mother plant, put it a warm, bright spot, and make sure to adequately water.
Repotting
Haworthia are small (usually remaining between 3" and 5" in height) and relatively slow-growing. They are often grown in small clusters in wide, shallow dishes. Over time, clusters will naturally enlarge as the mother plant sends off small plantlets.
When the cluster has outgrown its dish, repot in the spring or early summer into a new wide and shallow dish with fresh potting soil. This is also the time to take offsets for propagation.
Varieties
There are about 80 species of Haworthia, but their classification can be complex. The main difference between the common species is the size of the leaves and the orientation of the white markings on the leaves. H. margaritifera has warty white projections on the leaves, while H. fasciata features horizontal white stripes and is sometimes called the zebra plant.
Some of the species, such as H. bolusii have "tufted" edges to the leaves, while H. attenuata features long, pointed green leaves. In general, the best advice is to buy the most attractive variety based on leaf form and markings—they all have similar cultural requirements.
Grower's Tips
Haworthia are not considered difficult houseplants to grow—if you can keep a pot of aloe alive on a windowsill, chances are you can do the same with a dish of Haworthia.
As with all succulents, the most dangerous situation is too much water—they should never be allowed to sit in water under any circumstances.
At the same time, these decorative little plants can be grown in interesting containers such as tea cups and even miniature baby shoes. If you're given a Haworthia in such a container, make sure the container had adequate drainage. If it doesn't, it might be a good idea to pop the plant out of its container and add a layer of gravel to the bottom to reduce the wicking action of the soil above.
Finally, look out for sunburned spots on your plants.
In terms of appeal, these small, low growing plants form rosettes of fleshy green leaves that are generously covered with white, pearly warts or bands, giving them a distinctive appearance.
Just like other succulents, these plants appreciate bright light, adequate moisture in the summer, and relatively drier conditions in the winter. Don't overwater, but don’t also let them dry out too much.

Growing Conditions
Light: Bright light, but not direct sunlight. These grow in similar conditions to other succulents. White or yellow leaves usually signify too much sun.
Water: Water evenly and generously in the summer, letting the soil media dry out between waterings. In the winter, reduce watering to every other month. Never allow water to collect in the rosette.
Temperature: Warmer summers but cool in the winter (down to 50 degrees F).
Soil: Use a cactus mix or very fast-draining potting soil mixed with sand.
Fertilizer: Fertilize during the summer growing season with a cactus fertilizer. Don't feed during the winter.
Propagation
Haworthia can be propagated at repotting time using offsets from the mother plant.
When taking offsets, use a sharp knife or snippers and cut as close to the mother stem as possible to including as many roots as possible, then allow the offset to dry briefly before repotting it (similar to cuttings from other succulents). Pot the offsets in a small pot, using the same soil as the mother plant, put it a warm, bright spot, and make sure to adequately water.
Repotting
Haworthia are small (usually remaining between 3" and 5" in height) and relatively slow-growing. They are often grown in small clusters in wide, shallow dishes. Over time, clusters will naturally enlarge as the mother plant sends off small plantlets.
When the cluster has outgrown its dish, repot in the spring or early summer into a new wide and shallow dish with fresh potting soil. This is also the time to take offsets for propagation.

Varieties
There are about 80 species of Haworthia, but their classification can be complex. The main difference between the common species is the size of the leaves and the orientation of the white markings on the leaves. H. margaritifera has warty white projections on the leaves, while H. fasciata features horizontal white stripes and is sometimes called the zebra plant.
Some of the species, such as H. bolusii have "tufted" edges to the leaves, while H. attenuata features long, pointed green leaves. In general, the best advice is to buy the most attractive variety based on leaf form and markings—they all have similar cultural requirements.

Grower's Tips
Haworthia are not considered difficult houseplants to grow—if you can keep a pot of aloe alive on a windowsill, chances are you can do the same with a dish of Haworthia.
As with all succulents, the most dangerous situation is too much water—they should never be allowed to sit in water under any circumstances.
At the same time, these decorative little plants can be grown in interesting containers such as tea cups and even miniature baby shoes. If you're given a Haworthia in such a container, make sure the container had adequate drainage. If it doesn't, it might be a good idea to pop the plant out of its container and add a layer of gravel to the bottom to reduce the wicking action of the soil above.
Finally, look out for sunburned spots on your plants.
2
6


