求助
twunklink
2017年09月10日

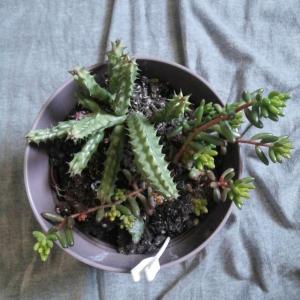
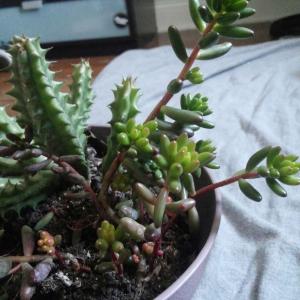
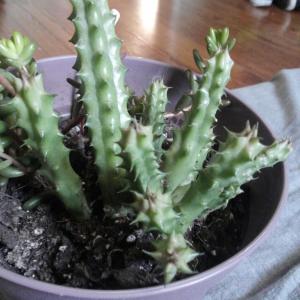
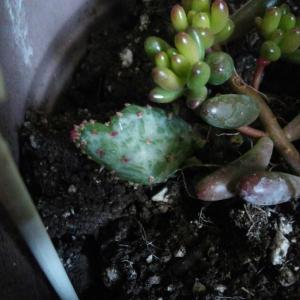
can i have some help IDing these succulents and a (maybe) baby cactus in this pot i picked up? thanks!!


0
0
Ueca:Brown plant with stems is Sedum rubrotinctum.
求助
ninque
2017年09月09日

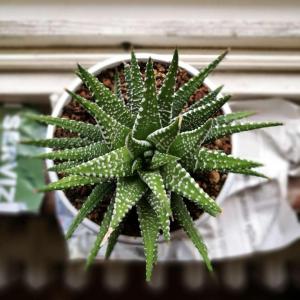
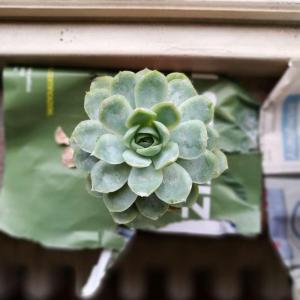
First succulents I've ever got, ID please and advice on maintaining? Thank you!!


1
0
Ueca:Image 1 appears to be Haworthia attenuata from the angle. Image 2 is Echeveria elegans. The first one is happy with indirect light but the second one prefers more sun.
tiny_forest:The first one is an Aloe and I'll search about the second one. Water every week (when the soil is dry) and give them indirect sunlight:)
成长记
Lucky Coyote
2017年09月07日

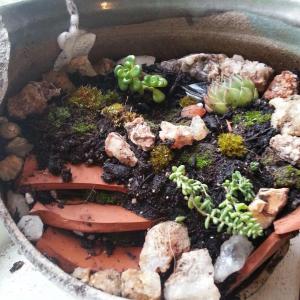
added a little bit more moss to my little garden in hopes it will spread and make it look more... alive and natural 😍 I want to one day have a garden sweeping with moss and succulents. Moss was my childhood napping bed 💜

1
0
Succulentsister
2017年08月31日
I got some succulents yesterday 😃👌🏼
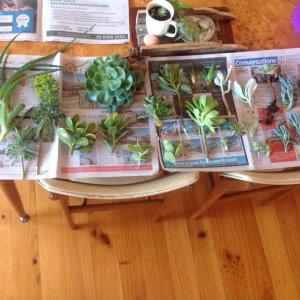
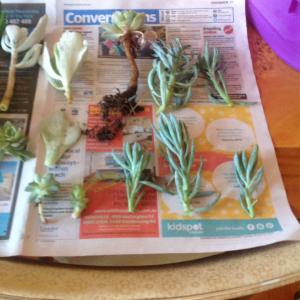


3
0
Penney:So great
meriunkat:awesome!!
求助
Missysunflo
2017年08月28日

I cant seem to get these succulents healthy again any advice? Im new and i would love people input


1
0
meriunkat:@Missysunflo okay good, try to give them less sun now that they will be trying to recover
Missysunflo:there's drainage holes on the bottom of the planters, i them out fully in the sun. I watered them every other day at first, now i water them when the soil is dry.
meriunkat:Also do those pots have drainage holes?
meriunkat:They should have indirect sun and gradually let them adjust to the sunlight, usually I water mine till I see the soil dry which can be every three days.
meriunkat:How much sunlight are they exposed to? how many times do you water them per week?
文章
Dummer. ゛☀
2017年08月27日

The pencil cactus plant is in the Euphorbia family of succulents. Another common name for the plant is Milkbush due to the cloudy sap it releases when injured. Be cautious when caring for a pencil cactus; the sap is toxic and may cause problems in some people. The pencil cactus needs high levels of light and moderately low moisture. It is an excellent houseplant and provides an interesting silhouette. Let’s learn how to grow pencil cactus in your home.

Information on the Pencil Cactus Plant
The pencil cactus is a large plant native to Africa and India. The plant is ideal for sunny warm spots indoors or greenhouse growing. Care of pencil cactus is minimal. Euphorbia tirucalli, or pencil cactus, is a tropical plant that may become 30 feet tall in habitat. The stems are slender and slightly toothed with no obvious foliage. The branches are the diameter of a pencil, which give rise to the name. The new growth on the end may be tinged pink and have tiny leaves which disappear as the branch matures.

How to Care for a Pencil Cactus
A pencil cactus needs very little care and can even be neglected if it is planted and situated correctly. The soil must be slightly gritty and well draining. The container to use could be an unglazed pot which will allow excess moisture to evaporate. Euphorbia plants are quite adapted to limited fertility environments and care of pencil cactus requires only one fertilization in spring. Full sun and temperatures of at least 65 F. (18 C.) or warmer are necessary when learning how to care for a pencil cactus. Pencil cactus is easy to grow. It will need water approximately every two to three weeks in summer but no water in winter. Allow the plant to dry out between irrigations. Care must be taken when caring for a pencil cactus to avoid the sap. Even eye protection is necessary because the pencil cactus plant produces a toxin that can cause an anaphylactic reaction. In most cases it can be cleared up with antihistamine but occasionally more severe reactions occur and are difficult to clear.

Care of Pencil Cactus Cuttings
Pencil cactus is very easy to propagate with cuttings. Great care must be taken when harvesting and planting these to avoid the sap, but the cuttings root readily. You will need small pots, a soilless medium to prevent rot and pathogens and a misting bottle. Take cuttings with a sterile razor blade and let them dry for two days to form a callus. Insert the cuttings into the medium at least an inch deep and mist. Caring for a pencil cactus cutting requires low light and slightly more moisture than fully established plants. Once new growth commences, gradually introduce the plant to higher light and reduce watering. The cactus will hit your ceiling in just a few years, so don’t be afraid to prune it and use the cuttings to make new pencil cactus plants.

Information on the Pencil Cactus Plant
The pencil cactus is a large plant native to Africa and India. The plant is ideal for sunny warm spots indoors or greenhouse growing. Care of pencil cactus is minimal. Euphorbia tirucalli, or pencil cactus, is a tropical plant that may become 30 feet tall in habitat. The stems are slender and slightly toothed with no obvious foliage. The branches are the diameter of a pencil, which give rise to the name. The new growth on the end may be tinged pink and have tiny leaves which disappear as the branch matures.

How to Care for a Pencil Cactus
A pencil cactus needs very little care and can even be neglected if it is planted and situated correctly. The soil must be slightly gritty and well draining. The container to use could be an unglazed pot which will allow excess moisture to evaporate. Euphorbia plants are quite adapted to limited fertility environments and care of pencil cactus requires only one fertilization in spring. Full sun and temperatures of at least 65 F. (18 C.) or warmer are necessary when learning how to care for a pencil cactus. Pencil cactus is easy to grow. It will need water approximately every two to three weeks in summer but no water in winter. Allow the plant to dry out between irrigations. Care must be taken when caring for a pencil cactus to avoid the sap. Even eye protection is necessary because the pencil cactus plant produces a toxin that can cause an anaphylactic reaction. In most cases it can be cleared up with antihistamine but occasionally more severe reactions occur and are difficult to clear.

Care of Pencil Cactus Cuttings
Pencil cactus is very easy to propagate with cuttings. Great care must be taken when harvesting and planting these to avoid the sap, but the cuttings root readily. You will need small pots, a soilless medium to prevent rot and pathogens and a misting bottle. Take cuttings with a sterile razor blade and let them dry for two days to form a callus. Insert the cuttings into the medium at least an inch deep and mist. Caring for a pencil cactus cutting requires low light and slightly more moisture than fully established plants. Once new growth commences, gradually introduce the plant to higher light and reduce watering. The cactus will hit your ceiling in just a few years, so don’t be afraid to prune it and use the cuttings to make new pencil cactus plants.
0
0
文章
Dummer. ゛☀
2017年08月27日

There are so many types of succulents with varying shapes that it can be difficult to decide which to include in the landscape. One little beauty that makes an excellent ground cover is called Othonna ‘Little Pickles.’ Read on to find out about growing ‘Little Pickles’ and Othonna plant care.

About Othonna ‘Little Pickles’
Othonna capensis is a fairly slow growing evergreen succulent. ‘Little Pickles’ is so named for its one inch pudgy blue-green leaves that do, indeed, resemble tiny pickles. Indigenous to the Drakensberg Mountains of South Africa, the plant grows in low growing clumps of about 4 inches in height and a foot across. Yellow daisy-like blooms emerge and wave cheerily an inch or so from above the foliage. The name Drakensberg means ‘dragon mountain’ in Afrikaans, and the Zulu people refer to the plant as ukhahlamba, meaning ‘barrier of spears.’ This particular succulent was introduced by Panayoti Kelaidis of the Denver Botanic Garden. Othonna is sometimes referred to as ‘Little Pickles Ice Plant’ and while it does bear some resemblance to Delosperma (hardy ice plant) and is of the same family, Asteraceae, the two are not the same plants. Still, ‘Little Pickles Ice Plant’ or ‘Othonna Ice Plant’ will likely be how the plant is listed.

Caring for Othonna Ice Plants
Othonna capensis is a fairly slow growing evergreen succulent. ‘Little Pickles’ is so named for its one inch pudgy blue-green leaves that do, indeed, resemble tiny pickles. Indigenous to the Drakensberg Mountains of South Africa, the plant grows in low growing clumps of about 4 inches in height and a foot across. Yellow daisy-like blooms emerge and wave cheerily an inch or so from above the foliage. The name Drakensberg means ‘dragon mountain’ in Afrikaans, and the Zulu people refer to the plant as ukhahlamba, meaning ‘barrier of spears.’ This particular succulent was introduced by Panayoti Kelaidis of the Denver Botanic Garden. Othonna is sometimes referred to as ‘Little Pickles Ice Plant’ and while it does bear some resemblance to Delosperma (hardy ice plant) and is of the same family, Asteraceae, the two are not the same plants. Still, ‘Little Pickles Ice Plant’ or ‘Othonna Ice Plant’ will likely be how the plant is listed.

Caring for Othonna Ice Plants
Othonna makes an excellent ground cover and also thrives in rock gardens or even containers. Once established, ‘Little Pickles’ is fairly drought tolerant. It is suited to USDA zones 6-9 and, in some cases, even into zone 5. Blooming in mid-spring through the fall, Othonna should be planted in full sun in well-draining soil. It does not like wet feet, particularly during winter months, so good drainage is crucial. Other than a distaste for soggy roots, caring for Othonna ice plants is nominal. As said, once established, it is drought tolerant. In warmer southern zones, Othonna can be aggressive, so a barrier of some sort should be placed around the plants unless you want it to take over an area in the garden. If your Othonna is looking peaked, you can fertilize with low nitrogen fertilizer 1-2 times during the growing season; otherwise, there is no need for any specific Othonna plant care. ‘Little Pickles’ seeds are sterile, so propagation is accomplished by spreading leaves atop the soil. New plants should be well established after 5-6 weeks.

About Othonna ‘Little Pickles’
Othonna capensis is a fairly slow growing evergreen succulent. ‘Little Pickles’ is so named for its one inch pudgy blue-green leaves that do, indeed, resemble tiny pickles. Indigenous to the Drakensberg Mountains of South Africa, the plant grows in low growing clumps of about 4 inches in height and a foot across. Yellow daisy-like blooms emerge and wave cheerily an inch or so from above the foliage. The name Drakensberg means ‘dragon mountain’ in Afrikaans, and the Zulu people refer to the plant as ukhahlamba, meaning ‘barrier of spears.’ This particular succulent was introduced by Panayoti Kelaidis of the Denver Botanic Garden. Othonna is sometimes referred to as ‘Little Pickles Ice Plant’ and while it does bear some resemblance to Delosperma (hardy ice plant) and is of the same family, Asteraceae, the two are not the same plants. Still, ‘Little Pickles Ice Plant’ or ‘Othonna Ice Plant’ will likely be how the plant is listed.

Caring for Othonna Ice Plants
Othonna capensis is a fairly slow growing evergreen succulent. ‘Little Pickles’ is so named for its one inch pudgy blue-green leaves that do, indeed, resemble tiny pickles. Indigenous to the Drakensberg Mountains of South Africa, the plant grows in low growing clumps of about 4 inches in height and a foot across. Yellow daisy-like blooms emerge and wave cheerily an inch or so from above the foliage. The name Drakensberg means ‘dragon mountain’ in Afrikaans, and the Zulu people refer to the plant as ukhahlamba, meaning ‘barrier of spears.’ This particular succulent was introduced by Panayoti Kelaidis of the Denver Botanic Garden. Othonna is sometimes referred to as ‘Little Pickles Ice Plant’ and while it does bear some resemblance to Delosperma (hardy ice plant) and is of the same family, Asteraceae, the two are not the same plants. Still, ‘Little Pickles Ice Plant’ or ‘Othonna Ice Plant’ will likely be how the plant is listed.

Caring for Othonna Ice Plants
Othonna makes an excellent ground cover and also thrives in rock gardens or even containers. Once established, ‘Little Pickles’ is fairly drought tolerant. It is suited to USDA zones 6-9 and, in some cases, even into zone 5. Blooming in mid-spring through the fall, Othonna should be planted in full sun in well-draining soil. It does not like wet feet, particularly during winter months, so good drainage is crucial. Other than a distaste for soggy roots, caring for Othonna ice plants is nominal. As said, once established, it is drought tolerant. In warmer southern zones, Othonna can be aggressive, so a barrier of some sort should be placed around the plants unless you want it to take over an area in the garden. If your Othonna is looking peaked, you can fertilize with low nitrogen fertilizer 1-2 times during the growing season; otherwise, there is no need for any specific Othonna plant care. ‘Little Pickles’ seeds are sterile, so propagation is accomplished by spreading leaves atop the soil. New plants should be well established after 5-6 weeks.
0
1
文章
Dummer. ゛☀
2017年08月27日

Night blooming cereus is one of the easiest cactus from which to take cuttings. These succulents can root in just a few weeks from cuttings that are taken in spring from its leaves. Propagating night blooming cereus from cuttings is faster and easier than trying to start new plants from seed. In this article, we’ll give you a few tips on how to propagate a night blooming cereus for the best chance at doubling your stock of these amazing plants.

Night Blooming Cereus Cuttings
Night blooming cereus is a leggy plant with flat leaves and gangly stems, but when it is blooming it goes from wall flower to star of the show. The fragrant dinner plate sized blooms are worth waiting for as they perfume your whole house. Rooting night blooming cereus to create more plants is easy. These cactus root quickly and establish as single plants in less than a month.
The best time to take cuttings is during the growing seasons, spring through summer. This is when plant cells are at their most active and can be induced to produce roots rather than leaf cells. Use clean, sharp implements anytime you take a cutting from a plant. Night blooming cereus cuttings should be 6 to 9 inches long and from terminal growth. This is where plant cells are youngest and easiest to influence. Let the cuttings callus in a warm dry location for up to 2 weeks. The ends will be whitish and closed. The callus step is crucial to rooting night blooming cereus. It is from this callus that the root cells will form.

How to Propagate a Night Blooming Cereus
Once you have your callused plant material, you need to prepare your medium. You can use a standard cactus potting soil or create a mixture of coarse sand and peat for propagating cereus cactus. Choose a container that drains well, such as a terra cotta pot, and one that is just a couple of inches bigger than the diameter of the leaf. Insert the cutting, callus side down, into you potting medium. Bury the cutting in the medium about half way and firm the soil around to remove any air pockets. Water your cutting and then only irrigate as often as you would an adult cactus. Never let soil get soggy, as the cutting will simply rot and any new roots will melt away. Keep the container in a cool, bright location for two weeks as roots form.

Care When Propagating Cereus Cactus
Once your cactus has roots, it is time to move it to a slightly warmer location. The cutting shouldn’t need repotting for a couple of years and can be grown on in its small pot. During the growing season, fertilize with a soluble plant fertilizer once per month. Just before blooms form, use a high phosphorus food to improve blooming. If any damage occurs to the stems and leaves, simply cut it off, trim the piece to where healthy tissue is and allow it to callus, propagating night blooming cereus anew. In just a short time, you could have so many of these plants you’ll be begging your friends to take one away.

Night Blooming Cereus Cuttings
Night blooming cereus is a leggy plant with flat leaves and gangly stems, but when it is blooming it goes from wall flower to star of the show. The fragrant dinner plate sized blooms are worth waiting for as they perfume your whole house. Rooting night blooming cereus to create more plants is easy. These cactus root quickly and establish as single plants in less than a month.
The best time to take cuttings is during the growing seasons, spring through summer. This is when plant cells are at their most active and can be induced to produce roots rather than leaf cells. Use clean, sharp implements anytime you take a cutting from a plant. Night blooming cereus cuttings should be 6 to 9 inches long and from terminal growth. This is where plant cells are youngest and easiest to influence. Let the cuttings callus in a warm dry location for up to 2 weeks. The ends will be whitish and closed. The callus step is crucial to rooting night blooming cereus. It is from this callus that the root cells will form.

How to Propagate a Night Blooming Cereus
Once you have your callused plant material, you need to prepare your medium. You can use a standard cactus potting soil or create a mixture of coarse sand and peat for propagating cereus cactus. Choose a container that drains well, such as a terra cotta pot, and one that is just a couple of inches bigger than the diameter of the leaf. Insert the cutting, callus side down, into you potting medium. Bury the cutting in the medium about half way and firm the soil around to remove any air pockets. Water your cutting and then only irrigate as often as you would an adult cactus. Never let soil get soggy, as the cutting will simply rot and any new roots will melt away. Keep the container in a cool, bright location for two weeks as roots form.

Care When Propagating Cereus Cactus
Once your cactus has roots, it is time to move it to a slightly warmer location. The cutting shouldn’t need repotting for a couple of years and can be grown on in its small pot. During the growing season, fertilize with a soluble plant fertilizer once per month. Just before blooms form, use a high phosphorus food to improve blooming. If any damage occurs to the stems and leaves, simply cut it off, trim the piece to where healthy tissue is and allow it to callus, propagating night blooming cereus anew. In just a short time, you could have so many of these plants you’ll be begging your friends to take one away.
0
0
文章
Dummer. ゛☀
2017年08月23日

The vast array of sizes, textures, colors and shapes of cacti and succulents provides nearly endless diversity for the succulent collector. Moon cactus plants are known as Gymnocalycium mihanovichii or Hibotan cactus. Strangely, the plant is something of a mutant and lacks the ability to produce chlorophyll, which means they must be grafted onto a rootstock with that ability. Instructions for how to grow a moon cactus are similar to most succulents, but they are short lived for the family even with good care.

Moon Cactus Info
Hibotan cacti are native to desert habitats in various parts of South America. There are over 80 species found in Argentina, Paraguay, Brazil and Bolivia. They are a colorful group of succulents that lack the necessary chlorophyll to produce plant sugars through photosynthesis. For this reason, the plants are grafted onto a species that produces plentiful chlorophyll upon which the moon cactus can sustain itself for several years. Moon cactus plants come in vibrant bright colors of hot pink, brilliant orange and even an almost neon yellow. They are commonly sold as gift plants and make lovely window box or southern exposure houseplants. These are small plants, generally only ½ inch across, although there are cultivars that get up to 8 inches in diameter.

Propagation of Moon Cactus
The moon cactus is usually sold already grafted in a process that removes the bottom of the Hibotan and the top of the rootstock cactus. The two halves are set together at the cut ends and soon heal together. The life of the moon cactus can be extended by re-grafting it onto a fresh rootstock. It can also be grown from seed, but this takes at least a year for a recognizable specimen. Sow the seeds over a dry succulent mixture and then cover with a sprinkle of fine grit. Moisten the flat and move it to a warm location for germination. Once the seedlings are large enough to remove, re-plant them in groups for best effect. More commonly, moon cactus propagation is achieved by removing the offsets, which are smaller versions of the parent plant growing from the base of the rootstock. These divide away easily and root readily in a cactus potting soil.

How to Grow a Moon Cactus
Purchased plants will come with moon cactus info that relates to the plants care and cultivation needs. In the event that it doesn’t, care of moon cactus is similar to any succulent or cactus species. Hibotan plants prefer temperatures on the warm side but need a minimum of 48 F. (9 C.) to survive. Wild plants grow in the shelter of taller specimens which shade them from the scorching sun, so indoor plants should be partially shielded from bright sunlight by slatted blinds during the brightest part of the day. Use unglazed shallow pots with numerous drainage holes to prevent standing water at the root zone. Water deeply and then allow the soil to completely dry to the base of the pot before reapplying moisture. Suspend watering in the winter months and repot in spring to reintroduce nutrient dense soil. The moon cactus prefers to have a crowded home, which means you can repot in the same pot for several years. In rare cases, and when care of moon cactus is optimum, you may be rewarded with small red to pink flowers in late spring to early summer.

Moon Cactus Info
Hibotan cacti are native to desert habitats in various parts of South America. There are over 80 species found in Argentina, Paraguay, Brazil and Bolivia. They are a colorful group of succulents that lack the necessary chlorophyll to produce plant sugars through photosynthesis. For this reason, the plants are grafted onto a species that produces plentiful chlorophyll upon which the moon cactus can sustain itself for several years. Moon cactus plants come in vibrant bright colors of hot pink, brilliant orange and even an almost neon yellow. They are commonly sold as gift plants and make lovely window box or southern exposure houseplants. These are small plants, generally only ½ inch across, although there are cultivars that get up to 8 inches in diameter.

Propagation of Moon Cactus
The moon cactus is usually sold already grafted in a process that removes the bottom of the Hibotan and the top of the rootstock cactus. The two halves are set together at the cut ends and soon heal together. The life of the moon cactus can be extended by re-grafting it onto a fresh rootstock. It can also be grown from seed, but this takes at least a year for a recognizable specimen. Sow the seeds over a dry succulent mixture and then cover with a sprinkle of fine grit. Moisten the flat and move it to a warm location for germination. Once the seedlings are large enough to remove, re-plant them in groups for best effect. More commonly, moon cactus propagation is achieved by removing the offsets, which are smaller versions of the parent plant growing from the base of the rootstock. These divide away easily and root readily in a cactus potting soil.

How to Grow a Moon Cactus
Purchased plants will come with moon cactus info that relates to the plants care and cultivation needs. In the event that it doesn’t, care of moon cactus is similar to any succulent or cactus species. Hibotan plants prefer temperatures on the warm side but need a minimum of 48 F. (9 C.) to survive. Wild plants grow in the shelter of taller specimens which shade them from the scorching sun, so indoor plants should be partially shielded from bright sunlight by slatted blinds during the brightest part of the day. Use unglazed shallow pots with numerous drainage holes to prevent standing water at the root zone. Water deeply and then allow the soil to completely dry to the base of the pot before reapplying moisture. Suspend watering in the winter months and repot in spring to reintroduce nutrient dense soil. The moon cactus prefers to have a crowded home, which means you can repot in the same pot for several years. In rare cases, and when care of moon cactus is optimum, you may be rewarded with small red to pink flowers in late spring to early summer.
2
2
文章
Dummer. ゛☀
2017年08月23日

Lithops plants are often called “living stones” but they also look a bit like cloven hooves. These small, split succulents are native to the deserts of South Africa but they are commonly sold in garden centers and nurseries. Lithops thrive in compacted, sandy soil with little water and blistering hot temperatures. While relatively easy to grow, a little information on lithops will help you learn how to grow living stone plants so that they thrive in your home.

Information on Lithops
There are numerous colorful names for plants in the Lithops genus. Pebble plants, mimicry plants, flowering stones, and of course, living stones are all descriptive monikers for a plant that has a unique form and growth habit.
Lithops are small plants, rarely getting more than an inch above the soil surface and usually with only two leaves. The thick padded leaves represent the cleft in an animal’s foot or just a pair of green to grayish brown stones clustered together. The plants have no true stem and much of the plant is underground. The resulting appearance has the double attribute of confusing grazing animals and conserving moisture.

Lithops Succulent Adaptations
below ground, it has minimal foliar space to gather sun’s energy. As a result, the plant has developed a unique way of enhancing solar collection by means of “windowpanes” on the surface of the leaf. These transparent areas are filled with calcium oxalate, which creates a reflective facet that increases light penetration. Another fascinating adaptation of lithops is the long life of the seed capsules. Moisture is infrequent in their native habitat, so the seeds can remain viable in the soil for months.

How to Grow Living Stones Plants
Growing living stones in pots is preferred for most but the hottest zones. Lithops need a cactus mix or potting soil with some sand incorporated. The potting media needs to dry before you add moisture and you must place the pot in as bright an area as possible. Place the plant in a southern facing window for optimum light entry. Propagation is through division or seed, although seed grown plants take many months to establish and years before they resemble the parent plant. You can find both seeds and starts on the Internet or at succulent nurseries. Adult plants are common at even big box nurseries.

Lithops Care
Lithops care is easy as long as you remember what type of climate the plant originates from and mimic those growing conditions. Be very careful, when growing living stones, not to overwater. These little succulents do not need to be watered in their dormant season, which is fall to spring. If you wish to encourage flowering, add a diluted cactus fertilizer in spring when you commence watering again. Lithops plants do not have many pest problems, but they may get scale, moisture gnats and several fungal diseases. Watch for signs of discoloration and evaluate your plant often for immediate treatment.

Information on Lithops
There are numerous colorful names for plants in the Lithops genus. Pebble plants, mimicry plants, flowering stones, and of course, living stones are all descriptive monikers for a plant that has a unique form and growth habit.
Lithops are small plants, rarely getting more than an inch above the soil surface and usually with only two leaves. The thick padded leaves represent the cleft in an animal’s foot or just a pair of green to grayish brown stones clustered together. The plants have no true stem and much of the plant is underground. The resulting appearance has the double attribute of confusing grazing animals and conserving moisture.

Lithops Succulent Adaptations
below ground, it has minimal foliar space to gather sun’s energy. As a result, the plant has developed a unique way of enhancing solar collection by means of “windowpanes” on the surface of the leaf. These transparent areas are filled with calcium oxalate, which creates a reflective facet that increases light penetration. Another fascinating adaptation of lithops is the long life of the seed capsules. Moisture is infrequent in their native habitat, so the seeds can remain viable in the soil for months.

How to Grow Living Stones Plants
Growing living stones in pots is preferred for most but the hottest zones. Lithops need a cactus mix or potting soil with some sand incorporated. The potting media needs to dry before you add moisture and you must place the pot in as bright an area as possible. Place the plant in a southern facing window for optimum light entry. Propagation is through division or seed, although seed grown plants take many months to establish and years before they resemble the parent plant. You can find both seeds and starts on the Internet or at succulent nurseries. Adult plants are common at even big box nurseries.

Lithops Care
Lithops care is easy as long as you remember what type of climate the plant originates from and mimic those growing conditions. Be very careful, when growing living stones, not to overwater. These little succulents do not need to be watered in their dormant season, which is fall to spring. If you wish to encourage flowering, add a diluted cactus fertilizer in spring when you commence watering again. Lithops plants do not have many pest problems, but they may get scale, moisture gnats and several fungal diseases. Watch for signs of discoloration and evaluate your plant often for immediate treatment.
1
3
文章
Dummer. ゛☀
2017年08月23日

Sweet, quirky little succulents in the garden add charm and ease of care, whether grown in-ground or in containers. Jovibarba is a member of this group of plants and produces compact rosettes of fleshy leaves. What is Jovibarba? You can think of these tiny plants as another form of hens and chicks, but for all its similarities in appearance, the plant is a separate species. However, it is in the same family, sharing identical site preferences and an almost indistinguishable appearance.

Difference Between Sempervivum and Jovibarba
Some of the easiest and most adaptable plants available are succulents. Many of these are even hardy specimens which can live in United States Department of Agriculture zone 3. Jovibarba hens and chicks are not Sempervivum, a genus that includes hens and chicks and several other succulent species. They have been defined as a separate genus and while they have similar appearance and share a common name, they reproduce quite differently and produce distinctive flowers. Just like Sempervivum, Jovibarba care is simple, straightforward and easy. The differences between these two plants go farther than simple scientific and DNA classification. In most sites, growing Jovibarba plants instead of Sempervivum is an interchangeable option. Both need sunny, dry locations and produce singular rosettes with blushed leaves. This is where similarities stop, however. Sempervivum flowers are star shaped in tones of pink, white or yellow. Jovibarba hens and chicks develop bell-shaped blooms in yellow hues. Sempervivum produce pups on stolons. Jovibarba can reproduce with pups on stolons or amongst the leaves. The stems, which attach the pups to the mother plant (or hen), are brittle and dry with age. The pups then easily detach from the parent, get blown or moved away and root in a new site. This gives Jovibarba species the name “rollers” due to the pups’ (or hens) ability to roll away from the hen. Most of the species of Jovibarba are alpine species. Jovibarba hirta is one of the largest of the species with several sub-species. It has a large rosette with burgundy and green leaves, and produces many pups nestled in the rosette. All Jovibarba plants will take 2 to 3 years from maturity before flowering. The parent rosette dies back after bloom but not before numerous pups have been produced.

Growing Jovibarba Plants
Plant these succulents in rockeries, tiered gardens and well-draining containers. The most important items when learning how to care for Jovibarba and its relatives are good drainage and protection from drying winds. Most species thrive even where snow is common and can withstand temperatures of -10 degrees Fahrenheit (-23 C.) or more with some shelter. The best soil for Jovibarba is a mixture of compost with vermiculite or sand added for increased drainage. They can even grow in small gravel. These cute little plants thrive in poor soil and are drought tolerant for short periods of time once established. However, for best growth, supplemental water should be given several times per month in summer. For the most part, they do not need fertilizer but may benefit from a little bone meal in spring. Jovibarba care is minimal, and they actually thrive on benevolent neglect. Once rosettes have flowered and died back, pull them out of the plant group and either install a pup in the place or fill in with soil mixture. The flower stalk is generally still attached to the dead or dying rosette and simply pulling that will remove the rosette.

Difference Between Sempervivum and Jovibarba
Some of the easiest and most adaptable plants available are succulents. Many of these are even hardy specimens which can live in United States Department of Agriculture zone 3. Jovibarba hens and chicks are not Sempervivum, a genus that includes hens and chicks and several other succulent species. They have been defined as a separate genus and while they have similar appearance and share a common name, they reproduce quite differently and produce distinctive flowers. Just like Sempervivum, Jovibarba care is simple, straightforward and easy. The differences between these two plants go farther than simple scientific and DNA classification. In most sites, growing Jovibarba plants instead of Sempervivum is an interchangeable option. Both need sunny, dry locations and produce singular rosettes with blushed leaves. This is where similarities stop, however. Sempervivum flowers are star shaped in tones of pink, white or yellow. Jovibarba hens and chicks develop bell-shaped blooms in yellow hues. Sempervivum produce pups on stolons. Jovibarba can reproduce with pups on stolons or amongst the leaves. The stems, which attach the pups to the mother plant (or hen), are brittle and dry with age. The pups then easily detach from the parent, get blown or moved away and root in a new site. This gives Jovibarba species the name “rollers” due to the pups’ (or hens) ability to roll away from the hen. Most of the species of Jovibarba are alpine species. Jovibarba hirta is one of the largest of the species with several sub-species. It has a large rosette with burgundy and green leaves, and produces many pups nestled in the rosette. All Jovibarba plants will take 2 to 3 years from maturity before flowering. The parent rosette dies back after bloom but not before numerous pups have been produced.

Growing Jovibarba Plants
Plant these succulents in rockeries, tiered gardens and well-draining containers. The most important items when learning how to care for Jovibarba and its relatives are good drainage and protection from drying winds. Most species thrive even where snow is common and can withstand temperatures of -10 degrees Fahrenheit (-23 C.) or more with some shelter. The best soil for Jovibarba is a mixture of compost with vermiculite or sand added for increased drainage. They can even grow in small gravel. These cute little plants thrive in poor soil and are drought tolerant for short periods of time once established. However, for best growth, supplemental water should be given several times per month in summer. For the most part, they do not need fertilizer but may benefit from a little bone meal in spring. Jovibarba care is minimal, and they actually thrive on benevolent neglect. Once rosettes have flowered and died back, pull them out of the plant group and either install a pup in the place or fill in with soil mixture. The flower stalk is generally still attached to the dead or dying rosette and simply pulling that will remove the rosette.
1
0


