文章
Dummer. ゛☀
2017年08月16日

The question, “why is my Christmas cactus dropping buds,” is a common one here at Gardening Know How. Christmas cactus plants are succulents and hail from the tropical forests of Brazil. Most of these are sold straight from greenhouses where they have experienced strictly controlled lighting, moisture and temperature conditions. Just moving these lovely plants into your home can cause bud drop on Christmas cactus, but there may be other factors at work as well. Read on to prevent Christmas cactus buds falling off and preserve the incredible flower display.

Why is My Christmas Cactus Dropping Flower Buds?
Sometimes I feel like the world is conspiring against me and my plants. There are so many factors that can cause them to fall ill or fail to flower or produce fruit. In the case of Christmas cactus bud drop, the causes can range from cultural care, lighting, and even the fickleness of the plant to its situation. These plants need more water then true cactus and require a photoperiod of at least 14 hours of darkness to set buds. Other issues that may result in a Christmas cactus dropping flower buds are incorrect moisture, drafty conditions, hot or cold temperatures, and an excessive number of buds.

Outside of root rot, bud drop on Christmas cactus is the most common problem. It is often caused by a change in environment, as these are sensitive plants brought up in carefully controlled environments. Simply moving your plant to a new location in the home can induce bud drop but new plants are in for a whole set of shocks that may contribute to falling buds. New temperatures, humidity levels, lighting, and care will confuse the plant and cause it to stop production on all those glorious flowers. Mimic the care from a greenhouse as closely as possible. Water evenly but do not allow soil to get soggy. Suspend fertilizing in late summer. Keep temperatures between 60 and 80 degrees F. (15-26 C.). Anything above 90 F. (32 C.) can result in Christmas cactus bud drop. Christmas cactus reside in the deeply vegetated tropical forests of Brazil. The dense tree canopy and other vegetation make a warm, shady womb in which these epiphytic plants develop. They require a period of time without much light to force bud formation. To ensure that there are no Christmas cactus buds falling off and production is dense, provide 14 hours of darkness in September until the end of November, but bright light the rest of the year. These forced “long nights” are naturally experienced by the plant in its native region. During the day, the plant should be placed in bright light for the remaining 10 hours but avoid scorching sun from southern windows. Once buds have set and begun to open, the false lighting regimen can end.

Other Causes of Christmas Cactus Dropping Flower Buds
If photo period and care are all correctly followed, there may be other problems with the plant. Incorrect fertilizer can cause the plant to push out so many blooms that it drops some off to make room for full development of the others. This abortive behavior is common in fruit plants, as well. Keep the cactus away from drafty doors and blowing heaters. These can dry the plant out and cause ambient temperatures surrounding the plant to fluctuate too drastically. The shock of such variant temperatures may cause bud drop. Indoor conditions in winter often reflect dry air, which is a condition Christmas cactus can’t tolerate. They are native to a region with rich, humid air and require some moisture in their atmosphere. This is easy to accomplish by placing a saucer filled with pebbles and water under the plant. Evaporation will moisten the air. Simple changes like these are often the answer to bud drop and can have you on your way to a fully blooming plant just in time for the holidays.

Why is My Christmas Cactus Dropping Flower Buds?
Sometimes I feel like the world is conspiring against me and my plants. There are so many factors that can cause them to fall ill or fail to flower or produce fruit. In the case of Christmas cactus bud drop, the causes can range from cultural care, lighting, and even the fickleness of the plant to its situation. These plants need more water then true cactus and require a photoperiod of at least 14 hours of darkness to set buds. Other issues that may result in a Christmas cactus dropping flower buds are incorrect moisture, drafty conditions, hot or cold temperatures, and an excessive number of buds.

Outside of root rot, bud drop on Christmas cactus is the most common problem. It is often caused by a change in environment, as these are sensitive plants brought up in carefully controlled environments. Simply moving your plant to a new location in the home can induce bud drop but new plants are in for a whole set of shocks that may contribute to falling buds. New temperatures, humidity levels, lighting, and care will confuse the plant and cause it to stop production on all those glorious flowers. Mimic the care from a greenhouse as closely as possible. Water evenly but do not allow soil to get soggy. Suspend fertilizing in late summer. Keep temperatures between 60 and 80 degrees F. (15-26 C.). Anything above 90 F. (32 C.) can result in Christmas cactus bud drop. Christmas cactus reside in the deeply vegetated tropical forests of Brazil. The dense tree canopy and other vegetation make a warm, shady womb in which these epiphytic plants develop. They require a period of time without much light to force bud formation. To ensure that there are no Christmas cactus buds falling off and production is dense, provide 14 hours of darkness in September until the end of November, but bright light the rest of the year. These forced “long nights” are naturally experienced by the plant in its native region. During the day, the plant should be placed in bright light for the remaining 10 hours but avoid scorching sun from southern windows. Once buds have set and begun to open, the false lighting regimen can end.

Other Causes of Christmas Cactus Dropping Flower Buds
If photo period and care are all correctly followed, there may be other problems with the plant. Incorrect fertilizer can cause the plant to push out so many blooms that it drops some off to make room for full development of the others. This abortive behavior is common in fruit plants, as well. Keep the cactus away from drafty doors and blowing heaters. These can dry the plant out and cause ambient temperatures surrounding the plant to fluctuate too drastically. The shock of such variant temperatures may cause bud drop. Indoor conditions in winter often reflect dry air, which is a condition Christmas cactus can’t tolerate. They are native to a region with rich, humid air and require some moisture in their atmosphere. This is easy to accomplish by placing a saucer filled with pebbles and water under the plant. Evaporation will moisten the air. Simple changes like these are often the answer to bud drop and can have you on your way to a fully blooming plant just in time for the holidays.
1
0
文章
Dummer. ゛☀
2017年08月15日

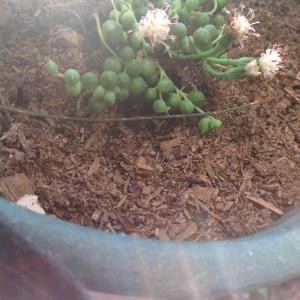
Burro’s tail cactus (Sedum morganianum) is not technically a cactus but a succulent. Although all cacti are succulents, not all succulents are cactus. Both do have similar requirements such as gritty soil, good drainage, sunshine and protection from extreme cold temperatures. Growing burro’s tail provides fascinating texture as a graceful houseplant or lush green exterior plant in many landscape situations.

Burro’s Tail Information
Burro’s tail is a heat and drought tolerant plant well suited for warm to temperate regions. The thick stems appear woven or plaited with leaves. The succulent is green to gray green or even blue green and may have a slight chalky look. Try a burro’s tail houseplant or use it on the patio or full sun garden bed.

Burro’s Tail Houseplant
The misnamed burro’s tail cactus produces long, sweeping stems that are arrayed with thick, fleshy green leaves. The succulent thrives indoors in a well-drained container where bright sunlight bathes the plant. A burro’s tail houseplant will grow equally well in a mixed succulent container or as a hanging specimen. Slowly introduce the plant to full sun once purchased to allow it to acclimate first, as light conditions vary from nursery to nursery, etc. Provide even moisture and fertilize with cactus food during the growing season. Divide the plant when it gets too large for a container and transplant it every couple of years to provide it with fresh nutrient-rich soil. Burro’s tail care is easy and makes it an excellent plant for the novice gardener.

Burro’s Tail Propagation
Burro’s tail features long stems laden with small, rounded leaves. The leaves fall off at the slightest touch and will litter the ground after transplanting or repotting. Gather the leaves and insert them partway into a moist soilless medium. Burro’s tail plants can tolerate periods of drought, but the new potential plants need to be kept lightly moist until they root and establish. Propagating burro’s tail will ensure multiple enough of this versatile plant to play with and apply to many different indoor or outdoor landscaping situations. Propagating will also make numerous starts to share with friends and family or spread around the garden. Growing Burro’s Tail Outdoors One of the most fun plants around, this succulent is simple to grow. Outdoor plants may need winter protection with a light layer of mulch to protect them from cold. Plant the burro’s tail in full sun where there is shelter from drying and damaging winds.

Growing Burro’s Tail Outdoors
One of the most fun plants around, this succulent is simple to grow. Outdoor plants may need winter protection with a light layer of mulch to protect them from cold. Plant the burro’s tail in full sun where there is shelter from drying and damaging winds.

Burro’s Tail Care and Uses
The frequent traveler or green thumb-challenged garden will find burro’s tail care ideal. Water carefully when growing burro’s tail. Keep the plant moderately and evenly moist. Excess water can cause the stems to rot and even kill the succulent. Burro’s tail works well in a hanging basket and decorates a mixed cactus and succulent container. It will flourish in rockery cracks and makes a unique ground cover. Try planting the bushy stems in a bed with mixed seasonal color or bright flowering perennials. It is a perfect choice for large leaved plants and useful as part of a xeriscape garden.

Burro’s Tail Information
Burro’s tail is a heat and drought tolerant plant well suited for warm to temperate regions. The thick stems appear woven or plaited with leaves. The succulent is green to gray green or even blue green and may have a slight chalky look. Try a burro’s tail houseplant or use it on the patio or full sun garden bed.

Burro’s Tail Houseplant
The misnamed burro’s tail cactus produces long, sweeping stems that are arrayed with thick, fleshy green leaves. The succulent thrives indoors in a well-drained container where bright sunlight bathes the plant. A burro’s tail houseplant will grow equally well in a mixed succulent container or as a hanging specimen. Slowly introduce the plant to full sun once purchased to allow it to acclimate first, as light conditions vary from nursery to nursery, etc. Provide even moisture and fertilize with cactus food during the growing season. Divide the plant when it gets too large for a container and transplant it every couple of years to provide it with fresh nutrient-rich soil. Burro’s tail care is easy and makes it an excellent plant for the novice gardener.

Burro’s Tail Propagation
Burro’s tail features long stems laden with small, rounded leaves. The leaves fall off at the slightest touch and will litter the ground after transplanting or repotting. Gather the leaves and insert them partway into a moist soilless medium. Burro’s tail plants can tolerate periods of drought, but the new potential plants need to be kept lightly moist until they root and establish. Propagating burro’s tail will ensure multiple enough of this versatile plant to play with and apply to many different indoor or outdoor landscaping situations. Propagating will also make numerous starts to share with friends and family or spread around the garden. Growing Burro’s Tail Outdoors One of the most fun plants around, this succulent is simple to grow. Outdoor plants may need winter protection with a light layer of mulch to protect them from cold. Plant the burro’s tail in full sun where there is shelter from drying and damaging winds.

Growing Burro’s Tail Outdoors
One of the most fun plants around, this succulent is simple to grow. Outdoor plants may need winter protection with a light layer of mulch to protect them from cold. Plant the burro’s tail in full sun where there is shelter from drying and damaging winds.

Burro’s Tail Care and Uses
The frequent traveler or green thumb-challenged garden will find burro’s tail care ideal. Water carefully when growing burro’s tail. Keep the plant moderately and evenly moist. Excess water can cause the stems to rot and even kill the succulent. Burro’s tail works well in a hanging basket and decorates a mixed cactus and succulent container. It will flourish in rockery cracks and makes a unique ground cover. Try planting the bushy stems in a bed with mixed seasonal color or bright flowering perennials. It is a perfect choice for large leaved plants and useful as part of a xeriscape garden.
1
0
文章
Dummer. ゛☀
2017年08月15日

Fans of Doctor Seuss illustrated books may find similarity of form in the bizarre boojum tree. The unique architectural shapes of these upright succulents, lend a surreal note to the arid landscape. Growing boojum trees requires bright light and warm temperatures. Among the many interesting boojum tree facts regards its shape. The Spanish name for the tree is Cirio, which means taper or candle.

What is a Boojum Tree?
Boojum trees (Fouquieria columnaris) are native to the Baja California peninsula and parts of the Sonoran desert. The plants are part of rocky hillsides and alluvial plains where water is rare and temperatures may be extreme. What is a boojum tree? The “tree” is actually a striking cacti with an upright form and imposing columnar height. Southern gardeners in arid regions can grow a boojum tree outdoors, while the rest of us will have to content ourselves with greenhouse and interior specimens that will not reach the heights those wild plants can achieve. Cultivated boojum trees may command a price tag of $1000.00 per foot (ouch!). The plants grow slowly, putting on less than a foot of dimension per year and wild harvest is prohibited due to the protected status of this cactus. Boojums in the wild have been found at 70 to 80 feet in height, but cultivated plants are significantly less at only 10 to 20 feet tall. The trees resemble taper candles with tiny bluish-green leaves that drop off when the plant reaches dormancy. These are cool season plants that do the majority of their growth from October to April and then go dormant in the hotter weather. The main stem is succulent and soft while smaller branches appear perpendicular to the trunk. Flowers are creamy white in clusters on the terminal ends of branches from February through March.

Boojum Tree Facts
Boojum trees are named after a mythical thing found in the work, The Hunting of the Snark, by Louis Caroll. Their fantastic form resembles an upside-down carrot and groups of them create quite an astounding display as the vertical trunks snake up from the earth. Boojum trees are quite rare due to seed disputes and their protected wild status. The drought tolerant cacti are perfect in the southwestern landscape and provide vertical appeal that is enhanced by thick-leaved succulents and other xeriscape plants. Gardeners who wish to try growing Boojum trees should have deep pockets, since purchasing even baby plants can be quite expensive. It is illegal to harvest wild plants.

Boojum Tree Care
If you are very lucky, you can try to grow a boojum tree from seed. Seed germination is sporadic and the seeds themselves can be difficult to find. Once seeds are sown, cultivation is similar to any other succulent. The plants need light shade when young but can tolerate full sun when mature. Sandy, well-drained soil is a must with superior drainage, as the worst evil to befall a boojum tree is root rot. Water potted plants once per week when they are actively growing. During dormancy the plant can do with half its normal water needs. Container boojum tree care requires addendum nutrients to supplement the potting mix. Feed the plant in February weekly with balanced fertilizer diluted to half. Growing boojum trees isn’t difficult provided you can find one and you don’t over water or feed the plant.

What is a Boojum Tree?
Boojum trees (Fouquieria columnaris) are native to the Baja California peninsula and parts of the Sonoran desert. The plants are part of rocky hillsides and alluvial plains where water is rare and temperatures may be extreme. What is a boojum tree? The “tree” is actually a striking cacti with an upright form and imposing columnar height. Southern gardeners in arid regions can grow a boojum tree outdoors, while the rest of us will have to content ourselves with greenhouse and interior specimens that will not reach the heights those wild plants can achieve. Cultivated boojum trees may command a price tag of $1000.00 per foot (ouch!). The plants grow slowly, putting on less than a foot of dimension per year and wild harvest is prohibited due to the protected status of this cactus. Boojums in the wild have been found at 70 to 80 feet in height, but cultivated plants are significantly less at only 10 to 20 feet tall. The trees resemble taper candles with tiny bluish-green leaves that drop off when the plant reaches dormancy. These are cool season plants that do the majority of their growth from October to April and then go dormant in the hotter weather. The main stem is succulent and soft while smaller branches appear perpendicular to the trunk. Flowers are creamy white in clusters on the terminal ends of branches from February through March.

Boojum Tree Facts
Boojum trees are named after a mythical thing found in the work, The Hunting of the Snark, by Louis Caroll. Their fantastic form resembles an upside-down carrot and groups of them create quite an astounding display as the vertical trunks snake up from the earth. Boojum trees are quite rare due to seed disputes and their protected wild status. The drought tolerant cacti are perfect in the southwestern landscape and provide vertical appeal that is enhanced by thick-leaved succulents and other xeriscape plants. Gardeners who wish to try growing Boojum trees should have deep pockets, since purchasing even baby plants can be quite expensive. It is illegal to harvest wild plants.

Boojum Tree Care
If you are very lucky, you can try to grow a boojum tree from seed. Seed germination is sporadic and the seeds themselves can be difficult to find. Once seeds are sown, cultivation is similar to any other succulent. The plants need light shade when young but can tolerate full sun when mature. Sandy, well-drained soil is a must with superior drainage, as the worst evil to befall a boojum tree is root rot. Water potted plants once per week when they are actively growing. During dormancy the plant can do with half its normal water needs. Container boojum tree care requires addendum nutrients to supplement the potting mix. Feed the plant in February weekly with balanced fertilizer diluted to half. Growing boojum trees isn’t difficult provided you can find one and you don’t over water or feed the plant.
1
0
文章
Dummer. ゛☀
2017年08月15日

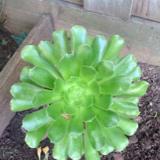
Aeoniums are fleshy leaved succulents that grow in a pronounced rosette shape. Growing aeoniums is easy in areas with few freezes. They can also grow indoors, in a sunny window where temperatures are toasty warm. Learn how to grow an aeonium plant for unique texture and form in both indoor and outdoor garden displays.

What Are Aeoniums?
Succulent plants have a special adaptive survival strategy for hot, dry locations. They come in a wide range of colors, textures and sizes. What are aeoniums? These plants also have the fleshy leaved characteristic of succulents, where they store moisture. Unlike many other succulents, however, aeonium have shallow root systems and cannot be allowed to dry out completely. Only the top few inches of soil should be allowed to dry out when growing aeoniums. There are over 35 aeonium species, in a graduating range of sizes.

Aeonium Uses
Consider growing aeoniums as part of a cactus or succulent display. They do well in shallow pots with a mixture of cactus soil and peat. You can combine them with other plants such as aloe, agave or jade plants. Place a thin layer of inorganic mulch such as ornamental rock around the plants and place in a sunny warm location. For outdoor use, place them along sunny borders or in rockeries. In temperate or cooler zones, frost may kill the foliage and the rosette will fall off. If the plant is mulched it will grow anew in spring.

How to Grow an Aeonium Plant
Provide the plant with well-drained soil in a sunny location. They prefer temperatures between 40 and 100 F. (4-38 C.). These succulents are very easy to grow from cuttings. You really just have to cut off a rosette and let the cut end dry out for a couple of days. Then set it in lightly moist peat moss. The piece will root quickly and produce a new plant.

Caring for Aeonium Plants
Aeonium care is remarkably easy. Plants in containers require more frequent watering than those in ground. Fertilize aeonium in containers once annually in spring when new growth commences. In-ground plants rarely need fertilizer, but may benefit from a light coating of mulch just around the base of the plant. Be careful not to pile it up around the stem or rot might set in. The most common problems when caring for aeonium plants are root rot and insects. Root rot is prevented by using clay pots with good drainage or checking soil percolation prior to planting. Keep the roots moist but never soggy. Good aeonium care also requires you to watch for pests. Mites and scale may attach the succulents. Combat these with horticultural soaps or neem oil. Be careful when using soap spays, however. Spraying too frequently can cause discoloration and lesions on the skin of the plant.

What Are Aeoniums?
Succulent plants have a special adaptive survival strategy for hot, dry locations. They come in a wide range of colors, textures and sizes. What are aeoniums? These plants also have the fleshy leaved characteristic of succulents, where they store moisture. Unlike many other succulents, however, aeonium have shallow root systems and cannot be allowed to dry out completely. Only the top few inches of soil should be allowed to dry out when growing aeoniums. There are over 35 aeonium species, in a graduating range of sizes.

Aeonium Uses
Consider growing aeoniums as part of a cactus or succulent display. They do well in shallow pots with a mixture of cactus soil and peat. You can combine them with other plants such as aloe, agave or jade plants. Place a thin layer of inorganic mulch such as ornamental rock around the plants and place in a sunny warm location. For outdoor use, place them along sunny borders or in rockeries. In temperate or cooler zones, frost may kill the foliage and the rosette will fall off. If the plant is mulched it will grow anew in spring.

How to Grow an Aeonium Plant
Provide the plant with well-drained soil in a sunny location. They prefer temperatures between 40 and 100 F. (4-38 C.). These succulents are very easy to grow from cuttings. You really just have to cut off a rosette and let the cut end dry out for a couple of days. Then set it in lightly moist peat moss. The piece will root quickly and produce a new plant.

Caring for Aeonium Plants
Aeonium care is remarkably easy. Plants in containers require more frequent watering than those in ground. Fertilize aeonium in containers once annually in spring when new growth commences. In-ground plants rarely need fertilizer, but may benefit from a light coating of mulch just around the base of the plant. Be careful not to pile it up around the stem or rot might set in. The most common problems when caring for aeonium plants are root rot and insects. Root rot is prevented by using clay pots with good drainage or checking soil percolation prior to planting. Keep the roots moist but never soggy. Good aeonium care also requires you to watch for pests. Mites and scale may attach the succulents. Combat these with horticultural soaps or neem oil. Be careful when using soap spays, however. Spraying too frequently can cause discoloration and lesions on the skin of the plant.
0
0
文章
Dummer. ゛☀
2017年08月15日

Root rot is a common disease in plants that is usually caused by poor drainage or improper watering. While more common in potted plants, root rot can also affect outdoor plants. Desert plants like succulents, cacti and agave are especially susceptible to root rot if they are planted in the wrong conditions. Continue reading to learn more about managing root rot in agave.

What is Agave Root Rot?
Agave, also commonly called century plant, is a desert plant native to Mexico. It grows best in dry conditions in full sun. Too much shade or soil that is too moist and drains poorly can cause the plant’s roots to rot. Weather fluctuations, such as unusual cold and rainy periods followed by extreme heat and humidity, can also contribute to root rot.
Agave is hardy in zones 8-10. They have been known to survive temperature down to 15 degrees F. (-9 C.) but when exposed to freezing temperatures, the plant will be damaged by frost in just a few hours. Weakened, damaged plant tissues become a perfect host for fungal and bacterial diseases and pests. Then as the earth heats up and humidity fills the air, fungal diseases quickly grow and spread. Because roots are under soil, root rot may go undetected until the whole plant tips over from having no roots to anchor it in place. Bacterial crown and root rot can also be common in agave, caused by the agave snout weevil. The adult agave snout weevil chews on the lower parts of the agave plant, injecting the plant tissues with a bacteria as it chews, which causes them to rot. It then lays its eggs in the rotting tissue and, when hatched, the agave snout weevil larvae feed on the rotting crown and roots.

Alleviating Root Problems of Agave Plants
Agave root rot symptoms may include a general unhealthy appearance of the plant, lesions around the plant crown, tipping over of the plant and roots that are gray/black and slimy. If caught before the entire root system has rotted, you can dig up the plant, remove all soil from the roots and cut off all the rotted parts. Then treat the plant and roots with a fungicide such as thiopanate methyl or neem oil. Move the plant to a different location with full sun and well-draining soil. Pumice can be mixed in with the soil for better drainage. If the roots have all rotted, all you can do is discard the plant and treat the soil with fungicide to prevent the fungal disease from spreading to other plants. To prevent agave root rot in the future, remember agave is a desert plant. It needs full sun and should be planted in an area that tends to be dry, like a rock garden.
What is Agave Root Rot?
Agave, also commonly called century plant, is a desert plant native to Mexico. It grows best in dry conditions in full sun. Too much shade or soil that is too moist and drains poorly can cause the plant’s roots to rot. Weather fluctuations, such as unusual cold and rainy periods followed by extreme heat and humidity, can also contribute to root rot.

Agave is hardy in zones 8-10. They have been known to survive temperature down to 15 degrees F. (-9 C.) but when exposed to freezing temperatures, the plant will be damaged by frost in just a few hours. Weakened, damaged plant tissues become a perfect host for fungal and bacterial diseases and pests. Then as the earth heats up and humidity fills the air, fungal diseases quickly grow and spread. Because roots are under soil, root rot may go undetected until the whole plant tips over from having no roots to anchor it in place. Bacterial crown and root rot can also be common in agave, caused by the agave snout weevil. The adult agave snout weevil chews on the lower parts of the agave plant, injecting the plant tissues with a bacteria as it chews, which causes them to rot. It then lays its eggs in the rotting tissue and, when hatched, the agave snout weevil larvae feed on the rotting crown and roots.

Alleviating Root Problems of Agave Plants
Agave root rot symptoms may include a general unhealthy appearance of the plant, lesions around the plant crown, tipping over of the plant and roots that are gray/black and slimy. If caught before the entire root system has rotted, you can dig up the plant, remove all soil from the roots and cut off all the rotted parts. Then treat the plant and roots with a fungicide such as thiopanate methyl or neem oil. Move the plant to a different location with full sun and well-draining soil. Pumice can be mixed in with the soil for better drainage. If the roots have all rotted, all you can do is discard the plant and treat the soil with fungicide to prevent the fungal disease from spreading to other plants. To prevent agave root rot in the future, remember agave is a desert plant. It needs full sun and should be planted in an area that tends to be dry, like a rock garden.
0
1
文章
Dummer. ゛☀
2017年08月13日

Kalanchoe plants are thick leaved succulents that are often seen in florist shops or garden centers. Most end up as potted plants but areas that can mimic their native land of Madagascar can grow them outdoors. The clusters of tiny flowers produce a large bloom held aloft on stems above the majority of the foliage. If you wish a second bloom, it is incumbent to know how to take care of a kalanchoe. These plants need short winter light periods to form new buds. Learn how to grow kalanchoe and the perennial can reward you with several seasons of the bright colorful flowers.
About Kalanchoe Plants
The deep green, scalloped leaves of the kalanchoe are just as attractive as the flowers. The sculpted foliage persists after bloom and provides for a handsome plant. The starry flowers are long lasting and bloom in winter to spring. Kalanchoe plants require well-drained soil and mild temperatures of at least 60 F. (16 C.). Little maintenance is necessary for kalanchoe care and the succulent has few disease or pest problems, especially when grown indoors.
How to Grow Kalanchoe Cuttings
Kalanchoe plants are fun to grow from cuttings. The vegetative stems produce the best plants and root quickest. Take a 2- to 3-inch section and strip off the bottom couple of leaves. Let the cutting sit out in a warm, dry location to form a callus on the end. Plant the cutting in pre-moistened peat and perlite up to the first leaf. Enclose the entire pot in plastic to form a little terrarium and conserve the moisture. Place the pot in a bright window with indirect light. Cuttings will root in 14 to 21 days and are then ready to transplant.
How to Take Care of a Kalanchoe
Plants may grow well in southern Florida year round or outside in USDA zones 8 to 10 during the summer months. Kalanchoe care is minimal but be cautious about light levels. Strong southern light can burn the tips of the leaves. Place pots in partial sun to light shade areas when growing kalachoe plants. The best planting mix is 60 percent peat moss and 40 percent perlite. Cut off spent flower stems and pinch back leggy growth to force a compact plant. Water the plant deeply and then allow it to dry out completely before you give it further moisture. Fertilize once per month during the growing season with a houseplant food.
Kalanchoe Care for Second Bloom
Although the plant foliage of growing kalanchoe succulent plants is interesting even without blooms, the flowers make the most spectacular display. To force the plant to bloom again, you must fool it into believing it has experienced winter. During October and early March, the day lengths are short enough to naturally force flower buds. In other periods, you will have to put the plant in a closet or dim room for most of the day. Bring it out only for morning light and then put it away after a few hours. The plant needs six weeks of 12 to 14 hour darkness to form spectacular new flowers. The best temperatures for formation of flowers are 40-45 F. (4-7 C.) at night and 60 F. (16 C.) during the day. Kalanchoe care for plants that have begun to form buds is the same as that for flowering plants.

About Kalanchoe Plants
The deep green, scalloped leaves of the kalanchoe are just as attractive as the flowers. The sculpted foliage persists after bloom and provides for a handsome plant. The starry flowers are long lasting and bloom in winter to spring. Kalanchoe plants require well-drained soil and mild temperatures of at least 60 F. (16 C.). Little maintenance is necessary for kalanchoe care and the succulent has few disease or pest problems, especially when grown indoors.

How to Grow Kalanchoe Cuttings
Kalanchoe plants are fun to grow from cuttings. The vegetative stems produce the best plants and root quickest. Take a 2- to 3-inch section and strip off the bottom couple of leaves. Let the cutting sit out in a warm, dry location to form a callus on the end. Plant the cutting in pre-moistened peat and perlite up to the first leaf. Enclose the entire pot in plastic to form a little terrarium and conserve the moisture. Place the pot in a bright window with indirect light. Cuttings will root in 14 to 21 days and are then ready to transplant.

How to Take Care of a Kalanchoe
Plants may grow well in southern Florida year round or outside in USDA zones 8 to 10 during the summer months. Kalanchoe care is minimal but be cautious about light levels. Strong southern light can burn the tips of the leaves. Place pots in partial sun to light shade areas when growing kalachoe plants. The best planting mix is 60 percent peat moss and 40 percent perlite. Cut off spent flower stems and pinch back leggy growth to force a compact plant. Water the plant deeply and then allow it to dry out completely before you give it further moisture. Fertilize once per month during the growing season with a houseplant food.
Kalanchoe Care for Second Bloom
Although the plant foliage of growing kalanchoe succulent plants is interesting even without blooms, the flowers make the most spectacular display. To force the plant to bloom again, you must fool it into believing it has experienced winter. During October and early March, the day lengths are short enough to naturally force flower buds. In other periods, you will have to put the plant in a closet or dim room for most of the day. Bring it out only for morning light and then put it away after a few hours. The plant needs six weeks of 12 to 14 hour darkness to form spectacular new flowers. The best temperatures for formation of flowers are 40-45 F. (4-7 C.) at night and 60 F. (16 C.) during the day. Kalanchoe care for plants that have begun to form buds is the same as that for flowering plants.
1
1
求助
Kiley_Cruse
2017年08月12日

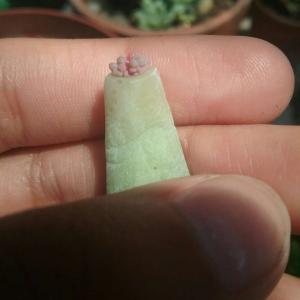
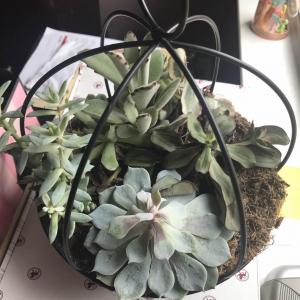
I also bought this with a bunch of succulents together but some arent doing too good while others are fine, should I seperate them?

0
0
Haleyfleeanne:Your echeveria appears rotted. You will need to pull it out and check it over. But it looks rotted all the way through. Sometimes you can save them but cutting the rot off and allowing the plant to reroot.


