成长记
kensong
2019年05月01日

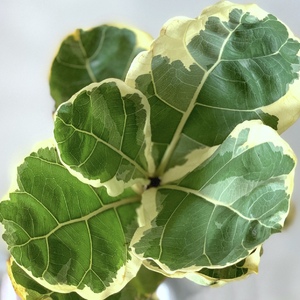
The hybrid Ficus Lyrata Variegata is not an easy find and also not an easy plant to care for compared to the regular FLF but it's such a beauty.
It's leaves look painted with a cream white that frames a forest green leaf with unpredictable patches of olive green intertwined.
#ficus #ficuslyrata #ficuslyratavariegata #ficuslyratavariegated #lyrata #rubberplant #rubberplants #variegated #variegatedplants #houseplants #gardening #gardening_love #betterhomesandgardens #urbanplants

1
0
成长记
Ichigobaibee
2019年03月16日

I now added "Echeveria Ice Green x Echeveria Sasa "冰玉x莎莎"" in my "garden"


1
0
文章
绿手指客服
2018年12月20日

Christmas is coming
How can we get less benefits?
This time we have to enlarge the trick!
Green finger lifetime vip
50% discount!
50% discount!
50% discount!
The important thing is said three times!
Activity is limited to 3 days! A rare opportunity!
Activity time 12.23-12.25

I wish you all a Merry Christmas in advance!
How can we get less benefits?
This time we have to enlarge the trick!
Green finger lifetime vip
50% discount!
50% discount!
50% discount!
The important thing is said three times!
Activity is limited to 3 days! A rare opportunity!
Activity time 12.23-12.25

I wish you all a Merry Christmas in advance!
0
0
succulentlover11
2018年09月11日

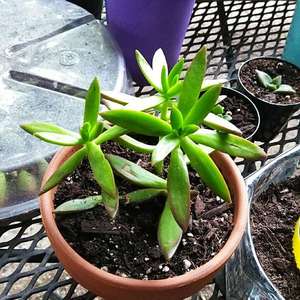
hello I'm new to this app I really need some help on my succulent my sedum firestorm its color is fading out it's supposed to be green with red tips around the leaf but it's turning all green and the leaves look really sad anybody please help me or give me some advice on the plan thank you

0
0
文章
Miss Chen
2018年09月10日

For a dramatic statement in your flower bed, try growing lupines (Lupinus spp.). These herbaceous perennials have mounds of bright green leaves and produce compact spikes of flowers that can grow upwards to 42 inches tall -- perfect for attracting bees, hummingbirds and butterflies. The flowers of these legumes come in a range of colors from white, cream, pink, rose-mauve, pale yellow, all shades of blue and all shades of violet, including one so dark it's nearly black. Lupines generally thrive in U.S. Department of Agriculture plant hardiness zones 4 to 7, depending on the species and cultivar.

Step 1
Select a well-drained site with full sunlight or semi-shade; tall varieties of lupines may need protection from the wind. The soil does not need to be particularly rich, but it should be neutral to slightly acidic. Test the soil and add sulfur or peat moss several weeks before planting to adjust its pH to between 6.8 and 7.2. Because lupines bloom early in the season and may look unsightly after flowering, place them near the back of the flower bed.
Step 2
Transplant lupines in the spring. Dig a hole that is larger than the plant's container. Carefully remove the lupine from the container and gently loosen the roots with your fingers. Place the plant in the hole, fill the hole with soil and tamp down gently to remove air spaces. Water gently to settle the soil. Depending upon the species of lupine, space the plants 15 to 24 inches apart. Apply light, organic mulch to hold down weeds and to help retain soil moisture.
Step 3
Water lupines regularly. Don't let the soil dry out completely. Apply a light amount of high potash fertilizer as the buds begin to form. Powdery mildew can be a problem, as well as aphids. Control these with a general fungicide and pesticide. Lupines can also develop viruses that cause stunting and discoloration. If this happens, destroy the plants; do not add them to the compost pile.

Step 4
Watch for the lupines to bloom beginning in early summer and continuing through mid-summer. Deadhead the plants regularly, removing spent flower spikes with pruning shears to prevent seed development. This allows the smaller flower spikes to develop and keeps lupines from spreading out of control. However, if you want to collect the seeds, allow the pods to dry on the plant and then collect the pods. Open the pods and store the seeds in an envelope in a cool dry place until time to plant.
Step 5
Sow the lupine seeds either in the early fall or early spring. Scarify (nick) the seeds before planting to quicken germination. Plant the seeds 1/4 to 1/2 inches deep. Because of the shallow planting depth, water gently so as not to disturb the seeds. Young seedlings require consistent moisture to help them establish healthy root systems.

Step 1
Select a well-drained site with full sunlight or semi-shade; tall varieties of lupines may need protection from the wind. The soil does not need to be particularly rich, but it should be neutral to slightly acidic. Test the soil and add sulfur or peat moss several weeks before planting to adjust its pH to between 6.8 and 7.2. Because lupines bloom early in the season and may look unsightly after flowering, place them near the back of the flower bed.
Step 2
Transplant lupines in the spring. Dig a hole that is larger than the plant's container. Carefully remove the lupine from the container and gently loosen the roots with your fingers. Place the plant in the hole, fill the hole with soil and tamp down gently to remove air spaces. Water gently to settle the soil. Depending upon the species of lupine, space the plants 15 to 24 inches apart. Apply light, organic mulch to hold down weeds and to help retain soil moisture.
Step 3
Water lupines regularly. Don't let the soil dry out completely. Apply a light amount of high potash fertilizer as the buds begin to form. Powdery mildew can be a problem, as well as aphids. Control these with a general fungicide and pesticide. Lupines can also develop viruses that cause stunting and discoloration. If this happens, destroy the plants; do not add them to the compost pile.

Step 4
Watch for the lupines to bloom beginning in early summer and continuing through mid-summer. Deadhead the plants regularly, removing spent flower spikes with pruning shears to prevent seed development. This allows the smaller flower spikes to develop and keeps lupines from spreading out of control. However, if you want to collect the seeds, allow the pods to dry on the plant and then collect the pods. Open the pods and store the seeds in an envelope in a cool dry place until time to plant.
Step 5
Sow the lupine seeds either in the early fall or early spring. Scarify (nick) the seeds before planting to quicken germination. Plant the seeds 1/4 to 1/2 inches deep. Because of the shallow planting depth, water gently so as not to disturb the seeds. Young seedlings require consistent moisture to help them establish healthy root systems.
0
0
文章
Miss Chen
2018年09月06日

A plant for pond edges, bog gardens and other wet sites, horsetail (Equisetum hyemale) grows in stands of bamboo-like, dark green stems. Also called scouring rush, horsetail is hardy in U.S. Department of Agriculture plant hardiness zones 3 through 11, and is a member of an ancient plant family that dates back 350 million years, notes the Missouri Botanical Garden. One reason for this perennial's long survival is its extremely aggressive spreading habit, but growing horsetail in containers gives you some control.
Containing Horsetail

Horsetail spreads outward through underground stems called rhizomes, and containers provide a barrier to these rhizomes. Plant horsetail in a container, with drainage holes, that's just large enough to accommodate the plant's root ball. Place a sheet of fine mesh, such as screen mesh, over the drainage holes to prevent horsetail rhizomes from growing through them, and spread a layer of general purpose potting soil over the mesh. Place the horsetail in the container. The top of the root ball should be 1 inch below the container rim. Fill in gaps around the root ball with more potting soil, and apply water until it runs though the drainage holes.
Planting in Water

Horsetail thrives in water gardens and on stream banks. Providing year-round color and structure in wet, full-sun and partial-shade sites, horsetail tolerates water to a depth of 4 inches over its roots. To add horsetail to your water garden or pond site, spread a 1-inch layer of gravel over the potting soil in the horsetail container to protect it. Place bricks on the bottom of the planting site to provide a firm, level base. Sink the horsetail container into the water slowly until it's submerged and resting firmly on the bricks.
Planting in Soil

Horsetail provides strong, vertical lines in Japanese gardens and can grow where few other plants survive. Dig a hole 2 or 3 inches wider than the horsetail container and 1 inch less deep. Place the container in the hole, and check that it's level. Twisting the container and pushing down gently helps level the container and firm the soil beneath it. Check that the container rim is protruding from the soil by 1 inch, and fill in the gaps around it with dug soil. Water the ground around the container to settle the soil, and fill in any hollows with more soil.
Controlling Horsetail
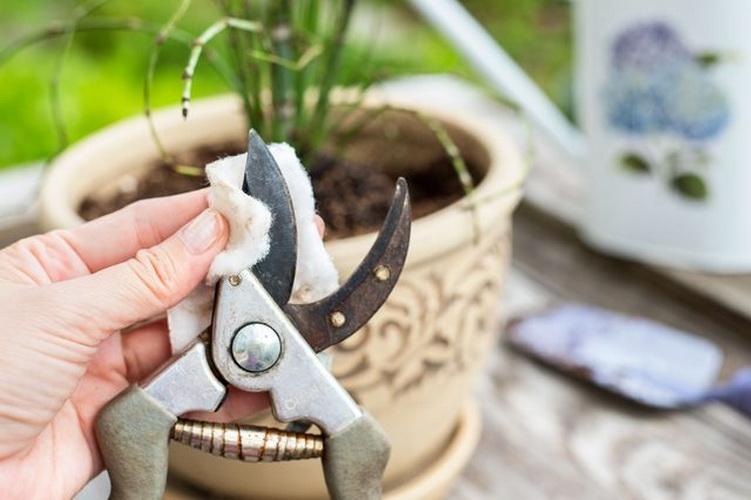
Prune regularly to control horsetail's spreading habit. Horsetail grows 2 to 4 feet tall and spreads indefinitely in favorable conditions. Check the horsetail monthly, at least, for rhizomes climbing over the container rim and stems with cone-like, spore-producing heads, which usually appear in spring. Clean pruning shear blades with rubbing alcohol, and prune escaping rhizomes and fruiting stems at ground level. Wipe the pruning shear blades with rubbing alcohol again after use. Place pruned horsetail debris in a sealed plastic bag in the trash. Don't grow horsetail in areas accessible to pets or livestock. Horsetail can be deadly to animals when eaten.
Containing Horsetail

Horsetail spreads outward through underground stems called rhizomes, and containers provide a barrier to these rhizomes. Plant horsetail in a container, with drainage holes, that's just large enough to accommodate the plant's root ball. Place a sheet of fine mesh, such as screen mesh, over the drainage holes to prevent horsetail rhizomes from growing through them, and spread a layer of general purpose potting soil over the mesh. Place the horsetail in the container. The top of the root ball should be 1 inch below the container rim. Fill in gaps around the root ball with more potting soil, and apply water until it runs though the drainage holes.
Planting in Water

Horsetail thrives in water gardens and on stream banks. Providing year-round color and structure in wet, full-sun and partial-shade sites, horsetail tolerates water to a depth of 4 inches over its roots. To add horsetail to your water garden or pond site, spread a 1-inch layer of gravel over the potting soil in the horsetail container to protect it. Place bricks on the bottom of the planting site to provide a firm, level base. Sink the horsetail container into the water slowly until it's submerged and resting firmly on the bricks.
Planting in Soil

Horsetail provides strong, vertical lines in Japanese gardens and can grow where few other plants survive. Dig a hole 2 or 3 inches wider than the horsetail container and 1 inch less deep. Place the container in the hole, and check that it's level. Twisting the container and pushing down gently helps level the container and firm the soil beneath it. Check that the container rim is protruding from the soil by 1 inch, and fill in the gaps around it with dug soil. Water the ground around the container to settle the soil, and fill in any hollows with more soil.
Controlling Horsetail

Prune regularly to control horsetail's spreading habit. Horsetail grows 2 to 4 feet tall and spreads indefinitely in favorable conditions. Check the horsetail monthly, at least, for rhizomes climbing over the container rim and stems with cone-like, spore-producing heads, which usually appear in spring. Clean pruning shear blades with rubbing alcohol, and prune escaping rhizomes and fruiting stems at ground level. Wipe the pruning shear blades with rubbing alcohol again after use. Place pruned horsetail debris in a sealed plastic bag in the trash. Don't grow horsetail in areas accessible to pets or livestock. Horsetail can be deadly to animals when eaten.
0
0
文章
Miss Chen
2018年09月06日

Winter-blooming clivia (Clivia miniata) flowers in winter and early spring. The clusters of yellow and orange blossoms are surrounded by strappy green leaves. Clivia grows outdoors in U.S. Department of Agriculture plant hardiness zones 9 through 11, but it can grow as a houseplant anywhere with proper care.

Pick a Spot
Whether you grow clivia outdoors in the garden, or indoors in a pot, provide the plant with partial shade. Outdoor beds with dappled sunlight work well, while indoors you can set them in an area with bright but indirect sunlight. Clivia is prone to root rot in wet soil, so grow them in well-draining beds or use pots with bottom drainage holes. Temperatures below 32 degrees Fahrenheit kill the plant, so bring outdoor potted plants indoors before a freeze and don't allow the foliage to touch a window during cold weather.
Watering Wisely
How much water a clivia needs depends on the season. During spring and summer, water the soil when the top 1 inch feels completely dry. When watering a potted plant, allow the excess to drain from the bottom drainage in the pot and empty the drip tray afterward. Withhold water from late fall through midwinter if you want the plant to flower, because clivia only flowers in response to drought stress. During this dry rest period, keep the temperature below 60 F to further encourage blooms. Resume regular watering and increase temperatures when the flower stalk is about 6 inches tall.
Feeding Tips
Light fertilizer encourages healthy growth, whether the clivia is grown indoors or outside. Fertilize once a week in spring and summer. Dilute 1/2 teaspoon of 15-15-15 fertilizer in 1 gallon of water, and use the mixture water for one regular watering each week. Clivia doesn't need fertilizer during its dormant period in fall and winter.
Pruning Needs
Clivia doesn't require any regular pruning, but you can trim off dead or badly damaged leaves to improve the plant's appearance. Gently pull off the leaves or trim them off with shears wiped with a rubbing alcohol-soaked cloth. Potted clivia also rarely needs repotting and grows best when root bound. If the roots completely fill the pot, which happens about every three or four years, transplant it in spring to a new pot one size larger than the old one. The new pot must have bottom drainage holes. Plant the clivia at the same depth it was growing previously, and handle the roots gently to avoid damage.

Controlling Pests
Diseases rarely affect clivia, with the exception of root rot in overly wet soil. Indoors, aphids and mites may feed on the foliage, but you can rinse these off with a strong stream of water. Slugs and snails may feast on clivia foliage outdoors. Pick these off by hand and drop them into a bucket of soapy water.

Pick a Spot
Whether you grow clivia outdoors in the garden, or indoors in a pot, provide the plant with partial shade. Outdoor beds with dappled sunlight work well, while indoors you can set them in an area with bright but indirect sunlight. Clivia is prone to root rot in wet soil, so grow them in well-draining beds or use pots with bottom drainage holes. Temperatures below 32 degrees Fahrenheit kill the plant, so bring outdoor potted plants indoors before a freeze and don't allow the foliage to touch a window during cold weather.
Watering Wisely
How much water a clivia needs depends on the season. During spring and summer, water the soil when the top 1 inch feels completely dry. When watering a potted plant, allow the excess to drain from the bottom drainage in the pot and empty the drip tray afterward. Withhold water from late fall through midwinter if you want the plant to flower, because clivia only flowers in response to drought stress. During this dry rest period, keep the temperature below 60 F to further encourage blooms. Resume regular watering and increase temperatures when the flower stalk is about 6 inches tall.
Feeding Tips
Light fertilizer encourages healthy growth, whether the clivia is grown indoors or outside. Fertilize once a week in spring and summer. Dilute 1/2 teaspoon of 15-15-15 fertilizer in 1 gallon of water, and use the mixture water for one regular watering each week. Clivia doesn't need fertilizer during its dormant period in fall and winter.
Pruning Needs
Clivia doesn't require any regular pruning, but you can trim off dead or badly damaged leaves to improve the plant's appearance. Gently pull off the leaves or trim them off with shears wiped with a rubbing alcohol-soaked cloth. Potted clivia also rarely needs repotting and grows best when root bound. If the roots completely fill the pot, which happens about every three or four years, transplant it in spring to a new pot one size larger than the old one. The new pot must have bottom drainage holes. Plant the clivia at the same depth it was growing previously, and handle the roots gently to avoid damage.

Controlling Pests
Diseases rarely affect clivia, with the exception of root rot in overly wet soil. Indoors, aphids and mites may feed on the foliage, but you can rinse these off with a strong stream of water. Slugs and snails may feast on clivia foliage outdoors. Pick these off by hand and drop them into a bucket of soapy water.
1
1
文章
Miss Chen
2018年09月05日

Kangaroo paw plants (Anigozanthos spp.) have long green leaves and finely textured flowering stems in tones of green, red or yellow. These perennial Australian natives grow in warm soil with a sandy composition that drains quickly. Although these plants are drought tolerant, summer watering can extend the flowering period. Tall kangaroo paw (Anigozanthos flavidus) is the one you're most likely to find and it grows in U.S. Department of Agriculture plant hardiness zones 9 through 11.

Choosing a Spot
Kangaroo paws grow in open, sunny sites, where water drains quickly through soil consisting mainly of sand or gravel. The plants are susceptible to frost damage, but planting them close to the south-facing side of a building offers some protection from cold damage in USDA zone 9.
Caring for Paws
Kangaroo paws need little or no fertilizer, but you can improve their growth with a slow-release 12-4-8 fertilizer spread over the soil around the plant at a rate of 1 tablespoon per 1 square foot. Apply the fertilizer once every three months or according to label instructions. Removing the fans of flowers helps stimulate growth because each fan of flowers only blooms once. Remove the fans when they start to wilt.
Watering Kangaroo Paws
Species of kangaroo paw plants other than tall kangaroo paw are adapted to periods of summer drought and enter a period of dormancy unless they are watered daily. Daily drip irrigation from a soaker hose will prevent kangaroo paw from going dormant in summer but will also shorten its lifespan considerably. Once a kangaroo paw has entered dormancy, watering it quickly rots the plant.
Controlling Snails
Snails can cause serious damage to kangaroo paws. Snails hide during the day and feed at night. Look for cool, dark places beneath landscaping timbers, boards and rocks that could provide shelter for snails near your kangaroo paws and remove them. Eliminating snails' habitat and regularly removing the pests by hand are a simple and effective way to control snails on kangaroo paws. Check your plants for the slimy trails each day until their numbers decline and then continue checking them weekly.

Treating Fungal Diseases
Kangaroo paws are susceptible to ink spot, which is a fungal infection that blackens flower stems and leaves, beginning at the leaf tips. Spacing plants further apart, keeping them in good health and avoiding overwatering help prevent this disease from taking hold in kangaroo paws. You can treat plants that are already infected using a foliar fungicidal spray containing mancozeb. Add 3 teaspoons of mancozeb for every 1 gallon of water you plan to use. Add the fungicide to the sprayer's tank before the water to ensure it mixes properly. Wearing chemical-resistant gloves, pants and a long-sleeved shirt while mixing and spraying will reduce accidental contact with the fungicide. Mancozeb is most effective when used to thoroughly coat foliage of affected plants once every seven to 10 days throughout the growing season.

Choosing a Spot
Kangaroo paws grow in open, sunny sites, where water drains quickly through soil consisting mainly of sand or gravel. The plants are susceptible to frost damage, but planting them close to the south-facing side of a building offers some protection from cold damage in USDA zone 9.
Caring for Paws
Kangaroo paws need little or no fertilizer, but you can improve their growth with a slow-release 12-4-8 fertilizer spread over the soil around the plant at a rate of 1 tablespoon per 1 square foot. Apply the fertilizer once every three months or according to label instructions. Removing the fans of flowers helps stimulate growth because each fan of flowers only blooms once. Remove the fans when they start to wilt.
Watering Kangaroo Paws
Species of kangaroo paw plants other than tall kangaroo paw are adapted to periods of summer drought and enter a period of dormancy unless they are watered daily. Daily drip irrigation from a soaker hose will prevent kangaroo paw from going dormant in summer but will also shorten its lifespan considerably. Once a kangaroo paw has entered dormancy, watering it quickly rots the plant.
Controlling Snails
Snails can cause serious damage to kangaroo paws. Snails hide during the day and feed at night. Look for cool, dark places beneath landscaping timbers, boards and rocks that could provide shelter for snails near your kangaroo paws and remove them. Eliminating snails' habitat and regularly removing the pests by hand are a simple and effective way to control snails on kangaroo paws. Check your plants for the slimy trails each day until their numbers decline and then continue checking them weekly.

Treating Fungal Diseases
Kangaroo paws are susceptible to ink spot, which is a fungal infection that blackens flower stems and leaves, beginning at the leaf tips. Spacing plants further apart, keeping them in good health and avoiding overwatering help prevent this disease from taking hold in kangaroo paws. You can treat plants that are already infected using a foliar fungicidal spray containing mancozeb. Add 3 teaspoons of mancozeb for every 1 gallon of water you plan to use. Add the fungicide to the sprayer's tank before the water to ensure it mixes properly. Wearing chemical-resistant gloves, pants and a long-sleeved shirt while mixing and spraying will reduce accidental contact with the fungicide. Mancozeb is most effective when used to thoroughly coat foliage of affected plants once every seven to 10 days throughout the growing season.
0
0
文章
Miss Chen
2018年09月01日

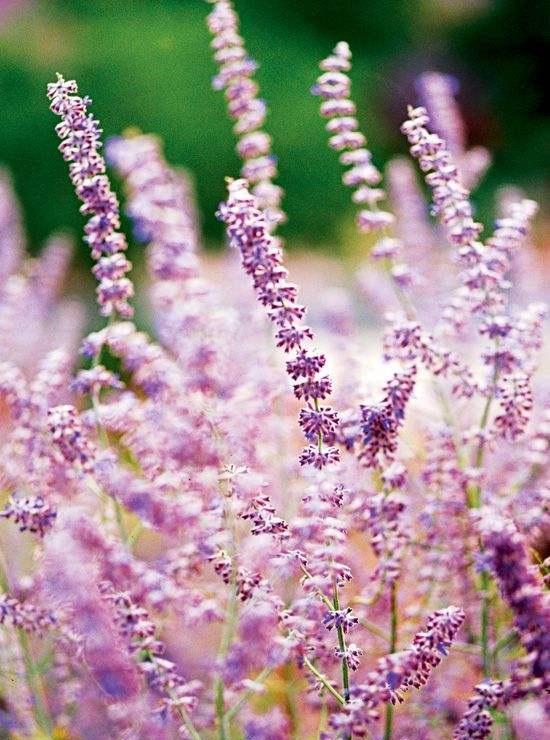
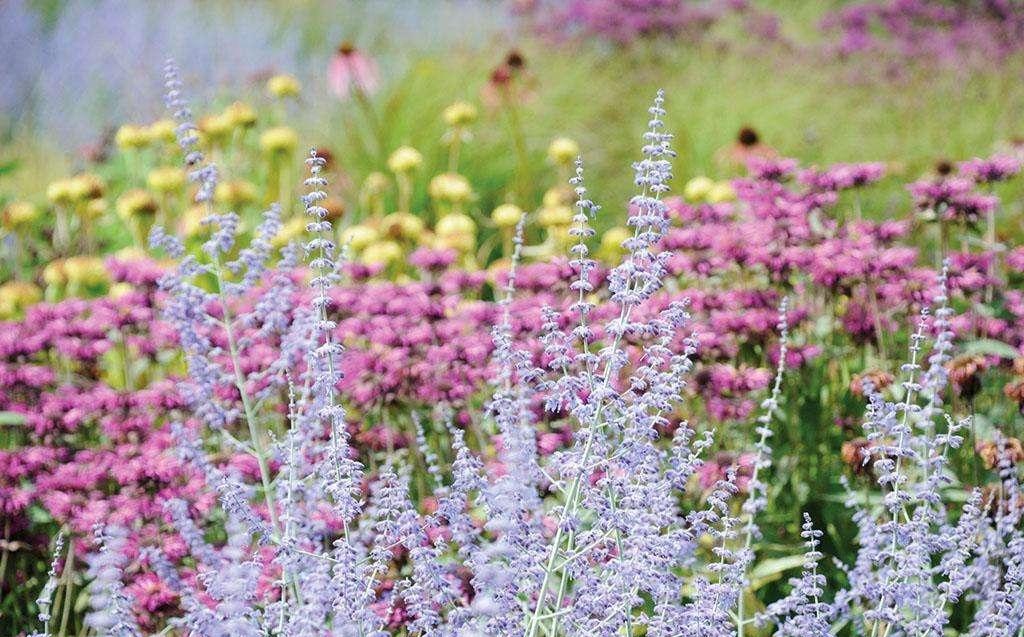
Russian sage blooms with bright purple flowers that resemble lavender, mixing well with its gray-green leaves and adding a depth of color to any garden. The hardy perennial plant is drought resistant, and though it carries the name "sage," is not part of the edible sage family. Move your Russian sage to ground that will not flood in the winter or dangerously soak the plants root system.
Preparing the Site
Loosen the soil and add compost to prepare the new growing site before transplanting Russian sage. The soil for growing Russian sage must be loose to encourage water to drain. Mixing compost into the planting site also helps drainage, and provides evenly moist soil. At any frost-free time of year, loosen the soil in the new growing site to a depth of 12 to 15 inches using a garden fork. Spread a layer of compost 2 to 4 inches thick, and mix it into the soil with the garden fork.
Digging Up Russian Sage
Russian sage requires careful removal to minimize damage to its root system. Growing 3- to 5-feet tall and 2- to 4-feet wide, Russian sage can have an extensive root system, and some damage is unavoidable. Digging up the plant carefully is unlikely to cause serious harm. Push a garden fork into the ground about 1 foot from the Russian sage's central stem, and lever the end of the fork upward. Repeat this around the plant's base, slowly working the root ball out of the soil. Wear gloves when handling the plant, since the leaves may cause irritation or an allergic reaction. Lift the plant out, and put it down on the soil's surface. Break off excess soil in areas that contain no roots, to lighten the plant's weight.
Moving Russian Sage
Take the Russian sage to its new growing site immediately after digging it up to prevent its roots from drying out. Russian sage is drought-tolerant and low-maintenance and should suffer few problems from transplanting, but replanting it right away increases the chances of success. Dig a hole 2 1/2 feet wide and as deep as the depth of the Russian sage's root ball, which is usually about 1 foot. Place the plant in the hole so that it's level and sitting at its original growing depth. You may need to add or remove soil at the base of the hole. Fill in the gaps around the root ball with dug soil, and gently firm the plant in its hole.
After Care
Regular watering helps Russian sage quickly establish in its new site. Water the Russian sage using a garden hose fitted with a spray attachment. Spray water over the root area until it begins to puddle, but avoid washing away soil. Through the rest of the growing season water Russian sage when the soil is dry to a depth of 2 inches. Russian sage grows sturdy, dense and upright if it is pruned in spring. Sterilize pruning shear blades by wiping them with a cloth that was dipped in rubbing alcohol, and prune all Russian sage stems to 6-inches tall in spring before new growth appears. Sterilize the pruning shears again after pruning.

Preparing the Site
Loosen the soil and add compost to prepare the new growing site before transplanting Russian sage. The soil for growing Russian sage must be loose to encourage water to drain. Mixing compost into the planting site also helps drainage, and provides evenly moist soil. At any frost-free time of year, loosen the soil in the new growing site to a depth of 12 to 15 inches using a garden fork. Spread a layer of compost 2 to 4 inches thick, and mix it into the soil with the garden fork.
Digging Up Russian Sage
Russian sage requires careful removal to minimize damage to its root system. Growing 3- to 5-feet tall and 2- to 4-feet wide, Russian sage can have an extensive root system, and some damage is unavoidable. Digging up the plant carefully is unlikely to cause serious harm. Push a garden fork into the ground about 1 foot from the Russian sage's central stem, and lever the end of the fork upward. Repeat this around the plant's base, slowly working the root ball out of the soil. Wear gloves when handling the plant, since the leaves may cause irritation or an allergic reaction. Lift the plant out, and put it down on the soil's surface. Break off excess soil in areas that contain no roots, to lighten the plant's weight.
Moving Russian Sage
Take the Russian sage to its new growing site immediately after digging it up to prevent its roots from drying out. Russian sage is drought-tolerant and low-maintenance and should suffer few problems from transplanting, but replanting it right away increases the chances of success. Dig a hole 2 1/2 feet wide and as deep as the depth of the Russian sage's root ball, which is usually about 1 foot. Place the plant in the hole so that it's level and sitting at its original growing depth. You may need to add or remove soil at the base of the hole. Fill in the gaps around the root ball with dug soil, and gently firm the plant in its hole.

After Care
Regular watering helps Russian sage quickly establish in its new site. Water the Russian sage using a garden hose fitted with a spray attachment. Spray water over the root area until it begins to puddle, but avoid washing away soil. Through the rest of the growing season water Russian sage when the soil is dry to a depth of 2 inches. Russian sage grows sturdy, dense and upright if it is pruned in spring. Sterilize pruning shear blades by wiping them with a cloth that was dipped in rubbing alcohol, and prune all Russian sage stems to 6-inches tall in spring before new growth appears. Sterilize the pruning shears again after pruning.
0
0
文章
Miss Chen
2018年08月31日

Blue flowers are hard to find in the garden -- most lean toward purple hues. However, Evolvulus glomeratus "Blue Daze" is aptly named: The low-growing, herbaceous perennial features true-blue flowers that stand out against the attractive, olive-green leaves. Perfect for borders or containers, "Blue Daze" blooms all summer long when cared for properly.

Climate and Temperatures
"Blue Daze" is a warmth-loving plant. It is hardy in U.S. Department of Agriculture plant hardiness zones 8 through 11. In cooler climates, it is often grown as an annual or in a container that is brought indoors for the winter. Situate this plant where it will stay nice and warm. In fact, if you have a hot spot in your garden where other plants wilt, replace those plants with this flower -- "Blue Daze" likes it hot. It can even tolerate salty conditions, so if you're near the coast, plant this flower in a hanging container and watch it withstand the salty air. Most outdoor plants die at the first hint of freezing temperatures, so bring container plants indoors well before cool fall temperatures arise. Some "Blue Daze" plants can tolerate a light frost if they are surrounded by a thick layer of mulch.
Light and Location
For "Blue Daze" to bloom properly, it needs full sunlight. Each flower opens for only one day, but it is replaced by a new flower the next day. If the day is cloudy or the plant is shaded, the flower won't open and its brief life is wasted. Locate these plants -- including those grown in containers -- where they will get as much hot, direct sunlight as possible. As far as soil goes, "Blue Daze" tolerates a range of soils, including poor or sandy soil, as long as it is well drained. If you bring a container indoors for the winter, locate it in bright but indirect sunlight and in a cool location.
Food and Water
Because "Blue Daze" is such a prolific bloomer, it benefits from monthly applications of fertilizer during the growing season. Use a bloom-boosting 15-30-15 formulation, water-soluble fertilizer once a month, following the instructions for application on the package. These instructions vary depending on the brand, but in general, dilute 1 tablespoon of the fertilizer in 1 gallon of water and use this solution to water your plants. Because "Blue Daze" thrives in full, hot sunlight, it needs frequent watering. Water when the surface of the soil feels dry to the touch and frequently enough so that the soil is almost continually but barely moist. In the winter, they need little watering.

Pests and Problems
"Blue Daze" is a hardy plant. It does not suffer from serious pest or disease problems. The one thing it cannot tolerate is soggy soil. Extended periods of rain cause fungal problems to develop in the soil, which quickly destroy the shallow roots of the plant. Overwatering leads to the same result, as does poorly drained soils. Plants grown in containers should have drainage holes in the base to prevent this problem, and home gardeners should avoid planting "Blue Daze" in depressions or other locations that tend to collect water.

Climate and Temperatures
"Blue Daze" is a warmth-loving plant. It is hardy in U.S. Department of Agriculture plant hardiness zones 8 through 11. In cooler climates, it is often grown as an annual or in a container that is brought indoors for the winter. Situate this plant where it will stay nice and warm. In fact, if you have a hot spot in your garden where other plants wilt, replace those plants with this flower -- "Blue Daze" likes it hot. It can even tolerate salty conditions, so if you're near the coast, plant this flower in a hanging container and watch it withstand the salty air. Most outdoor plants die at the first hint of freezing temperatures, so bring container plants indoors well before cool fall temperatures arise. Some "Blue Daze" plants can tolerate a light frost if they are surrounded by a thick layer of mulch.
Light and Location
For "Blue Daze" to bloom properly, it needs full sunlight. Each flower opens for only one day, but it is replaced by a new flower the next day. If the day is cloudy or the plant is shaded, the flower won't open and its brief life is wasted. Locate these plants -- including those grown in containers -- where they will get as much hot, direct sunlight as possible. As far as soil goes, "Blue Daze" tolerates a range of soils, including poor or sandy soil, as long as it is well drained. If you bring a container indoors for the winter, locate it in bright but indirect sunlight and in a cool location.
Food and Water
Because "Blue Daze" is such a prolific bloomer, it benefits from monthly applications of fertilizer during the growing season. Use a bloom-boosting 15-30-15 formulation, water-soluble fertilizer once a month, following the instructions for application on the package. These instructions vary depending on the brand, but in general, dilute 1 tablespoon of the fertilizer in 1 gallon of water and use this solution to water your plants. Because "Blue Daze" thrives in full, hot sunlight, it needs frequent watering. Water when the surface of the soil feels dry to the touch and frequently enough so that the soil is almost continually but barely moist. In the winter, they need little watering.

Pests and Problems
"Blue Daze" is a hardy plant. It does not suffer from serious pest or disease problems. The one thing it cannot tolerate is soggy soil. Extended periods of rain cause fungal problems to develop in the soil, which quickly destroy the shallow roots of the plant. Overwatering leads to the same result, as does poorly drained soils. Plants grown in containers should have drainage holes in the base to prevent this problem, and home gardeners should avoid planting "Blue Daze" in depressions or other locations that tend to collect water.
0
0


