文章
Dummer. ゛☀
2017年09月24日

Answers to frequently asked questions about starting seeds indoors
I’VE talked to so many gardeners who are experienced at growing plants outdoors but hesitate to start seeds indoors. To me, starting seeds is one of the most rewarding parts of gardening. It gets my hands in the soil (or at least the seed-starting mix) during the dark, cold days of late winter and early spring. And it's so amazing and rewarding to plant a seemingly lifeless seed and watch it sprout and grow. Here are answers to some of the hundreds of questions I've been asked about seed starting. When you see how easy it is, I hope you'll give it a try!
Why start seeds indoors?
Gardeners start their own seeds for all sorts of reasons. First of all, if you start your own seeds, you can plant hard-to-find varieties. You'll likely find fewer than a dozen varieties available as plants at your local garden center, but hundreds more are available as seeds.You can save money, too; a packet of seeds costs a few dollars and usually contains a dozen or more seeds — a single plant often costs more than an entire packet. Nurturing a little patch of green indoors is a great way to beat the winter blues, and I think it's particularly rewarding to grow a plant from seed to harvest.
What seeds are easiest to start indoors?
If you're new to seed starting, begin with easy, reliable seeds, including tomato, pepper, basil, zinnia, marigold, cosmos. These all germinate readily and grow quickly. Once you've mastered these, you can try your hand at more challenging plants.
When should I sow my seeds?
When you're starting seeds indoors, timing is everything. The goal is to grow seedlings that are the ideal size for transplanting into the garden at the proper time. Sowing dates depend on:
your average last spring frost date;
whether the plant prefers cool or warm growing conditions;
how quickly the seed germinates and grows.
Most seed packets suggest a planting time, such as "sow seeds indoors six weeks before your average last frost date." To calculate your planting date, start by determining your average last spring frost date, mark it on a calendar, and count back in one-week increments. Learn more: When to Start Your Seeds
How do I know my last frost date in spring?
The easiest way to find out is to ask a neighbor who's an experienced gardener. You can also contact a local Master Gardener program (part of your state's Cooperative Extension) or ask staff at your local garden center. The date of the actual last spring frost varies from year to year so the "average last spring frost date" is just an approximation, but it gives you a starting point.
Can I grow on a windowsill or do I need special grow lights?
Although it's possible to grow seedlings on a sunny windowsill, you'll get much better results if you grow them under lights. That's because the sunlight in early spring isn't nearly as intense as summer sun, and the days are shorter, too. Seedlings growing on a windowsill will reach for the sun, resulting in long, weak stems that bend toward the light. Plants grown under the consistent, bright fluorescent lights of a light garden, on the other hand, will have strong, stocky stems that will adapt better once they're transplanted into the garden. Learn more: Gardening Under Lights
Can I use garden soil to start seeds?
Garden soil tends to drain poorly, especially when it's used in small seed-starting trays. It can also harbor disease organisms that can damage or kill young seedlings. You'll get the best results by starting seeds in a lightweight mix formulated specially for seed starting, such as Germinating Mix. These mixes drain freely yet retain enough water for seedling roots, and they're free of fungi and other disease-causing organisms. Learn more: Choosing the Right Soil for Seed Starting.
What type of pot should I use?
While you can start seeds in any container that has drainage holes, specially designed seed-starting pots and trays provide optimal conditions. They let you start lots of seeds in a small space, and they drain freely to prevent rot. Some people prefer biodegradable pots, such as Cowpots; others prefer reusable trays. Self-watering, all-in-one seed-starting systems are convenient and foolproof. Learn more: How to Select the Right Seed Starting System
How deep do I plant the seeds?
Most seed packets tell you how deep to plant. A rule of thumb is to sow seeds two or three times as deep as they are wide. Take care not to plant seeds too deep. A seed contains a limited supply of stored food to nourish it during germination. If you plant it too deep, it will run out of food before it reaches the light and grows big enough to start producing its own. Some seeds require light to germinate; the seed packet should say this. Sow these seeds on the surface of the planting mix.
Which is better, watering from the top or from the bottom?
Bottom watering is usually preferable because it keeps the soil surface dryer, helping prevent disease problems. For small seeds or surface-sown seeds, top misting keeps the surface moist for better germination. Self-watering seed-starting systems, such as our GrowEase Seed Starter Kit, use a wicking fabric to supply water from the bottom, providing a steady supply of just the right amount of water to plant roots. You just fill the reservoir and don't need to worry about over- or under-watering.
When do I remove the greenhouse cover on my seed starter?
The greenhouse cover holds in moisture, raising the humidity for fast germination. As soon as you see the first tiny sprout, remove the cover. This allows air to circulate around seedlings, minimizing disease problems.

How close should the grow lights be to the seedlings?
Keep the lights a few inches from the tops of the seedlings to promote strong, stocky growth. Our light gardens have adjustable lights that are easy to raise as the seedlings grow.
Do I leave the lights on all the time?
Most seedlings grow best when lights are kept on for about 14 to 16 hours per day. They need a period of darkness (as they would in nature) to rest and prepare for active growth when the lights are back on. An automatic timer makes this easy.
Do I need to thin my seedlings?
A few weeks after seeds start growing, they may start crowding each other. When that happens, it will be time to thin the seedlings. This is the hardest part of seed starting for most gardeners. Choose the strongest seedling and removing the others nearby. This gives the remaining seedling room to grow. Although you can try to separate seedlings and replant, invariably you'll damage some roots, setting back growth. The best way to thin is to snip off extra seedlings at the soil line.
When should I start fertilizing my seedlings?
The first set of leaf-like structures aren't leaves at all, but are the seed's food storage structures, called cotyledons. The second and subsequent sets are true leaves, and they resemble the mature plant's leaves. Begin fertilizing seedlings when they're an inch or two tall, or when they have their second set of true leaves.
How do I know when it's time to transplant into larger pots?
Tomatoes and other fast-growing plants may outgrow their pots before it's time to move them into the garden. About a month after sowing or when seedlings are about 4" tall, gently remove one of the seedlings from its pot. If the roots are beginning to fill the space, then it's time to transplant them into a larger pot. Avoid waiting too long, because root crowding can stunt plant growth and make it difficult for plants to recover after transplanting.
What is "hardening off" and how do I do it?
Hardening off is simply acclimating plants to outdoor conditions. Seedlings grown indoors have been coddled — you've been giving them just the right amount of light, moisture and nutrients. Outdoor conditions are more challenging, with fluctuating temperatures and light levels, more variable soil moisture, and wind. About a week before you plan to set the seedlings into the garden, start hardening them off. Place them in a protected spot outdoors (partly shaded, out of the wind) for a few hours, bringing them in at night. Gradually, over the course of a week or 10 days, expose them to more and more sunshine and wind. A cold frame is a great place to harden off plants.

What Went Wrong?
EVEN the most experienced seed starters occasionally have problems. Here are some symptoms, and possible causes.
Poor germination. Although most common vegetables and annual flowers germinate readily, some types of plants have notoriously poor germination rates. Often, this is indicated on the seed packet (with the suggestion to sow extra seed). First of all, be sure you've given plants enough time to germinate. At sowing time, mark the pots with the type of plant, date of sowing, and days to germination (found on the seed packet). Some seeds take two weeks or more to sprout. Poor germination can be caused by overly wet or cold soil, which causes seeds to rot. (The latter can be remedied with a Heat Mat.) If the soil was too dry, the seeds may not have been able to absorb enough moisture to sprout. And if the soil dried out even once after they began growing, the fragile new roots may have died before the shoot even emerged above the soil. Poor germination can also be caused by out-dated seed, and seed that hasn't been properly stored.
Damping off. If, after a few days, some of your seedlings keel over, as though a tiny lumberjack felled them at the soil line, then you're probably seeing the effects of damping off. This is caused by soil-borne fungi attacking the stem. There's no cure, and the seeds won't resprout. Start over with clean containers and sterile seed-starting mix. Allow the soil surface to dry out slightly between waterings, and place a fan in the room for good air circulation. To disinfect used containers, sterilize them in a 10 percent bleach solution (1 part bleach to 9 parts water.) To learn more, read the article Damping Off
Mold and algae growth. If you see fuzzy white growth or slimy green patches on the surface of the planting mix, or on the outside of biodegradable pots, it's probably mold or algae. Although generally harmless to the seedling, they both indicate that the seed-starting mix is too wet. Allow it to dry out slightly between waterings and use a small fan in the room to increase air circulation.
Pale, stretched-out seedlings with weak stems. "Leggy" seedlings are often the result of inadequate light, both in intensity and duration. Place plants under grow lights, arranging them so the lights are a few inches above the tops of the plants, and keep the lights on for about 14 to 16 hours per day. Leggy plants can also result from too-warm room temperatures and overcrowding. Inadequate fertilizing can lead to pale, weak-stemmed plants.
Discolored leaves. If seedling foliage is pale green, yellowish green, or has a purple cast to it, the plants may need a nutrient boost. Begin fertilizing seedlings when they're an inch or two tall, or when they have their second set of true leaves. Use a water-soluble fertilizer that's diluted to half-strength, applying weekly for the first few weeks. After that, you can go up to full strength applied weekly. (Be sure to follow the label directions for dilution rates.)
I’VE talked to so many gardeners who are experienced at growing plants outdoors but hesitate to start seeds indoors. To me, starting seeds is one of the most rewarding parts of gardening. It gets my hands in the soil (or at least the seed-starting mix) during the dark, cold days of late winter and early spring. And it's so amazing and rewarding to plant a seemingly lifeless seed and watch it sprout and grow. Here are answers to some of the hundreds of questions I've been asked about seed starting. When you see how easy it is, I hope you'll give it a try!
Why start seeds indoors?
Gardeners start their own seeds for all sorts of reasons. First of all, if you start your own seeds, you can plant hard-to-find varieties. You'll likely find fewer than a dozen varieties available as plants at your local garden center, but hundreds more are available as seeds.You can save money, too; a packet of seeds costs a few dollars and usually contains a dozen or more seeds — a single plant often costs more than an entire packet. Nurturing a little patch of green indoors is a great way to beat the winter blues, and I think it's particularly rewarding to grow a plant from seed to harvest.
What seeds are easiest to start indoors?
If you're new to seed starting, begin with easy, reliable seeds, including tomato, pepper, basil, zinnia, marigold, cosmos. These all germinate readily and grow quickly. Once you've mastered these, you can try your hand at more challenging plants.
When should I sow my seeds?
When you're starting seeds indoors, timing is everything. The goal is to grow seedlings that are the ideal size for transplanting into the garden at the proper time. Sowing dates depend on:
your average last spring frost date;
whether the plant prefers cool or warm growing conditions;
how quickly the seed germinates and grows.
Most seed packets suggest a planting time, such as "sow seeds indoors six weeks before your average last frost date." To calculate your planting date, start by determining your average last spring frost date, mark it on a calendar, and count back in one-week increments. Learn more: When to Start Your Seeds
How do I know my last frost date in spring?
The easiest way to find out is to ask a neighbor who's an experienced gardener. You can also contact a local Master Gardener program (part of your state's Cooperative Extension) or ask staff at your local garden center. The date of the actual last spring frost varies from year to year so the "average last spring frost date" is just an approximation, but it gives you a starting point.
Can I grow on a windowsill or do I need special grow lights?
Although it's possible to grow seedlings on a sunny windowsill, you'll get much better results if you grow them under lights. That's because the sunlight in early spring isn't nearly as intense as summer sun, and the days are shorter, too. Seedlings growing on a windowsill will reach for the sun, resulting in long, weak stems that bend toward the light. Plants grown under the consistent, bright fluorescent lights of a light garden, on the other hand, will have strong, stocky stems that will adapt better once they're transplanted into the garden. Learn more: Gardening Under Lights
Can I use garden soil to start seeds?
Garden soil tends to drain poorly, especially when it's used in small seed-starting trays. It can also harbor disease organisms that can damage or kill young seedlings. You'll get the best results by starting seeds in a lightweight mix formulated specially for seed starting, such as Germinating Mix. These mixes drain freely yet retain enough water for seedling roots, and they're free of fungi and other disease-causing organisms. Learn more: Choosing the Right Soil for Seed Starting.
What type of pot should I use?
While you can start seeds in any container that has drainage holes, specially designed seed-starting pots and trays provide optimal conditions. They let you start lots of seeds in a small space, and they drain freely to prevent rot. Some people prefer biodegradable pots, such as Cowpots; others prefer reusable trays. Self-watering, all-in-one seed-starting systems are convenient and foolproof. Learn more: How to Select the Right Seed Starting System
How deep do I plant the seeds?
Most seed packets tell you how deep to plant. A rule of thumb is to sow seeds two or three times as deep as they are wide. Take care not to plant seeds too deep. A seed contains a limited supply of stored food to nourish it during germination. If you plant it too deep, it will run out of food before it reaches the light and grows big enough to start producing its own. Some seeds require light to germinate; the seed packet should say this. Sow these seeds on the surface of the planting mix.
Which is better, watering from the top or from the bottom?
Bottom watering is usually preferable because it keeps the soil surface dryer, helping prevent disease problems. For small seeds or surface-sown seeds, top misting keeps the surface moist for better germination. Self-watering seed-starting systems, such as our GrowEase Seed Starter Kit, use a wicking fabric to supply water from the bottom, providing a steady supply of just the right amount of water to plant roots. You just fill the reservoir and don't need to worry about over- or under-watering.
When do I remove the greenhouse cover on my seed starter?
The greenhouse cover holds in moisture, raising the humidity for fast germination. As soon as you see the first tiny sprout, remove the cover. This allows air to circulate around seedlings, minimizing disease problems.
How close should the grow lights be to the seedlings?
Keep the lights a few inches from the tops of the seedlings to promote strong, stocky growth. Our light gardens have adjustable lights that are easy to raise as the seedlings grow.
Do I leave the lights on all the time?
Most seedlings grow best when lights are kept on for about 14 to 16 hours per day. They need a period of darkness (as they would in nature) to rest and prepare for active growth when the lights are back on. An automatic timer makes this easy.
Do I need to thin my seedlings?
A few weeks after seeds start growing, they may start crowding each other. When that happens, it will be time to thin the seedlings. This is the hardest part of seed starting for most gardeners. Choose the strongest seedling and removing the others nearby. This gives the remaining seedling room to grow. Although you can try to separate seedlings and replant, invariably you'll damage some roots, setting back growth. The best way to thin is to snip off extra seedlings at the soil line.
When should I start fertilizing my seedlings?
The first set of leaf-like structures aren't leaves at all, but are the seed's food storage structures, called cotyledons. The second and subsequent sets are true leaves, and they resemble the mature plant's leaves. Begin fertilizing seedlings when they're an inch or two tall, or when they have their second set of true leaves.
How do I know when it's time to transplant into larger pots?
Tomatoes and other fast-growing plants may outgrow their pots before it's time to move them into the garden. About a month after sowing or when seedlings are about 4" tall, gently remove one of the seedlings from its pot. If the roots are beginning to fill the space, then it's time to transplant them into a larger pot. Avoid waiting too long, because root crowding can stunt plant growth and make it difficult for plants to recover after transplanting.
What is "hardening off" and how do I do it?
Hardening off is simply acclimating plants to outdoor conditions. Seedlings grown indoors have been coddled — you've been giving them just the right amount of light, moisture and nutrients. Outdoor conditions are more challenging, with fluctuating temperatures and light levels, more variable soil moisture, and wind. About a week before you plan to set the seedlings into the garden, start hardening them off. Place them in a protected spot outdoors (partly shaded, out of the wind) for a few hours, bringing them in at night. Gradually, over the course of a week or 10 days, expose them to more and more sunshine and wind. A cold frame is a great place to harden off plants.
What Went Wrong?
EVEN the most experienced seed starters occasionally have problems. Here are some symptoms, and possible causes.
Poor germination. Although most common vegetables and annual flowers germinate readily, some types of plants have notoriously poor germination rates. Often, this is indicated on the seed packet (with the suggestion to sow extra seed). First of all, be sure you've given plants enough time to germinate. At sowing time, mark the pots with the type of plant, date of sowing, and days to germination (found on the seed packet). Some seeds take two weeks or more to sprout. Poor germination can be caused by overly wet or cold soil, which causes seeds to rot. (The latter can be remedied with a Heat Mat.) If the soil was too dry, the seeds may not have been able to absorb enough moisture to sprout. And if the soil dried out even once after they began growing, the fragile new roots may have died before the shoot even emerged above the soil. Poor germination can also be caused by out-dated seed, and seed that hasn't been properly stored.
Damping off. If, after a few days, some of your seedlings keel over, as though a tiny lumberjack felled them at the soil line, then you're probably seeing the effects of damping off. This is caused by soil-borne fungi attacking the stem. There's no cure, and the seeds won't resprout. Start over with clean containers and sterile seed-starting mix. Allow the soil surface to dry out slightly between waterings, and place a fan in the room for good air circulation. To disinfect used containers, sterilize them in a 10 percent bleach solution (1 part bleach to 9 parts water.) To learn more, read the article Damping Off
Mold and algae growth. If you see fuzzy white growth or slimy green patches on the surface of the planting mix, or on the outside of biodegradable pots, it's probably mold or algae. Although generally harmless to the seedling, they both indicate that the seed-starting mix is too wet. Allow it to dry out slightly between waterings and use a small fan in the room to increase air circulation.
Pale, stretched-out seedlings with weak stems. "Leggy" seedlings are often the result of inadequate light, both in intensity and duration. Place plants under grow lights, arranging them so the lights are a few inches above the tops of the plants, and keep the lights on for about 14 to 16 hours per day. Leggy plants can also result from too-warm room temperatures and overcrowding. Inadequate fertilizing can lead to pale, weak-stemmed plants.
Discolored leaves. If seedling foliage is pale green, yellowish green, or has a purple cast to it, the plants may need a nutrient boost. Begin fertilizing seedlings when they're an inch or two tall, or when they have their second set of true leaves. Use a water-soluble fertilizer that's diluted to half-strength, applying weekly for the first few weeks. After that, you can go up to full strength applied weekly. (Be sure to follow the label directions for dilution rates.)
0
0
文章
Dummer. ゛☀
2017年09月23日
Savvy gardeners are always on the watch for important plant infections in their gardens. One area that many neglect, however, are parasitic plants. If a plant is growing on or near another, it’s generally assumed they’re simply compatible, and not that one is drawing vital nutrients from the other. Learn more about holoparasitic plants in this article so you can better distinguish plant friend from foe.
What are Holoparasitic Plants?
Spending time in the garden means getting better acquainted with some of the more lowly denizens contained therein. You learn which plants are weeds, which ones are useful groundcover and, if you’re lucky, which ones are holoparasitic plants. With anything in life, the plant kingdom contains a small segment (about 4,400 species) of flowering plants that don’t produce any or all of their own food. This holoparasitic information will help you better recognize them when wandering the garden path.
Holoparasitic plants in the garden may be some of the least obvious occupants, but they can have a big impact. These plants are wholly dependent on host plants to survive, tapping into their xylem and phloem, gaining access to water, minerals and other organic products. Holoparasitic plants don’t photosynthesize, but they do flower and often feature leaves that have reduced to scales and succulent stems. Parasitic plants like these attach to their host using a specialized structure called the haustorium, which is always a vital structure in holoparasites.
Holoparasitic plants in gardens can either act strictly as parasites, stealing nutrients and giving nothing in return, but also not seriously injuring their hosts, or they can behave as pathogens. Plant family Hydnoraceae, for example, often coexist with their plant hosts. Other holoparasites, like dodder, will attach to and kill a wide range of host plants – in this way behaving both as a parasite and a pathogen. These two types of holoparasitic plants tend create a pretty simplistic picture, since, in reality, some strictly parasitic plants can accidentally kill their hosts, and some pathogenic plants can be resisted by genetically strong hosts.
Other types of holoparasitic plants include:
Toothwort
Broomrape
Beechdrop
Squawroot
Holoparasitic Plants vs. Carnivorous Plants
Although it might seem like holoparasitic plants and carnivorous plants have a great deal in common, they’re really very different creatures. Where holoparasitic plants attach themselves to other plants, often without even bothering to produce roots or leaves, carnivorous plants both root in their environments and produce small and often waxy leaves for photosynthesis.
Holoparasites produce none of their own food. Carnivorous plants, on the other hand, produce all of their own food, but live in nutrient-poor environments and, as such, must get some of their most vital building blocks by dissolving animals that have been lured and captured using a various traps.
In a way, holoparasitic plants and carnivorous plants are complete opposites. They both thrive in areas where many plants would struggle, but how they do it is entirely different. Holoparasites work only hard enough to find a host; carnivorous plants work every day to bait and trap unsuspecting insects and small animals.
0
0
文章
Dummer. ゛☀
2017年09月23日
The Prickly Pear Cactus (Opuntia sp.) thrives in hot, dry desert areas, growing 3 to 20 feet (0.9 to 6 m) tall, depending on the variety and growing conditions. It spreads to cover 3 to 15 feet (0.9 to 4.5 m). The leaves and fruit are edible once the spines are removed. Leaf pads are eaten as a vegetable. Fruit are eaten raw and used to make juice, jelly and candy.
Prickly Pear Cactus is hardy in U.S. Department of Agriculture hardiness zones 3b through 11. Once established, Prickly Pear Cactus are easy to care for and tolerate drought for two or three weeks.
Fill small pots or a seed tray with cactus soil. Break up any lumps in soil. Water the soil thoroughly and allow to drain.
Sow the seeds in the late spring when night temperatures consistently reach above 45 degrees Fahrenheit (7 degrees Celsius). Rub the Prickly Pear Cactus seeds against a piece of sandpaper to scratch the seed coat. Scratched seeds germinate faster and more reliably than untreated seeds.
Plant one seed per pot or plant seeds 1 inch (2.5 cm) apart in seed trays. Press the seed into the soil and cover with a fine layer of soil, barely 1/8 inch (3 mm) thick.
Mist the soil surface with a fine spray of water. Cover the tray with the plastic lid or put individual pots in plastic bags. Cut a small hole in the plastic to create a vent.
Place the pots or tray in a sunny window or under artificial lights. Check the soil daily for moisture and temperature. Ideal soil and air temperatures for prickly pear cactus is 70 degrees Fahrenheit (21 degrees Celsius). If heat builds up under the plastic, move the container or open the vent further to release excess heat. Water the soil as needed with a fine mist, keeping the soil moist but not wet.
Inspect the seedlings daily. Cactus that turn yellow need more light. Brown or red cactus are receiving too much light.
Transplant the seedlings into larger pots or outside once the roots are well-developed. Place the transplants in full sun spaced 24 to 36 inches (60 to 90 cm) apart. Keep the soil moist for the first two weeks or until the plant has adjusted to its new location. Increase the time between watering once the cactus are established, allowing the soil to dry out slightly.
Fertilize with a balanced fertilizer such as 10-10-10 to encourage pad growth. If you prefer to encourage flowers and fruit, use a low-nitrogen fertilizer such as 0-10-10.
Tips
Harvest Prickly Pear Cactus seeds from the ripe fruit of a Prickly Pear Cactus. Wash the seeds to remove all pulp, and dry them on a paper towel in a warm place for a week or two until completely dry. Store seeds in an air-tight container in a cool, dark place until ready to plant the following spring.
Warning
Prickly Pear Cactus earn their name. Wear gloves and handle the plants carefully, the spines are sharp and cause painful irritation.
0
0
文章
Dummer. ゛☀
2017年09月23日
Cacti growing in the wild with paddles and branches tend to drop them to the ground where they root in the rainy season. This is a form of vegetative self-propagation. Even a smashed cactus will attempt to grow roots from the pieces that make contact with the ground. Prickly Pear Cactus (Opuntia compressa), which grows in U.S. Department of Agriculture plant hardiness zones 4 through 9, forms colonies with its paddle-like branches through self-propagation. It is possible to regrow a cactus from an arm if taken from a healthy cactus.
Timing
While you can root a cactus branch any time of year, rooting while the cactus is actively growing gives the best chance of success. Try rooting the arm in late spring or summer while nighttime temperatures stay above 60 degrees Fahrenheit (16 degrees Celsius). When temperatures fall below 60 F (16 C), the development of roots slows and the arm dries out before rooting. Branches taken from dormant cacti have the worst chance of rooting.
Drying
Once the arm is cut or falls off the cactus, let it dry at room temperature in a shady area for two to seven days. The cut end needs to callus over. This hardening of the wound prevents rotting. It also stops plant diseases from entering through the wound and infecting the cactus arm.
Rooting Mixture
The soil for rooting cactus needs to drain quickly, but hold some moisture near the forming roots. The most common mixture is half organic and half inorganic materials. Peat moss holds moisture and provides slow-release nutrients for the developing roots. Use coarse-textured sand, which does not compact down like fine-textured sand. The sand improves the drainage properties of the rooting mixture.
Potting
Handle the cactus piece with care so it does not stab your fingers. Use heave-duty gloves, tongs or a folded newspaper wrapped around the prickly piece when moving it. Avoid touching the piece with your hands if it is spiny. Press the cut end of the cactus into the soil mixture. If the branch is large, bury the bottom part of the cactus until the soil supports the branch.
Rooting
Most cacti will form roots in four to six weeks during the growing season. Keep the soil damp by misting the soil, but do not over-water the rooting branch. Water deeply, but do not let the container sit in water, which will lead to rot. Once the roots are established, then the plant pot will lift up when the arm is gently picked up. Let the soil dry between watering sessions once the roots develop.
0
0
文章
Dummer. ゛☀
2017年09月23日
Succulents are a favorite group of plants for many indoor gardeners. Succulents and cacti are part of the same group of plants. They have the advantage of growing slowly, requiring minimum care and not outgrowing their locations rapidly. They are simple plants; they require direct sun, well-draining soil and rarely, if ever, need to be fertilized. Sandy soils are best. It is possible to purchase cactus mixes that are sandy with a bit of gravel. A great deal of organic matter is not necessary. Watering is done occasionally. When you think of the origin of these plants, a hot, dry climate with lean soils and not a great deal of rainfall give you the framework of what they expect.
Succulents can be propagated in several ways. It is unusual for them to bloom and then produce viable seeds. The usual way is called vegetative propagation. It is essentially creating a clone from the original plant.
Division or Separation
Many succulents multiply themselves through division, but some cacti will have small plants appear along the ribs or leaf edges of the plant. When the plantlets are big enough to handle easily, they can be removed.
With division of other succulents, little plants come up surrounding the parent plant when it is mature. Eventually, more little plants come up and surround the larger surrounding plants and the container is filled. The plant and soil can be taken from the pot and the small plants gently removed. Water the plant well before taking it out of the container so more soil will adhere to the roots. There needs to be roots on the small plants for them to grow. If they are without roots, it may take a long time for roots to form. Pot the little ones in containers. If the little plants are without roots or they broke off, see the information below on callusing.
Cuttings and Callusing
A few succulents can be propagated by taking cuttings off the original plant. Sometimes it is because the plant has been damaged or a misplaced elbow and an unceremonious freefall to the floor. Unfortunately, the broken part will not repair and grow again, but the broken segment can be used to generate another plant. The important part is that the broken piece cannot be potted up immediately. It needs a period of time to dry or “callus.”
If the freshly cut piece comes in contact with damp soil, it will rot. Let the cuttings sit for a few days or longer for big pieces. After a period of time, the damp, broken area forms a tough skin or callus over the tissue. The callused plant part can be placed in slightly damp soil. Embed the piece very shallowly. If it is placed too deeply, it will not grow. It may be necessary to support the small plant by having it lean on a craft stick or tongue depressor or against the side of the container. It often takes many months for succulents to form roots. Do not place small plants on a cold window sill or close to a cold window because it will take even longer to grow roots. If a full grown leaf or branch is broken off a succulent like Haworthia or Euphorbia after callusing, it could grow roots. However, if the leaf is broken off Aloe vera, it will not.
There are enough differences in the world of succulents that one size or one rule does not fit all. Smart Gardeners are discovering this continually when learning about plants. Invite a succulent home. They make mannerly and attractive houseguests.
1
3
文章
Dummer. ゛☀
2017年09月23日
Growing cacti and succulents from seed is relatively straightforward, and can produce a diverse collection of plants in only a few years. There are more than 2,000 species of cacti and succulents suitable as tabletop potted plants or tall floor plants. Cactus and succulent seeds are generally available from commercial seed companies.
1. Clean propagation pans by washing them with disinfectant. Pans should be small and shallow, no more than 4 inches (10 cm) deep and 6 inches (15 cm) in diameter. There are many different suggested growing media formulas to experiment with. One formula calls for mixing a coarsely sifted organic growing medium, such as commercial potting soil, with an equal volume of sharp sand, perlite or pumice for drainage.
2. Pasteurize your growing medium by baking it in an oven at 300 degrees Fahrenheit (150 degrees Celsius) for 30 minutes. Allow it to cool and wet it thoroughly. Let it drain but not dry out. Fill the propagation pans with the moist soil mixture to about 0.5 inch (1.2 cm) below the rim.
3. Sow seeds in the pans around the end of April. Plant seeds as deep into the soil as the seeds are wide and press down lightly. Cover small seeds with a sprinkling of sand to hold them in place. Seed spacing will depend on the species of cactus or succulent you are germinating. Cover the pans with clear plastic or glass. Place them in a bright location but out of direct sun. Keep temperature around 70 degrees Fahrenheit (21 degrees Celsius). If soil seems too dry, spray lightly with water. Be sparing. Too much water can drown the seed. Don’t let soil dry out.
4. Watch for germination. Most cacti and succulents will germinate within three weeks but some species require more time — up to a year. When seedling plants appear, raise the cover during the day for ventilation. Watch soil moisture. Don’t allow soil to dry out but also don’t saturate it. Keep temperature between 50 and 70 degrees Fahrenheit (10 and 21 degrees Celsius).
5. Transplant your plants into their permanent pots. Most cacti and succulents will be ready to transplant in 6 months to a year after germination. The right growth size for transplanting will depend on the species you are growing. Most cacti can be transplanted when they are the size of a large marble. Many other succulents may be transplanted when they are 2 to 4 inches (5 to 10 cm) tall. Gently lift the plants from the growing medium, set into the soil of the new container, firm the soil around the roots and water well.
1
1
文章
Dummer. ゛☀
2017年09月23日
Growing plants from seed is not as hard as you might think – even though many of us have tried and failed! One of the most common mistakes people make is planting the seeds too deeply. You should only plant a seed as deep in the soil as the seed is wide. When seeds are planted too deeply the tiny plants emerge and begin to grow but do not reach the surface before they run out of stored food. Follow these instructions for growing cacti from seed and you will surely be successful.
Seed
It is best to use fresh seed when growing most cacti. Seed can be obtained from a commercial source or collected from a plant in your collection. Take care when collecting seed from a cactus collection. Some cactus species hybridize freely and true seed cannot be assured unless pollination has been monitored carefully.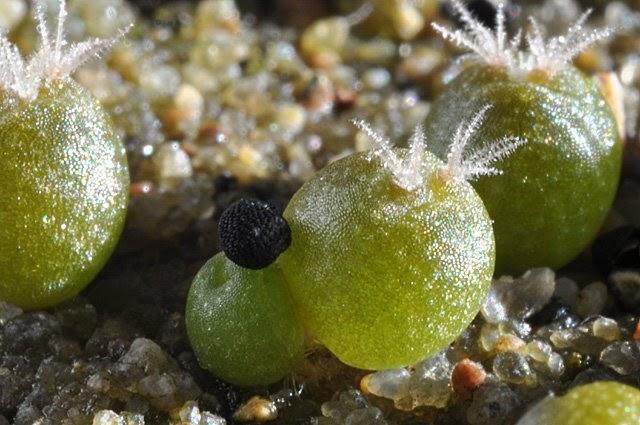
Soil
A good potting mix, amended with ½ its volume of granite, perlite or pumice for drainage, makes a good mix for growing cacti from seed. It is important that the soil be as pest-free as possible. To pasteurize soil, put it in a shallow heatproof pan, place it in the oven at 300°F (150°C) for 30 minutes. Most commercial soils are at least pasteurized, if not sterilized. Check the label.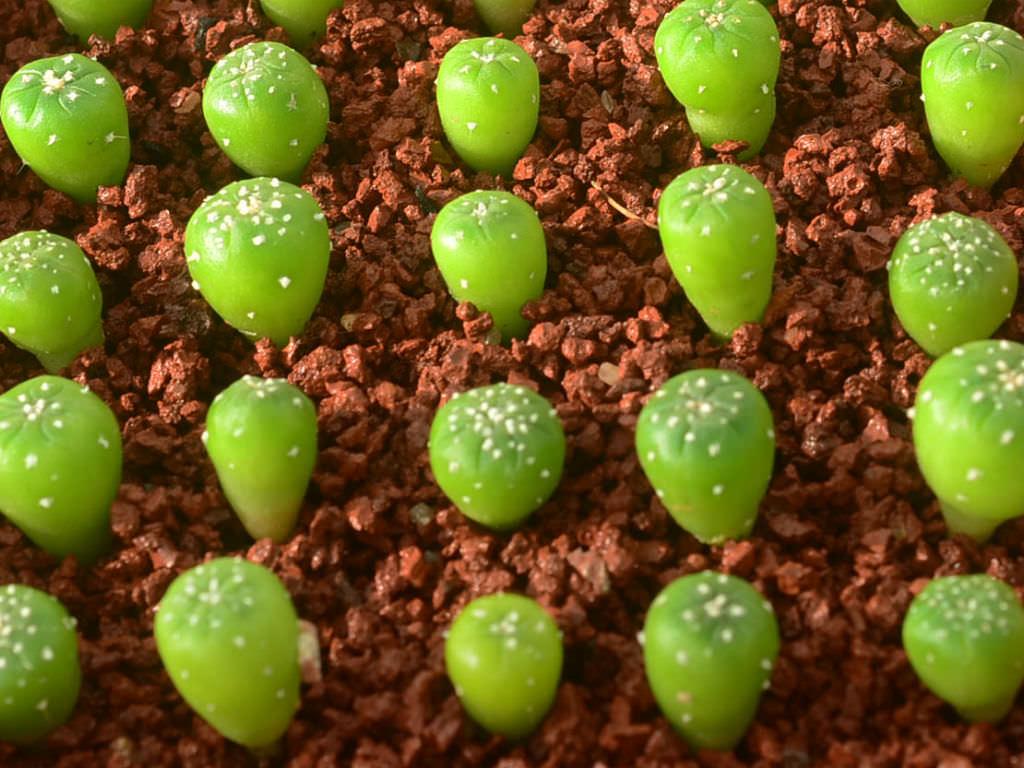
Planting
Be sure that all containers to be used are clean. The type of container is not important, but shallow ones are preferred. Water the soil thoroughly and let it drain completely before planting. Spread the seed evenly over the top of the soil. Cover the seed lightly with the mix or very fine sand. When planted, cover the container with any transparent lid. This will retain moisture and allow light to reach the seedlings.
Germination
Cactus seeds need both light and warmth to germinate. A sunny window is a good location, but be careful the light is not too strong and therefore too hot. The moisture retained by the cover should be sufficient to germinate the seed. Most cactus seeds germinate within 3 weeks, but some take much longer – be patient. Once the spines are showing, raise the cover for ventilation during the day. Do not allow the soil to dry out. The amount of water will depend on how much light and heat the seedlings receive. Watch the seedlings carefully. Do not swamp them in puddled water but do not let them dry out completely.
Repotting
Seedlings are ready to transplant into larger containers when they are the size of marbles between 6 months to a year after germination. Be sure the soil mix is very well drained, and the container is no larger than twice the diameter of the plant. At this size, plants can be grown in clumps or groups of 6-8 per pot until they are about 1 inch (2.5 cm) across, then separated and individually repotted. Lift the small plants carefully from the growing mix, place in the new container, firm the soil around the roots, and water in.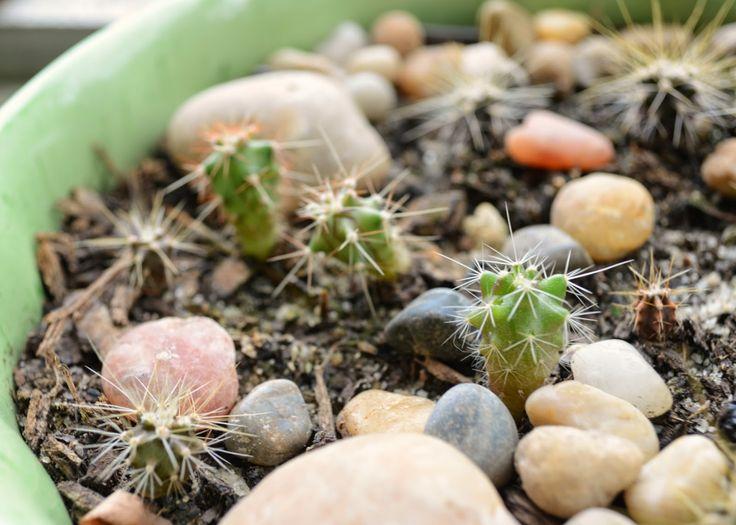
It is usually best to let the young plants recover from transplanting in a shaded area. Even in cacti that naturally grow with full sun, seedlings will be tender to full sun until they are older. Acclimate a young plant to the sun gradually beginning when it is about 1 inch (2.5 cm) across. It is often easier to acclimate young plants to the sun in the winter, and provide some shade in the summer until they are about 3 inches (7.5 cm) across.
Fertilization
Fertilize young seedlings monthly in the growing season, usually the warm season. Use a formulation specifically for cactus, or an all purpose soluble houseplant formula at ½ the recommended strength.
0
0
文章
Dummer. ゛☀
2017年09月23日
Succulent plants are as lovely as they are easy to grow. The best part is that its leaves and stem provide an endless number of identical plants through simple propagation. Growing succulents from clippings is both fun and rewarding. They grow quickly and with minimal effort, and the resulting plants make great gifts and lively home decor. A well-clipped leaf or stem is practically all a gardener needs to grow an entirely new succulent with success.
Propagating from a Leaf Clipping
It is easy to remove a succulent leaf from a healthy plant without disrupting its appearance or hindering its growth. Also, when a succulent has grown “leggy,” with a long stem that some growers dislike, they can separate each of the plant’s many leaves and grow them into new plants.
Prepare the Soil
Prepare a new pot or tray of cactus or succulent soil. Cactus or succulent soil must provide good drainage. A mixture of equal parts cactus potting soil and perlite works well. It need not be more than a couple inches deep for the beginning stage. An aluminum baking pan works well for propagating several new plants at once.
Clip or Pluck a Leaf
Gardeners can pluck succulent leaves from an existing plant by hand or cut them with a metal tool. A sharp knife, razor blade, or pruning shears work well. It is important to sterilize a metal tool first to prevent infection in the plant or leaf. Cut as close to the stem as possible, and take care not to bruise the leaf or stem. To pluck by hand, rock the leaf gently from side to side until it comes loose. Some leaves loosen very easily, which makes hand-plucking a popular method.
Let the Leaves Dry
Lay the fresh leaf cuttings down flat on the surface of the soil mix, and place the container in bright, indirect sunlight. Let the leaves dry out for a few days before adding any water. This is an important step because watering them immediately can easily cause them to rot. It also allows time for the “wound” from cutting to callous over, preventing disease from sinking in.
Let Roots Develop
Once they have sufficiently dried and calloused, some people start moistening the soil regularly, while others give the leaves more time to grow on their own. In humid environments, the leaves may not require any water at all. In a dry climate or a house with dry air conditioning, it is a good idea to water sparingly but consistently. An effective method is to add a sprinkle of water to the pot whenever the soil has completely dried out. After anywhere from a few weeks to a month, tiny roots, and possibly the leaves of a new baby plant, emerge from the cut end of the leaves.
Help the Roots Find the Soil
Sometimes the roots grow down into the soil on their own, and sometimes they grow into the air and need a little help. In the latter situation, form a small divot in the soil, and gently cover the roots with a tiny layer of soil. Use a spray bottle to add a light spritz of water about once a week from this point.
Separate and Enjoy
Within about a month or so, gardeners should see new growth on the planted cutting. At this point, it is safe to place each in its own pot or mix them into an arrangement for a garden setting. Once a succulent reaches maturity, it only needs watering once every few weeks.
Propagating from a Stem
When a succulent plant gets leggy from lack of light, an easy method for salvaging the plant is to “behead” it and propagate new plants both from the head and the stem. This process is identical to propagating from leaf cuttings.
Cut the rosette off the top with a sterile instrument, and let the cutting dry and callous. Water sparingly until roots emerge, and then simply let nature take its course. The remaining stem should grow new plantlets on its own. Growers can then cut and propagate these as well.
0
1


文章
Dummer. ゛☀
2017年09月23日
Leaf cuttings are easier than they look, and it is very satisfying to see the young plants growing from the old leaf.
There are a number of succulents that can be propagated easily this way: Gasteria, Haworthia, Sansevieria and plants of the Crassulaceae family (Crassula, Kalanchoe, Sedum, Graptopetalum).
The easy way is just to get a leaf. Let the cut dry out in the shade for a day to a week, and just place them on top of the soil. Do not bury or semi-bury into the soil. The roots will find their way into the soil on their own. The soil should be well drained. If you need to improvise good growing soil, mix half well-rotted compost with half fine pumice or grit. You can expect to see a change in the leaf after 3-4 weeks and the young plants will take a season to develop into new plants.
The leaves need water at some point but only a light sprinkling. While “grown-up” succulents only need to be watered every week, or even once a month (depending on the season/heat), the leaves need to be watered constantly without being watered too much. Only water the soil after it is dry.
The temperature is an important factor. Succulents of the Crassulaceae family will root better in the fall, and in late winter/early spring. They will generally not root in the summer, but rather slowly dry out, or rot. The rule of thumb is that the leaf cuttings has chances to grow only if the parent plant is actively growing.
1
2
文章
Dummer. ゛☀
2017年09月23日
Growing a collection of succulents for your indoor garden starts with one you already own.
1. Cut the Heads
Any healthy succulent is a candidate for propagation, especially those that have central, trunk-like stems. If propagating from a rosette-style succulent, you can begin at step 2. Otherwise, use a sharp pair of scissors to snip a leaf-covered section of one of the stems that’s at least 3 inches (7.5 cm) long. This is your cutting. If your plant’s stems are looking bare and you can’t find 3 inches (7.5 cm) of lush growth to work with, instead cut at least 1 inch (2.5 cm) under the best-looking bunch of leaves.
2. Pluck Leaves
Succulents will propagate from individual leaves, too. You can either pluck leaves from your clippings or from the parent plant. Hold the fleshy leaf close to the stem. Twist gently to remove cleanly. Any fat, juicy leaves will fall off with ease. Others you may have to coax off. What’s left on the leaf’s stem is called meristematic tissue, and it looks like a potato eye. This is where small new roots and leaves will start to emerge a few weeks after beginning step 3.
3. Arrange and Water
Place your clippings and leaves, cut ends up, on a dish filled with fast-draining soil and facing indirect sunlight. Leave for about three days or until the ends callus over. Once that happens, use a spray bottle to squirt everything five to six times until the soil is moist but not soaked. Repeat whenever the soil is dry, roughly every four to five days. In about three to four weeks, tiny pink roots will start to sprout from your clippings. Be patient, observe, and keep watering.
4. Tend To The Pups
Six or seven weeks after starting the propagating process, you’ll notice baby pups (i.e. tiny leaves, i.e. the cutest things you’ve ever seen) emerging from the parent leaves. The parents may look shriveled—this is because they are feeding the pups with their own water and nutrients. It’s now time to transfer your cuttings and leaves to containers of their own, at least 4 inches (10 cm) in diameter. Cover the new roots with 0.5 inch (1.3 cm) of soil, sit back, and watch your garden grow.
0
0
文章
Dummer. ゛☀
2017年09月22日
Although a cactus plant prefers slightly cramped growing conditions in a container, there may come a time when it outgrows its pot and needs a larger one. When the cactus roots reach the edge of the container, you must repot a large cactus. With attention to detail and by following expert recommendations, you can give your cactus fresh soil in a larger container so it can continue to thrive.
Instructions
Choose a container that is only 1 to 2 inches (2.5 to 5 cm) larger than the present container to ensure that you do not place the cactus in a pot that is too large. A cactus in a container too large may begin decaying because the soil will stay too wet. Fill the container approximately halfway with cactus potting soil.
Wear the leather gloves and long sleeves to protect your hands and arms from the cactus. Loosen the cactus from the container by inserting the trowel gently around the perimeter of the container. Wrap the cactus with newspaper so you can grasp it and work
Transfer the cactus from the old container to the new container. Set the cactus into the container so the plant will be at the same depth as it was growing in the old container. Fill additional soil in around the roots of the cactus and firm the soil down gently to finish repotting it.
Place the repotted cactus into its regular growing location with direct sunlight. Do not water the cactus for two to three days after repotting.
Tips and Warnings
Repot a cactus in the spring before the plant begins growing actively again.
Install a stake in the new container at the time you repot if your large cactus requires support. Choose a stake that is as tall as the cactus and place it into the container as you place the cactus into the container. Fill soil around both the cactus roots and the stake then tie the stake to the cactus with stretchy plant ties.
0
0
文章
Dummer. ゛☀
2017年09月22日
Even if you love that great succulent look, or if drought has led you to these plants, you may already have had trouble growing them. The cause of death is overwatering, after which rot sets in, and the plants literally melt down into a gushy rotten mess. The problem is knowing when they want water and when they don’t.
For you to understand the “when to water” question, you need to know how succulents are different from ordinary plants. The chief characteristic is specialized cells that hold moisture ready rather than deriving new moisture daily from the soil. After they are watered, succulents take up moisture until every succulent cell is fully hydrated. Over time, they utilize this stored moisture, gradually reducing the hydrostatic pressure inside the cells and tissues within the plant. In between water applications, the roots prefer a dry, airy soil, which is why they are typically grown in porous potting soils for cactus and succulents.
Problems arise in wetter or more humid climates when soils don’t dry out in between water applications. They also occur when the drain hole in a pot becomes blocked or if it was too small to begin with. Pots designed for succulents often have numerous holes for this reason.
To know when to water them, you must learn how to tell when hydrostatic pressure is low.
Physical Touch
When your newly watered succulent is fully hydrated, it’s in the “hard body” stage. Squeeze it gently to get a feel for how hard the individual plant becomes, and let this serve as a basis for future comparison. When the internal moisture is used up, the whole plant will gradually soften due to loss of pressure. They actually yield to your touch. Beware of those with only some parts softening, as this can indicate invisible rot is spreading into healthy tissue.
Visual Change
Every succulent plant when fully hydrated will stand up to its full height and form, which combine to create attitude. Many alter their overall attitude when internal pressure drops low enough. For example, Pachypodium’s long thin stalk will literally fold in half, then once watered, it straightens right back up again as hydrostatic pressure returns. Others will show slight wrinkles on the skin caused by reduced interior tissue volume. Drooping leaves, sagging tips or subtle leaning are all changes of attitude caused by low internal moisture.
Watering Method
In my experience, there are a lot of problems caused when succulents are watered from the top down like ordinary potted plants. Water travels down the edges of the soil mass and out the bottom, leaving too little behind for adequate uptake. Succulents often rot right at the soil line due to this kind of watering. For easily handled pots, simply set them in a pan of water so the soil inside can wick up the water through the drain hole. When the moisture wicks up to the surface of the soil, take the pot out of the water and let it drain. This method ensures that the entire soil mass, not just the edges are fully moistened.
Remember that most succulents originate in habitats with occasional heavy rain events followed by extended periods of drought. Fortunately they speak to us in the silent language of touch and appearance, which tell you clearly when they’re dry enough for a drink.
3
2
文章
Dummer. ゛☀
2017年09月22日
Succulents are marvels of nature that store extra water in their leaves, stems, or roots. Because they have the reputation for growing in arid conditions, many people fail to realize that when we bring them into our home and garden environments, they do need to be watered regularly. We share what you need to know on how to water succulents and keep them thriving.
How to Water Succulents Indoors
Rather than giving your succulents sips of water here and there, give them a good soaking — to the point the water runs out the drainage holes at the bottom of the pot. Be sure to empty the water that runs into the saucer beneath the plant pot. Then let the soil dry out completely before watering again.
Sedums, Hens and Chicks, Jade Plants, Kalanchoe, Aloe vera, and Sansevieria are popular choices for indoor plants. Succulents also include cacti, which, generally, may need less water than other succulents.
Succulents like well-drained soil. A good quality potting soil mixed with either a material such as perlite will help ensure good drainage. In addition to quality potting media, make sure your containers have drainage holes, because too much moisture can result in rotten roots.
Succulents require more water in the early spring when the plant is growing. Water needs may lessen in the summer and even more so during the winter. When the light decreases during the winter months and most succulents are in a dormant period, their water requirements also decrease. During winter, water your succulents when the soil is dry. This could be as infrequently as once per month but will depend on your conditions.
The frequency of watering will also depend on the light and growing conditions in your area, as well as the size of the container. The larger the container, the more moisture it can hold. Small, shallow pots may need to be watered more frequently.
How to Water Succulents in Outdoor Containers
Summer is a good time to move potted succulents outdoors. Though they love sun, give them a chance to acclimate to outdoor conditions by placing them in a partially shaded area before moving to a sunnier location. Keep them out of intense sunlight from late morning to mid afternoon. Outdoor plants generally require more water than indoor plants. Again, your conditions will dictate how often succulents will need water. Start by checking on a weekly basis, paying attention to the condition of the potting media and whether it’s bone dry or moist.
Succulents, including cacti, which are grown in shallow containers, may need water every few days.
How to Water Succulents in the Ground
Succulents, particularly Sedums, grow quite well in the ground. They, too, may need to be watered weekly, depending on conditions. Established plants will have a stronger root system and tolerate dry conditions much better than new plants.
Whether you grow hardy or annual succulents, they need to be in well-drained soil. Standing water is a prescription for disaster. As with houseplants, soil conditions and water needs go hand-in-hand.
2
2
文章
Dummer. ゛☀
2017年09月22日
Sempervivum arachnoideum, sometimes known as Cobweb Houseleek is a species of flowering plant in the family Crassulaceae, native to the Alps, Apennines and Carpathians.
It is a low-growing, evergreen, perennial succulent, forming a mat of fleshy rosettes up to 1.2 inch (3 cm) in diameter. Leaves are green or reddish, with cobwebby white hairs at the tips. Starry pink flowers are up to 0.4 inch (1 cm) in width in flat cymes on stems up to 5 inches (12.5 cm).
Growing Conditions
Light: Full sun to light shade
Hardiness Zones: 4a – 8b
Soil: Sempervivum arachnoideum, as with most succulents, need excellent drainage. Poor, sandy soil would be just fine. You could work some peat into heavier soil, to lighten them and improve drainage.
Water: Regular in growing season, very little in winter.
Propagation
Propagate by seed sown in spring, or root offsets in spring.
General Care
Relatively easy to grow in container or in rock garden, scree bed, wall crevice, trough or alpine house. After the plant blooms and sets seed it will die, but there will be many offsets to take its place. Plant in well drained succulent soil mix in full sun to light shade. Water regularly during the growing season and allow soil to dry out before watering again. Water very little during the winter months.
Pests and Problems
Sempervivum arachnoideum can get vine weevil and may be subject to a rust.
1
2

