文章
Miss Chen
2021年10月25日

Homegrown fruit always beats market fruit for freshness and taste, but not everyone has the space to grow a fruit tree or a melon vine. For that reason, berries are the gateway fruit for many gardeners, and none are easier to grow in the home garden than the blackberry. As native North American fruiting shrubs that can typically be harvested from June to August, blackberries are primed to grow in your yard with little extra maintenance. All you need to grow summer blackberries for your pies, jams, and smoothies is a spot with full sun and a good supply of soil amendments such as compost or leaf mold.
Blackberries are sold as dormant bare roots or as potted plants. They are best planted when the canes are dormant—generally in early spring. If you have the patience to grow blackberries from seed, plant them in the ground in the fall. Planted from seeds, blackberry canes generally will begin producing meaningful quantities of fruit in their second full year of growth.
Botanical Name Rubus Fruticosus
Common Name Blackberry
Plant Type Perennial
Size 3–5 feet
Sun Exposure Full sun
Soil Type Rich, well-drained loam
Soil pH Slightly acidic to neutral (5.5 to 7.0)
Hardiness Zones 5–8
Native Area North America, especially the Pacific Northwest
How to Plant Blackberries
As members of the Rosaceae family, the cultivation of blackberries resembles that of rose bushes. Fortunately, blackberries are closer to wild roses in their ease of care than they are to a hybrid tea rose. Blackberries will tolerate many growing conditions, but the harvest of a struggling blackberry plant will be disappointing compared to the harvest of a pampered plant. Plenty of sunshine, regular irrigation, and rich loamy soil will give plants the energy and nutrients they need to yield sweet, jumbo blackberries.
Plants should be spaced 5 to 6 feet apart; if planting in rows, space the rows 5 to 8 feet apart. If necessary, amend the soil before planting so it is rich, well-drained, and slightly acidic. Blackberries should be planted relatively shallow—about 1 inch deeper than they were growing in the nursery pot.
Trailing varieties of blackberries should have a trellis or other form of support to secure the canes.
Light
Sites with full sun are best for productive blackberry bushes. Some afternoon shade is tolerated, especially in areas with hot summers.
Soil
Careful site selection will ensure a long life for your blackberries, which usually live for about a decade with proper care. The ideal soil is slightly acidic with good drainage; these plants do not do well in clay soil. An elevated site or raised beds will not only help drainage but will also prevent late spring frosts from damaging flower buds. Remove all weeds that might draw nutrients or water away from your blackberries, as their shallow roots are susceptible to this competition.
Keep a good layer of mulch over the root zone at all times. This will feed the plants, conserve water moisture, and keep weeds down.
Water
Blackberries need moderate amounts of water, around 1 inch per week provided either by rainfall or from ground-level irrigation. Blackberries do not fare well in wet soils.
Temperature and Humidity
Blackberries require a period of cold dormancy to germinate, but because of their shallow root systems, they don't do well in areas where temperatures go below zero degrees routinely. Zones 5 to 8 provide the best environment for blackberries. Cold winter temperatures combined with wet spring soils may lead to plant death. The reverse environment of hot, dry winds is also unfavorable for blackberry growing and may result in stunted, seedy fruits.
Fertilizer
Fertilize your blackberries in the spring when plants are emerging from dormancy, using a balanced 10-10-10 formula. Fertilize plants again in the fall with an application of manure and compost, which will also suppress weeds and improve soil tilth.
Blackberry Varieties
Blackberries are usually categorized according to their growth habit:
Erect thorny blackberries grow upright and don't require support for the canes. They have very sharp spines on the canes—sharp enough to tear clothing.
Erect thornless blackberries are similar, but have canes without the prickly thorns. They, too, require no trellis supports.
Trailing thornless blackberries have sprawling canes that require a trellis or system of wires to hold them up above the ground.
'Shawnee' is resistant to cold, and has self-supporting thorny canes. 'Natchez' is thornless and erect, and will form a hedgerow as it spreads by suckers. Semi-erect thornless varieties like 'Chester' and 'Triple Crown' grow as a clump, and benefit from a trellis. Varieties like 'Prime-Ark Traveler' produce fruit on new and old canes throughout the season.
Blackberries vs. Raspberries
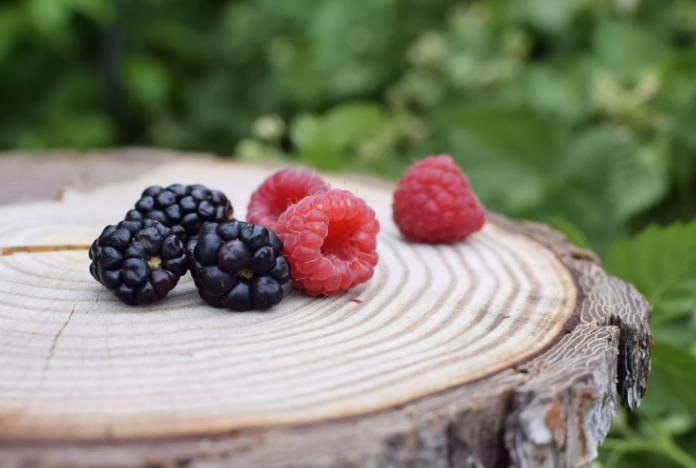
Both blackberries and raspberries belong to the Rubus genus. Blackberry and raspberry plants look very similar—both featuring thorny canes and compound leaves with toothed edges in groups of three or five. One key difference between the fruits of blackberries and raspberries is the way the fruits are formed. The tiny globes of the fruits, called drupelets, are attached to a white core in blackberries. Raspberries, including black raspberries, form drupelets with a hollow core.
Harvesting
Because they are highly perishable, it's important to follow the development of your ripening blackberries carefully. Immature blackberries start out green, then transition to red before maturing to a deep, glossy black. Blackberries do not continue to ripen after harvest, so pick the berries only after they have turned completely black. Berries last about seven days in the refrigerator after harvest.
Pruning
Blackberry roots are perennial but the canes are biennial. This means that second-year canes that have produced their fruit need to be trimmed away after harvesting.
For an established shrub, new canes that haven't yet fruited should be tip-pruned to about 3 feet in summer. This will cause the new canes to branch out, maximizing the fruit produced. Once these canes produce fruit, they should be removed to the ground immediately after the fruit harvest.
In early spring before new growth has started, remove any canes damaged by winter, and thin out the remaining canes to the four or five strongest canes.

Propagating Blackberries
It's easy to propagate blackberry plants from stem cuttings. Cut a 4-inch piece from the end of the stem in late spring when temperatures are mild and rainfall is plenty. Plant it in the soil, and keep it moist. Roots will form in two to four weeks. These newly started plants can be planted in the fall, or you can keep them in a sheltered location and plant them the following spring.
Common Pests and Diseases
Blackberries are prone to anthracnose, stem blight, and crown gall. Prevent disease by purchasing disease-free plant stock from reputable nurseries, and planting your blackberries away from areas with wild brambles, which may carry these diseases.
Insect pests include stink bugs and raspberry crown borers. Keeping your plants healthy and vigorous will make them less attractive to insect attack.
Blackberries are sometimes afflicted by viral diseases. Raspberry bushy dwarf virus and blackberry calico virus both cause bright yellow splotches to appear on leaves. Affected plants will need to be removed and destroyed.
How to Grow Blackberries in Pots
When growing blackberries in containers, choose a compact cultivar like Baby Cakes that does not need pruning. Choose large containers that hold at least five gallons of soil to prevent drying out.
Blackberries are sold as dormant bare roots or as potted plants. They are best planted when the canes are dormant—generally in early spring. If you have the patience to grow blackberries from seed, plant them in the ground in the fall. Planted from seeds, blackberry canes generally will begin producing meaningful quantities of fruit in their second full year of growth.
Botanical Name Rubus Fruticosus
Common Name Blackberry
Plant Type Perennial
Size 3–5 feet
Sun Exposure Full sun
Soil Type Rich, well-drained loam
Soil pH Slightly acidic to neutral (5.5 to 7.0)
Hardiness Zones 5–8
Native Area North America, especially the Pacific Northwest
How to Plant Blackberries
As members of the Rosaceae family, the cultivation of blackberries resembles that of rose bushes. Fortunately, blackberries are closer to wild roses in their ease of care than they are to a hybrid tea rose. Blackberries will tolerate many growing conditions, but the harvest of a struggling blackberry plant will be disappointing compared to the harvest of a pampered plant. Plenty of sunshine, regular irrigation, and rich loamy soil will give plants the energy and nutrients they need to yield sweet, jumbo blackberries.
Plants should be spaced 5 to 6 feet apart; if planting in rows, space the rows 5 to 8 feet apart. If necessary, amend the soil before planting so it is rich, well-drained, and slightly acidic. Blackberries should be planted relatively shallow—about 1 inch deeper than they were growing in the nursery pot.
Trailing varieties of blackberries should have a trellis or other form of support to secure the canes.

Light
Sites with full sun are best for productive blackberry bushes. Some afternoon shade is tolerated, especially in areas with hot summers.
Soil
Careful site selection will ensure a long life for your blackberries, which usually live for about a decade with proper care. The ideal soil is slightly acidic with good drainage; these plants do not do well in clay soil. An elevated site or raised beds will not only help drainage but will also prevent late spring frosts from damaging flower buds. Remove all weeds that might draw nutrients or water away from your blackberries, as their shallow roots are susceptible to this competition.
Keep a good layer of mulch over the root zone at all times. This will feed the plants, conserve water moisture, and keep weeds down.
Water
Blackberries need moderate amounts of water, around 1 inch per week provided either by rainfall or from ground-level irrigation. Blackberries do not fare well in wet soils.
Temperature and Humidity
Blackberries require a period of cold dormancy to germinate, but because of their shallow root systems, they don't do well in areas where temperatures go below zero degrees routinely. Zones 5 to 8 provide the best environment for blackberries. Cold winter temperatures combined with wet spring soils may lead to plant death. The reverse environment of hot, dry winds is also unfavorable for blackberry growing and may result in stunted, seedy fruits.
Fertilizer
Fertilize your blackberries in the spring when plants are emerging from dormancy, using a balanced 10-10-10 formula. Fertilize plants again in the fall with an application of manure and compost, which will also suppress weeds and improve soil tilth.
Blackberry Varieties
Blackberries are usually categorized according to their growth habit:
Erect thorny blackberries grow upright and don't require support for the canes. They have very sharp spines on the canes—sharp enough to tear clothing.
Erect thornless blackberries are similar, but have canes without the prickly thorns. They, too, require no trellis supports.
Trailing thornless blackberries have sprawling canes that require a trellis or system of wires to hold them up above the ground.
'Shawnee' is resistant to cold, and has self-supporting thorny canes. 'Natchez' is thornless and erect, and will form a hedgerow as it spreads by suckers. Semi-erect thornless varieties like 'Chester' and 'Triple Crown' grow as a clump, and benefit from a trellis. Varieties like 'Prime-Ark Traveler' produce fruit on new and old canes throughout the season.
Blackberries vs. Raspberries
Both blackberries and raspberries belong to the Rubus genus. Blackberry and raspberry plants look very similar—both featuring thorny canes and compound leaves with toothed edges in groups of three or five. One key difference between the fruits of blackberries and raspberries is the way the fruits are formed. The tiny globes of the fruits, called drupelets, are attached to a white core in blackberries. Raspberries, including black raspberries, form drupelets with a hollow core.
Harvesting
Because they are highly perishable, it's important to follow the development of your ripening blackberries carefully. Immature blackberries start out green, then transition to red before maturing to a deep, glossy black. Blackberries do not continue to ripen after harvest, so pick the berries only after they have turned completely black. Berries last about seven days in the refrigerator after harvest.
Pruning
Blackberry roots are perennial but the canes are biennial. This means that second-year canes that have produced their fruit need to be trimmed away after harvesting.
For an established shrub, new canes that haven't yet fruited should be tip-pruned to about 3 feet in summer. This will cause the new canes to branch out, maximizing the fruit produced. Once these canes produce fruit, they should be removed to the ground immediately after the fruit harvest.
In early spring before new growth has started, remove any canes damaged by winter, and thin out the remaining canes to the four or five strongest canes.

Propagating Blackberries
It's easy to propagate blackberry plants from stem cuttings. Cut a 4-inch piece from the end of the stem in late spring when temperatures are mild and rainfall is plenty. Plant it in the soil, and keep it moist. Roots will form in two to four weeks. These newly started plants can be planted in the fall, or you can keep them in a sheltered location and plant them the following spring.
Common Pests and Diseases
Blackberries are prone to anthracnose, stem blight, and crown gall. Prevent disease by purchasing disease-free plant stock from reputable nurseries, and planting your blackberries away from areas with wild brambles, which may carry these diseases.
Insect pests include stink bugs and raspberry crown borers. Keeping your plants healthy and vigorous will make them less attractive to insect attack.
Blackberries are sometimes afflicted by viral diseases. Raspberry bushy dwarf virus and blackberry calico virus both cause bright yellow splotches to appear on leaves. Affected plants will need to be removed and destroyed.
How to Grow Blackberries in Pots
When growing blackberries in containers, choose a compact cultivar like Baby Cakes that does not need pruning. Choose large containers that hold at least five gallons of soil to prevent drying out.
0
0
文章
Miss Chen
2021年10月24日

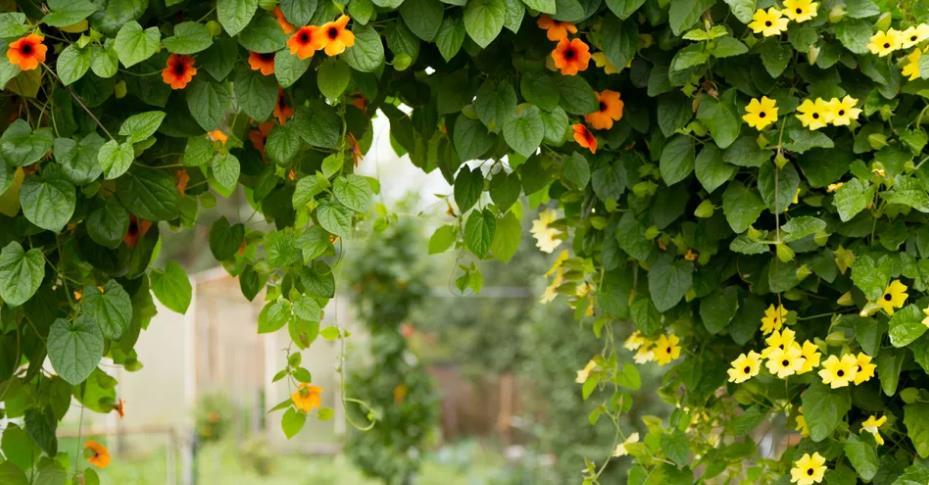
Named for its resemblance to the popular hardy garden flower black-eyed Susan (Rudbeckia spp.), the black-eyed Susan vine (Thunbergia alata) is instead a tender perennial climbing yet bushy vine that is normally grown as an annual. It is a great plant for containers and hanging baskets and is particularly beloved for its distinctive flowers in vivid orange, yellow, and other colors. The flowers have dark centers, like the other black-eyed Susans, and the vine blooms for many weeks in the summer and into fall.
Black-eyed Susan vine is a diminutive vine that grows to a maximum of about 8 feet in temperate zones or when grown in containers, although it can grow to 20 feet in frost-free zones, where the plant is evergreen. The leaves are arrow- or heart-shaped and up to 3 inches long. This vine climbs by winding its way up support structures rather than clinging with tendrils.
Also called clockvine, the black-eyed Susan vine is grown as an annual in USDA hardiness zones 3 to 9 but can be grown as a perennial in zones 10 and 11.
Botanical Name Thunbergia alata
Common Name Black-Eyed Susan vine
Plant Type Flowering vine, annual or perennial
Mature Size 3 to 8 ft. tall, 3 to 6 ft. wide
Sun Exposure Full sun to part shade
Soil Type Fertile, well-drained
Soil pH 6.5 to 7.5
Bloom Time Summer (as an annual)
Flower Color Orange, white, yellow, red, pink
Hardiness Zones 10 to 11 (USDA)
Native Area East Africa
Black-Eyed Susan Vine Care
Black-eyed Susan vines are usually planted as annuals in containers or hanging baskets with mixed plantings, but they can also be planted in the ground to cover trellises, arbors, fences, and other structures. The plant works well to cascade down over retaining walls, and it can also serve as a ground cover. Aesthetically, it presents very well when combined with plants that have purple leaves or flowers.
If propagating or growing from seed, it's best to provide vertical structure in the ground or pots, for the vines before they need them, preferably before planting, so you don't have to disrupt the young plants later. You can simply plant them near a fence (with a post or planks they can climb), stand up a cage structure, or erect a tripod, or a tall pole.
Light
Grow these plants in full sun to part shade. Some afternoon shade is beneficial, especially in warmer climates, as the hottest sun's rays may be damaging.
Soil
Plant a black-eyed Susan vine in soil that is rich, fertile, and well-drained with medium moisture-retention properties. It prefers a soil pH that is close to neutral.
Water
Water regularly and deeply to keep the soil moist but not wet. If the leaves begin to wilt, the soil is probably too dry and needs a bit more water. In containers, do not let the soil dry out completely.
Temperature and Humidity
The black-eyed Susan vine thrives in warm, humid climates, which explains why it is invasive in tropical areas. However, it will grow anywhere in its zone range, provided it gets enough water. It tends to flower best after the hottest days of the summer are over.
Fertilizer
Feed the plants (indoors or outdoors) every two to three weeks during their bloom season. Follow the package directions, but in many cases, it's best to use a half-strength solution of fertilizer designed to boost blooming.
Black-Eyed Susan Vine Varieties
Cultivars of Thunbergia alata have very similar foliage and overall habits and are mostly distinguished by flower color.
'Angel Wings': White flowers
'African Sunset': Dark red-purple flowers
'Arizona Dark Red': Deep orange-red flowers
'Blushing Susie': Apricot and rose flowers
'Canary Eyes': Yellow flowers
'Lemon A-Peel': Bright yellow flowers with a very dark center
'Orange Wonder': Bright orange flowers with no dark center
'Raspberry Smoothie': Pale lilac-pink flowers and grey-green foliage
'Superstar Orange': Extra-large orange flowers
'Susie' mix: Orange, yellow, and white flowers with or without contrasting centers
Propagating Black-Eyed Susan Vines
Propagating this vine from stem cuttings is easy and it's usually best done over the winter.
Take a cutting several inches from a terminal end of a healthy plant.
Remove the bottom leaves of the cutting.
Place the cutting in a glass of water to root.
Change the water in the glass every two or so days.
When the roots thicken, plant it in a well-draining pot in potting soil.
Grow the plant until spring and then transplant outdoors after the threat of frost has passed.
How to Grow Black-Eyed Susan Vines From Seed
This vine is easily started from seeds sown directly in the garden after the last expected frost date (when the soil is at least 60 degrees Fahrenheit). In colder climates, nursery transplants are normally used; or, you can start them indoors six to eight weeks before the last frost. Germination occurs about 10 to 14 days after sowing in warmer temperatures of 70 to 75 degrees Fahrenheit, and up to 20 days in cooler temperatures.

Potting and Repotting Black-Eyed Susan Vines
Black-eyed Susan vines grown in large pots with vertical structures can make beautiful decorations outdoors as well as inside your home. You can set a pair flanking a front door or define the edges of a patio or outdoor sitting area. Indoors, a pot of climbing vine can brighten the corner of a sunroom or even a large, bright bathroom.
Indoor vines can even flower in the winter, provided they get plenty of sun and the temperature doesn't drop below 60 degrees Fahrenheit. Feed container plants (indoors or outdoors) every two to three weeks during the blooming period.
Overwintering
Move potted vines indoors so the vines can even flower in the winter, provided they get plenty of sun and the temperature doesn't drop below 60 degrees Fahrenheit. Feed indoor wintering container plants every two to three weeks during the cold season's blooming period.
Common Pests & Diseases
This showy vine is free of most serious insect or disease problems when grown outdoors, but indoors the plants can have problems with scale, spider mites, and whiteflies. Typically, these can be managed with neem oil or horticultural soap.
Black-eyed Susan vine is a diminutive vine that grows to a maximum of about 8 feet in temperate zones or when grown in containers, although it can grow to 20 feet in frost-free zones, where the plant is evergreen. The leaves are arrow- or heart-shaped and up to 3 inches long. This vine climbs by winding its way up support structures rather than clinging with tendrils.
Also called clockvine, the black-eyed Susan vine is grown as an annual in USDA hardiness zones 3 to 9 but can be grown as a perennial in zones 10 and 11.

Botanical Name Thunbergia alata
Common Name Black-Eyed Susan vine
Plant Type Flowering vine, annual or perennial
Mature Size 3 to 8 ft. tall, 3 to 6 ft. wide
Sun Exposure Full sun to part shade
Soil Type Fertile, well-drained
Soil pH 6.5 to 7.5
Bloom Time Summer (as an annual)
Flower Color Orange, white, yellow, red, pink
Hardiness Zones 10 to 11 (USDA)
Native Area East Africa
Black-Eyed Susan Vine Care
Black-eyed Susan vines are usually planted as annuals in containers or hanging baskets with mixed plantings, but they can also be planted in the ground to cover trellises, arbors, fences, and other structures. The plant works well to cascade down over retaining walls, and it can also serve as a ground cover. Aesthetically, it presents very well when combined with plants that have purple leaves or flowers.
If propagating or growing from seed, it's best to provide vertical structure in the ground or pots, for the vines before they need them, preferably before planting, so you don't have to disrupt the young plants later. You can simply plant them near a fence (with a post or planks they can climb), stand up a cage structure, or erect a tripod, or a tall pole.
Light
Grow these plants in full sun to part shade. Some afternoon shade is beneficial, especially in warmer climates, as the hottest sun's rays may be damaging.
Soil
Plant a black-eyed Susan vine in soil that is rich, fertile, and well-drained with medium moisture-retention properties. It prefers a soil pH that is close to neutral.
Water
Water regularly and deeply to keep the soil moist but not wet. If the leaves begin to wilt, the soil is probably too dry and needs a bit more water. In containers, do not let the soil dry out completely.
Temperature and Humidity
The black-eyed Susan vine thrives in warm, humid climates, which explains why it is invasive in tropical areas. However, it will grow anywhere in its zone range, provided it gets enough water. It tends to flower best after the hottest days of the summer are over.
Fertilizer
Feed the plants (indoors or outdoors) every two to three weeks during their bloom season. Follow the package directions, but in many cases, it's best to use a half-strength solution of fertilizer designed to boost blooming.
Black-Eyed Susan Vine Varieties
Cultivars of Thunbergia alata have very similar foliage and overall habits and are mostly distinguished by flower color.
'Angel Wings': White flowers
'African Sunset': Dark red-purple flowers
'Arizona Dark Red': Deep orange-red flowers
'Blushing Susie': Apricot and rose flowers
'Canary Eyes': Yellow flowers
'Lemon A-Peel': Bright yellow flowers with a very dark center
'Orange Wonder': Bright orange flowers with no dark center
'Raspberry Smoothie': Pale lilac-pink flowers and grey-green foliage
'Superstar Orange': Extra-large orange flowers
'Susie' mix: Orange, yellow, and white flowers with or without contrasting centers
Propagating Black-Eyed Susan Vines
Propagating this vine from stem cuttings is easy and it's usually best done over the winter.
Take a cutting several inches from a terminal end of a healthy plant.
Remove the bottom leaves of the cutting.
Place the cutting in a glass of water to root.
Change the water in the glass every two or so days.
When the roots thicken, plant it in a well-draining pot in potting soil.
Grow the plant until spring and then transplant outdoors after the threat of frost has passed.
How to Grow Black-Eyed Susan Vines From Seed
This vine is easily started from seeds sown directly in the garden after the last expected frost date (when the soil is at least 60 degrees Fahrenheit). In colder climates, nursery transplants are normally used; or, you can start them indoors six to eight weeks before the last frost. Germination occurs about 10 to 14 days after sowing in warmer temperatures of 70 to 75 degrees Fahrenheit, and up to 20 days in cooler temperatures.

Potting and Repotting Black-Eyed Susan Vines
Black-eyed Susan vines grown in large pots with vertical structures can make beautiful decorations outdoors as well as inside your home. You can set a pair flanking a front door or define the edges of a patio or outdoor sitting area. Indoors, a pot of climbing vine can brighten the corner of a sunroom or even a large, bright bathroom.
Indoor vines can even flower in the winter, provided they get plenty of sun and the temperature doesn't drop below 60 degrees Fahrenheit. Feed container plants (indoors or outdoors) every two to three weeks during the blooming period.
Overwintering
Move potted vines indoors so the vines can even flower in the winter, provided they get plenty of sun and the temperature doesn't drop below 60 degrees Fahrenheit. Feed indoor wintering container plants every two to three weeks during the cold season's blooming period.
Common Pests & Diseases
This showy vine is free of most serious insect or disease problems when grown outdoors, but indoors the plants can have problems with scale, spider mites, and whiteflies. Typically, these can be managed with neem oil or horticultural soap.
0
0
文章
Miss Chen
2021年09月30日

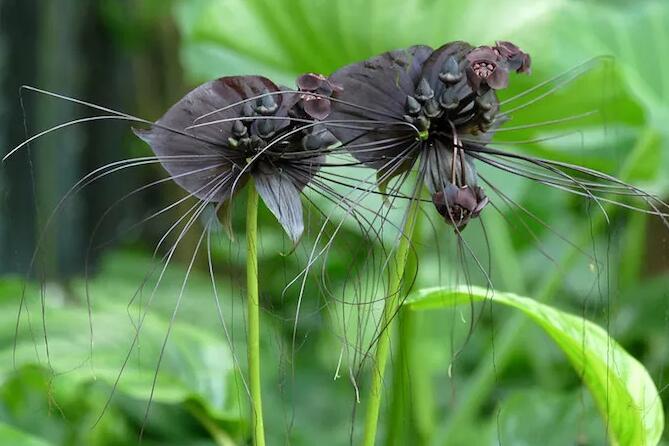
The black bat flower is an exotic looking, unusual plant that is somewhat difficult to grow, but rewarding for its unusual shape, texture and color in the garden. True to its common name, the bat flower looks like a bat with its wing shaped bracts and seed pods that look a bit like bat faces. It is an understory plant native to the forests of Asia and Australia, and grows best in a semi-tropical environment.
It is sometimes also referred to as tiger beard, due to its long bracteoles which look like whiskers. The purple variety is a dark dusky color that ranges from maroon to purple, but often looks black. There is also a white flowering variety (Tacca integrifolia) that grows twice as large as the black one. Dramatic in the garden, bat flowers do not really survive long in a vase and so aren't really useful as cut flowers. The bat flower will bloom from late spring through early fall with new blooms appearing repeatedly throughout the season.
Botanical Name Tacca chantrieri
Common Name Bat flower
Plant Type Perennial
Mature Size 36 inches tall, 12 inches wide
Sun Exposure Partial sun to dappled shade
Soil Type Fertile, well-drained
Soil pH 6.1 to 7.5
Bloom Time Late summer through fall
Flower Color Black (dark purple), white (Tacca integrifolia))
Hardiness Zones 9b to 11
Native Areas Asia, Australia
How to Grow Bat Flower
While this is a fairly tropical plant, it does do well in some parts of the United States, and can be grown successfully in Florida, Louisiana, Mississippi and parts of California, wherever a moist, warm environment can be found. It may be necessary to create a small micro climate that is hospitable to this somewhat delicate plant. The bat flower is generally not vulnerable to pests, other than the usual slugs and snails one finds in a tropical garden.
Light
The bat flower requires warm temperatures but prefers a shady location. Plant where it will get indirect light, on the north side of a house, preferably in a setting with additional tropical understory plants.
Soil
Bat flower needs a rich, well-drained soil with plenty of organic matter. Amending soil with peat moss, pine bark, and compost may prove necessary. For container growing, use a rich potting medium with 50 percent soil, 40 percent amendments and 10 percent sand for good drainage.
Water
After planting, keep the soil moist and water consistently. Bat flowers should not be allowed to dry out for too long. But make sure the planting location has good drainage.
Fertilizer
Black bat flowers benefit from fertilizing. Using a liquid fertilizer suitable for orchids is appropriate, applied every week, or use a general slow release fertilizer.
Temperature and Humidity
Since bat flowers are a semi-tropical plant, they do not withstand cold temperatures. If the temperature goes below 55F, bat flowers may die. They are happiest when the temperature is between 70 and 80 degrees. They can also be grown indoors but a consistently moist environment should be provided. Using a plant mister and having a humidifier will help ensure the bat flower gets the moisture it needs.
Propagating Bat Flower
The bat flower may be propagated from seeds that have been allowed to dry well, but they will take some time to germinate. Harvesting the seeds from the plant requires waiting until the seed pod has matured and split open. Bat flower can also be propagated from a tuberous root or rhizome cutting. Divide these rhizomes in the fall, and plant three feet apart. You can also order rhizomes from a catalog. Be patient when propagating, as the rhizomes need to reach a large enough size before they will form flowers.
Growing in Containers
It's possible to grow black bat flower in containers. If keeping them indoors, locate them near a window where the light is indirect. They also appreciate decent air circulation, as opposed to a closed greenhouse environment. Don't allow the plant to become root bound; keep an eye on it and repot into a bigger container as needed. Repotting once every year is a good rule of thumb. A wide shallow pot works best. You can put the containers outside in the summer, but avoid placing them in direct sunlight.
It is sometimes also referred to as tiger beard, due to its long bracteoles which look like whiskers. The purple variety is a dark dusky color that ranges from maroon to purple, but often looks black. There is also a white flowering variety (Tacca integrifolia) that grows twice as large as the black one. Dramatic in the garden, bat flowers do not really survive long in a vase and so aren't really useful as cut flowers. The bat flower will bloom from late spring through early fall with new blooms appearing repeatedly throughout the season.
Botanical Name Tacca chantrieri
Common Name Bat flower
Plant Type Perennial
Mature Size 36 inches tall, 12 inches wide
Sun Exposure Partial sun to dappled shade
Soil Type Fertile, well-drained
Soil pH 6.1 to 7.5
Bloom Time Late summer through fall
Flower Color Black (dark purple), white (Tacca integrifolia))
Hardiness Zones 9b to 11
Native Areas Asia, Australia
How to Grow Bat Flower
While this is a fairly tropical plant, it does do well in some parts of the United States, and can be grown successfully in Florida, Louisiana, Mississippi and parts of California, wherever a moist, warm environment can be found. It may be necessary to create a small micro climate that is hospitable to this somewhat delicate plant. The bat flower is generally not vulnerable to pests, other than the usual slugs and snails one finds in a tropical garden.
Light
The bat flower requires warm temperatures but prefers a shady location. Plant where it will get indirect light, on the north side of a house, preferably in a setting with additional tropical understory plants.
Soil
Bat flower needs a rich, well-drained soil with plenty of organic matter. Amending soil with peat moss, pine bark, and compost may prove necessary. For container growing, use a rich potting medium with 50 percent soil, 40 percent amendments and 10 percent sand for good drainage.

Water
After planting, keep the soil moist and water consistently. Bat flowers should not be allowed to dry out for too long. But make sure the planting location has good drainage.
Fertilizer
Black bat flowers benefit from fertilizing. Using a liquid fertilizer suitable for orchids is appropriate, applied every week, or use a general slow release fertilizer.
Temperature and Humidity
Since bat flowers are a semi-tropical plant, they do not withstand cold temperatures. If the temperature goes below 55F, bat flowers may die. They are happiest when the temperature is between 70 and 80 degrees. They can also be grown indoors but a consistently moist environment should be provided. Using a plant mister and having a humidifier will help ensure the bat flower gets the moisture it needs.
Propagating Bat Flower
The bat flower may be propagated from seeds that have been allowed to dry well, but they will take some time to germinate. Harvesting the seeds from the plant requires waiting until the seed pod has matured and split open. Bat flower can also be propagated from a tuberous root or rhizome cutting. Divide these rhizomes in the fall, and plant three feet apart. You can also order rhizomes from a catalog. Be patient when propagating, as the rhizomes need to reach a large enough size before they will form flowers.
Growing in Containers
It's possible to grow black bat flower in containers. If keeping them indoors, locate them near a window where the light is indirect. They also appreciate decent air circulation, as opposed to a closed greenhouse environment. Don't allow the plant to become root bound; keep an eye on it and repot into a bigger container as needed. Repotting once every year is a good rule of thumb. A wide shallow pot works best. You can put the containers outside in the summer, but avoid placing them in direct sunlight.
0
0


