文章
Dummer. ゛☀
2017年08月04日

Give your garden and outdoor living spaces a shot of steady, season-long color by planting marigolds. This popular annual flower is a garden favorite because they are easy to care for, grow well from seeds, and attract pollinators. Many varieties of marigolds can also help repel root-knot nematodes, microscopic worms that live in the soil and can damage vegetable and fruit plants. Here is everything you need to know to grow marigolds.

How to Choose Marigolds
Before planting marigolds, decide which type you want to grow. The most commonly grown marigolds are African (also called American or Aztec) and French types. African marigolds have large flower heads (up to 5 inches across) on plants that grow from 10 to 36 inches tall, making them good for fresh cutting. French marigolds are smaller and bushier, with flowers up to 2 inches across on plants that are 6 to 18 inches tall. They are excellent for planting among taller plants in need of pollination.
Where to Plant Marigolds
When planting marigolds, choose a spot in full sun. In warmest regions, provide protection from the sun during the hottest part of the day. As you ponder where to plant, understand that these annual flowers crave fertile, well-drained soil. Marigolds planted in heavy clay soil that doesn’t drain well are usually not productive.

How to Water Marigolds
When growing marigolds, check soil weekly: When the top inch is dry, it’s time to water. (Marigolds growing in containers may need more frequent watering.) Each time you water, be sure to drench the soil, and aim the nozzle or spout of your watering device toward the base of the plants.
How to Care for Marigolds
While growing marigolds, you may discover Japanese beetles on the blooms, especially the larger blossoms of the African types. Knock the beetles into soapy water to drown them, or spray plants with Ortho® Insect Killer Rose & Flower. You will also want to keep an eye out for spent flowers, and remove them as soon as you see them. This process is called deadheading, and it encourages plants to form new flower buds. Marigolds stand up to heat and humidity, but in the hottest regions, plants can enter a rest period during summer’s most sizzling days. Keep plants well-watered during this time. As soon as intense heat lifts, plants should resume blooming.
How to Use Marigolds
In the garden, French marigolds create a colorful edging that beckons butterflies and other pollinators. African marigolds are ideal for picking for fresh arrangements. In addition to the beauty they offer, marigolds can also be planted as pest control in the vegetable garden or flower beds. They contain a chemical (thiophene) that helps control nematodes in soil. Marigold flowers make great additions to bouquets and dry well. You can also eat the petals, which have a slightly peppery flavor. Put them in salads or on baked goods, or add them to stir-fries.
How to Pick Marigolds
If you’re picking marigolds for bouquets or drying, cut blossoms in the morning or late afternoon. Harvest flowers for either use when they are fully open. Choose newly opened flowers for edible uses.

How to Choose Marigolds
Before planting marigolds, decide which type you want to grow. The most commonly grown marigolds are African (also called American or Aztec) and French types. African marigolds have large flower heads (up to 5 inches across) on plants that grow from 10 to 36 inches tall, making them good for fresh cutting. French marigolds are smaller and bushier, with flowers up to 2 inches across on plants that are 6 to 18 inches tall. They are excellent for planting among taller plants in need of pollination.
Where to Plant Marigolds
When planting marigolds, choose a spot in full sun. In warmest regions, provide protection from the sun during the hottest part of the day. As you ponder where to plant, understand that these annual flowers crave fertile, well-drained soil. Marigolds planted in heavy clay soil that doesn’t drain well are usually not productive.

How to Water Marigolds
When growing marigolds, check soil weekly: When the top inch is dry, it’s time to water. (Marigolds growing in containers may need more frequent watering.) Each time you water, be sure to drench the soil, and aim the nozzle or spout of your watering device toward the base of the plants.
How to Care for Marigolds
While growing marigolds, you may discover Japanese beetles on the blooms, especially the larger blossoms of the African types. Knock the beetles into soapy water to drown them, or spray plants with Ortho® Insect Killer Rose & Flower. You will also want to keep an eye out for spent flowers, and remove them as soon as you see them. This process is called deadheading, and it encourages plants to form new flower buds. Marigolds stand up to heat and humidity, but in the hottest regions, plants can enter a rest period during summer’s most sizzling days. Keep plants well-watered during this time. As soon as intense heat lifts, plants should resume blooming.

How to Use Marigolds
In the garden, French marigolds create a colorful edging that beckons butterflies and other pollinators. African marigolds are ideal for picking for fresh arrangements. In addition to the beauty they offer, marigolds can also be planted as pest control in the vegetable garden or flower beds. They contain a chemical (thiophene) that helps control nematodes in soil. Marigold flowers make great additions to bouquets and dry well. You can also eat the petals, which have a slightly peppery flavor. Put them in salads or on baked goods, or add them to stir-fries.
How to Pick Marigolds
If you’re picking marigolds for bouquets or drying, cut blossoms in the morning or late afternoon. Harvest flowers for either use when they are fully open. Choose newly opened flowers for edible uses.
0
0
文章
Dummer. ゛☀
2017年08月04日

Sunflowers are such a colorful and whimsical addition to every garden. They’re easy to grow from seed, and make excellent cut flowers.
There are hundreds of different varieties of sunflowers, including perennial varieties that come back every year. Home gardeners most commonly plant annual varieties (which last only one growing season), including both dwarf and tall varieties with multiple branches and dozens of blooms (perfect for cutting). The types of sunflowers grown especially for seed harvesting also fall into the category of annual flowers. You can find sunflowers with flower colors ranging from pale lemon yellow to orange, pink, burgundy, and bright yellow. There are also bi-color and multi-color varieties.
No matter which you choose, let us teach you how to grow sunflowers for weeks of gorgeous flowers.
Where to Plant Sunflowers
Sunflowers grow best in full, bright sun, and in evenly moist, well-drained soil. The amount of space they need depends on which varieties you are growing. Branching types with multiple blooms on one stem need more space horizontally than large single-flowered types. Take care to select a spot to grow taller varieties where they won’t throw too much shade on other shorter, sun-loving plants. The north side of a flower border is almost always a good spot.
When to Plant Sunflowers
Sunflowers are warm-weather plants. You can plant sunflowers outside at the same time you plant peppers, tomatoes, eggplants, zinnias, and other warm-season vegetables and flowers. For a longer sunflower bloom period, plant a row or grouping of sunflowers every two weeks for four to six weeks during the early summer.
How to Prepare the Soil for Planting Sunflowers
Make sure your plants get off to the best start! Prepare new in-ground planting areas with Miracle-Gro® All Purpose Garden Soil, mixing 3 inches of garden soil into the top 6 to 8 inches of native soil. This will feed new plants and help build strong roots, both of which will mean big, beautiful blooms!

How to Plant Sunflowers
While you can start sunflowers from seed indoors, it’s just as easy to grow them from seed outdoors. Plant sunflower seeds directly into the garden when the soil is warm—at least fifty degrees Fahrenheit. Use your thumb to push seeds 1 to 2 inches deep into the soil. Depth and spacing depends on the variety, so read the instructions on the seed package.
How to Water Sunflowers
Water thoroughly at the time of planting and keep the planting area about as moist as a wrung-out sponge (not soggy) while the seeds are sprouting. Most sunflowers are fairly drought-tolerant once established, but will bloom better with regular water. To be on the safe side, water sunflowers well when the top two inches of soil are dry.
How to Feed Sunflowers
While sunflowers are not big feeders, you will get more and better blooms if you make sure they get a steady stream of nutrition. A month after planting, begin feeding sunflowers with Miracle-Gro® Water Soluble All Purpose Plant Food. Make sure to follow the directions on the package.

How to Stake Sunflowers
Whether or not you need to stake your sunflowers depends on how tall they get, the strength of the stems, and the branching pattern. If you’re growing a bunch of sunflowers for cut flowers, you can plant the seeds and then create a latticework of stakes and twine for the plants to grow up through. Create two rows of staggered stakes with 3 feet in between each stake. Run twine around the stakes to create a wide lattice. You can also stake individual plants that are beginning to droop by placing a sturdy stake 3 inches from the plant stem and tying the stem to the stake, loosely, with twine in a couple of places.

How to Avoid Pest Problems with Sunflowers
Squirrels and chipmunks can be a problem when you first plant sunflower seeds, as they love to dig them up and eat them. Shake some ground cayenne pepper on the ground around where you’ve planted the seeds. If that doesn’t deter them, try starting seeds indoors and then planting them outside once they have sprouted. If you’re growing sunflowers for seed, these pests can be a problem near the time of harvest as well. When the outer petals dry up, cover the large flower heads with lightweight cloth tied around the stem.
How to Harvest Sunflower Seeds
Cut the large flower heads off when the back of the large flower disk has turned black and the seed heads are dry. Leave in a cool, dry place for a few days to completely dry out, and then remove the seeds by gently rubbing the flower heads with your thumbs. Keep dried seeds in a breathable paper or cloth bag to prevent mold growth.
How to Grow Sunflowers: Recap
Plant in a sunny location with moist, well-drained soil.
Prepare the existing soil by adding Miracle-Gro® All Purpose Garden Soil.
Sow seeds directly in the garden when the soil warms up in the spring.
Water seeds at the time of planting and regularly throughout the growing season.
Feed sunflowers with Miracle-Gro® Water Soluble All Purpose Plant Food, starting a month after planting.
Stake sunflowers if they have multiple branches or heavy flower heads.
Prevent pests from digging up newly planted seeds and from eating seed heads you hope to harvest.
Harvest flower heads when the back has turned black and the seeds have dried out.
There are hundreds of different varieties of sunflowers, including perennial varieties that come back every year. Home gardeners most commonly plant annual varieties (which last only one growing season), including both dwarf and tall varieties with multiple branches and dozens of blooms (perfect for cutting). The types of sunflowers grown especially for seed harvesting also fall into the category of annual flowers. You can find sunflowers with flower colors ranging from pale lemon yellow to orange, pink, burgundy, and bright yellow. There are also bi-color and multi-color varieties.
No matter which you choose, let us teach you how to grow sunflowers for weeks of gorgeous flowers.

Where to Plant Sunflowers
Sunflowers grow best in full, bright sun, and in evenly moist, well-drained soil. The amount of space they need depends on which varieties you are growing. Branching types with multiple blooms on one stem need more space horizontally than large single-flowered types. Take care to select a spot to grow taller varieties where they won’t throw too much shade on other shorter, sun-loving plants. The north side of a flower border is almost always a good spot.
When to Plant Sunflowers
Sunflowers are warm-weather plants. You can plant sunflowers outside at the same time you plant peppers, tomatoes, eggplants, zinnias, and other warm-season vegetables and flowers. For a longer sunflower bloom period, plant a row or grouping of sunflowers every two weeks for four to six weeks during the early summer.
How to Prepare the Soil for Planting Sunflowers
Make sure your plants get off to the best start! Prepare new in-ground planting areas with Miracle-Gro® All Purpose Garden Soil, mixing 3 inches of garden soil into the top 6 to 8 inches of native soil. This will feed new plants and help build strong roots, both of which will mean big, beautiful blooms!

How to Plant Sunflowers
While you can start sunflowers from seed indoors, it’s just as easy to grow them from seed outdoors. Plant sunflower seeds directly into the garden when the soil is warm—at least fifty degrees Fahrenheit. Use your thumb to push seeds 1 to 2 inches deep into the soil. Depth and spacing depends on the variety, so read the instructions on the seed package.
How to Water Sunflowers
Water thoroughly at the time of planting and keep the planting area about as moist as a wrung-out sponge (not soggy) while the seeds are sprouting. Most sunflowers are fairly drought-tolerant once established, but will bloom better with regular water. To be on the safe side, water sunflowers well when the top two inches of soil are dry.
How to Feed Sunflowers
While sunflowers are not big feeders, you will get more and better blooms if you make sure they get a steady stream of nutrition. A month after planting, begin feeding sunflowers with Miracle-Gro® Water Soluble All Purpose Plant Food. Make sure to follow the directions on the package.

How to Stake Sunflowers
Whether or not you need to stake your sunflowers depends on how tall they get, the strength of the stems, and the branching pattern. If you’re growing a bunch of sunflowers for cut flowers, you can plant the seeds and then create a latticework of stakes and twine for the plants to grow up through. Create two rows of staggered stakes with 3 feet in between each stake. Run twine around the stakes to create a wide lattice. You can also stake individual plants that are beginning to droop by placing a sturdy stake 3 inches from the plant stem and tying the stem to the stake, loosely, with twine in a couple of places.

How to Avoid Pest Problems with Sunflowers
Squirrels and chipmunks can be a problem when you first plant sunflower seeds, as they love to dig them up and eat them. Shake some ground cayenne pepper on the ground around where you’ve planted the seeds. If that doesn’t deter them, try starting seeds indoors and then planting them outside once they have sprouted. If you’re growing sunflowers for seed, these pests can be a problem near the time of harvest as well. When the outer petals dry up, cover the large flower heads with lightweight cloth tied around the stem.
How to Harvest Sunflower Seeds
Cut the large flower heads off when the back of the large flower disk has turned black and the seed heads are dry. Leave in a cool, dry place for a few days to completely dry out, and then remove the seeds by gently rubbing the flower heads with your thumbs. Keep dried seeds in a breathable paper or cloth bag to prevent mold growth.

How to Grow Sunflowers: Recap
Plant in a sunny location with moist, well-drained soil.
Prepare the existing soil by adding Miracle-Gro® All Purpose Garden Soil.
Sow seeds directly in the garden when the soil warms up in the spring.
Water seeds at the time of planting and regularly throughout the growing season.
Feed sunflowers with Miracle-Gro® Water Soluble All Purpose Plant Food, starting a month after planting.
Stake sunflowers if they have multiple branches or heavy flower heads.
Prevent pests from digging up newly planted seeds and from eating seed heads you hope to harvest.
Harvest flower heads when the back has turned black and the seeds have dried out.
2
0
文章
Dummer. ゛☀
2017年08月04日

How to Choose Hydrangeas
There are several types of hydrangea plants. Most grow as shrubs, although there is one vine, called climbing hydrangea. Mophead and lacecap types, perhaps the most common hydrangeas in zones 6 through 9, can fill many roles in the landscape. To grow hydrangeas as a hedge, choose panicle, smooth, or oakleaf hydrangea, which also offers good fall leaf color. If you are planning to grow hydrangeas in full shade, choose oakleaf hydrangea or the climbing type. If you’re planting hydrangeas in colder regions, panicle hydrangea (the type that can be grown as a tree) is the one you want, as it is the most winter-hardy.
Where to Plant Hydrangeas
The most important factors when choosing where to plant hydrangeas are light and moisture. In the South, plant them where they will receive morning sunlight and afternoon shade. With these conditions, you can grow the extremely popular French (also called bigleaf) hydrangea or panicle hydrangea. In northern regions, these same types of hydrangeas will grow in all-day sun.
The name hydrangea contains the root word “hydra” (like in hydration), which gives a clue about how much water these plants need. Make sure the spot you select is close to a water source. Know, too, that French hydrangeas tend to need the most water to thrive.

What Kind of Soil to Use for Hydrangeas
To grow hydrangeas in planting beds, focus on improving the native soil. One simple way to do that is to combine equal parts existing soil and Miracle-Gro® Garden Soil for Trees and Shrubs. In warmer regions (zones 7 and warmer), where winter tends to be mild, you can also grow hydrangeas in containers. Create just the right environment for them by filling pots with Miracle-Gro® Moisture Control® Potting Mix.
It is worth noting that mophead and lacecap hydrangeas both change flower color based on soil pH, which is a measure of how alkaline or acidic the soil is. Flowers turn pink to red in alkaline soil, and lavender to blue in acidic soil.
When to Plant Hydrangeas
When you see hydrangea plants for sale at local garden centers, that’s usually the right time for planting. This timing will vary by region. For instance, in areas with winter freezing and snow, hydrangeas should be planted in early spring or early fall (as soon as summer heat breaks). In warmer regions with mild winters, the window for planting hydrangeas is longer, from fall all the way through to early spring.

How to Plant Hydrangeas
How far apart to space plants depends on what type of hydrangea you’re growing. It’s best to check the plant tag. Note that hydrangeas planted in the shade tend to grow a little larger and spread a little more. When planting hydrangeas, dig a hole that is twice as wide as the width of the container the hydrangea came in. Place the plant in the hole so that the root ball is at the same depth as it was in the original pot, then fill in the hole with the 50-50 soil mixture described above. Water well after planting.
How to Plant Hydrangeas in Containers
To plant hydrangeas in containers, again check that plants are at the same depth as they were growing previously. How large a container to use depends on how large your hydrangea will grow. Typically, it’s safe to start with a pot 2 inches larger than the container the plant is currently in.How to Water Hydrangeas
Water deeply after planting, making sure to soak the root ball and surrounding soil. If the hydrangeas are dormant (without leaves), you may not need to water again until growth resumes.
Hydrangeas thrive in consistently moist soil. Check the soil at least once a week. When the top inch of soil is dry, it’s time to water. Once hydrangeas are established, they typically survive on rainfall, except during times of drought.How to Mulch Hydrangeas
After planting hydrangeas, apply a 2- to 3-inch-thick mulch layer around (but not on) the plants. Mulch helps keep soil moist and weeds at bay by blocking the weeds’ growth and access to sunlight. Choose whichever mulch looks best in your landscape: Scotts® bagged mulch, shredded leaves, pine straw, or some other locally available material.
How to Feed Hydrangeas
Fertilize hydrangeas in early spring as new growth appears and again just before summer. Avoid feeding hydrangeas after August, especially in regions with cold winters. A slow-release plant food works well. For best results, try Miracle-Gro® Shake ’n Feed® Flowering Trees & Shrubs Plant Food, which feeds for up to 3 months.
How to Prune Hydrangeas
When to prune hydrangeas hinges on the type of hydrangea you’re growing. Both French and oakleaf hydrangeas flower on old wood (last year’s stems), so you should prune plants right after flowering is finished. Smooth and panicle hydrangeas flower on new growth, which means you can prune stems in late winter to early spring. In general, as long as you give hydrangeas enough elbow room to spread and reach their mature size, you shouldn’t have to do too much pruning beyond cutting out dead or damaged wood.

How to Protect Hydrangeas in Winter
In colder areas, many gardeners erect a burlap screen around oakleaf and French hydrangeas in an effort to help protect flower buds that have already formed for the next year. The most important aspect of winter protection, however, is making sure the hydrangea you’re growing is hardy in your gardening zone.
How to Use Hydrangeas
Hydrangeas can fill multiple roles in the garden. Plant a hydrangea privacy hedge, or use them as a foundation planting around a home. A single hydrangea can be the focal point of a garden, and potted hydrangeas can bring beauty to a deck or entry garden. Hydrangeas also integrate well into mixed borders of shrubs and perennials, and make a natural-looking addition to a woodland setting.
Fresh hydrangea flowers are a favorite for filling vases and adorning wedding bouquets. If you want to dry hydrangea blooms, most experts suggest waiting to let flowers age and dry naturally on the plant. Harvest at the color stage you prefer.
There are several types of hydrangea plants. Most grow as shrubs, although there is one vine, called climbing hydrangea. Mophead and lacecap types, perhaps the most common hydrangeas in zones 6 through 9, can fill many roles in the landscape. To grow hydrangeas as a hedge, choose panicle, smooth, or oakleaf hydrangea, which also offers good fall leaf color. If you are planning to grow hydrangeas in full shade, choose oakleaf hydrangea or the climbing type. If you’re planting hydrangeas in colder regions, panicle hydrangea (the type that can be grown as a tree) is the one you want, as it is the most winter-hardy.
Where to Plant Hydrangeas
The most important factors when choosing where to plant hydrangeas are light and moisture. In the South, plant them where they will receive morning sunlight and afternoon shade. With these conditions, you can grow the extremely popular French (also called bigleaf) hydrangea or panicle hydrangea. In northern regions, these same types of hydrangeas will grow in all-day sun.
The name hydrangea contains the root word “hydra” (like in hydration), which gives a clue about how much water these plants need. Make sure the spot you select is close to a water source. Know, too, that French hydrangeas tend to need the most water to thrive.

What Kind of Soil to Use for Hydrangeas
To grow hydrangeas in planting beds, focus on improving the native soil. One simple way to do that is to combine equal parts existing soil and Miracle-Gro® Garden Soil for Trees and Shrubs. In warmer regions (zones 7 and warmer), where winter tends to be mild, you can also grow hydrangeas in containers. Create just the right environment for them by filling pots with Miracle-Gro® Moisture Control® Potting Mix.
It is worth noting that mophead and lacecap hydrangeas both change flower color based on soil pH, which is a measure of how alkaline or acidic the soil is. Flowers turn pink to red in alkaline soil, and lavender to blue in acidic soil.
When to Plant Hydrangeas
When you see hydrangea plants for sale at local garden centers, that’s usually the right time for planting. This timing will vary by region. For instance, in areas with winter freezing and snow, hydrangeas should be planted in early spring or early fall (as soon as summer heat breaks). In warmer regions with mild winters, the window for planting hydrangeas is longer, from fall all the way through to early spring.

How to Plant Hydrangeas
How far apart to space plants depends on what type of hydrangea you’re growing. It’s best to check the plant tag. Note that hydrangeas planted in the shade tend to grow a little larger and spread a little more. When planting hydrangeas, dig a hole that is twice as wide as the width of the container the hydrangea came in. Place the plant in the hole so that the root ball is at the same depth as it was in the original pot, then fill in the hole with the 50-50 soil mixture described above. Water well after planting.
How to Plant Hydrangeas in Containers
To plant hydrangeas in containers, again check that plants are at the same depth as they were growing previously. How large a container to use depends on how large your hydrangea will grow. Typically, it’s safe to start with a pot 2 inches larger than the container the plant is currently in.How to Water Hydrangeas
Water deeply after planting, making sure to soak the root ball and surrounding soil. If the hydrangeas are dormant (without leaves), you may not need to water again until growth resumes.
Hydrangeas thrive in consistently moist soil. Check the soil at least once a week. When the top inch of soil is dry, it’s time to water. Once hydrangeas are established, they typically survive on rainfall, except during times of drought.How to Mulch Hydrangeas
After planting hydrangeas, apply a 2- to 3-inch-thick mulch layer around (but not on) the plants. Mulch helps keep soil moist and weeds at bay by blocking the weeds’ growth and access to sunlight. Choose whichever mulch looks best in your landscape: Scotts® bagged mulch, shredded leaves, pine straw, or some other locally available material.
How to Feed Hydrangeas
Fertilize hydrangeas in early spring as new growth appears and again just before summer. Avoid feeding hydrangeas after August, especially in regions with cold winters. A slow-release plant food works well. For best results, try Miracle-Gro® Shake ’n Feed® Flowering Trees & Shrubs Plant Food, which feeds for up to 3 months.
How to Prune Hydrangeas
When to prune hydrangeas hinges on the type of hydrangea you’re growing. Both French and oakleaf hydrangeas flower on old wood (last year’s stems), so you should prune plants right after flowering is finished. Smooth and panicle hydrangeas flower on new growth, which means you can prune stems in late winter to early spring. In general, as long as you give hydrangeas enough elbow room to spread and reach their mature size, you shouldn’t have to do too much pruning beyond cutting out dead or damaged wood.

How to Protect Hydrangeas in Winter
In colder areas, many gardeners erect a burlap screen around oakleaf and French hydrangeas in an effort to help protect flower buds that have already formed for the next year. The most important aspect of winter protection, however, is making sure the hydrangea you’re growing is hardy in your gardening zone.
How to Use Hydrangeas
Hydrangeas can fill multiple roles in the garden. Plant a hydrangea privacy hedge, or use them as a foundation planting around a home. A single hydrangea can be the focal point of a garden, and potted hydrangeas can bring beauty to a deck or entry garden. Hydrangeas also integrate well into mixed borders of shrubs and perennials, and make a natural-looking addition to a woodland setting.
Fresh hydrangea flowers are a favorite for filling vases and adorning wedding bouquets. If you want to dry hydrangea blooms, most experts suggest waiting to let flowers age and dry naturally on the plant. Harvest at the color stage you prefer.
1
2
成长记
meriunkat
2017年07月22日

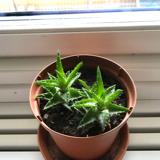
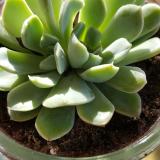
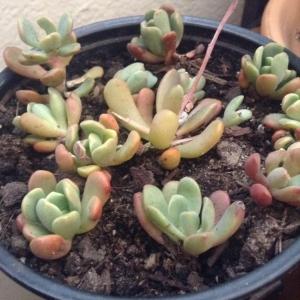
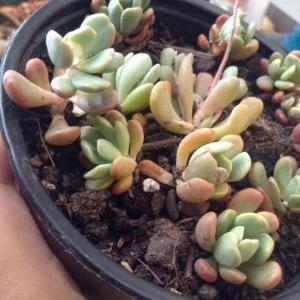
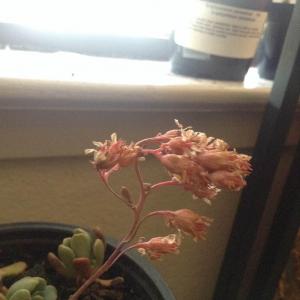
Anyone have an idea what kind of succulents these might be? they don't grow very much, i believe some have reached there full growth size. I took them out feom under bolders on the Lake Tahoe hiking trails.


2
0
Abby Gill:My guess is sedum pachyphyllum, but don't take my word for it.
成长记
Cleaux
2017年07月17日

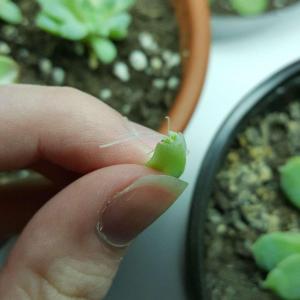
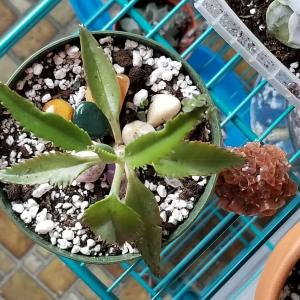
Gave her a piece of rabbit poop and it made open up and grow so much (also dropped it the other day😓)

1
0
Eljac
2017年07月09日

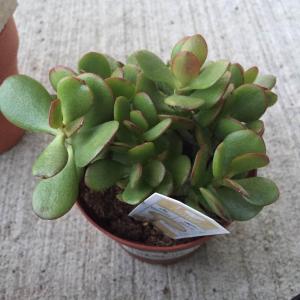
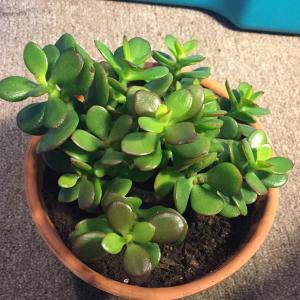
Its hard to believe after only two months, that my jade plant has grown exponentially this much larger ! I even had to change the pot size so it could have more room to grow :)


0
0
文章
Dummer. ゛☀
2017年07月01日

Another name for
Patchouli, alias sweet scented gum, mountain anise, patchouli, healthy grass, Cang Zhen, and patchouli grass.
Growth habit of
Patchouli is warm and light enough to grow in a half shade place, while keeping the temperature in the right range.
More like moist growth environment, more afraid of drought, the soil requirements are not high, usually choose deep fertile sandy soil.
The propagation of patchouli is generally seed and reproduction.
character
Perennial herb. Stem erect, high 0.5~1.5m, four prism, thick 7~8mm, the upper is very short hair, glabrous proximally in the upper part, with fertile branches. The heart leaves ovate to oblong lanceolate, length 4.5~11cm, width 3~6.5cm, upward gradually small, apex long caudate acuminate, base cordate, thin truncate, margin coarsely dentate, papery, with olive green, nearly glabrous, slightly below pale, puberulent and glandular punctate; petiole length 1.5~3.5cm.
Verticillasters many flowered, in the main stem or branch composed of terminal dense cylindrical spikes, spike length 2.5~12cm, diameter 1.8~2.5cm; base of inflorescence bracts not longer than 5mm, width 1~2mm, linear lanceolate, long acuminate, bract shape is similar, smaller, ca. 2~3mm; verticillasters with a short stalk, the total stem length was about 3mm, glandular puberulent. Calyx tubular obconical, ca. 6mm, width 2mm, glandular puberulent and yellow glandular, how many dyed light purple or purple red throat, slightly oblique, calyx teeth triangular lanceolate, ca. 3 teeth 2.2mm, 2 teeth slightly short. Corolla blue purple, ca. 8mm, outside puberulent, crown tube base width of about 1.2mm, micro beyond calyx, upward gradually wide, to the throat width 3mm, limb two lip, lip straight, apex emarginate, lower lip 3 lobed, lobes wide, length 2mm, width 3.5mm, flat, margin undulate, base width, lateral lobes semicircular. Stamens extending out of corolla, filaments slender, flattened, glabrous. Style nearly as long as stamens, filiform, apex equal, 2 - lobed. Disk thick, annular.
Ovary lobes apically villous. Mature nutlets ovate oblong, ca. 1.8mm, width 1.1mm, ventral ribbed, apex hispidulous, brown.


0
0


