文章
Miss Chen
2018年07月02日

Lima beans (Phaseolus lunatus) look like snap beans when they grow, and they develop as either vining or bush-like plants. Not tolerant of frost, lima bean seeds are sown in moist, fertile soil that is at least 65 degrees Fahrenheit.
Time Frame

A general time frame for germination of a lima bean is between six and 18 days. This is after the bean is sown in moist, well-drained soil at an depth of 1 inch in soil that is at least 65 degrees.
Factors

Temperature affects the rate of germination, as does the availability of moisture to soften the seed coat and cause the plant embryo to expand. Cool soil temperatures increase the time for germination, while warmer temperatures with ample moisture decrease the time of germination, perhaps to only three to six days. Dry soil never promotes germination.
Activity

Lima beans will germinate outside of soil if left in contact with damp paper towels and warm air temperatures. To study factors on germination, sow seeds in damp soil and various controlled/monitored temperatures as well as in a jar filled with damp towels or cotton balls. Note differences in germination rates as well as visually watching the seed transform through the glass jar walls.
Time Frame

A general time frame for germination of a lima bean is between six and 18 days. This is after the bean is sown in moist, well-drained soil at an depth of 1 inch in soil that is at least 65 degrees.
Factors

Temperature affects the rate of germination, as does the availability of moisture to soften the seed coat and cause the plant embryo to expand. Cool soil temperatures increase the time for germination, while warmer temperatures with ample moisture decrease the time of germination, perhaps to only three to six days. Dry soil never promotes germination.
Activity

Lima beans will germinate outside of soil if left in contact with damp paper towels and warm air temperatures. To study factors on germination, sow seeds in damp soil and various controlled/monitored temperatures as well as in a jar filled with damp towels or cotton balls. Note differences in germination rates as well as visually watching the seed transform through the glass jar walls.
0
0
文章
Miss Chen
2018年06月20日

Red onions can be eaten raw, boiled, broiled, baked, creamed, steamed, fried or pickled. These cool-season vegetables are grown by gardeners either from seeds or from small bulbs. Onions are biennial plants that take two years to complete their life cycle. When planted from seed, the red onion forms and above-ground steam--modified leave --and tiny underground bulbs. The next year, larger bulbs form until the red onions are mature and ready for harvest. Planting small red onion bulbs, known as onion sets, allows gardeners to bypass the first year of growing and harvest mature onions much more quickly.

Loosen the soil to the depth of 6 inches with a shovel two to four weeks before the last frost date. Till the soil until it is loose and ready for planting. Add 2 inches of compost to the soil to ensure good fertility.

Plant the red onion sets 1 inch deep and 2 to 4 inches apart. Cover them with soil, but do not compact the soil. Plant additional rows of onions 12 to 18 inches apart.

Weed the onion patch by hand. Red onions have shallow roots and do not grow well among weeds and grass, which compete for soil nutrients and moisture. Use a garden hoe to eradicate the weeds between the rows.

Water the red onion bulbs each week whenever the weather is dry. Water the soil around the base of the plants until the soil is moist to depth of 2 to 4 inches, depending on the size of the bulbs. Use a 1-inch layer of straw mulch around the red onion bulbs to suppress weed growth and hold in soil moisture.

Feed the red onions three weeks after active growth has started. Place a narrow band of 10-10-10 slow-release fertilizer 2 to 3 inches beside the row of onions. Scratch it into the top 1 inch of soil and water right away to start the fertilizer working. Use about 1 lb. of fertilizer for every 100 square feet of planting space.
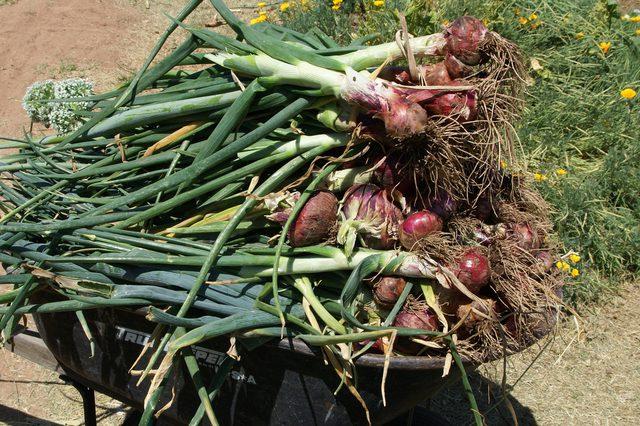
Pull every other onion when harvesting for the first time. This allows the red onions left in the garden more room to grow. Harvest the onions on a dry morning. Let the onions dry for the day in the shade. Later, braid the tops together and hang the red onion bunches in a cool, dry area with good air circulation.

Loosen the soil to the depth of 6 inches with a shovel two to four weeks before the last frost date. Till the soil until it is loose and ready for planting. Add 2 inches of compost to the soil to ensure good fertility.

Plant the red onion sets 1 inch deep and 2 to 4 inches apart. Cover them with soil, but do not compact the soil. Plant additional rows of onions 12 to 18 inches apart.

Weed the onion patch by hand. Red onions have shallow roots and do not grow well among weeds and grass, which compete for soil nutrients and moisture. Use a garden hoe to eradicate the weeds between the rows.

Water the red onion bulbs each week whenever the weather is dry. Water the soil around the base of the plants until the soil is moist to depth of 2 to 4 inches, depending on the size of the bulbs. Use a 1-inch layer of straw mulch around the red onion bulbs to suppress weed growth and hold in soil moisture.

Feed the red onions three weeks after active growth has started. Place a narrow band of 10-10-10 slow-release fertilizer 2 to 3 inches beside the row of onions. Scratch it into the top 1 inch of soil and water right away to start the fertilizer working. Use about 1 lb. of fertilizer for every 100 square feet of planting space.

Pull every other onion when harvesting for the first time. This allows the red onions left in the garden more room to grow. Harvest the onions on a dry morning. Let the onions dry for the day in the shade. Later, braid the tops together and hang the red onion bunches in a cool, dry area with good air circulation.
0
0
文章
Miss Chen
2018年06月20日

Soybean, lentil and pinto bean seeds grow rapidly, but the time it takes for a bean seed to germinate depends in part on where it sprouts. Germination of a seed in garden soil is measured from the day the seed is planted until just before its first shoot emerges above the soil. Germination outside the soil in a sprouting jar or other container usually is much shorter. Sometimes this is done as part of a science project or to produce edible sprouts.

Soybeans
Soybeans are a good model for a science germination experiment, because they sprout in three to four days in petri dishes, according to the Science Project Lab website. But Michigan State University notes that germination in the soil takes six to 14 days. Cold and excess or inadequate moisture are among the conditions that can slow germination outdoors. Living Gently Quarterly notes that soybean sprouts are becoming more common in cooking. But it warns not to sprout commercial seeds intended for planting, because they are chemically treated.
Lentils
The Sprout People website says it takes two to three days to germinate lentil seeds in sprouters, which are typically lidded containers with holes for air circulation. If growing in the garden, lentil seeds germinate in about 10 days at 68 degrees Fahrenheit, according to the Harvest to Table website. They are hardy annuals and members of the pea family. Sprouting any bean seed involves a process of soaking and regularly rinsing the seeds until they germinate in a sprouter that is kept out of direct sunlight and stored at 70 degrees Fahrenheit. Lentil sprouts can be eaten raw or cooked.

Pinto Beans
In soil, pinto beans germinate in four to eight days, according to the Texas A&M University Extension. But Sprout People says that when germinated in a sprouter, the process only takes 2 to 4 days. Unlike soybean and lentil sprouts, pinto bean sprouts are not edible unless cooked. Sprout People says they add a "delicate sweetness" to soup and that the process of sprouting alleviates some of the gaseousness associated with beans.

Soybeans
Soybeans are a good model for a science germination experiment, because they sprout in three to four days in petri dishes, according to the Science Project Lab website. But Michigan State University notes that germination in the soil takes six to 14 days. Cold and excess or inadequate moisture are among the conditions that can slow germination outdoors. Living Gently Quarterly notes that soybean sprouts are becoming more common in cooking. But it warns not to sprout commercial seeds intended for planting, because they are chemically treated.
Lentils
The Sprout People website says it takes two to three days to germinate lentil seeds in sprouters, which are typically lidded containers with holes for air circulation. If growing in the garden, lentil seeds germinate in about 10 days at 68 degrees Fahrenheit, according to the Harvest to Table website. They are hardy annuals and members of the pea family. Sprouting any bean seed involves a process of soaking and regularly rinsing the seeds until they germinate in a sprouter that is kept out of direct sunlight and stored at 70 degrees Fahrenheit. Lentil sprouts can be eaten raw or cooked.

Pinto Beans
In soil, pinto beans germinate in four to eight days, according to the Texas A&M University Extension. But Sprout People says that when germinated in a sprouter, the process only takes 2 to 4 days. Unlike soybean and lentil sprouts, pinto bean sprouts are not edible unless cooked. Sprout People says they add a "delicate sweetness" to soup and that the process of sprouting alleviates some of the gaseousness associated with beans.
0
0
文章
Miss Chen
2018年06月19日

Zucchini are summer garden favorites, growing quickly and easily and producing such abundant crops that they inspire the old joke that you'll run out of friends before you run out of extra zucchini. After you sow your zucchini seeds into your garden, you will watch the plant grow, emerging as a tiny seedling and, within a few months, sprawling as a long vine across your garden, producing flowers and, eventually, fruits.

Germination
Hold a zucchini seed in your hand and you are holding the raw materials for one of your garden's largest and most productive plants. The zucchini's life begins with germination, when soil temperatures warm to about 70 degrees Fahrenheit, causing the seed to absorb large quantities of water. Water triggers the embryo to begin growing, and soon, it exceeds the tight confines of the seed coat and bursts free. The root emerges first, correctly orienting and anchoring the seed in the soil. Next, the primitive leaves, called cotyledons, stretch upward, pushing aside the soil and reaching for the light.
Growth
Zucchini grow in two forms: bush, or determinate, and vining, or indeterminate. Growth from a tiny seedling into these large forms requires rapid mitosis, a process during which cells make an extra copy of their genetic material and split into two cells. Growth occurs in a part of the plant called the meristem, which you can find at the growing end of a zucchini vine, the tips of the roots and in the nodes, points along the stem that develop into leaves and flowers. The ability of the zucchini plant to produce so many different structures from a single type of cell allows the plant to grow rapidly, producing edible fruits within a matter of a few months.

Reproduction
During the final stage of the zucchini's life, it concentrates its energy on producing seeds to ensure the survival of the next generation. When the days lengthen in midsummer, meristems along the vine grow into flower buds. Zucchini, like all members of the squash family, produce male and female flowers separately on a single vine and rely on bees to carry pollen from male flowers to female flowers. Once pollination occurs, the pollen grows into a tube that enters the ovary of the female flower and deposits sperm cells where they can fertilize the egg within. Each ovule within the ovary develops into a separate seed, and the wall of the ovary thickens into a fleshy fruit coat, the tasty green fruit that you recognize as zucchini.

Germination
Hold a zucchini seed in your hand and you are holding the raw materials for one of your garden's largest and most productive plants. The zucchini's life begins with germination, when soil temperatures warm to about 70 degrees Fahrenheit, causing the seed to absorb large quantities of water. Water triggers the embryo to begin growing, and soon, it exceeds the tight confines of the seed coat and bursts free. The root emerges first, correctly orienting and anchoring the seed in the soil. Next, the primitive leaves, called cotyledons, stretch upward, pushing aside the soil and reaching for the light.
Growth
Zucchini grow in two forms: bush, or determinate, and vining, or indeterminate. Growth from a tiny seedling into these large forms requires rapid mitosis, a process during which cells make an extra copy of their genetic material and split into two cells. Growth occurs in a part of the plant called the meristem, which you can find at the growing end of a zucchini vine, the tips of the roots and in the nodes, points along the stem that develop into leaves and flowers. The ability of the zucchini plant to produce so many different structures from a single type of cell allows the plant to grow rapidly, producing edible fruits within a matter of a few months.

Reproduction
During the final stage of the zucchini's life, it concentrates its energy on producing seeds to ensure the survival of the next generation. When the days lengthen in midsummer, meristems along the vine grow into flower buds. Zucchini, like all members of the squash family, produce male and female flowers separately on a single vine and rely on bees to carry pollen from male flowers to female flowers. Once pollination occurs, the pollen grows into a tube that enters the ovary of the female flower and deposits sperm cells where they can fertilize the egg within. Each ovule within the ovary develops into a separate seed, and the wall of the ovary thickens into a fleshy fruit coat, the tasty green fruit that you recognize as zucchini.
0
0
求助
Pommy Mommy
2018年06月11日

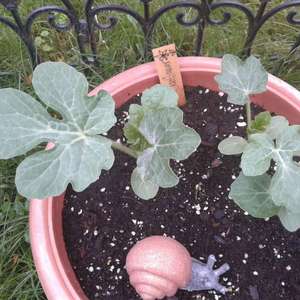
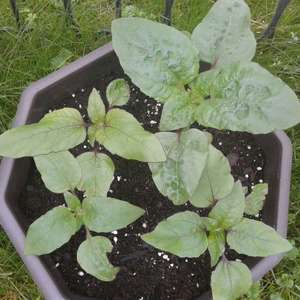
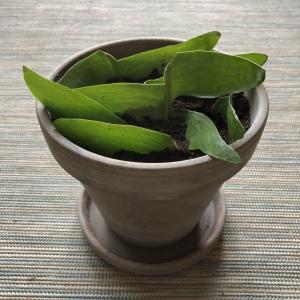
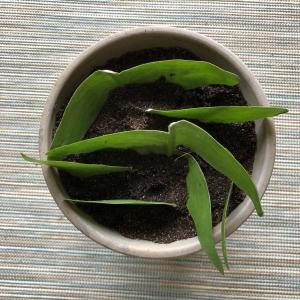
I THOUGHT planted "Dwarf Sunflowers" seeds in both pots, at the same time a few weeks ago but as you can obviously see, they're two completely different looking plants. I KNOW (for sure) the brown, octagon shaped pot is sunflowers. But I have NO IDEA what the seedlings are in the round terracotta pot. P] 00P]


1
0
Pommy Mommy:I think you're right! I think they are Crimson watermelons and they are huge now no fruit yet but I'll post them soon as I find any
sunnyzou:most like a kind of melon
成长记
Plantlin
2018年05月21日

And the second leaf I put in soil for cuttings and seeds! Only added some water to the first three pieces. Let’s wait and see! Owww can’t wait! ;)


1
0
文章
Miss Chen
2018年05月15日

Across the month of March, gardeners in Tennessee prepare their soil beds in anticipation of planting potatoes. Rather than growing these vegetables from seeds, gardeners purchase small, healthy tubers called seed potatoes, which are certified disease-free. Since seed potatoes are planted in the ground and initially protected from frost, planting take place roughly two to four weeks before the average last spring frost date across the Volunteer State. The ideal garden site for potatoes is one with fertile, organic-rich soil that is moist and drains well. Full sun exposure ensures the best growth and production of tubers for harvest.

Step 1
Cultivate the soil with a shovel or rototiller in early spring as soon as the ground is workable. Dig the soil 6 to 10 inches deep. That means there is no frost in the soil, and it's not overly wet. Depending on the location in Tennessee, prepare the vegetable garden area for potatoes between late February and late March.
Step 2
Scatter 1 to 3 inches of organic matter on top of the soil and mix with the shovel or rototiller. Use compost, leaf mold or well-rotted animal manure to improve the texture and fertility of the soil. The potatoes will benefit from your bed preparation.
Step 3
Rake the tilled area smooth with a garden rake and allow it to naturally settle for three to seven days. While raking, remove any debris and pulverize any soil clumps so the area is even and fine-textured.
Step 4
Purchase seed potatoes at the garden center. Ask staff members for insight into the different varieties. Confirm that the seed potatoes are certified disease-free. They also should look plump and feel dry and firm to the touch.

Step 5
Cut the seed potatoes with a knife into segments about 2 oz. in size. Each cut segment needs to contain at least one dormant bud called an eye. From this eye the potato stem and roots sprout. This is optional since some seed potatoes are rather small and don't need cutting so one to three eyes exist on each. If you cannot plant the cut seed potatoes within four hours, allow them to air dry for one or two days. This curing of the wounds seals the tuber and helps prevent any infestation by disease spores.
Step 6
Create a 4- to 5-inch-deep furrow in the vegetable garden with the hoe. Space rows of potatoes 36 inches apart.
Step 7
Place a seed potato into the furrow with the cut side down or eyes oriented upward or to the side. Space potatoes 10 to 12 inches apart in the furrow. Cover them with soil and gently tamp the surface with the back of the hoe blade. This removes air pockets and brings the seed potatoes in direct contact with soil particles.

Step 1
Cultivate the soil with a shovel or rototiller in early spring as soon as the ground is workable. Dig the soil 6 to 10 inches deep. That means there is no frost in the soil, and it's not overly wet. Depending on the location in Tennessee, prepare the vegetable garden area for potatoes between late February and late March.
Step 2
Scatter 1 to 3 inches of organic matter on top of the soil and mix with the shovel or rototiller. Use compost, leaf mold or well-rotted animal manure to improve the texture and fertility of the soil. The potatoes will benefit from your bed preparation.
Step 3
Rake the tilled area smooth with a garden rake and allow it to naturally settle for three to seven days. While raking, remove any debris and pulverize any soil clumps so the area is even and fine-textured.
Step 4
Purchase seed potatoes at the garden center. Ask staff members for insight into the different varieties. Confirm that the seed potatoes are certified disease-free. They also should look plump and feel dry and firm to the touch.

Step 5
Cut the seed potatoes with a knife into segments about 2 oz. in size. Each cut segment needs to contain at least one dormant bud called an eye. From this eye the potato stem and roots sprout. This is optional since some seed potatoes are rather small and don't need cutting so one to three eyes exist on each. If you cannot plant the cut seed potatoes within four hours, allow them to air dry for one or two days. This curing of the wounds seals the tuber and helps prevent any infestation by disease spores.
Step 6
Create a 4- to 5-inch-deep furrow in the vegetable garden with the hoe. Space rows of potatoes 36 inches apart.
Step 7
Place a seed potato into the furrow with the cut side down or eyes oriented upward or to the side. Space potatoes 10 to 12 inches apart in the furrow. Cover them with soil and gently tamp the surface with the back of the hoe blade. This removes air pockets and brings the seed potatoes in direct contact with soil particles.
0
0
文章
Miss Chen
2018年05月14日

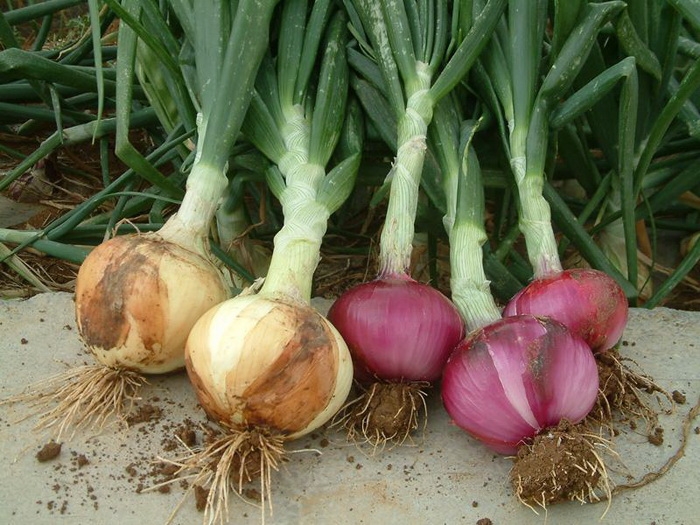
Homegrown vegetables always have more flavor and taste than store-purchased products, including onions. Most homegrown onions start with seeds or what is called seed sets, but Egyptian and potato onion varieties can grow from vegetative parts of the original onion plant. Potato, or multiplier, onions form an underground compound bulb from the mother bulb. This compound bulb is composed of six to 12 individual onion bulbs. Egyptian onions, on the other hand, send up a shoot with tiny bulblets on top for planting. Gardeners primarily grow multipliers and Egyptian onion to harvest as green onions in the spring. They sometimes are known as winter onions.
Step 1
Prepare the soil where you intend to plant the onions by adding organic matter in a ratio of one part organic matter to two parts soil. Work the mixture with a shovel into the plot at a depth of six to eight inches. Onions need a rich, loamy soil that will drain well.
Step 2
Harvest the attached compound bulbs from the mother bulb for either type of onion. Carefully dig the multiplier onion's mother bulb from the ground and separate the attached smaller onion bulbs from it. Cut off the bulblet cluster from the center green stem on the Egyptian onion and separate the bulblets.
Step 3
Plant bulbs or bulblets one to two inches deep and spaced three to five inches apart. Dig a hole for each onion piece, place the onion pointed end up, and cover it with the amended soil. Gently pat down the soil surface to eliminate air pockets and ensure good contact between the piece and the soil.
Step 4
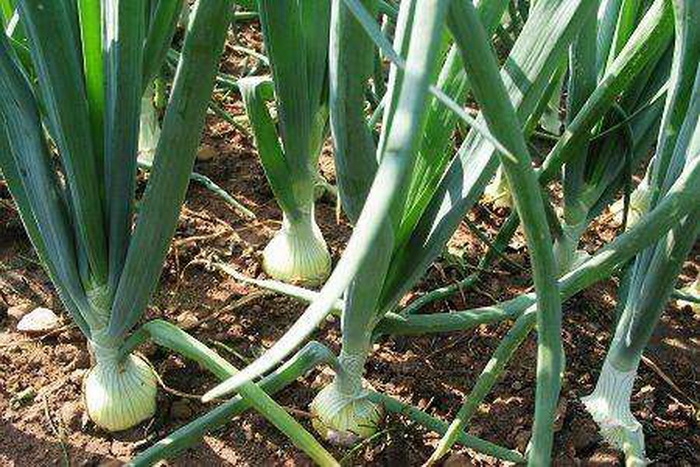
Apply a fertilize formulated to a 1-2-2 ratio, like 5-10-10, following the instructions, every four to six weeks until the first frost. In the spring, apply one more feeding when the temperatures begin to warm. Onions are heavy feeder and require additional supplements of phosphorus and potassium, but overfeeding can produce soft bulbs or burn plants.
Step 5
Apply three to six inches of mulch over the planted onions in colder climates when the temperatures drop to freezing to protect growing onions. Remove the mulch once temperatures warm in the spring.

Step 1
Prepare the soil where you intend to plant the onions by adding organic matter in a ratio of one part organic matter to two parts soil. Work the mixture with a shovel into the plot at a depth of six to eight inches. Onions need a rich, loamy soil that will drain well.
Step 2
Harvest the attached compound bulbs from the mother bulb for either type of onion. Carefully dig the multiplier onion's mother bulb from the ground and separate the attached smaller onion bulbs from it. Cut off the bulblet cluster from the center green stem on the Egyptian onion and separate the bulblets.
Step 3
Plant bulbs or bulblets one to two inches deep and spaced three to five inches apart. Dig a hole for each onion piece, place the onion pointed end up, and cover it with the amended soil. Gently pat down the soil surface to eliminate air pockets and ensure good contact between the piece and the soil.

Step 4
Apply a fertilize formulated to a 1-2-2 ratio, like 5-10-10, following the instructions, every four to six weeks until the first frost. In the spring, apply one more feeding when the temperatures begin to warm. Onions are heavy feeder and require additional supplements of phosphorus and potassium, but overfeeding can produce soft bulbs or burn plants.
Step 5
Apply three to six inches of mulch over the planted onions in colder climates when the temperatures drop to freezing to protect growing onions. Remove the mulch once temperatures warm in the spring.
0
0
成长记
MrsMissy3477
2018年05月11日

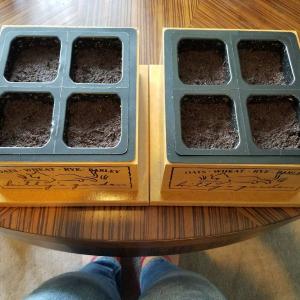
Mixed seeds in each pod. Left is Box 1, Right is Box 2. Planted in peat moss discs today, 05.11.18.

2
0
文章
Miss Chen
2018年04月29日

Too much water leads to root rot, while not enough causes splitting and hotness. If you get the seeds in the ground two to three weeks before the last winter frost, they'll be ready for eating radishes in 25 to 45 days. Radish seeds must remain moist for proper germination and sprouting to occur. This process takes five to 10 days. Implement a dedicated watering routine once the radish leaves appear. Proper watering practices ensure an ample amount of flavor and crunch.

Weeding
Pull out all weeds and keep them out during radish germination. If the seeds have to compete with nutrient-depleting weed roots, growth and yield will be stifled. Place a surveyor's stake at each end of the row where you'll be planting the seeds and then tie a string between the two. If any plant grows that isn't beneath this string, rip them out. Early and daily weeding practices will keep both you and the radishes from getting overwhelmed.
Preparing the Soil
Wait for the soil temperature to remain above 40 degrees. Rough up the soil with a garden fork and mix in 2 to 4 inches of organic compost. Apply 2 to 4 cups of all-purpose fertilizer over every 100 square feet of soil. Work the compost and fertilizer into the first 6 inches of the seedbed. Radishes do best when grown in sandy, well-draining soils. If you have clay-type soil, amend it with 3 inches of peat moss. Mix the peat moss in with the soil.
Planting
Plant the seeds 1/2 to 1 inch deep in a row beneath the string. Spacing doesn't matter at this point, but try to plant a seed every ½ inch. If you want more than one crop, plant new seeds every 10 days while temperatures remain below 80 degrees. Hotter temperatures make radishes bitter and hollow. Spring and fall are the best times to plant radishes.

Watering
Radishes need water, but not too much. Radishes will thrive in a seedbed with proper drainage. Keep the soil evenly moist, but not soaked. Don't allow the soil to completely dry out before watering. This causes the roots to crack. The soil should always feel wet to the touch. If you live in an arid climate where evaporation is a problem, mulch around the plants with a 2-inch layer of lawn clippings. The mulch keeps the weeds down.
Harvesting
Pull up ripe radishes after 25 to 45 days. Shake off the soil and wash them clean. Cut the leaves and root tip from the bulb with a sharp knife. Store uneaten radishes in the refrigerator inside a water-filled dish. The water keeps them from drying out and cracking.

Weeding
Pull out all weeds and keep them out during radish germination. If the seeds have to compete with nutrient-depleting weed roots, growth and yield will be stifled. Place a surveyor's stake at each end of the row where you'll be planting the seeds and then tie a string between the two. If any plant grows that isn't beneath this string, rip them out. Early and daily weeding practices will keep both you and the radishes from getting overwhelmed.
Preparing the Soil
Wait for the soil temperature to remain above 40 degrees. Rough up the soil with a garden fork and mix in 2 to 4 inches of organic compost. Apply 2 to 4 cups of all-purpose fertilizer over every 100 square feet of soil. Work the compost and fertilizer into the first 6 inches of the seedbed. Radishes do best when grown in sandy, well-draining soils. If you have clay-type soil, amend it with 3 inches of peat moss. Mix the peat moss in with the soil.
Planting
Plant the seeds 1/2 to 1 inch deep in a row beneath the string. Spacing doesn't matter at this point, but try to plant a seed every ½ inch. If you want more than one crop, plant new seeds every 10 days while temperatures remain below 80 degrees. Hotter temperatures make radishes bitter and hollow. Spring and fall are the best times to plant radishes.

Watering
Radishes need water, but not too much. Radishes will thrive in a seedbed with proper drainage. Keep the soil evenly moist, but not soaked. Don't allow the soil to completely dry out before watering. This causes the roots to crack. The soil should always feel wet to the touch. If you live in an arid climate where evaporation is a problem, mulch around the plants with a 2-inch layer of lawn clippings. The mulch keeps the weeds down.
Harvesting
Pull up ripe radishes after 25 to 45 days. Shake off the soil and wash them clean. Cut the leaves and root tip from the bulb with a sharp knife. Store uneaten radishes in the refrigerator inside a water-filled dish. The water keeps them from drying out and cracking.
0
1
文章
Miss Chen
2018年04月29日

Bell peppers ripen in shades of yellow, orange, red, green or purple. The seeds inside the peppers appear disc-shaped and white. The small seeds require specific light and temperature settings for them to germinate. The seeds are often germinated indoors to control the conditions. Bell pepper seeds will germinate in eight to 10 weeks depending on the variety and growing environment. After the seeds germinate, you can harvest the peppers in 65 to 70 days.

Step 1
Select fresh bell peppers and cut the tops off with a knife. Scoop the insides out of the pepper with a spoon. Remove any debris from the seeds and spread them on a pepper towel in a single layer.
Step 2
Place the paper towel with the seeds on a plate. Place the seeds outdoor in the sun or next to a sunny window. Allow the bell pepper seeds to dry for five to six days.
Step 3
Store the pepper seeds in a paper envelope. Store the envelope in a dry location until early spring arrives.
Step 4
Fill seed starting pots with seed starting soil. Warm the soil to 80 degrees F by placing the pots under a heat lamp.

Step 5
Soak the bell pepper seeds in warm water for three hours. Sow two bell pepper seeds in each container. The seeds require a shallow planting, so plant them twice as deep as their diameter.
Step 6
Cover the pots with a clear plastic bag or a plastic dome that comes with seed starting pots. Inspect the soil daily to ensure that it does not dry out completely. Water the soil so that it remains moist. Avoid overwatering the seeds because it can lead to fungal infestations.
Step 7
Maintain the 80 degrees F temperature under the heat lamp. Keep the bell peppers under the heat for 16 hours a day. Always check the soil temperature to ensure that it remains between 80 and 90 degrees F during the daytime. Turn the heat lamp off for eight hours at night so that the soil temperature remains above 60 degrees F. Continue to repeat the heat and light conditions until the seeds germinate.
Step 8
Thin the bell pepper seeds to one healthy seedling to each pot once one set of true leaves develops. Transplant the bell pepper seedlings outdoors once the threat of frost passes and the soil temperature remains above 50 degrees F. Space the pepper plants 12 to 18 inches apart.

Step 1
Select fresh bell peppers and cut the tops off with a knife. Scoop the insides out of the pepper with a spoon. Remove any debris from the seeds and spread them on a pepper towel in a single layer.
Step 2
Place the paper towel with the seeds on a plate. Place the seeds outdoor in the sun or next to a sunny window. Allow the bell pepper seeds to dry for five to six days.
Step 3
Store the pepper seeds in a paper envelope. Store the envelope in a dry location until early spring arrives.
Step 4
Fill seed starting pots with seed starting soil. Warm the soil to 80 degrees F by placing the pots under a heat lamp.

Step 5
Soak the bell pepper seeds in warm water for three hours. Sow two bell pepper seeds in each container. The seeds require a shallow planting, so plant them twice as deep as their diameter.
Step 6
Cover the pots with a clear plastic bag or a plastic dome that comes with seed starting pots. Inspect the soil daily to ensure that it does not dry out completely. Water the soil so that it remains moist. Avoid overwatering the seeds because it can lead to fungal infestations.
Step 7
Maintain the 80 degrees F temperature under the heat lamp. Keep the bell peppers under the heat for 16 hours a day. Always check the soil temperature to ensure that it remains between 80 and 90 degrees F during the daytime. Turn the heat lamp off for eight hours at night so that the soil temperature remains above 60 degrees F. Continue to repeat the heat and light conditions until the seeds germinate.
Step 8
Thin the bell pepper seeds to one healthy seedling to each pot once one set of true leaves develops. Transplant the bell pepper seedlings outdoors once the threat of frost passes and the soil temperature remains above 50 degrees F. Space the pepper plants 12 to 18 inches apart.
0
0
文章
Miss Chen
2018年04月27日

Pumpkins (Cucurbita spp.) grow when there is no threat of frost for at least 90 days. An annual vine that dies after the pumpkin fruits form and ripen, gardeners in the United States plant seeds in late spring or midsummer for harvest in time for October festivities. Pumpkins need abundant sunlight and warmth to grow, flower and set fruits well. Shady garden locations are poor sites for raising pumpkin plants.
Growing Requirements

Pumpkin patches are always in an open, sunny spot.
Pumpkin vines need lots of space to sprawl their vines across the garden soil. Depending on the variety, 500 to 2,000 square feet is needed for bush-vine pie and jumbo jack o' lantern types, respectively. Plant seeds in a fertile, moist but well-drained soil that is slightly acidic to neutral in pH. Full sun is a must -- at least 8 hours of direct sunrays daily. Insufficient sunlight causes vines to grow long and spindly with few leaves and flowers.
Effects of Shade
Shady growing conditions retard the growth of pumpkins on many levels. The shade delays warming of soil and air, thereby slowing vine growth. Lack of sun prevents leaves from producing enough carbohydrates, leads to delay in flowering and slows the development of pumpkin fruits. Pumpkin vines also do not do well in moist, high humidity conditions. A shady garden slows evaporation of dew and rain droplets and can increase susceptibility for stem, root and fruit rot from fungi and molds.
When to Plant Pumpkins

In the northern United States where the summers aren't too hot and the frost-free growing seasons are shorter, sow pumpkin seeds in mid to late spring after the expected last spring frost date in May. Soil temperatures above 60 degrees Fahrenheit are best. Sow pumpkins the same time as cucumbers, sweet corn, watermelon, cantaloupe and squash. In the extreme southern U.S., sow pumpkins in early summer, anytime from mid June early July, so they grow and ripen just in time for harvest in September and October. Pumpkin vines die too early in summer in the South, which leads to pumpkin rot or deterioration in the warm temperatures if sown in April or May.
Flowering Insight

Ample sunlight encourages production of flowers in pumpkin vines. Blossoms are either male or female in gender, and both must be present for pollination by bees. The flowers open during the day and close at night or when it's not bright enough or rainy. Shady conditions can delay flowers opening and keep temperatures too cool for heavy visitation by bees. Only pollinated, female pumpkin flowers produce pumpkin fruits.
Growing Requirements

Pumpkin patches are always in an open, sunny spot.
Pumpkin vines need lots of space to sprawl their vines across the garden soil. Depending on the variety, 500 to 2,000 square feet is needed for bush-vine pie and jumbo jack o' lantern types, respectively. Plant seeds in a fertile, moist but well-drained soil that is slightly acidic to neutral in pH. Full sun is a must -- at least 8 hours of direct sunrays daily. Insufficient sunlight causes vines to grow long and spindly with few leaves and flowers.
Effects of Shade
Shady growing conditions retard the growth of pumpkins on many levels. The shade delays warming of soil and air, thereby slowing vine growth. Lack of sun prevents leaves from producing enough carbohydrates, leads to delay in flowering and slows the development of pumpkin fruits. Pumpkin vines also do not do well in moist, high humidity conditions. A shady garden slows evaporation of dew and rain droplets and can increase susceptibility for stem, root and fruit rot from fungi and molds.
When to Plant Pumpkins

In the northern United States where the summers aren't too hot and the frost-free growing seasons are shorter, sow pumpkin seeds in mid to late spring after the expected last spring frost date in May. Soil temperatures above 60 degrees Fahrenheit are best. Sow pumpkins the same time as cucumbers, sweet corn, watermelon, cantaloupe and squash. In the extreme southern U.S., sow pumpkins in early summer, anytime from mid June early July, so they grow and ripen just in time for harvest in September and October. Pumpkin vines die too early in summer in the South, which leads to pumpkin rot or deterioration in the warm temperatures if sown in April or May.
Flowering Insight

Ample sunlight encourages production of flowers in pumpkin vines. Blossoms are either male or female in gender, and both must be present for pollination by bees. The flowers open during the day and close at night or when it's not bright enough or rainy. Shady conditions can delay flowers opening and keep temperatures too cool for heavy visitation by bees. Only pollinated, female pumpkin flowers produce pumpkin fruits.
0
0


