文章
Dummer. ゛☀
2017年09月19日

Large, ragged holes in the leaves of cabbage, broccoli, Brussels sprouts, collards, kale, or cauliflower plants are a sign that cabbageworms may have invaded your garden. The green caterpillars may also bore into the heads of these crops, leaving behind their dark green frass (droppings). Cabbage loopers cause similar damage. Plants can tolerate a moderate amount of damage without reduction in yield.
The cabbageworm is the larval form of a small white butterfly (Pieris rapae) that has three to four black spots on its wings. The butterfly lays white eggs on the underside of leaves; eggs hatch within a week and the larvae feed for approximately two weeks. The larvae pupate in silken cocoons attached to the lower leaves. There are several generations per year, and they are found throughout North America.
Prevention and control
Cover susceptible crops with garden fabric in early spring as a barrier to the egg-laying moths.
If plants are not covered, inspect them frequently. Crush the eggs; handpick the cabbageworms and drop them into a pail of soapy water.
Encourage native beneficial insects, such as parasitic wasps, that prey on caterpillars.
Remove plant debris from the garden in fall to minimize opportunities for the pest to overwinter.
0
0
文章
Dummer. ゛☀
2017年09月19日
The tomato hornworm, Manduca quinquemaculata, and the tobacco hornworm, M. sexta, are common pests of tomato, tobacco, eggplant, pepper, and potato throughout most of the United States. The hornworms are large (up to 4 inches long), bright green caterpillars with diagonal white stripes and a prominent horn at the rear. The two species have slightly different markings. The tomato hornworm has 8 diagonal white stripes on each side; the horn is straight and black. The tobacco hornworm has 7 diagonal white stripes; its horn is curved and red.
Symptoms and Diagnosis
Larvae of both species consume entire leaves and small stems and may chew large pieces from green fruit. Hornworm damage is obvious when the infestation is moderate to heavy because of the large amount of defoliation. Search for the large caterpillars. Large, black droppings on the leaves or ground beneath the plant will usually indicate the presence of hornworms.
Life Cycle
Hornworms overwinter in the soil as hard-shelled, brown pupae. Large adult moths, known as sphinx or hummingbird moths, emerge in May or June and deposit spherical green eggs on the undersides of leaves of host plants. The larvae hatch a week later and feed on foliage and fruit for three to four weeks until reaching full development. Pupation occurs in the soil and adults emerge 2 to 4 weeks later to lay second generation eggs. In Missouri there may be one or two generations depending on location.
Integrated Pest Management Strategies
1. Handpick caterpillars. Handpicking is usually all that is needed to control these pests in a home garden. Larvae are most easily located in early morning, often on the exterior of the plant. Leave any caterpillars with small white cocoons on their backs; they are being parasitized by a braconid wasp, which will soon produce more wasps to control them.
2. Biological control. Bacterial insecticides containing Bacillus thuringiensis kurstaki (Btk) are effective when larvae are smaller. It may take several days for the caterpillars to die, but feeding generally stops shortly after treatment.
3. Cultivation. Disking or rototilling after harvest destroys pupae in soil, reducing overwintering numbers.
4. Chemical control. An application of carbaryl (Sevin) or permethrin will effectively control hornworms if handpicking is impractical. However, chemical control will also reduce the numbers of beneficial insects.
0
0
文章
Dummer. ゛☀
2017年09月19日
Algal leaf spot is a foliar disease most commonly seen in warm humid climates or in greenhouses. The causal organism is Cephaleuros virescens, a green parasitic alga whose usual hosts are plants with leathery leaves such as cotoneasters, magnolias, hollies, rhododendrons and viburnums. Algal leaf spot is sometimes called green scurf because the spots may have a crusty, fuzzy or flaky appearance.
Symptoms and Diagnosis
Algal leaf spot is characterized by grayish, green, brown or orange cushion-like blotches on the leaf surface. Some hosts may also have diseased twigs and branches that are girdled and stunted with reddish brown fruiting bodies. The spots are generally 1/2 inch or less in diameter although they may coalesce to form larger colonies. Leaf tissue may die beneath the spots and the leaves may yellow and drop prematurely.
Life Cycle
During wet weather, the algae produce spores that are spread by wind and splashing rain. The spores infect leaf tissue causing small, greenish circular spots that may age to light brown or reddish brown. The spots may appear raised and velvety. The algae will overwinter or survive other unfavorable environmental conditions in leaf spots including those on fallen leaves.
Integrated Pest Management Strategies
1. Encourage healthy plants with good cultural techniques. This disease is most damaging on plants that are already slow-growing or weakened.
2. Clean up fallen leaves and remove diseased leaves from the plant. Good sanitation practices will help control this disease.
3. Promote dry leaves by improving air circulation and drainage. If necessary, selectively prune overcrowded vegetation. Avoid spraying water on the leaves.
4. Use fungicidal sprays containing copper if chemical control is necessary
0
0
文章
Dummer. ゛☀
2017年09月18日
Hens and Chicks plant (Sempervivum spp.) produce rosettes of thick leaves that cluster together in colonies of both large and small plants. Foliage color varies depending on the variety, but many feature green interior leaves surrounded by a ring of red or darker green foliage. Each Hens and Chicks rosette flowers approximately every four years, near the end of its life, but the plants are constantly producing new rosettes from the roots to replace those that fade. Hens and Chicks grow outdoors in U.S. Department of Agriculture hardiness zones 3 to 8, but you can grow them as houseplants everywhere.

1. Place potted plants in an area that receives full sunlight. Grow potted plants in a fast-draining succulent mix in a pot that contains at least one bottom drainage hole. Outdoors, plant Hens and Chicks in a sandy or rocky bed that drains quickly and receives full sun to part shade.

2. Water the plants only when the soil dries out completely. Water until moisture drips from the bottom of the pot and empty the pot’s drip tray after the soil finishes draining, usually within 30 to 60 minutes. Garden plants rarely require watering.
3. Cut old rosettes of foliage from the plant after they produce a flower and die back naturally. Cut the rosettes off the plant at ground level with a clean, sharp knife.

4. Remove offsets, or small new plants, from the outside of a group of Hens and Chicks to propagate new plants. Cut the small offsets from the small plants just below the soil surface with a sharp knife. Plant the rosettes in a well-draining bed or pot of succulent potting soil immediately after removal. The offsets quickly set roots and grow into new plants.
1. Place potted plants in an area that receives full sunlight. Grow potted plants in a fast-draining succulent mix in a pot that contains at least one bottom drainage hole. Outdoors, plant Hens and Chicks in a sandy or rocky bed that drains quickly and receives full sun to part shade.
2. Water the plants only when the soil dries out completely. Water until moisture drips from the bottom of the pot and empty the pot’s drip tray after the soil finishes draining, usually within 30 to 60 minutes. Garden plants rarely require watering.
3. Cut old rosettes of foliage from the plant after they produce a flower and die back naturally. Cut the rosettes off the plant at ground level with a clean, sharp knife.
4. Remove offsets, or small new plants, from the outside of a group of Hens and Chicks to propagate new plants. Cut the small offsets from the small plants just below the soil surface with a sharp knife. Plant the rosettes in a well-draining bed or pot of succulent potting soil immediately after removal. The offsets quickly set roots and grow into new plants.
4
2
lrgarden:so beautiful
文章
Dummer. ゛☀
2017年09月18日
The eastern white pine, Pinus strobus, is a fast growing, easily transplanted tree. It can become quite large, requiring sufficient room to develop properly. White pine needles are bluish-green to medium-green with five per bundle, about 4 inches long, very thin, and not stiff. Used as a windbreak, the limbs are brittle and may suffer wind damage which can help lead to decline of the tree. In general, symptoms of decline include some pattern of needle yellowing or browning, shriveled bark on trunk and branches, oozing sap, and in some cases, death of the tree. Affected trees can range from 2 feet to 20 feet or more. The main factor is root decline.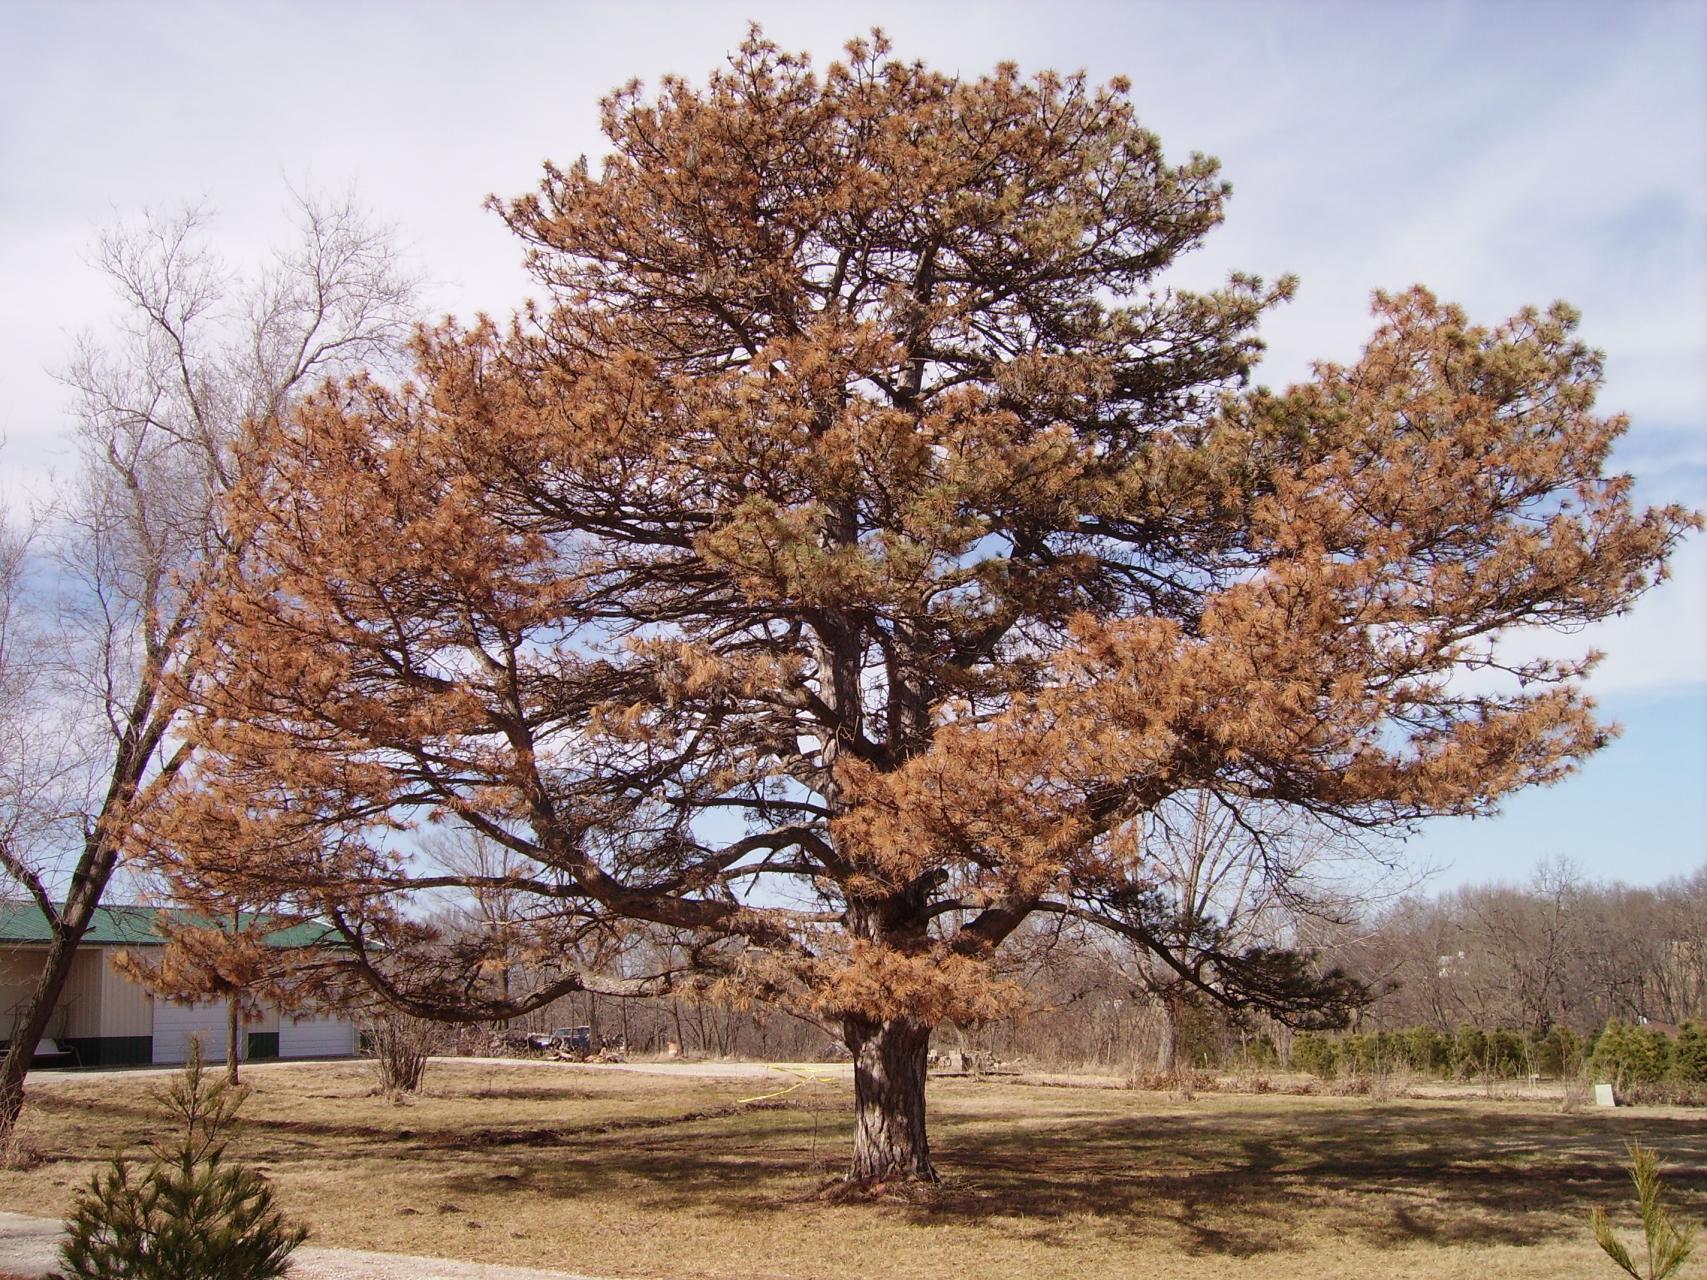
Symptoms and Diagnosis
Inspect the roots for brown discoloration and the outer layer pulling off or not present. If the roots are white and healthy, then there are other problems. Other symptoms will be yellowing or browning of the needles and a limp appearance. Do not, however, confuse this with the normal yellowing and shedding of just older needles that occurs annually in the fall. The bark of the trunk and branches may shrivel and ooze sap. White pines suffer under conditions of urban stress, resulting in decreased vigor, less branching, shorter needles, and noticeable foliage chlorosis.
Life Cycle
There is no life cycle as the problem is environmental. There can be many contributing factors, one of which is air pollutants. Other factors can be soil pH, water-logged soil, drought, flooding, heat, and sudden extremes in temperature and moisture. Heat is a main consideration. Even though white pine grows from USDA Zone 3 to 8, it does not appear to thrive in the hot humid areas. Possible use as an understory tree in these areas may help it survive.
A white pine in poor health can be attacked by two root pathogens which can speed the decline of the tree; however, they are not the cause of decline. These pathogens are Phytophthora and Verticicladiella. Fungicides are not recommended as the fungi are not the cause of the tree decline.
Integrated Pest Management Strategies
1. Maintain plant vigor. When planting the tree, insure that the soil is moist, rich, well-drained, and on the acid side. The white pine can tolerate full sun though it will perform better in partial shade. Avoid hot, west-facing sites.
2. Select the planting area carefully. Do not use white pines as a windbreak. Since the branches are brittle, they can be damaged, causing stress in the tree. The brittleness can also lead to damage from snow and ice. Do not plant along roadways as salt spray is injurious to the tree. The tree is also subjected to ozone stress which causes needle tips to brown.
3. Planting time. White pines are best planted in spring. If fall planting is done, care should be taken to amend the soil, fertilize, water thoroughly, mulch adequately, and consider application of an anti-desiccant during early winter. Avoid using winter salt on roadways and paths especially where traffic is high.
4. On-going care. Make sure the soil is adequately drained and that the tree is watered in periods of drought. Fertilize with an acid-type fertilizer like ammonium sulfate.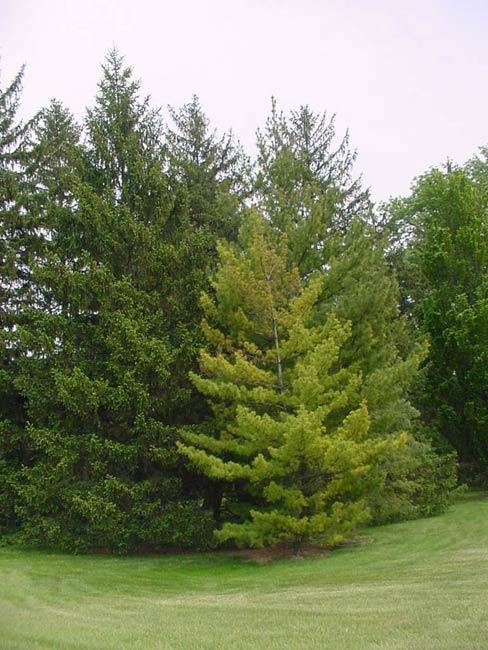
5. Removal. Prompt removal of white pines suffering from decline is not required as they will not infect surrounding pines.
0
0
文章
Dummer. ゛☀
2017年09月17日
Echeveria ‘Doris Taylor’, also known as Woolly Rose, is an attractive succulent that forms rosettes of pale-green, fleshy leaves covered with small white hairs. A low-maintenance succulent, the woolly rose can easily thrive if provided with the right conditions. Often grown outside in warm, arid regions, the Woolly Rose is best suited to U.S. Department of Agriculture plant hardiness zones 9b to 11; it should be brought inside during the winter if grown in colder climates.

Growing Conditions and General Care
Place the Woolly Rose where it will receive full morning sun or partially shaded afternoon sunlight. If the it is in a pot, place it out on the balcony or porch during warm, sunny weather. Give the Woolly Rose at least a foot (30 cm) of space on each side to prevent it from being crowded by other plants.
Water whenever the soil feels dry during the growing season. Water lightly until the soil is moist but not very wet. Woolly Rose can go for a long period without water once they are established, but they grow better and faster if they receive regular watering during the growing season. Reduce watering during the winter, allowing the soil to dry thoroughly between waterings.
Fertilize Woolly Rose with liquid 2-7-7 succulent and cactus fertilizer during the growing season, from spring to late summer. Add seven drops of the fertilizer to 1 quart of water and sprinkle around the base of the succulent. Fertilize once every two weeks.
Woolly Rose will drop many of its lower leaves during the winter. Remove shriveled and fallen leaves as they accumulate around the base of the plant. Discard the leaves before they begin to rot. Decaying leaves can spread disease to the rest of the plant if not removed.

Repotting
Repot Woolly Rose plants once roots become visible around drainage holes. Repot into a pot 1 inch (2.5 cm) wider and deeper or out into the garden. Woolly Rose prefer very well-draining soil.

Propagation
Propagate Woolly Rose plants by taking cuttings during the growing season. Cut off a branch and allow it to dry for 24 hours in a warm location with indirect light. Plant the cutting in moist potting soil and place in indirect sunlight or where it will receive direct morning sun. Keep soil moist but not wet. Roots should appear within a few weeks after planting.
Growing Conditions and General Care
Place the Woolly Rose where it will receive full morning sun or partially shaded afternoon sunlight. If the it is in a pot, place it out on the balcony or porch during warm, sunny weather. Give the Woolly Rose at least a foot (30 cm) of space on each side to prevent it from being crowded by other plants.
Water whenever the soil feels dry during the growing season. Water lightly until the soil is moist but not very wet. Woolly Rose can go for a long period without water once they are established, but they grow better and faster if they receive regular watering during the growing season. Reduce watering during the winter, allowing the soil to dry thoroughly between waterings.
Fertilize Woolly Rose with liquid 2-7-7 succulent and cactus fertilizer during the growing season, from spring to late summer. Add seven drops of the fertilizer to 1 quart of water and sprinkle around the base of the succulent. Fertilize once every two weeks.
Woolly Rose will drop many of its lower leaves during the winter. Remove shriveled and fallen leaves as they accumulate around the base of the plant. Discard the leaves before they begin to rot. Decaying leaves can spread disease to the rest of the plant if not removed.
Repotting
Repot Woolly Rose plants once roots become visible around drainage holes. Repot into a pot 1 inch (2.5 cm) wider and deeper or out into the garden. Woolly Rose prefer very well-draining soil.
Propagation
Propagate Woolly Rose plants by taking cuttings during the growing season. Cut off a branch and allow it to dry for 24 hours in a warm location with indirect light. Plant the cutting in moist potting soil and place in indirect sunlight or where it will receive direct morning sun. Keep soil moist but not wet. Roots should appear within a few weeks after planting.
0
1
文章
Dummer. ゛☀
2017年09月17日
If you’re looking to decorate your home or office with gorgeous yet low maintenance plants, succulents may be the best choice for you. Their resilient nature often makes them the best choice for people just beginning to tap into their green thumb or those who have little time to tend to their plants. While it’s true that succulents require less watering, unless you are prepared to learn how to take care of these types of plants properly, you could wind up accidently killing them. So let’s dig into the basics to jump start your future horticulture hobby.

1. Watering
Watering is arguably the most important aspect to focus on when growing succulents because it is one of the fastest ways to accidently kill them.
Succulents are prone to root rot, which is caused by damp roots. For this reason, succulents’ soil should only be soaked temporarily when you water them, and watering is only necessary when the soil is completely dry. This is important to note because other plants tend to require water more often and sometimes even require their soil to be moist constantly. Mixing up the requirements could kill your succulents.

2. Light
Succulents need a lot of sunlight each day, with the minimum recommendation being three hours of direct sunlight.
When indoors, find the window with the most sunlight and put your succulents there in order to promote healthy growth. The key is to keep these plants out of the shade, whether they’re inside or outside, unless you are in an extremely hot climate. Succulents in harsher, hotter conditions benefit from shade during peak sun hours, which can be counterintuitive because of the stereotypes developed by the portrayal of cactuses (most of which are succulents) in Western films you may have seen. Succulents are actually very durable and are able to survive in a variety of temperatures due to their resilient nature. They can survive in temperatures as low as 35 degrees Fahrenheit (2 degrees Celsius) overnight!

3. Soil
The ability of succulents to keep hydrated is one trait most professional athletes should revere. This means that they prefer soil that drains easily. When planting succulents outside, make sure you plant them in areas where the ground doesn’t tend to stay moist or hold water, as this type of location could drown your succulents and cause root rot. If you’re planning on keeping your plants in pots, ensure that there are plenty of drainage holes in the bottom of the pots before adding soil, especially if you choose to keep the plants inside. This will help prevent overwatering.

Types of soil that are best for succulents consist of gravel, volcanic rock, cactus soil, and other similar soils. There are many succulent-specific soil mixes available, too.
As with all gardening, watching your plants and noticing changes, like drooping leaves, can help you understand what each plant needs. Every plant is different, and despite general guidelines for care, they require individual attention to make sure they grow into healthy, flourishing succulents.
1. Watering
Watering is arguably the most important aspect to focus on when growing succulents because it is one of the fastest ways to accidently kill them.
Succulents are prone to root rot, which is caused by damp roots. For this reason, succulents’ soil should only be soaked temporarily when you water them, and watering is only necessary when the soil is completely dry. This is important to note because other plants tend to require water more often and sometimes even require their soil to be moist constantly. Mixing up the requirements could kill your succulents.
2. Light
Succulents need a lot of sunlight each day, with the minimum recommendation being three hours of direct sunlight.
When indoors, find the window with the most sunlight and put your succulents there in order to promote healthy growth. The key is to keep these plants out of the shade, whether they’re inside or outside, unless you are in an extremely hot climate. Succulents in harsher, hotter conditions benefit from shade during peak sun hours, which can be counterintuitive because of the stereotypes developed by the portrayal of cactuses (most of which are succulents) in Western films you may have seen. Succulents are actually very durable and are able to survive in a variety of temperatures due to their resilient nature. They can survive in temperatures as low as 35 degrees Fahrenheit (2 degrees Celsius) overnight!
3. Soil
The ability of succulents to keep hydrated is one trait most professional athletes should revere. This means that they prefer soil that drains easily. When planting succulents outside, make sure you plant them in areas where the ground doesn’t tend to stay moist or hold water, as this type of location could drown your succulents and cause root rot. If you’re planning on keeping your plants in pots, ensure that there are plenty of drainage holes in the bottom of the pots before adding soil, especially if you choose to keep the plants inside. This will help prevent overwatering.
Types of soil that are best for succulents consist of gravel, volcanic rock, cactus soil, and other similar soils. There are many succulent-specific soil mixes available, too.
As with all gardening, watching your plants and noticing changes, like drooping leaves, can help you understand what each plant needs. Every plant is different, and despite general guidelines for care, they require individual attention to make sure they grow into healthy, flourishing succulents.
2
3
Dummer. ゛☀:😁😁😁beautiful
文章
Dummer. ゛☀
2017年09月17日
Nimblewill, Muhlenbergia schreberi, is a warm-season perennial grass, which forms dense mats one or more feet in diameter in sun or shade. Patches look fuzzy, somewhat like a scouring pad, with a dull, blue-green tinge making them quite noticeable against the greener lawn grasses. Its stoloniferous growth pattern makes it resemble creeping bentgrass and Bermuda grass. Because it is a warm-season grass, patches of nimblewill appear as brown, dead spots early in the year and can be confused with actual dead spots. During the growing season its blue-green color and "fuzzy" faded appearance helps to differentiate it from other grasses. It is weakly attached to its roots and pulls up easily. It grows well in either sun or shade and often invades shady areas of turf where other more desirable grasses find it difficult to grow.

Symptoms and Diagnosis
Nimblewill has thin flat leaves with four veins on the upper surface; its leaves are usually less than 2 inches long and are blue-green. Leaves are rolled in the bud with a very short membranous ligule and only a few hairs near the ligule. The hard thin stems begin growing upright but later often lie flat on the ground near the base and become upright farther up the stem. It can be confused with creeping bentgrass which is finer in texture with narrow green leaves, a large, pointed ligule and no hairs around the ligule. Another look-a-like is Bermuda grass, which can be distinguished by its fringed ligule of fringed hairs.

Life Cycle
Nimblewill is a warm-season perennial grass, which flowers from August to October. It turns brown at the first frost and is very slow to green up in the spring. It spreads by seeds and spreading stems.

Integrated Pest Management Strategies
1. Maintenance. Maintain a dense, healthy lawn through proper turf selection, establishment, and maintenance. Improve soil drainage, reduce shade and increase air movement.
2. Chemical control. Presently only one herbicide available to homeowners, Tenacity (active ingredient mesotrione), provides selective control of nimblewill in cool-season lawns such as Kentucky bluegrass, tall fescue, fine fescues and perennial ryegrass. Application rates can vary so follow label directions. It is not approved for use on warm-season grasses such as zoysia grass. Several applications are needed for good control and a non-ionic surfactant should be added to the mix. Nimblewill will become bleached and white as it dies.
A cheaper control method is to apply a non-selective, post-emergent herbicide such as glyphosate (Roundup) to patches of nimblewill and then replant the areas. Apply the herbicide when the nimblewill is actively growing during the summer. Applying in late autumn to early spring when it is dormant will not provide control. Glyphosate, being a non-selective herbicide, will kill desirable lawn grasses as well.
3. Watering. Improve drainage as nimblewill thrives in poorly drained moist soil.

Organic Strategies
Strategies 1 and 4 are strictly organic approaches.
Symptoms and Diagnosis
Nimblewill has thin flat leaves with four veins on the upper surface; its leaves are usually less than 2 inches long and are blue-green. Leaves are rolled in the bud with a very short membranous ligule and only a few hairs near the ligule. The hard thin stems begin growing upright but later often lie flat on the ground near the base and become upright farther up the stem. It can be confused with creeping bentgrass which is finer in texture with narrow green leaves, a large, pointed ligule and no hairs around the ligule. Another look-a-like is Bermuda grass, which can be distinguished by its fringed ligule of fringed hairs.
Life Cycle
Nimblewill is a warm-season perennial grass, which flowers from August to October. It turns brown at the first frost and is very slow to green up in the spring. It spreads by seeds and spreading stems.
Integrated Pest Management Strategies
1. Maintenance. Maintain a dense, healthy lawn through proper turf selection, establishment, and maintenance. Improve soil drainage, reduce shade and increase air movement.
2. Chemical control. Presently only one herbicide available to homeowners, Tenacity (active ingredient mesotrione), provides selective control of nimblewill in cool-season lawns such as Kentucky bluegrass, tall fescue, fine fescues and perennial ryegrass. Application rates can vary so follow label directions. It is not approved for use on warm-season grasses such as zoysia grass. Several applications are needed for good control and a non-ionic surfactant should be added to the mix. Nimblewill will become bleached and white as it dies.
A cheaper control method is to apply a non-selective, post-emergent herbicide such as glyphosate (Roundup) to patches of nimblewill and then replant the areas. Apply the herbicide when the nimblewill is actively growing during the summer. Applying in late autumn to early spring when it is dormant will not provide control. Glyphosate, being a non-selective herbicide, will kill desirable lawn grasses as well.
3. Watering. Improve drainage as nimblewill thrives in poorly drained moist soil.
Organic Strategies
Strategies 1 and 4 are strictly organic approaches.
0
0
文章
Dummer. ゛☀
2017年09月17日
Downy mildew is an extremely serious fungal disease of grapes that can result in severe crop loss. It is caused by the fungus Plasmopara viticola.
Symptoms and Diagnosis
The pathogen attacks all green parts of the vine, especially the leaves. Lesions on leaves are angular, yellowish, sometimes oily, and located between the veins. As the disease progresses, a white cottony growth can be observed on the lower leaf surface.
Severely infected leaves will drop. If enough defoliation occurs, the overwintering buds will be more susceptible to winter injury. Infected shoot tips become thick, curl, and eventually turn brown and die. Young berries are highly susceptible, appearing grayish when infected. Berries become less susceptible when mature. Eventually, infected berries will drop.
Life Cycle
The fungus overwinters in diseased leaves on the ground. Spores are released in the spring and spread to the leaves and berries by splashing rain and wind. The fungus has two types of spores, both germinating into swimming spores. These spores swim to the stomates (breathing pores) of plants and initiate infection. Water is necessary for the spores to swim and infect, so outbreaks of the disease coincide with periods of wet weather. Downy mildew is favored by all factors that increase the moisture content of soil, air, and the plant, with rainfall being the principal factor for infection during the growing season. Downy mildew infection can become a severe problem when a wet winter is followed by a wet spring and a warm summer with frequent rainfall.
Integrated Pest Management Strategies
1. Maintain plant vigor. Make sure soils are welldrained. Fertilize according to soil test information obtained at least every other year.
2. Sanitation. Remove fallen leaves which are the source of overwintering inoculum.
3. Pruning. Prune out the ends of infected shoots.
4. Fungicides. Fungicides are an important control measure, especially on susceptible cultivars. They should be applied just before bloom, 7 to 10 days later (usually at the end of bloom), 10 to 14 days after that, and finally, 3 weeks after the third application. For cultivars very susceptible to downy mildew or where the disease was severe the previous season, an additional application is suggested about 2 weeks before the first blossom opens. Pesticides registered for use include captan, copper, fosetyl-Al, mancozeb, maneb, and ziram.
5. Cultivars. Select and plant resistant cultivars.
0
0
文章
Dummer. ゛☀
2017年09月17日
Black rot, caused by the fungus Guignardia bidwellii, is a serious disease of cultivated and wild grapes. The disease is most destructive in warm, wet seasons. It attacks all green parts of the vine – leaves, shoots, leaf and fruit stems, tendrils, and fruit. The most damaging effect is to the fruit. Note: Guignardia bidwellii forma parthenocissi causes a leaf spot on Boston ivy and Virginia creeper. Control is as for black rot of grapes.
Warm, muggy weather in the spring and summer, along with unsprayed fruit of susceptible varieties, may cause fruit to become almost completely rotted by harvest time. Black rot is not difficult to control if good cultural practices are followed along with the use of protective fungicide sprays.
Symptoms and Diagnosis
Leaves: Reddish brown and circular to angular spots appear on the upper surface of the leaves starting in late spring. As spots merge, they form irregular, reddish brown blotches. The number of spots or lesions per leaf varies from 2 to more than 100 depending on the severity of the disease. The center of the leaf spot turns tannish brown and is surrounded by a black margin. Black, speck-sized fruiting bodies (pycnidia) are arranged in a definite ring just inside the margin of the lesion. Only young, rapidly growing leaves are affected.
Fruit: Shortly after the flower petals fall, fruit infection can occur. Most infections start when the fruit is half to almost full size. A small spot will appear that becomes circular and whitish tan, often surrounded by a brown ring. This happens while the berry is still green. The spots grow rapidly and may cover half of the berry within 48 hours. Within a few days the entire berry becomes coal black, hard, and mummified. The surface of the withered fruit is soon covered with minute, black, pimple-like, sporeproducing pycnidia that are arranged in circular zones.
Life Cycle
The black rot fungus overwinters in canes, tendrils, and leaves on the grape vine and on the ground. Mummified berries on the ground or those that are still clinging to the vines become the major infection source the following spring. During rain, microscopic spores (ascospores) are shot out of numerous, black fruiting bodies (perithecia) and are carried by air currents to young, expanding leaves. In the presence of moisture, these spores germinate in 36 to 48 hours and eventually penetrate the leaves and fruit stems. The infection becomes visible after 8 to 25 days. When the weather is wet, spores can be released the entire spring and summer providing continuous infection. Cool weather slows growth of the fungus. It requires warm weather for optimal growth and a period of 2 to 3 days of rain, drizzle, or fog.
New black rot infections continue into late spring and summer during prolonged periods of warm, rainy weather. During August, the pycnidia are transformed into the overwintering stage (pycnosclerotia) that gives rise to perithecia within which the spring ascospores are produced, completing the disease cycle.
Integrated Pest Management Strategies
1. Planting. Space vines properly and choose a planting site where the vines will be exposed to full sun and good air circulation. Keep the vines off the ground and insure they are properly tied, limiting the amount of time the vines remain wet thus reducing infection.
2. Sanitation. Keep the fruit planting and surrounding areas free of weeds and tall grass. This practice will promote lower relative humidity and rapid drying of vines and thereby limit fungal infection.
3. Pruning. Prune the vines in early winter during dormancy. Select only a few strong, healthy canes from the previous year’s growth to produce the following season’s crop. Remove these prunings from the vineyard and burn or destroy.
4. Cultivation. Cultivate the vineyard before budbreak to bury the mummified berries. Diseased berries covered with soil do not produce spores that will reach the developing vines. For homegrown grapes, use 2–3 inches of leaf mulch or fine bark to cover infected debris.
5. Fungicides. Use protective fungicide sprays. Pesticides registered to protect the developing new growth include copper, captan, ferbam, mancozeb, maneb, triadimefon, and ziram. Important spraying times are as new shoots are 2 to 4 inches long, and again when they are 10 to 15 inches long, just before bloom, just after bloom, and when the fruit has set.
6. Cultivars. Cultivars with large, juicy berries are the most susceptible. In general, grapes that ripen late in the season are affected the least. Most commercial cultivars are sufficiently resistant if adequately protected with a fungicide spray program.
0
0
文章
Dummer. ゛☀
2017年09月16日
Japanese beetles are 3/8" (8-11 mm) long and ¼" (5-7 mm) wide, brilliant metallic green insects with copper-brown wings whose hard body makes them unpalatable to many predators, including birds. To distinguish them from other metallic green or copper-colored beetles, the diagnostic sign is a row of 5 small tufts of white hairs under the wing covers on each side and a 6th pair at the tip of the abdomen. The larvae, called grubs, are grayish-white with a dark brown head. They are C-shaped when disturbed. The 1st instar (stage of an insect or arthropod between molts) is 1/16” (1.5 mm) long and the 3rd instar is 1¼” (32mm) long. They are found in the soil where they feed on the tender roots of vegetables, lawn grasses, and other plants.
Life Cycle
Japanese beetles overwinter as a partially grown grub in the soil below the frost line. The grubs resume feeding on grass roots in the spring, and then pupate near the soil surface. Adults emerge between May and July, depending on their geographic location . Adults live 30-45 days and feed, usually in groups, first on low-growing plants and then on tree leaves, working from the top of the plants downward. After feeding and mating, each female lays 1-5 eggs at a time before again feeding and mating until a total of 40-60 eggs are laid 2-4” under the soil surface in grassy areas. Most are laid by mid-August. The eggs hatch after 8-14 days, and the young grubs feed on fine grass roots until cold weather drives them below the frost line. Most are in the 3rd instar by this time. In spring the grubs come to the surface, continuing their development and forming a pupa in an earthen cell 1-3" deep in the soil.
Japanese beetle adults are active for about 6 weeks in the summer. Since adult beetle damage is primarily aesthetic, control is not essential for survival of ornamental plants. Because they are strong fliers and frequently move about, by season’s end, adults are capable of having traveled many miles from where they lived as grubs. As a result, local beetle control does not insure less grub damage to lawns. Likewise, local grub control will not necessarily prevent adult damage to garden plants.
Integrated Pest Management Strategies:
1. Hand-pick adult beetles. If only a few adults are present, shake plants early in the morning (~ 7 a.m.) when they are sluggish. They should be collected and dropped into a container of soapy water. Any beetles or damaged leaves will attract more insects and should be removed..
2. Pheromone traps. Research has found that pheromone traps attract many more beetles than they catch and probably do more harm than good to plants in the beetles’ flight path and near the traps. Their use is not recommended.
3. Use insecticides if necessary. To control adults, one of two very safe pesticide, pyrethrum or Neem, can be applied in two applications, 3 to 4 days apart, to control the problem. If something stronger is needed, carbaryl (Sevin) may be used (every 5-10 days during heavy infestation) with monitoring for mites or aphids, in which case acephate (Orthene; more toxic) or malathion should be used. Other insecticides include Turcam, Closure (bendiocarb), permethrin, and synthetic pyrethroids. With any insecticide, efficacy will be decreased if there is heavy rainfall shortly after application of the chemical.
To control grubs present in damaging numbers, newer chemicals, Merit (imidacloprid) and MACH2 (halofenozide), applied in June and July 20 days before anticipated Japanese beetle adult egg-laying activity, have enough residual to kill new grubs coming to the soil surface to feed in late July through August. It is important to apply evenly over all the ground and to water in well. These chemicals will also be effective on other grub species when applied at the appropriate times.
4. Biological controls. The hard body of the beetle makes them unpalatable to many predators, such as birds. However, toads, moles, shrews, and skunks are known to feed on the beetles.
To control grubs, bacterial milky spore disease (Paenibacillus popillae, formerly known as Bacillus popillae) can be applied as a dust for Japanese beetle grub control and must be ingested by the grub to be effective. Once inside the digestive tract; spores reproduce within the grub, eventually turning it an opaque milky white before killing it. Spores then disperse into the surrounding soil and can persist for many years, but do not spread until live hosts are present. The more grubs, the faster it spreads. Milky spore infects only Japanese beetle grubs and has no effect on beneficial organisms. Its efficacy is questionable and the spore count has to build up for 2-3 years, during which time no insecticides may be used. More research needs to be done.
Other biological controls are parasitic nematodes that need to be applied when the grubs are small, with irrigation before and after application. Species of Heterorhabditis are said to be more effective than strains of Steinernema carpocapsae.
5. Use trap crops. When practical, crops which are highly favored by Japanese beetles can be used to draw the adults away from other crops. Trap crops include: borage, white geraniums, grape vines, evening primroses, and zinnias. The beetles can be collected or killed on the trap crops. This method provides early detection and can limit the amount of spray needed to control the insects.
6. Select resistant plants. Among trees and shrubs are: ash, dogwood, American elder, shagbark hickory, holly, red and silver maple, oaks, pear, white poplar, sweet gum, and tulip tree; euonymus and common lilac.
Avoid planting the most susceptible plants: roses, grapes, and rose of Sharon; apple and crabapple, mountain ash, grey birch, American and horse chestnut, elm, linden, Japanese and Norway maple, London plane tree, Lombardy poplar, Prunus (cherry, etc.), sassafras, and black walnut.
0
0
文章
Dummer. ゛☀
2017年09月15日
Fairy rings are caused by a diverse family of soil-inhabiting fungi called basidiomycetes. They typically appear as dark green circles in the lawn ranging in size from a few inches to 200 feet or more in diameter. Lush rings of turf are formed by the release of nutrients, in particular nitrogen, from the activity of the fungus living on organic matter in the soil. A circle of mushrooms usually develops around the edge of the infected area.
Fairy rings grow outward at the rate of 6 to 24 inches annually depending on grass, soil and weather conditions. They are most common on sandy soils that are low in water and fertility. Thick thatch layers also contribute to this problem.
Besides being unsightly, fairy rings can cause serious damage to lawns. Often the disease will produce a thick fungal mat that prevents water from reaching the grass roots below. Once the soil becomes dry it is very difficult to wet and the grass roots eventually die. The fungus may also deplete soil nutrients and, in some cases, will release a toxic by-product that can directly kill the turf within a ring.
Note: The name “fairy ring” comes from an old folk-tale. People once believed that the mushrooms appeared where fairies had danced the night before.
Treatment
Recommended products labeled for use against this fungal problem include:
Physan 20 works on a variety of disease outbreaks affecting lawns, turf and grass. Use 1 Tbsp per gallon of water and thoroughly soak the problem area, repeat as needed. One pint diluted treats 6,400 square feet.
Practices that promote a healthy lawn will help to reduce the occurrence of this turfgrass disease.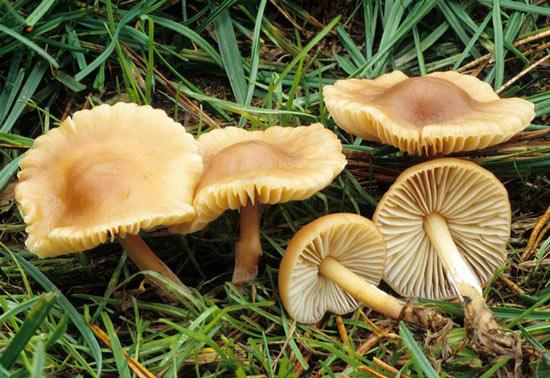
Remove excess thatch and aerate compacted soils.
Keep lawns well watered.
Encourage beneficial soil microbes by top dressing with a humus builder such as well aged manure or finished compost.
Once the disease appears it is very difficult to eliminate — there is NO natural control.
Homeowners will often mask the problem, using fertilizers rich in nitrogen, rather than eradicate it.
Mushrooms can be removed by regular mowing or raking.
Most fungicides have NOT proven to be effective.
Your mantra should be; fertilize, water, aerate and mow.
0
0
文章
Dummer. ゛☀
2017年09月14日
A serious disease of apples and ornamental crabapples, apple scab (Venturia inaequalis) attacks both leaves and fruit. The fungal disease forms pale yellow or olive-green spots on the upper surface of leaves. Dark, velvety spots may appear on the lower surface. Severely infected leaves become twisted and puckered and may drop early in the summer.
Symptoms on fruit are similar to those found on leaves. Scabby spots are sunken and tan and may have velvety spores in the center. As these spots mature, they become larger and turn brown and corky. Infected fruit becomes distorted and may crack allowing entry of secondary organisms. Severely affected fruit may drop, especially when young.
Apple scab overwinters primarily in fallen leaves and in the soil. Disease development is favored by wet, cool weather that generally occurs in spring and early summer. Fungal spores are carried by wind, rain or splashing water from the ground to flowers, leaves or fruit. During damp or rainy periods, newly opening apple leaves are extremely susceptible to infection. The longer the leaves remain wet, the more severe the infection will be. Apple scab spreads rapidly between 55-75 degrees F.
Treatment
Choose resistant varieties when possible.
Rake under trees and destroy infected leaves to reduce the number of fungal spores available to start the disease cycle over again next spring.
Water in the evening or early morning hours (avoid overhead irrigation) to give the leaves time to dry out before infection can occur.
Spread a 3- to 6-inch layer of compost under trees, keeping it away from the trunk, to cover soil and prevent splash dispersal of the fungal spores.
For best control, spray liquid copper soap early, two weeks before symptoms normally appear. Alternatively, begin applications when disease first appears, and repeat at 7 to 10 day intervals up to blossom drop.
Bonide® Sulfur Plant Fungicide, a finely ground wettable powder, is used in pre-blossom applications and must go on before rainy or spore discharge periods. Apply from pre-pink through cover (2 Tbsp/ gallon of water), or use in cover sprays up to the day of harvest.
Organocide® Plant Doctor is an earth-friendly systemic fungicide that works its way through the entire plant to combat a large number of diseases on ornamentals, turf, fruit and more. Apply as a soil drench or foliar spray (3-4 tsp/ gallon of water) to prevent and attack fungal problems.
Containing sulfur and pyrethrins, Bonide® Orchard Spray is a safe, one-hit concentrate for insect attacks and fungal problems. For best results, apply as a protective spray (2.5 oz/ gallon) early in the season. If disease, insects or wet weather are present, mix 5 oz in one gallon of water. Thoroughly spray all parts of the plant, especially new shoots.
0
0
文章
Dummer. ゛☀
2017年09月13日
Description
Garden aphids, also known as plant lice, include many different species in the Aphidoidea insect family. Aphids are very small--roughly 1/10th of an inch long. The most common colors are green and black, though brown, reddish-brown, and gray aphids inhabit some parts of the country. They have two long, tubular appendages on the tail end of their body.
Life Cycle
Aphid eggs overwinter attached to plants, then hatch as nymphs in the spring.
These nymphs then produce eggs asexually, producing more nymphs that grow to maturity in just one week. Then, in the fall the nymphs will lay eggs that contain some male aphids. These males then mate with the nymphs to produce the eggs that will overwinter and start the next generation of aphids. Mature aphids lay three to six eggs per day. The rapid asexual reproduction cycle during the growing season is what leads to the rapid and widespread infestation so familiar to many gardeners.
Signs of Aphid Infestation
Aphids suck the sap out of tender plant shoots and leaves using beak-like mouths, injecting the leaves with their saliva as they do so. The damage to plants is twofold: drinking the sap can weaken the plant, and injecting the saliva can spread diseases from plant to plant. In addition, aphids excrete a sticky, clear substance called "honey dew" which commonly fosters the development sooty mold.
Sooty mold is unsightly and interferes with the plant's ability to photosynthesize.
Because aphids are so tiny, sometimes the first sign that massive infestation is pending is the sign of many ants on your plants. The honeydew secretion is much prized as a food by ants, so when you see many ants on plants, there is a very good likelihood that aphids are also present.
Effect on Garden Plants
Aphids can weaken a plant, stunt its growth, cause leaves to curl or wilt, and delay fruit or flower production. In general, an overall anemic appearance to your plants when there is not water shortage or other obvious reason will strongly hint that aphids are to blame.
Organic Controls for Aphids
There are a number of non-chemical ways to combat or discourage aphid infestations.
Sometimes, a strong blast of water from the hose will knock the aphids off of a plant and solve the problem.
If you attract or purchase certain beneficial insects, such as lady bugs, lacewings, parasitic wasps or damsel bugs, they will attack the aphids. For this reason, fewer chemical pesticides used in the garden can paradoxically reduce the severity of aphid infestations. A more diverse insect population generally keeps aphid attacks at bay. Plantings mint, fennel, dill, yarrow and dandelions will attract these predators to your garden. Ants are natural enemies of predatory insects, so you may need to control ants in order to maximize the hunting ability of the beneficials.
Plants can also be sprayed with insecticidal soap, or a homemade tomato leaf or garlic spray to kill aphids, but must be reapplied when the infestations reappear.
Some biological insecticides based on fungi are known to work on aphids.
If You Use Chemical Solutions
Aphids are easily killed by standard chemical pesticides, but because they are so prolific and will reinfest so readily, gardeners who try to rely on chemicals often find that their problems are intensified over the long run, as the chemicals must be reapplied often and will also destroy populations of beneficial insects and discourage other aphid predators, such as insect-eating birds.
Many gardeners find that an adapted form of the integrated pest management (IPM) practice used by commercial agriculture is a good approach for home gardening. Under this philosophy, some degree of plant damage is deemed acceptable as the price paid for a diverse gardening culture in which the presence of many insect species tends to prevent any one pest from causing overwhelming damage.
Over the long run, minimal use of chemical pesticides tends to produce an overall healthier garden, albeit one in which small levels of insect damage may be present.
0
0
文章
Dummer. ゛☀
2017年09月13日
There is hardly a gardener out there who hasn’t encountered a Japanese beetle. The adult Japanese beetle is a shiny, metallic green with copper-brown wing covers and it’s about 3/8 of an inch in length. However, not all metallic green or copper beetles are Japanese Beetles. To make sure you're dealing with Japanese beetles check their undersides for five small, white tufts under the wing covers and an additional tuft at the end of the abdomen.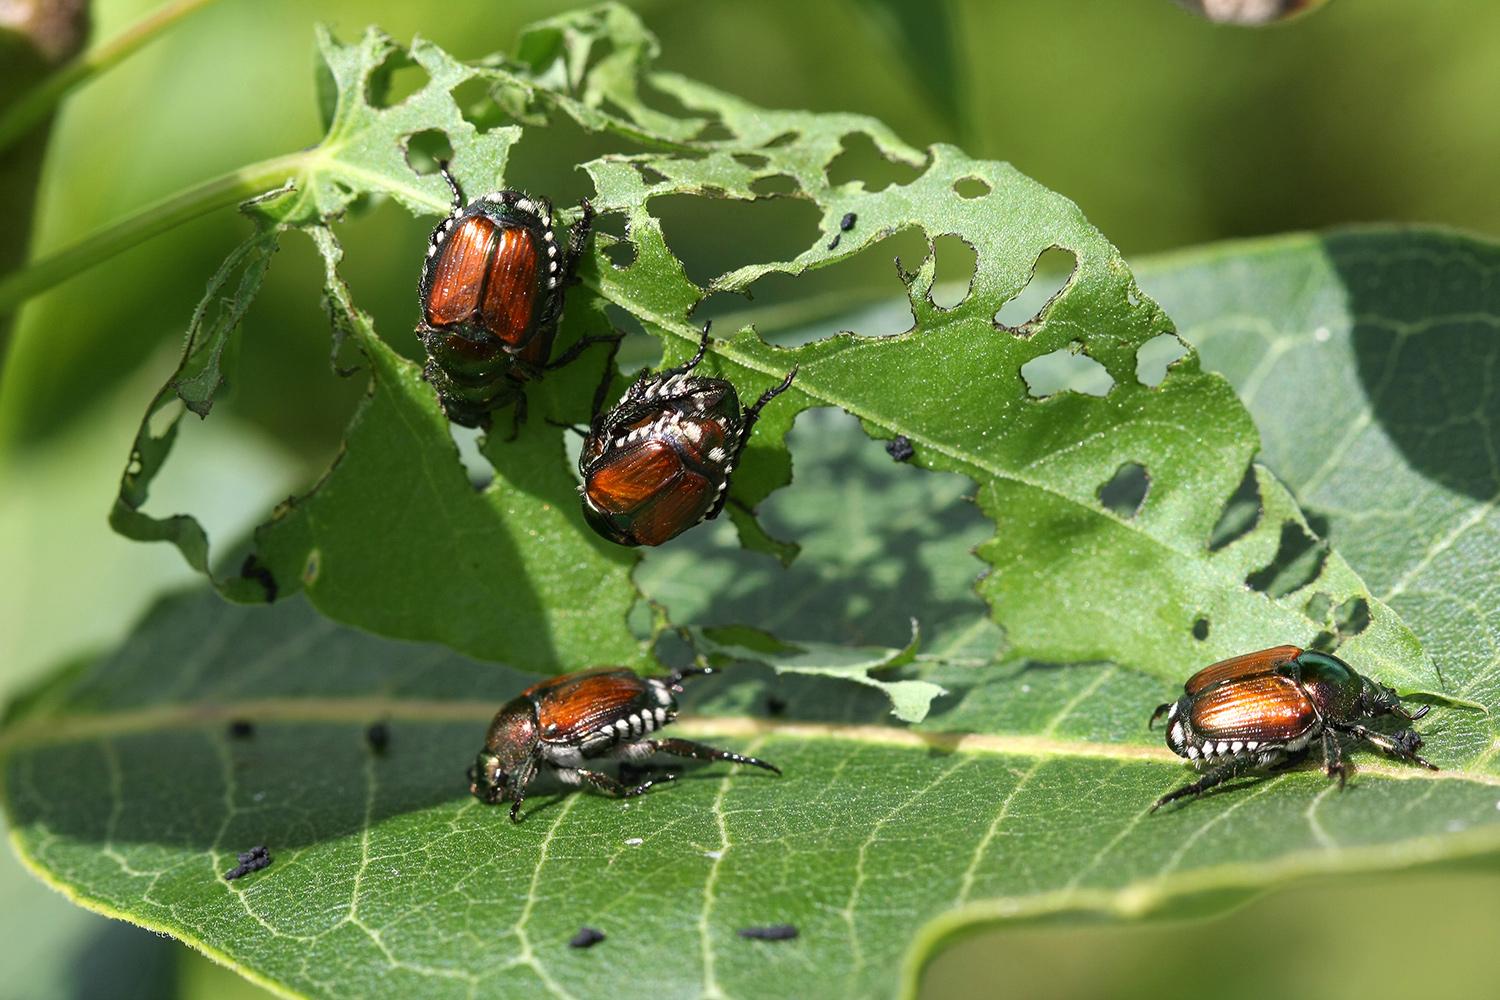
An individual Japanese beetle doesn’t do that much damage while feeding on a plant, but they tend to congregate in large numbers and can easily defoliate shrubs and trees. These bugs are hard to get rid of, but there are steps you can take to control them. Keep in mind that the adult Japanese beetles are only around for a little over a month, so don’t automatically reach for harsh chemicals unless they become a serious problem.
Stages of Development
Beetles typically go through 4 stages of development. It’s important to know when they are passing through each stage in your climate because control methods are different for each stage.
The life stages for the Japanese Beetle are:
Egg: Small, oval, white eggs. These are laid in the soil. If moisture is sufficient, they will absorb it and enlarge, becoming rounder as they do.
Larvae: This is the white grub stage that is so familiar in lawns. Japanese beetle larvae have a V-shaped series of bristles on their raster (the underside of the tip of the abdomen.) Grubs will grow in length as they feed and mature.
Pupae: The pupae stage is where the grub starts to transform into a beetle. Japanese beetle pupae start out cream colored and age to a reddish brown.
Adult Beetle: The adult beetles are about 3/8 inch long, and the shell is a shiny, metallic green with copper-brown wing covers. Adults emerge from the ground between May and June, depending on your area. They live for about 30 to 50 days.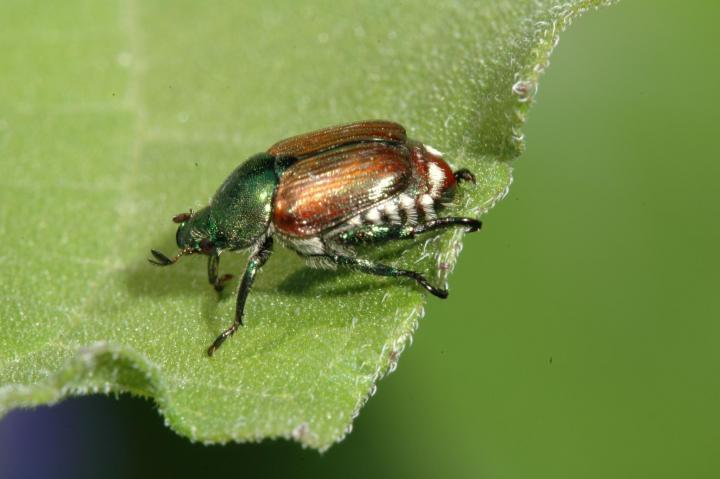
Life Cycle of the Japanese Beetle
The first beetles to emerge start to look for suitable plants to eat and start feeding immediately. They also send out an odor known as a congregation pheromone to signal later emerging beetles where to go. Mating starts soon after.
The females will feed on your plants for a couple of days and then burrow into the soil to lay their eggs. Shortly after, they will return to feeding and mating and start the cycle all over again. By the end of the season, each female Japanese beetle will have laid about 50 eggs.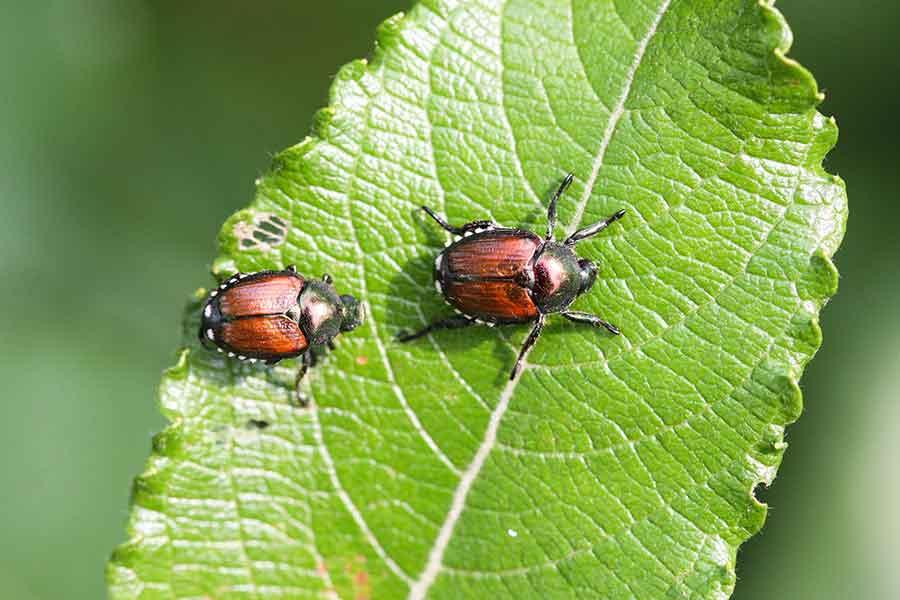
Eggs develop at different rates in different soil temperatures, developing most rapidly in warm soils of about 80 to 90 degrees F. Once they develop into larvae, they will move up toward the surface of the soil and start feeding on roots and organic matter. This is why grub control is usually applied in late summer to fall. The pesticide needs to be applied while the grubs are feeding on the grass roots.
As the soil cools and the grubs mature, they start moving back down deeper into the soil for winter. They’ll stay there until the soil warms in the spring, at which time they burrow back up toward the surface where they’ll pupate and eventually emerge as adults.
What Plants do Japanese Beetles Eat?
There’s a wide smorgasbord of plants for Japanese beetles to feast on, over 300 varieties of trees, shrubs and non-woody plants. Some of their favorites include roses, maples, elms, grapes and crab apples. However, they also feed on weeds like poison ivy and bracken.
How to Control Adult Japanese Beetles
It’s impossible to get rid of Japanese beetles entirely. More will fly in as the current crop are killed. There aren’t many natural controls for adult Japanese beetles. Birds aren’t partial to them, and although some predatory wasps and flies have been imported, their population isn’t large enough yet to control the Japanese beetle problem.
The most effective natural control is to go into your garden with a jar of soapy water and knock the beetles into it. Japanese beetles feed in groups, starting at the top of plants, so it’s pretty easy to fill a jar with them.
Insecticidal soap will kill adult Japanese beetles only if it is sprayed directly on the beetle. It does not have any residual effect, meaning that beetles that aren’t sprayed directly won’t be harmed.
A word of caution about the pheromone beetle traps. They will attract beetles; you’ll probably wind up with more beetles coming into your yard than you would have without the trap. The original intention of the traps was to track when and how many Japanese beetles were in the area, not as a means of eradication.
Finally, if you have repeated intense infestations, you should check your soil in late summer to see if you have a large grub population. Lift a 1 square foot section of turf. If there are more than a dozen grubs in this small area, consider treating your lawn with some type of grub control. However, not every garden that has a Japanese beetle problem is associated with a lawn full of grubs. The beetles can hatch in your neighbor's lawn and find your tasty garden with very little effort.
More Toxic Controls (to Be Used With Caution)
There are several insecticides labeled for use on adult Japanese beetles. These sprays will kill on contact and also have some residual effect. Keep in mind that these sprays will kill more than just the Japanese beetles, so use them only for extreme infestations. And again, Japanese beetles are only a pest for a little over a month, so don’t overreact. Always read and follow label directions when using any pesticide.
0
0

