文章
Dummer. ゛☀
2017年08月28日

What is a crocodile fern? Native to Australia, crocodile fern (Microsorium musifolium ‘Crocydyllus’), sometimes known as crocodyllus fern, is an unusual plant with wrinkled, puckery leaves. The light green, segmented leaves are marked with dark green veins. Although the distinctive texture has been compared to a crocodile’s hide, the crocodile fern plant actually has a graceful, delicate appearance.
Facts about Crocodyllus Fern
What is a crocodile fern? Crocodile fern plant is a tropical fern suitable for growing outdoors only in the temperate climates of USDA plant hardiness zones 10 and 11 (and sometimes 9, with protection). Grow crocodile fern indoors if your climate has even a possibility of winter frost; chilly temps will kill the plant in a hurry. At maturity, crocodile fern reaches heights of 2 to 5 feet with a similar width. Although the broad green leaves appear to arise directly from the soil, the fronds actually grow from rhizomes that grow just under the surface.
Crocodile Fern Care
Growing crocodile ferns requires a bit more attention than your average houseplant, but crocodile fern care really isn’t involved or complicated. Crocodile ferns need regular water, but the plant won’t last long in soggy, poorly drained soil. A rich, well-drained potting soil such as a soil formulated for African violets works very well. To keep the plant happy, water whenever the surface of the potting mix feels slightly dry. Water until liquid drips through the drainage hole (always use a pot with a drainage hole!), then let the pot drain thoroughly. A kitchen or bathroom is an ideal environment because crocodile ferns benefit from humidity. Otherwise, increase humidity by placing the pot on a tray or plate with a layer of wet pebbles, but never let the bottom of the pot stand in the water.
Crocodile fern plants perform best in indirect or low light. A spot in front of a sunny window is too intense and may scorch the fronds. Cool to average room temperatures are fine, but avoid heating vents, drafts or air conditioners. To ensure your crocodyllus fern has adequate nutrients to keep it looking its best, provide a diluted water-soluble fertilizer or a special fern fertilizer once every month during spring and summer. Read the instructions carefully. Too much fertilizer won’t make your plant grow faster. In fact, it may kill the plant.
0
0
文章
Dummer. ゛☀
2017年08月27日
Sagebrush (Artemisia tridentata) is a common sight along roadsides and in open fields in parts of the Northern Hemisphere. The plant is characteristic with its grayish green, needle-like leaves and spicy, yet acrid, smell. During the heat of the day, the scent is a recognizable fragrance in desert and scrublands. Growing sagebrush plants in the home landscape provides a natural look for the open field or pasture.

What is Sagebrush?
While familiar to most people, there are wonderful attributes to this plant. What is sagebrush and what are uses for sagebrush? This amazingly adaptive plant is tough enough to thrive in inhospitable terrain.
It has fine hairs on the leaves that help prevent moisture loss and produces a deep taproot that dredges moisture from nearly subterranean deposits of moisture under the earth. This plant is a member of the family Artemisia, or wormwood, of which there are varieties across the globe. Artemisia is a genus of plants with pronounced medicinal abilities. Sagebrush plants are no exception and teas were made from the bush and used for the healthful properties.

Additional Sagebrush Plant Information
appearance. They are about an inch long and end in a three-pronged set of “teeth.” This characteristic is important sagebrush plant information and sets them apart from other species of Artemisia. The young bark is gray and covered in fine hairs while older growth is dressed in shredded bark that falls off easily. Most plants do not grow taller than 4 feet but occasionally they have been found 10 feet tall in their native habitat. The shorter size is more likely when growing sagebrush plants in the home landscape.

Uses for Sagebrush
In addition to the medicinal uses for sagebrush, it is important habitat for native birds, small rodents and reptiles. The plant was used as building material for baskets and rope, and the wood was fuel for early Native American people. It also has importance as a spiritual and ritual aromatic plant. The smoke is thought to have cleansing properties by those with belief in spirits. As a poultice, it clears lungs and eases aches and pains. It was once chewed for its ability to soothe stomach problems and bowel issues. Another of the uses for sagebrush included lining cloth with the leaves of the plant as a diaper.

How to Care for a Sagebrush Plant
Sagebrush is a member of a hardy and adaptive genus that thrives where moisture and nutrients are low. They can survive ferocious winds and extreme periods of drought. As such, the worst thing you can do to sagebrush is overwater it. If you give the plant supplemental water in spring, it will bloom. There is no need to water after the plant has been established. Most pests and insects are repelled naturally by the plant’s strong taste and odor. Plant the bush in well-drained soil with plenty of sand or gritty material mixed into a depth of at least 8 inches. Potted plants should grow in a mixture of half sand and half perlite. This provides the dry conditions even in a container that the plants need. Pruning to remove dead wood or errant growth should be done in late winter. Try a sagebrush plant for part of your xeriscape garden or as an anchoring plant for unused and arid zones of the landscape.
What is Sagebrush?
While familiar to most people, there are wonderful attributes to this plant. What is sagebrush and what are uses for sagebrush? This amazingly adaptive plant is tough enough to thrive in inhospitable terrain.
It has fine hairs on the leaves that help prevent moisture loss and produces a deep taproot that dredges moisture from nearly subterranean deposits of moisture under the earth. This plant is a member of the family Artemisia, or wormwood, of which there are varieties across the globe. Artemisia is a genus of plants with pronounced medicinal abilities. Sagebrush plants are no exception and teas were made from the bush and used for the healthful properties.
Additional Sagebrush Plant Information
appearance. They are about an inch long and end in a three-pronged set of “teeth.” This characteristic is important sagebrush plant information and sets them apart from other species of Artemisia. The young bark is gray and covered in fine hairs while older growth is dressed in shredded bark that falls off easily. Most plants do not grow taller than 4 feet but occasionally they have been found 10 feet tall in their native habitat. The shorter size is more likely when growing sagebrush plants in the home landscape.
Uses for Sagebrush
In addition to the medicinal uses for sagebrush, it is important habitat for native birds, small rodents and reptiles. The plant was used as building material for baskets and rope, and the wood was fuel for early Native American people. It also has importance as a spiritual and ritual aromatic plant. The smoke is thought to have cleansing properties by those with belief in spirits. As a poultice, it clears lungs and eases aches and pains. It was once chewed for its ability to soothe stomach problems and bowel issues. Another of the uses for sagebrush included lining cloth with the leaves of the plant as a diaper.
How to Care for a Sagebrush Plant
Sagebrush is a member of a hardy and adaptive genus that thrives where moisture and nutrients are low. They can survive ferocious winds and extreme periods of drought. As such, the worst thing you can do to sagebrush is overwater it. If you give the plant supplemental water in spring, it will bloom. There is no need to water after the plant has been established. Most pests and insects are repelled naturally by the plant’s strong taste and odor. Plant the bush in well-drained soil with plenty of sand or gritty material mixed into a depth of at least 8 inches. Potted plants should grow in a mixture of half sand and half perlite. This provides the dry conditions even in a container that the plants need. Pruning to remove dead wood or errant growth should be done in late winter. Try a sagebrush plant for part of your xeriscape garden or as an anchoring plant for unused and arid zones of the landscape.
0
0
文章
Dummer. ゛☀
2017年08月27日
Ajuga (Ajuga spp.), also known as carpet bugle or bugleweed, is an adaptable, low growing plant that forms a thick carpet of foliage, often with a grayish-green, bronze or reddish tint. The plant is covered with springtime blooms of blue, purple, violet, white or pink, depending on the variety. Although most varieties are relatively well-behaved, Ajuga reptans is a rambunctious cultivar that spreads by long runners. It tends to escape its boundaries and invades flower beds and lawns if it isn’t carefully contained. Ajuga weed control is tricky, and tackling ajuga plants in lawns is especially challenging. Read on for more information about getting rid of bugleweed.
How to Control Ajuga
Below are the most effective methods for treating bugleweeds that have become invasive. Hand pulling – It’s always best to manage unwanted plants without use of chemicals whenever possible. If you want to remove ajuga in an environmentally friendly manner, the best solution is pulling – and a lot of it. Watering the area the day before will make ajuga easier to pull, as will loosening the soil around the plants with a spade or garden fork. Use a weeding fork to dig deep under the roots for more thorough ajuga weed control. Take your time and remove as many roots as possible because even small pieces that remain in the soil can take root and spread. Keep a careful watch on the area and pull new plants as soon as they appear. It will take time, but if you are persistent, you will eventually gain the upper hand.
Dispose of the plants properly and don’t toss them on your compost pile; they’ll take root and you’ll be back at square one – or worse. Homemade herbicide – Another option for getting rid of bugleweed is to create a homemade, environmentally friendly herbicide by mixing equal parts very hot water and vinegar. Stir in a small amount of salt and a few drops of liquid dish soap. Apply the solution with a spray bottle or a garden sprayer. Black plastic – If the ajuga isn’t in your lawn, you may be able to smother large patches with black plastic. Secure the plastic with bricks or rocks and leave it alone for two weeks so the sun can “bake” the ajuga. If the plants are still alive, leave the plastic in place for an additional two weeks. Chemical herbicides – If all else fails, ajuga weed control may require an herbicide such as Round-up. If the ajuga is in your lawn, read the label carefully and be sure to use a non-selective herbicide that will kill the ajuga without harming your lawn.
0
0
文章
Dummer. ゛☀
2017年08月26日
Parsley is a mild-flavored herb, and parsley leaves are often used to create attractive garnishes for a variety of dishes. Rich in vitamins and minerals, the ruffled green herb is a flavorful addition to soups and other culinary delights. Although good old curly parsley is the most familiar, you might be surprised that there are many different kinds of parsley. Read on to learn about various types of parsley.
Types and Varieties of Parsley
Many people think some parsley types are best for garnish and others are best suited for cooking. Try them all, and you can make your own decision about the best parsley varieties!
Curly (Common) Parsley – This standard type of parsley, versatile and easy to grow, is both decorative and edible. Curly parsley varieties include Forest Green parsley and Extra Curled Dwarf parsley, a fast-growing, compact variety. Flat-Leaf Parsley – Flat-leaf parsley is tall, reaching mature heights of 24 to 36 inches. It is appreciated for its culinary qualities, and is more flavorful than curly parsley. Flat-leaf parsley includes Titan, a compact variety that displays small, deep green, serrated leaves; Italian Flat Leaf, which tastes slightly peppery and looks a bit like cilantro; and Giant of Italy, a big, distinctive plant that tolerates a variety of difficult growing conditions. Flat-leaf parsley types are excellent additions to a butterfly garden.
Japanese Parsley – Native to Japan and China, Japanese parsley is an evergreen perennial herb with a somewhat bitter flavor. The sturdy stems are often eaten like celery. Hamburg Parsley – This large parsley has thick, parsnip-like roots that add texture and flavor to soups and stews. Hamburg parsley leaves are ornamental and look a bit like ferns. Now that you know about the most common varieties of parsley, you can try them all and see which one(s) you prefer in your kitchen or herb garden.
0
0
文章
Dummer. ゛☀
2017年08月26日
Catmint is an aromatic herb that is commonly grown in the garden. It produces clusters of lavender-blue flowers amid mounds of gray-green foliage. This easily grown plant has an interesting history regarding its various uses in the landscape. For example, the herb is thought to have been first cultivated in the Roman town of Nepeti, where it was used as herbal tea and insect repellent. This is also believed to be the origin of its genus name, Nepeta.
Difference Between Catnip and Catmint
Many people wonder what is the difference between catnip and catmint. While basically considered the same plant that shares many of the same characteristics, there are differences between the two species. Catnip (Nepeta cataria) has less ornamental value in the garden than its catmint (Nepeta mussinii) counterpart. Catnip is also found to be highly attractive to cats, with many of them exhibiting a naturally induced euphoria around the plant. They may nibble on it or even roll around in the foliage. This type is most suitable for “cat friendly” gardens. If you don’t want your garden overrun with felines, plant catmint instead, which is much less attractive to them.
How to Grow Catmint
Catmint herb is easy to grow. These plants are good for mass planting or edging and are suitable near vegetables as an insect deterrent—especially aphids and Japanese beetles. Catmint can be grown in sun or partial shade with average, well-draining soil. They are even heat and drought tolerant, making them excellent plants for dry garden areas. Catmint is most often grown by seed or through division.
How & When to Plant Catmint
The seeds or divisions of catmint plant are planted in spring. They require plenty of space too and should be spaced (or thinned) to at least a foot or so apart. Overcrowded plants can lead to powdery mildew or leaf spot, especially in hot, humid climates. Caution is needed when planting some types of catmint plants, as they can be aggressive growers. Therefore, you may want to add some edging around them. Likewise, catmint can be planted and grown in containers.
Care of Catmint
Basic care of catmint is easy. Water catmint plants regularly until they become well established. Mulch will help retain moisture and keep down weeds. Once plants are a few inches tall, pinch them back to promote bushier growth. Catmint blooms throughout summer and fall. Deadheading spent blooms promotes additional flowering. It can also help prevent reseeding. Faassen’s catmint (Nepeta x faassenii) is sterile however, and doesn’t require deadheading. Shear the plants back to half their size in fall or following harvest.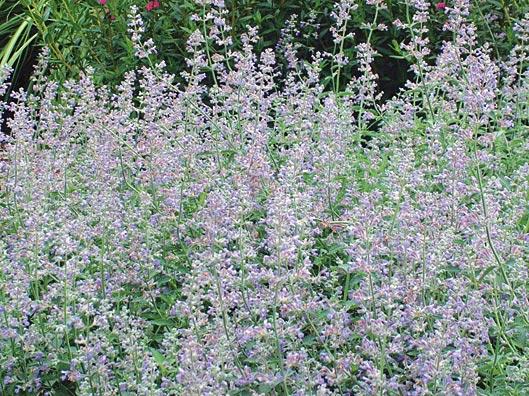
Harvesting and Uses of Catmint Herb
Catmint can be used fresh, dried, or frozen for both culinary and herbal use. Harvest leaves as flowers begin to bloom, cutting top leaves, stems, and flowers if desired. Spread out to dry in a cool, ventilated area and store the dried herb in an airtight container or bag to preserve its potency. The leaves and shoots can be added to soups and sauces. Tea made from the leaves and flowers can be used for calming nerves and relieving coughs, congestion, and menstrual cramps.
1
1
文章
Dummer. ゛☀
2017年08月26日
Banana mint plants (Mentha arvensis ‘Banana’) are a variety of mint with bright, fuzzy, lime-green foliage and a pronounced, very delightful aroma of banana. Like all mint plants, growing banana mint is easy. Read on for all the banana mint information you need to get started with this fun, and rather quirky plant.
Banana Mint Information
Although these plants are grown primarily for their foliage, the small purple flowers, which bloom throughout the summer, are highly attractive to bees, butterflies and other beneficial insects. Mature height of the plant is about 18 inches. Banana mint plants are perennial, and suitable for growing in USDA plant hardiness zones 5 through 11.
Growing Banana Mint
Banana mint grows in partial shade or full sunlight and nearly any type of well-drained soil. However, keep in mind that although banana mint may not be quite as rowdy as many of its mint cousins, it can still become quite aggressive. If you’re concerned that the plants may be bullies in your garden, plant them in containers to keep growth in check. Planting seeds isn’t recommended for banana mint, and may not produce the results you’re hoping for. However, it’s easy to start mint cuttings or divisions from an existing plant, or by planting young banana mint plants purchased at a nursery or greenhouse. You can even root banana mint cuttings in a glass of water.
Banana Mint Care
Banana mint requires little care. The most important thing is to keep the soil moist, but not saturated. Banana mint plants don’t tolerant dry soil. Harvest banana mint regularly to keep the plant full and attractive. If the plant ever begins to look long and leggy in midsummer, feel free to cut it back by about one-third of its height. It will rebound quickly. Cut the plants nearly to the ground in fall. If you live in the cooler ranges of the acceptable climate zones, a layer of mulch will protect the roots during the winter.
Uses for Banana Mint
Fresh banana mint leaves add flavor to hot and cold tea, adult beverages, ice cream and baked goods, such as muffins and cookies. The leaves are also easy to dry for use in the off-season.
0
0
文章
Dummer. ゛☀
2017年08月26日
What are tea plants? The tea we drink comes from various cultivars of Camellia sinensis, a small tree or large shrub commonly known as the tea plant. Familiar teas such as white, black, green and oolong all come from tea plants, although the method of processing varies considerably. Read on to learn about growing tea plants at home.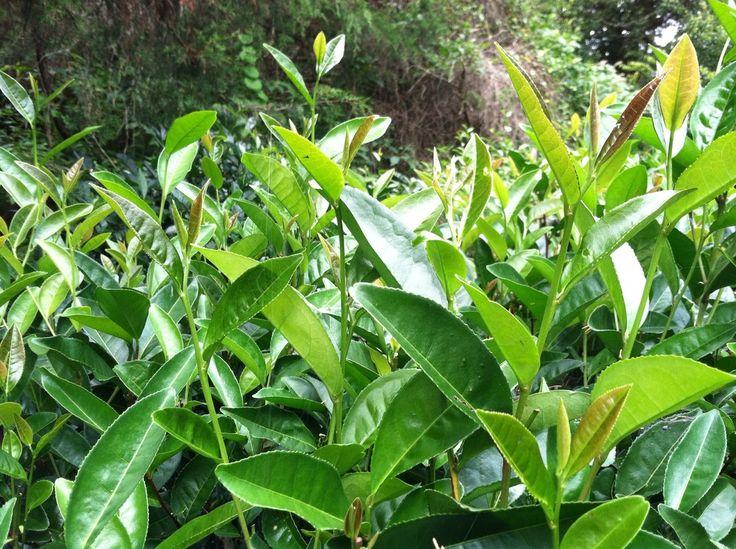
Tea Plants in the Garden
The most familiar and widely grown tea plants include two common varieties: Camellia sinensis var. sinensis, used primarily for white and green tea, and Camellia sinensis var. assamica, used for black tea.
The first is native to China, where it grows at very high elevations. This variety is suitable for moderate climates, generally USDA plant hardiness zones 7 through 9. The second variety, however, is native to India. It isn’t frost tolerant and grows in tropical climates of zone 10b and above. There are countless cultivars derived from the two main varieties. Some are hardy plants that grow in climates as far north as zone 6b. In colder climates, tea plants do well in containers. Bring the plants indoors before temperatures drop in autumn.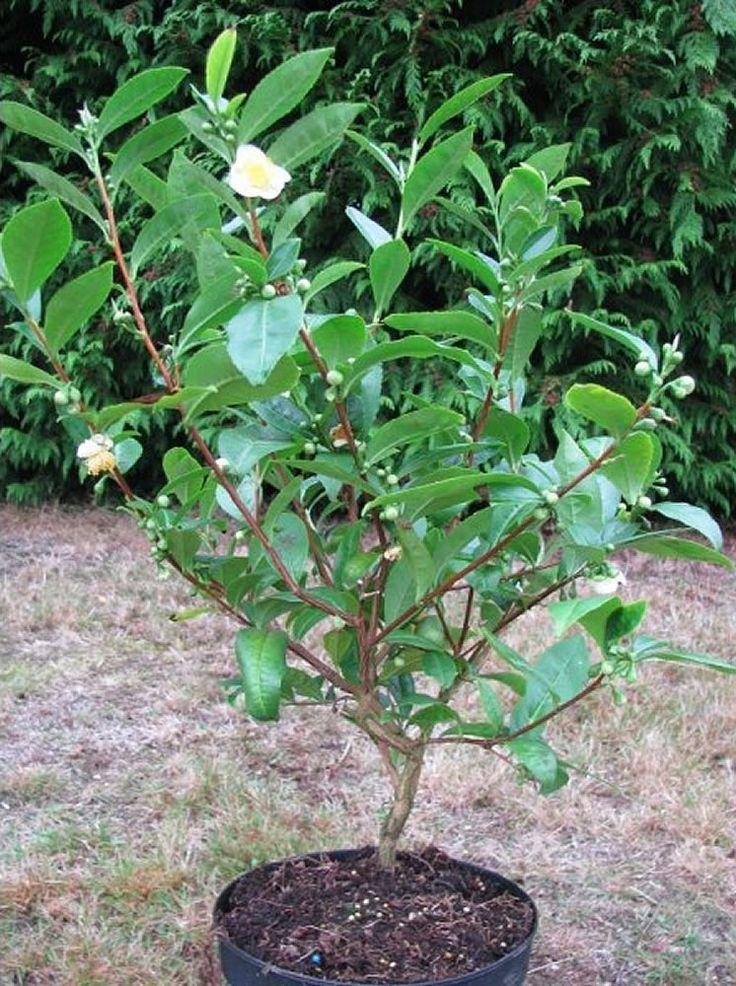
Growing Tea Plants at Home
Tea plants in the garden require well drained, slightly acidic soil. An acidic mulch, such as pine needles, will help retain the proper soil pH. Full or dappled sunlight is ideal, as are temperatures between 55 and 90 F. (13-32 C). Avoid full shade, as tea plants in sun are more robust. Otherwise, tea plant care isn’t complicated. Water plants frequently during the first two years – generally two or three times per week during the summer, using rainwater whenever possible. Allow the soil to dry slightly between waterings. Saturate the rootball but don’t overwater, as tea plants don’t appreciate wet feet. Once the plants are well established, continue to water as needed during hot, dry weather. Spray or mist the leaves lightly during dry periods, as tea plants are tropical plants that thrive in humidity.
Pay close attention to tea plants grown in containers, and never allow the soil to become completely dry. Fertilize in spring and early summer, using a product formulated for camellia, azaleaand other acid-loving plants. Always water well before feeding tea plants in the garden, and immediately rinse any fertilizer that lands on the leaves. You can also use a water-soluble fertilizer.
2
1
文章
Dummer. ゛☀
2017年08月26日
I use my home grown herbs in teas to soothe my stomach, ease headaches, and treat a myriad of other symptoms, but I love my black tea and green tea as well. This made me wonder about growing and harvesting my own tea plants.
About Harvesting Tea Plants
Billions of people count on a cup of soothing tea each and every day, but probably most of those billions have no idea what their tea is made of. Sure, they may get the idea that tea is made from, well, leaves of course, but what type of leaves? Camellia sinensis produces almost all of the world’s teas from black to oolong to white and green. Camellias are popular garden specimens chosen for their lively color in the winter and fall when little else is in bloom. These are different cultivars than those grown for tea. Camellia sinensis can be grown in sunny to partially shaded areas in USDA zones 7-9. Allowed to grow unmolested, the plant grows naturally into a large shrub or small tree or it can be pruned to a height of about 3 feet (.9 m.) to make tea plant harvesting easier and to promote new growth.
When to Harvest Tea Plants
C. sinensis is very hardy and can survive temperatures as low as 0 F. (-18 C.) but cooler temperatures will cause the plant to grow more slowly and/or become dormant. It takes about 2 years before the plant is mature enough for tea plant harvesting, and about 5 years for the plant to really become a tea leaf producer. So when can you harvest tea plants? Only the young, tender leaves and buds are used for tea. That’s why you should prune the plant: to facilitate new growth. Prune the tips of the plant in the late winter. Harvesting of tea plants can commence in the spring as the plants begin to leaf out. Once the new shoots appear at the tips of the pruned branches, allow them to grow until 2-4 are unfurling. At this point you’re ready to learn how to harvest Camellia sinensis.
How to Harvest Camellia sinensis
The secret to making great green tea is to harvest just the top two new leaves and leaf bud on the new spring growth. Even commercially, harvesting is still done by hand since machinery can damage the tender leaves. Once the leaves are plucked, they are spread in a thin layer on a tray and then left to dry in the sun. You can harvest tea every 7-15 days depending upon the development of the tender shoots. Different processes are used to produce black teas which are usually harvested in July and August when temperatures are at their peak. To utilize your tea leaves, steam them for 1-2 minutes and then immediately run under cold water to stop the cooking process (this is called shocking) and to allow them to retain their vibrant green color. Then roll the soft leaves between your hands or with a sushi mat into tubes. Once the tea leaves are rolled into tubes, place them in an oven safe dish and bake them at 215 F. (102 C.) for 10-12 minutes, turning them every 5 minutes. The tea is ready when the leaves are completely dried. Allow them to cool and then store them in a sealed glass container.
1
1
文章
Dummer. ゛☀
2017年08月26日
Sageis a very popular herb to have in the garden, and with good reason. The fragrance and taste of its leaves are unlike anything else, making it very popular in cooking. Many gardeners simply stick to green sage, but an interesting alternative that’s gaining some real traction is tricolor sage. Tricolor sage plants are so exciting because they do double duty as a culinary herb and as an ornamental. Keep reading to learn more about growing tricolor sage and tricolor sage care.
Uses for Tricolor Sage in Gardens
Tricolor sage (Salvia officinalis ‘Tricolor’) is mainly distinguished from its cousins by its leaves. Though the main color is green, the edges are bordered with uneven splotches of white and the interiors splashed with shades of pink and purple. The overall effect is a very pleasant, somewhat subdued mottling of color. Is tricolor sage edible? Absolutely! Its flavor is the same as that of any common sage, and its leaves can be used interchangeably in any recipe that calls for sage. If you don’t want it for culinary purposes, simply growing tricolor sage plants in the garden as ornamentals works too.
Tricolor Sage Care
Tricolor sage care is extremely easy. The plants do best in full sun, though they can tolerate a little bit of shade. They tend to grow to between 1 and 1.5 feet tall and wide. They prefer drier, sandier soil, and will tolerate both acidic and alkaline conditions. They tolerate drought well. In midsummer, they produce beautiful blue to lavender flowers that are very attractive to butterflies.
Apart from the color of the leaves, the biggest thing that sets tricolor sage apart is its tenderness to cold. While green sage is quite winter hardy down to USDA zone 5, tricolor sage really only survives down to zone 6. If you live in a cooler climate, it may be a good idea to plant your tricolor sage plants in containers that can be brought indoors in the winter.
0
0
文章
Dummer. ゛☀
2017年08月25日
What is mushroom herb and exactly what can I do with it? Mushroom herb (Rungia klossii) is a leafy green plant with a distinctive mushroom-like flavor, hence the name. Cooks love to incorporate mushroom herb plants into pasta sauces, soups, sandwiches or any food that benefits from its mild, mushroom like flavor. Has this piqued your interest about mushroom herb plant? Read on to learn more.
Mushroom Herb Info
An attractive plant with shiny, deep green leaves and blue-violet flowers in springtime, mushroom herb plants usually top out at about 24 inches (60 cm.) at maturity. However, regular pinching and frequent harvesting prevents legginess and keeps the plant bushy and compact.
Mushroom plant thrives in rich soil, so dig 2 or 3 inches (5-7 cm.) of compost into the soil at planting time. Find a location where the plant is in partial shade or light sunlight, as mushroom herb plants tend to be smaller when exposed to a lot of direct sunlight or intense heat. Although this plant is relatively drought tolerant, it grows faster with regular irrigation. Mushroom herb plant hales from tropical climates and won’t tolerate extreme cold. If you live north of USDA planting zone 9, growing mushroom herb plants in the garden won’t be feasible. Instead, plant mushroom herb in a container and bring it indoors when temperatures drop in autumn.
Mushroom Plant Uses
Mushroom plant is an amazingly healthy plant, providing nutrients such as calcium, protein, iron, beta-carotene and vitamins A and C. Mushroom herb plants are also rich in chlorophyll, which herbalists appreciate for its blood cleansing properties. Mushroom plant herbs are great for people who choose not to eat fungi for health reasons, or those who enjoy the flavor of mushrooms but not the texture. Cooking actually brings out the distinctive mushroom-like flavor. Add leaves to cooked dishes at the last minute to prevent loss of color and nutrients.
0
0
文章
Dummer. ゛☀
2017年08月25日
The name “Allspice” is indicative of the combination of cinnamon, nutmeg, juniper and clove essence of the berries. With this all encompassing nomenclature, what is allspice pimenta?What is Allspice Pimenta?
Allspice comes from the dried, green berries of Pimenta dioica. This member of the myrtle family (Myrtaceae) is found in the Central American countries of Guatemala, Mexico, and Honduras and was presumably brought there by migratory birds. It is indigenous to the Caribbean, specifically Jamaica, and was first identified around 1509 with its name being a derivative of the Spanish word “pimiento,” meaning pepper or peppercorn.
Historically, allspice was used to preserve meats, generally wild pig called “boucan” during the 17th century peak of pirating along the Spanish Main, leading to them to being labeled as “boucaneers,” today known as “buccaneers.” Allspice pimenta is also known as “pimento” although it is not related to the red pimientos seen stuffed into green olives and swirling around in your martini. Nor is allspice a blend of spices as its name suggests, but rather a flavor of its own derived from the dried berries of the this medium sized myrtle.
Allspice for Cooking
Allspice is used for flavoring everything from liquor, baked goods, meat marinades, chewing gum, candies, and mincemeat to the intrinsic flavoring of a holiday favorite – eggnog. Allspice oleoresin is a natural mixture of the oils of this myrtle berry and resin often utilized in sausage making. Pickling spice is actually a combination of ground allspice pimenta and a dozen other spices. Allspice for cooking, however, may occur with either the powdered or whole berry form. Allspice for cooking is procured from the drying of the tiny green berries of the female plant of allspice pimenta harvested along the “pimento walks,” then often dried and crushed until powdered and of a rich port wine hue. Whole dried berries of allspice pimenta may also be purchased and then ground just prior to use for maximum flavor. The ripe berries of this aromatic fruit are too gelatinous to use, so berries are picked prior to ripening and may then also be crushed to extract their potent oils.
Can You Grow Allspice?
With such an extensive repertoire of uses, growing allspice herbs sounds like a tempting prospect for the home gardener. The question then is, “Can you grow allspice herbs in one’s garden?” As previously mentioned, this shiny leaved evergreen tree is found growing in the temperate climates of the West Indies, Caribbean and Central America, so obviously a climate that most closely mimics those is most optimal for growing allspice herbs. When removed and cultivated in areas with climates dissimilar to those above, the plant does not usually bear fruit, so can you grow allspice? Yes, but in most areas of North America, or Europe for that matter, allspice herbs will grow but fruiting will not occur. In areas of Hawaii where the weather is favorable, allspice has been naturalized after seeds were deposited from birds and can grow to heights of 10-60 feet tall. If growing allspice pimenta in a climate that is not tropical to subtropical, allspice will do well in greenhouses or even as a houseplant, as it adapts well to container gardening. Keep in mind that allspice pimenta is dioecious, meaning it requires both a male and female plant to fruit.
0
0
文章
Dummer. ゛☀
2017年08月25日
Composting is a great way to do away with garden waste and get free nutrients in return. It’s mostly common knowledge that effective compost needs a good mix of “brown” and “green” material, but if you want to go above and beyond, you can add more specialty ingredients. Yarrow, in particular, is thought to be an excellent addition because of its high concentration of certain nutrients and its ability to speed up the decomposition process. Keep reading to learn more about composting with yarrow.
Yarrow as Compost Accelerant
Is yarrow good for composting? A lot of gardeners say yes. Yarrow plants have a high concentration of sulfur, potassium, copper, phosphates, nitrates, copper, and potash. No matter what, these are beneficial nutrients to have in your compost. In fact, many gardeners use yarrow to make a useful, nutrient rich tea that can be used in a similar fashion to compost tea.
How Does Yarrow Speed Up Decomposition?
Still, there’s more to yarrow than that. It’s also thought by some sources that these high concentrations of nutrients work to speed up the decomposition process of the composting materials around them. This is good – faster decomposition means less time to finished compost and, ultimately, more compost.
How does composting with yarrow work? Most sources recommend chopping up a single small yarrow leaf and adding it to your compost heap. Using yarrow in compost even in such small amounts is, presumably, enough to have a noticeable effect. So what’s the bottom line?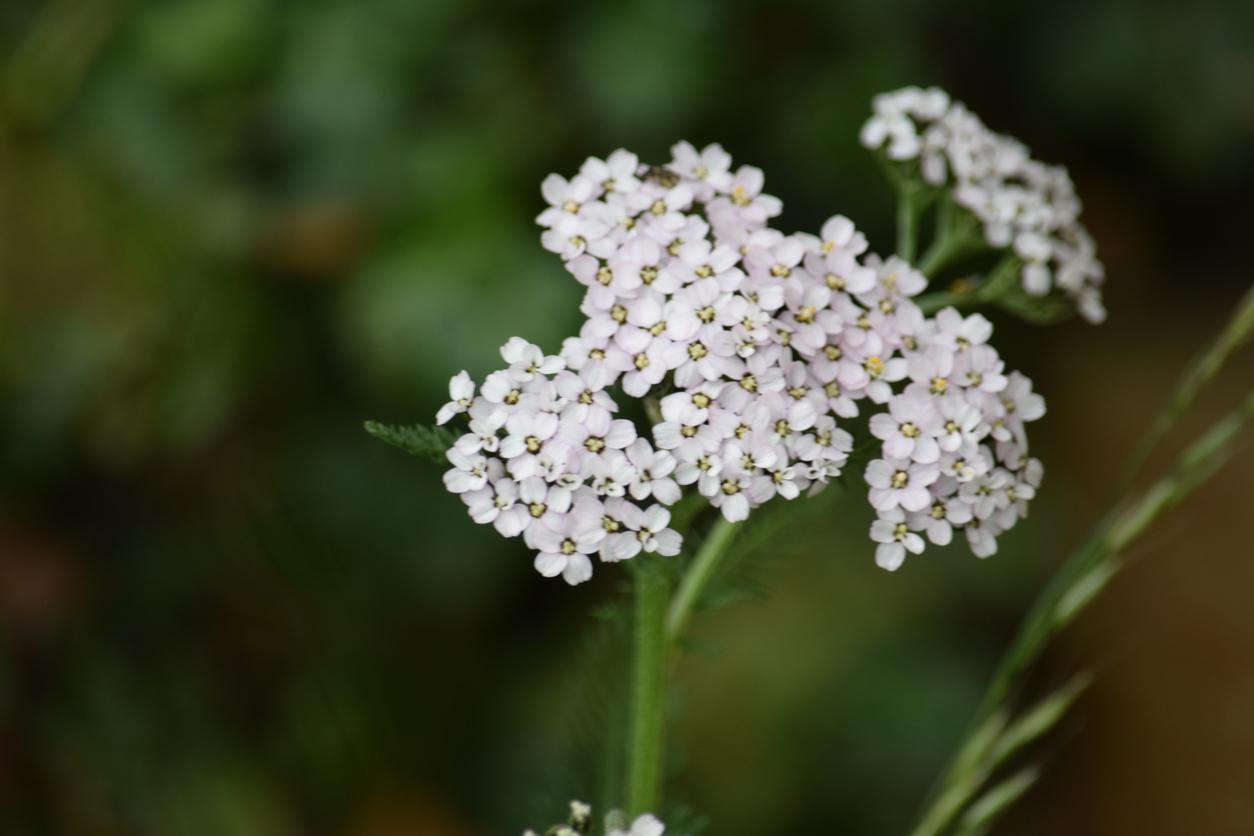
Composting with yarrow is certainly worth a try, but the amount needed is so miniscule that it’s not necessarily worth it to plant an entire crop just for the sake of adding it to the compost pile. If you already have it growing in your garden, however, give it a shot! At the very least you’ll be adding plenty of good nutrients to your eventual compost.
0
0
文章
Dummer. ゛☀
2017年08月24日
Elfin creeping thyme plant is as cherubic as its name implies, with small glossy, green aromatic leaves and teeny weensy purple or pink blossoms. Keep reading for information on elfin thyme care.
What is Elfin Thyme?
This nugget of information does not completely answer the question of, “What is elfin thyme?” Elfin creeping thyme plant (Thymus serpyllum) is a low growing (1-2 inches tall) herbaceous perennial sub shrub with a dense mounding habit. In cold climates, this little herb is deciduous, while in milder regions, the plant will retain its foliage year round. Flowers are borne upon the fragrant green to grayish blue foliage in summer and are extremely attractive to bees. Native to Europe, this little creeping variety of thyme is not only drought and heat tolerant, but deer and rabbit resistant, making it a lovely option for a natural garden landscape.
How Do I Plant Elfin Thyme?
The slightly fuzzy or haired foliage of a growing elfin thyme works well among stepping stones, trailing through a rock garden and even as a forgiving substitute for grassy lawns. These little guys are adaptable to foot traffic, even fairly heavy foot traffic, and continue to spread while being tromped on, filling the air with their heavenly scent. Growing elfin thyme is hardy to USDA hardiness zone 4 and should be planted in full sun and well draining soil, although it will also adapt to shadier areas. Shaded areas of growing elfin thyme will tend to clump more while sun exposure encourages the thyme to become more of a ground cover, spreading to a width of about 4 to 8 inches. When growing elfin thyme, the plants require at least five hours of sun per day and should be spaced 6 inches apart.
Elfin Thyme Care
The care of elfin thyme isn’t complicated. These hardy and forgiving herbs adapt to a variety of climatic and environmental conditions, even able to survive cold winter weather and sustained frost. Needing no fertilization or frequent watering and with an ability to withstand both hot, dry conditions or chilly weather, elfin creeping thyme plant is often a prized selection for xeriscaping, a landscaping plan that requires no irrigation. Although the leaves are flavorful and aromatic, the tiny 1/8 to 3/8 inch leaves are rather a pain to pick, so most people use other varieties of common thyme for their culinary herb uses and allow elfin thyme to play the role of an ornamental.
0
0
文章
Dummer. ゛☀
2017年08月24日
Salad burnet plant is a Mediterranean native with hardy tolerance. It is a perennial herb, which is naturalized in Europe and North America. Salad burnet herb is a member of the rose family and is used as an erosion control, salad green and used for flavoring in vinegars and sauces. There are also old cosmetic and medicinal applications for the plant. Salad burnet is easy to grow and makes a useful addition to the herb garden or perennial bed.
Salad Burnet Herb
The salad burnet herb (Sanguisorba minor) is a low 6- to 18-inch leafy plant that begins as a rosette. It has pinnate basal leaves with four to 12 pairs of leaflets. The leaflets are oval and lightly serrated at the edges. The leaves taste like cucumber and add a fresh taste to salads. The herb is savory when mixed into an herb butter, mixed into spreading cheese, chopped and sprinkled over vegetables or as part of a potato dish. Clumps of the plant get 12 inches across and remain small with consistent harvesting.
Salad Burnet Flowers
Salad burnet flowers appear in spring and are in a rounded cluster of purple to pink tiny blooms. Salad burnet flowers can be used as a garnish for fresh drinks or cakes. Salad burnet plant has male, bisexual and female flowers that appear in late spring and early summer. The top flowers are male, middle flowers bisexual and the female flowers grow on the top of the cluster. The flowering stems rise from the basal rosette and can grow to 1 foot in height.
How to Grow Salad Burnet
Learning how to grow salad burnet is similar to learning any herbal cultivation. It thrives in well-drained soil with a pH of 6.8 and a sunny to partially shady location. The herb starts easily from seed, which should be planted 12 inches apart. The old foliage and flowering stems need to be removed, as they appear to force new growth. The bed needs to be weeded and salad burnet should be watered during dry periods. Salad burnet does not tolerate transplanting so ensure you like the location before you plant the herb. The flowers of salad burnet herb are not self-pollinating and must be pollinated by wind. In good conditions, the plants will form seed in fall. They will self-seed easily and form a patch of the herb. Older plants should be removed because their flavor is not as good as the plant ages. New plants grow so easily that a constant supply of tender new leaves can be had by saving seed and successional sowing. Sprinkle the seed in the garden bed and cover lightly with a dusting of sand. With moderate moisture, salad burnet growing is easy and fast.
0
0
文章
Dummer. ゛☀
2017年08月24日
Garlic is an easy to grow plant that is used for its bulb and its greens. Garlic scapes are the first tender green shoots on garlic which will become bulbils. They are edible when young and add a delicate garlic flavor to salads, soups and sauces. You can use them just as you would use chives. Most gardeners wouldn’t encourage growing garlic scapes but when they appear, remove them and use them for early spring flavor.
What is a Garlic Scape?
Garlic scapes are curly tendrils of greenery that come up from hard necked garlic plants. They terminate in something that looks like a bud. If you let the scape grow, it will flower with a wiry white-tipped cluster of tiny blooms. Each bloom will swell at the tip and produce seeds that bloat and turn brown. The protuberances become bulbils or tiny bulbs, which may be planted and will become garlic in three to four years. They can be removed without damaging the plant and eaten when young.
Growing Garlic Scapes
There’s nothing you need to do to grow garlic scapes other than to plant garlic. Their formation is a natural part of the garlic growth cycle and part of the plant’s reproductive process. Provide good care to the garlic and watch in spring for the curly slender stems. Cutting scapes of garlic is an early season activity in March or April. If you allow the scapes to develop, they become woody and lose their flavor.
Should I Cut Garlic Scapes?
Cutting scapes of garlic off the plant is an individual decision. Many gardeners believe that the removal of the scapes will increase the bulb production because the plant can put its energy into the underground growth. You can also leave them and allow them to mature so you can harvest the bulbils for future harvests. Consider the size of cloves you like to have when you ask yourself, “Should I cut garlic scapes?” If you’re trying to grow monstrous garlic, you will likely want to remove the scapes.
How to Harvest Garlic Scapes
The only tools necessary for cutting scapes of garlic are scissors and a container. Cut the scape at the base of the plant. You can eat the slim green leaves and the bud-like structure. You can also just pinch or bend off the stems. They should snap off easily. Rinse them and put them in a glass of water or in a zip top bag in the refrigerator where they will keep for several days.
Using Garlic Scapes
Once you’ve tried these little delicacies, you will never wonder, what is a garlic scape? The fresh, delicate garlic flavor will be imprinted on your culinary memory with recipes to follow. Use garlic scapes in soups, stews and sauces. Slice them into salads or sauté them as a quick addition to pasta. Use them to flavor foods like fish or go crazy and make them into a flavorful pesto. These flavorful shoots are too good to waste.
0
2

