文章
Dummer. ゛☀
2017年08月15日

This lovely sunflower forms largeattractive clumps up to a metre in height. The easiest way to distinguish Arrowleaf Balsamroot from other sunflowers is by the silvery-green arrow-head-shaped leaves.

Distribution
The range of the plant extends from British Columbia and south to Colorado and central California. It is one of many sunflowers found in the Rocky Mountains.

Habitat and Blooming Times
Arrowleaf Balsamroot grows on well-drained soil in open woodland sites exposed to plenty of sunshine. It blooms from late May to July and grows
Uses
American Indians used the seeds to make a kind of flour called pinole.

Etymology
Balsamorhiza, the genus name, means 'balsam root'. The specific epithet sagittata means 'arrow shaped' - a reference to the leaves of this plant, which are shaped like arrowheads.
Distribution
The range of the plant extends from British Columbia and south to Colorado and central California. It is one of many sunflowers found in the Rocky Mountains.
Habitat and Blooming Times
Arrowleaf Balsamroot grows on well-drained soil in open woodland sites exposed to plenty of sunshine. It blooms from late May to July and grows
Uses
American Indians used the seeds to make a kind of flour called pinole.
Etymology
Balsamorhiza, the genus name, means 'balsam root'. The specific epithet sagittata means 'arrow shaped' - a reference to the leaves of this plant, which are shaped like arrowheads.
0
0
文章
Miss Chen
2017年08月14日

Impatiens add color to shaded garden beds. Available in colors ranging from pink to deep lavender, impatiens produce abundant blooms amongst bright green foliage. These annual flowers thrive in the cooler weather of spring, but can bloom all summer long with proper care. If impatiens aren't blooming well, they likely aren't receiving the nutrients, water or maintenance they need.

Soil and Location
For the best blooms, choose a garden bed that receives dappled sunlight all day or morning shade and afternoon sun. Impatiens can't tolerate the direct mid-day sun. Plant in beds that also provide good drainage. The flowers thrive in rich loam soils that aren't prone to standing water. Apply compost to the bed before planting to improve the quality of the soil and improve the blooms on the plants.
Fertilizing
Impatiens are heavy feeders, so additional fertilization is needed throughout the growing season to replenish the plants for reblooming. Impatiens require nitrogen to produce healthy foliage and phosphorus to bloom. A fertilizer that provides equal amounts of these nutrients, such as a 10-10-10 or 13-13-13 analysis, works well in most gardens. Reapply the fertilizer every six to eight weeks throughout spring and summer so the impatiens are never starved for nutrients.
Watering
Proper irrigation ensures the soil never dries out completely. Impatiens can't tolerate drought, so watering regularly is necessary, otherwise the plants suffer and blooms diminish. Provide enough water to moisten the top 6 inches of soil at each watering, which is about equal to 1 inch of rainfall. Water one to two times a week, or when the soil surface just begins to dry. Mulching around the plants helps keep the soil moist between watering. Water at the base of plants so the flowers and foliage remain dry. Wet plants are susceptible to powdery mildew.

Pruning
Come midsummer, a combination of heat and older plants can lead to impatiens becoming leggy. They may also begin blooming poorly at this time. Improve both the shape of the impatiens and the amount of flowers by pinching back the plants. Pinch back all the stems to within 3 inches of the ground, leaving at least one set of leaves on each stem. Impatiens quickly produce new growth and return to full bloom within a couple of weeks after pinching. The foliage also returns fuller and rounder, giving a better shape to the plants.
Soil and Location
For the best blooms, choose a garden bed that receives dappled sunlight all day or morning shade and afternoon sun. Impatiens can't tolerate the direct mid-day sun. Plant in beds that also provide good drainage. The flowers thrive in rich loam soils that aren't prone to standing water. Apply compost to the bed before planting to improve the quality of the soil and improve the blooms on the plants.
Fertilizing
Impatiens are heavy feeders, so additional fertilization is needed throughout the growing season to replenish the plants for reblooming. Impatiens require nitrogen to produce healthy foliage and phosphorus to bloom. A fertilizer that provides equal amounts of these nutrients, such as a 10-10-10 or 13-13-13 analysis, works well in most gardens. Reapply the fertilizer every six to eight weeks throughout spring and summer so the impatiens are never starved for nutrients.
Watering
Proper irrigation ensures the soil never dries out completely. Impatiens can't tolerate drought, so watering regularly is necessary, otherwise the plants suffer and blooms diminish. Provide enough water to moisten the top 6 inches of soil at each watering, which is about equal to 1 inch of rainfall. Water one to two times a week, or when the soil surface just begins to dry. Mulching around the plants helps keep the soil moist between watering. Water at the base of plants so the flowers and foliage remain dry. Wet plants are susceptible to powdery mildew.
Pruning
Come midsummer, a combination of heat and older plants can lead to impatiens becoming leggy. They may also begin blooming poorly at this time. Improve both the shape of the impatiens and the amount of flowers by pinching back the plants. Pinch back all the stems to within 3 inches of the ground, leaving at least one set of leaves on each stem. Impatiens quickly produce new growth and return to full bloom within a couple of weeks after pinching. The foliage also returns fuller and rounder, giving a better shape to the plants.
0
0
文章
Miss Chen
2017年08月14日
Impatiens (Impatiens wallerana) is an annual flower that thrives in partial to full shade. They produce colorful blooms from early summer to fall. Their leaves are an attractive dark green color, though under the wrong growing conditions, they may turn yellow.

Considerations
Downy mildew is a fungus disease that affects impatiens. In addition to premature leaf fall and stunting, other symptoms include yellowing leaves. Other diseases affecting impatiens include verticillium wilt and botrytis blight. Both diseases also cause leaves to turn yellow. Fungicides may help treat the impatiens in the early stages of any of these plant diseases.
Significance
Over-watering impatiens may cause leaves to turn yellow. To prevent this, keep the soil moist between waterings. Alternatively, too little water may cause impatiens' leaves to turn yellow as well. If the soil is dry and yellow leaves appear, it's time to water the impatiens.

Nutrient Deficiency
Impatiens requires a monthly application of a water-soluble fertilizer. Not getting the correct amount of fertilizer may stunt plant growth and turn leaves yellow. Always follow the recommended application rate when applying fertilizer to impatiens.
Considerations
Downy mildew is a fungus disease that affects impatiens. In addition to premature leaf fall and stunting, other symptoms include yellowing leaves. Other diseases affecting impatiens include verticillium wilt and botrytis blight. Both diseases also cause leaves to turn yellow. Fungicides may help treat the impatiens in the early stages of any of these plant diseases.
Significance
Over-watering impatiens may cause leaves to turn yellow. To prevent this, keep the soil moist between waterings. Alternatively, too little water may cause impatiens' leaves to turn yellow as well. If the soil is dry and yellow leaves appear, it's time to water the impatiens.
Nutrient Deficiency
Impatiens requires a monthly application of a water-soluble fertilizer. Not getting the correct amount of fertilizer may stunt plant growth and turn leaves yellow. Always follow the recommended application rate when applying fertilizer to impatiens.
0
0
文章
Miss Chen
2017年08月14日
Annual bread-seed or lettuce-leaf poppies (Papaver somniferum) produce flat, tissue-papery blooms in shades of pink, red, purple and white. They grow 4 to 5 feet tall, with lush, pale green foliage that stands upright from the stalk. These are the same poppies that are the source of opium and it is illegal in the United States to grow them for that purpose.

Colors
While specific strains, such as Lauren's Grape (purple), Danish Flag (deep orange with white feathery centers) and peony poppies (multiple petals in jewel tones) are offered in commercial seed packages, grocery-store poppy seeds grow just as well, although in limited colors and types. Most produce a single pink poppy flower.
Timing
Annual poppies grow best if they get a period of cold, so it is often recommended that they be planted in fall or sprinkled on the snow. However, especially in areas with wet winters and cold springs, planting in mid-February yields better results.
Planting
Scatter the seeds on the ground and do not cover them, as sunlight is needed for germination. If your climate is dry, keep the seeds moist with a fine spray from the hose until they come up. When the plants are about 3 inches tall, thin out any crowded clumps.
Gathering Seeds
Poppy flowers last only a few days. After the petals drop, the poppy seed heads will begin to dry. Leave them on the plant until the stalks have turned beige and the slits at the top of the poppy pod have opened to release the seeds. Gather the heads and let them dry completely, then shake out the seeds.

Replanting
Many of the seeds will fall to the ground and plant themselves, but save some seeds to scatter again in spring, especially if the grocery-store seeds yield any unusual colors or forms that you wish to grow again.
Colors
While specific strains, such as Lauren's Grape (purple), Danish Flag (deep orange with white feathery centers) and peony poppies (multiple petals in jewel tones) are offered in commercial seed packages, grocery-store poppy seeds grow just as well, although in limited colors and types. Most produce a single pink poppy flower.
Timing
Annual poppies grow best if they get a period of cold, so it is often recommended that they be planted in fall or sprinkled on the snow. However, especially in areas with wet winters and cold springs, planting in mid-February yields better results.
Planting
Scatter the seeds on the ground and do not cover them, as sunlight is needed for germination. If your climate is dry, keep the seeds moist with a fine spray from the hose until they come up. When the plants are about 3 inches tall, thin out any crowded clumps.
Gathering Seeds
Poppy flowers last only a few days. After the petals drop, the poppy seed heads will begin to dry. Leave them on the plant until the stalks have turned beige and the slits at the top of the poppy pod have opened to release the seeds. Gather the heads and let them dry completely, then shake out the seeds.
Replanting
Many of the seeds will fall to the ground and plant themselves, but save some seeds to scatter again in spring, especially if the grocery-store seeds yield any unusual colors or forms that you wish to grow again.
1
1
文章
Dummer. ゛☀
2017年08月13日
With broad, dark green, fan-shaped foliage on tall stalks, lady palm plants (Rhapis excelsa) have an oriental appeal. As stand-alone plants, they have a formal elegance and when planted in masses they lend a touch of the tropics to the landscape. Outdoors they can reach heights of 6 to 12 feet with a spread of 3 to 12 feet. When grown in the confines of a container, they stay much smaller.
Lady Palm Care Indoors
Place your lady palm plant near an east-facing window, out of direct sunlight. They thrive in comfortable indoor temperatures of between 60 and 80 F. (16-27 C.).
Water the palm when the soil is dry to a depth of 1 inch in spring and summer. In fall and winter, allow the soil to dry to a depth of two inches. Drench the soil with water until it comes out the drainage holes in the bottom of the pot and empty the saucer under the pot after 20 to 30 minutes. When the plant becomes so large and heavy that it is hard to empty the saucer, set it on top of a layer of pebbles to prevent the soil from reabsorbing the moisture.
Repot a lady palm plant every two years, increasing the size of the pot each time until it is as large as you want it to grow. After it has reached the desired size, repot every two years or so into the same pot or a pot of the same size to refresh the potting soil. African violet potting mix is ideal for growing lady palms. Take care not to over-fertilize a lady palm plant. Feed them only in summer using half-strength liquid houseplant fertilizer. With proper care, the plant should last for several years.
How to Care for a Lady Palm Outdoors
Outdoors, large plantings of lady finger palms may remind you of bamboo, but without the invasive tendencies. Plant them as you would hedges on 3- to 4-foot centers to form a screen or backdrop. They also make nice specimen plants. Outdoor plants produce fragrant, yellow flowers in spring. Lady palms are hardy in USDA hardiness zones 8b through 12. They need full or partial shade. Although they adapt well to a variety of soil types, they perform best in a rich, well-drained soil with plenty of organic matter. Water often enough to keep the soil lightly moist where practical. The plants tolerate moderate drought. Use a palm fertilizer, according to the label instructions, no more than once a year.
0
0
文章
Dummer. ゛☀
2017年08月13日
By the time the leaves change and the first storms of winter approach, the intrepid gardener is itching for some living green thing to nurture and bring color to the home. Flaming katy kalanchoe is an ideal plant to chase away the winter doldrums. In most zones the plant is used as an interior plant, but growing flaming katy outdoors is possible in the warmer climates. The shiny green, scalloped leaves and brilliant flowers enliven any situation and care for flaming katy is a breeze. Discover how to grow flaming katy plants and charge up your interior with some vibrant tones and unique foliage.
Information on Flaming Katy Kalanchoe
Flaming katy is grouped with the succulent variety of plants. This lovely specimen if often found in the gift floral section of your local supermarket or big box nursery, but don’t let its availability fool you. Flaming katy houseplant is a spectacle to behold, especially if you are starved for color and a new plant buddy. The leaves are thick and waxy like a jade plant but have a sculpted edge. Plants get about 12 inches high and just a little smaller in width. The flowers are a real show stopper in bright colors like pink, yellow, orange and red. The plants require well drained soil and prefer drier conditions. Flaming katy houseplants that get overwatered will show their displeasure with yellowing, dropping leaves and rotten stems.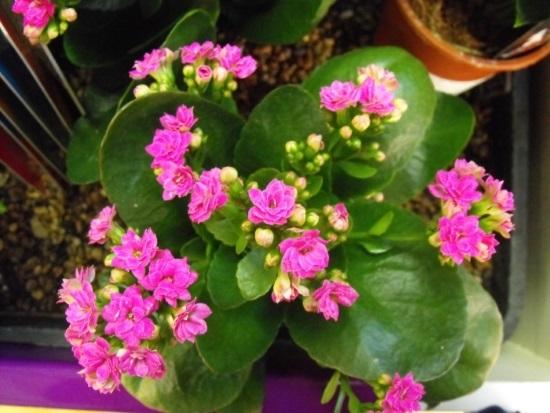
How to Grow Flaming Katy Plants
Kalanchoe is familiar as a houseplant but it is possible to grow them outside too. They need bright sun and temperatures of 65 to 70 F. (18-21 C.). The plants are native to Madagascar and do not tolerate boggy soil, cold temperatures or shade. Even a light freeze can kill the plant, but it makes an excellent patio plant in summer. Bring it inside when cold temperatures threaten and use it as a houseplant. Growing this plant from seed is not recommended. Starts are relatively cheap and thrive and grow quickly in sun to part shade. Lower light conditions promote greener foliage and the plants will still fill with blooms. Flaming katy kalanchoe needs at least six weeks of shorter days and up to 12 for more compact blooms. Use a sandy potting mix for container outdoor plants and amend garden beds with plenty of grit to ensure drainage. You rarely need to water unless you have endlessly hot, dry days. Apply water from the base of the plant to prevent water spotting and rot on the leaves. Allow the top of the soil to completely dry out before watering again.
The importance of not overwatering cannot be stressed enough. The moderate moisture needs of the plant are one of the keys to care for flaming katy. During the blooming season, fertilize monthly with a diluted flowering plant food. Remove spent flowers and pinch off any dead leaves to enhance the appearance of the plant. It is a lovely foliage plant even when not in bloom and the thick leaves store moisture. Lightly wrinkled leaves signal that it is time to water. Follow these hints on care for flaming katy and you will have a proven winner for many seasons to come.
0
0
文章
Dummer. ゛☀
2017年08月12日
Weeping figs (Ficus benjamina) are elegant trees with slender gray trunks and a profusion of green leaves. Weeping fig tree care depends on whether you are growing weeping fig trees indoors or outdoors. Let’s learn more about outdoor care for weeping figs.
Weeping Fig Plant Information
Growing weeping fig trees indoors and growing weeping fig trees outdoors are completely different endeavors. It is almost as if indoor and outdoor weeping figs are different species.
Indoors, weeping figs are attractive container plants that rarely grow above 6 to 8 feet. Outdoors, however, the trees grow into huge specimens (up to 100 feet tall and 50 feet wide) and are often used for hedges. That being said, weeping figs only thrive outdoors in USDA plant hardiness zones 10 to 11. Therefore, most weeping figs are grown as indoor plants. If you are fortunate enough to live in one of these warm, tropical-like areas though, caring for weeping figs outdoors is something you need to know.
Weeping Fig Tree Care Outdoors
As indoor container plants, weeping figs grow quite slowly, but outside, it’s a different story. This plant can quickly become a monster of a tree if not kept pruned, which it tolerates well. In fact, with regards to weeping fig tree pruning, it readily accepts severe pruning, so don’t hesitate to remove any dead foliage when you see it. If you want to do weeping fig tree pruning to shape or reduce the size of the tree, you can take off up to one-third of the outer growth of the canopy at a time. Caring for weeping figs indoors is a matter of selecting an appropriate location. As its roots spread just as fast as it grows tall, the tree can potentially damage foundations. So, if choosing to grow outdoors, plant it well away from the home, at least 30 feet. If you read up on weeping fig plant information, you find that the plant prefers well-drained, moist, loamy soil and thrives in a location with bright, indirect sunlight indoors. Outdoors is pretty much the same with a few exceptions. The tree can grow well in full sun to shade.
Once established, creeping figs are fairly drought and heat tolerant. They are said to be hardy to 30 F. (-1 C.) but just one hard frost can cause severe damage to the tree. However, when grown in areas with less harsh winters, most will rebound provided the roots are protected. Adding a 3- to 4-inch layer of mulch can help. Outdoor problems with creeping figs include freezing temps; severe drought; high winds; and insect pests, especially thrips. Weeping fig tree care can be tricky since issues are often hard to diagnose. No matter what the problem, the tree reacts the same way: it drops leaves. Most experts agree that the number one cause of leaf drop in weeping fig is overwatering (especially indoors). A good rule of thumb is to keep your tree’s soil moist but never wet, backing off in the winter. You can provide the tree with liquid fertilizer about once a month during the growing season, but outdoors this isn’t usually necessary or advisable due to its faster growth.
0
0
文章
Miss Chen
2017年08月11日
Burn spots on leaves, dark-green or weak leaves, a weak center stem and failure to bloom are all signs that an orchid (Orchidaceae) is failing to thrive. It is not yet dead, though, and can return to blooming with a correct diagnosis of its problem and a few simple steps to correct it.

Diagnose the Problem
Healthy orchid leaves are grassy green with yellow undertones. Dark-green leaves are a symptom of not enough light exposure.
White or brown dry areas on orchid leaves indicate sunburn. The sun damage is irreversible in small or large areas that turn black. Sun-damaged spots do not harm the plant's health or flowering, but continued exposure to excessive light continues the damage.
Overwatering causes root rot because the roots are not able to absorb enough oxygen when full of water. The symptoms include swollen, soft roots and wrinkled leaves. Underwatering turns roots white and makes the plant susceptible to diseases.
Brown-tipped orchid leaves and inhibited growth indicate overfertilization.
A weak center stem and wilted lower leaves may indicate the plant is simply too crowded and needs to be repotted. A pot-bound orchid also may have weak leaves, or its roots may spill over its pot's side.
Lessen Sun Damage and Overwatering
Sunburn spots are alleviated easily by reducing the amount of direct sunlight that falls onto the orchid. Orchids grow best with a south- or east-facing window exposure. Use a sheer curtain to increase shade.

Water the plant's potting medium only one time per week if root rot is the problem, and ensure the potting medium has not disintegrated. Orchids available in markets and garden centers are often grown in peat moss mixtures that disintegrate after one or two seasons. Peat moss becomes sodden and retains water easily. Water should drain quickly out of the plant container's bottom after the potting medium has been soaked thoroughly.
Feed the Plant
"Fertilize weakly, weekly" is the standard advice from many orchid growers. Revitalize an underfertilized or overfertilized plant by putting it on a healthy feeding schedule. Either commercial orchid fertilizer in granulated or liquid form, or houseplant fertilizer is beneficial. Choose a 20-20-20 formula that has little or no urea, which may attract bacterial growth. Dilute the fertilizer's label-recommended dosage to ¼ strength by mixing it with water, and use it weekly. Always fertilize after the plant's soil has been thoroughly soaked with water to avoid root burn.
Repot a Crowded Plant
A pot-bound orchid comes to life again when it is put in a larger container and given new potting material. Repotting alleviates potential disease problems and encourages healthy growth. Choose a clay or plastic container one size bigger than the present one. Ensure the container has bottom drainage holes.
Commercial growing material for orchids is either bark-based or peat moss-based. The nutrients in either of those types help to revive an orchid that is not blooming or has weak leaf development.
Shake off all the old potting material as you replant the orchid. Cut off roots that are dry and shriveled or white and swollen, leaving ones that are firm to the touch.
Diagnose the Problem
Healthy orchid leaves are grassy green with yellow undertones. Dark-green leaves are a symptom of not enough light exposure.
White or brown dry areas on orchid leaves indicate sunburn. The sun damage is irreversible in small or large areas that turn black. Sun-damaged spots do not harm the plant's health or flowering, but continued exposure to excessive light continues the damage.
Overwatering causes root rot because the roots are not able to absorb enough oxygen when full of water. The symptoms include swollen, soft roots and wrinkled leaves. Underwatering turns roots white and makes the plant susceptible to diseases.
Brown-tipped orchid leaves and inhibited growth indicate overfertilization.
A weak center stem and wilted lower leaves may indicate the plant is simply too crowded and needs to be repotted. A pot-bound orchid also may have weak leaves, or its roots may spill over its pot's side.
Lessen Sun Damage and Overwatering
Sunburn spots are alleviated easily by reducing the amount of direct sunlight that falls onto the orchid. Orchids grow best with a south- or east-facing window exposure. Use a sheer curtain to increase shade.
Water the plant's potting medium only one time per week if root rot is the problem, and ensure the potting medium has not disintegrated. Orchids available in markets and garden centers are often grown in peat moss mixtures that disintegrate after one or two seasons. Peat moss becomes sodden and retains water easily. Water should drain quickly out of the plant container's bottom after the potting medium has been soaked thoroughly.
Feed the Plant
"Fertilize weakly, weekly" is the standard advice from many orchid growers. Revitalize an underfertilized or overfertilized plant by putting it on a healthy feeding schedule. Either commercial orchid fertilizer in granulated or liquid form, or houseplant fertilizer is beneficial. Choose a 20-20-20 formula that has little or no urea, which may attract bacterial growth. Dilute the fertilizer's label-recommended dosage to ¼ strength by mixing it with water, and use it weekly. Always fertilize after the plant's soil has been thoroughly soaked with water to avoid root burn.
Repot a Crowded Plant
A pot-bound orchid comes to life again when it is put in a larger container and given new potting material. Repotting alleviates potential disease problems and encourages healthy growth. Choose a clay or plastic container one size bigger than the present one. Ensure the container has bottom drainage holes.
Commercial growing material for orchids is either bark-based or peat moss-based. The nutrients in either of those types help to revive an orchid that is not blooming or has weak leaf development.
Shake off all the old potting material as you replant the orchid. Cut off roots that are dry and shriveled or white and swollen, leaving ones that are firm to the touch.
0
0
文章
Dummer. ゛☀
2017年08月10日
Chinese evergreen plants (Aglaonemas spp.) are leafy plants popular in homes and offices. They thrive in low light and a mild, protected environment. They are compact plants and grow big leaves that are a mix of green and cream color. Pruning Chinese evergreen plant foliage is hardly ever required. However, there are times that trimming Chinese evergreens is appropriate. Keep reading for more information on when and how to cut back a Chinese evergreen.
Chinese Evergreen Pruning
Many houseplants require regular or even constant pruning and pinching to keep them looking good. One of the advantages of Chinese evergreen is that they are very low maintenance. As long as you keep these plants in low light areas with temperatures of 65 to 75 F. (18-23 C.), they will likely thrive.
Because of the dense leafing of the plant, trimming Chinese evergreens is not a must. In fact, since new growth appears from the plant crown, pruning Chinese evergreen plant leaves can kill the entire plant. You may be tempted to pick up the pruners if the plant, as it matures, begins to look leggy. Experts suggest that you resist. Instead, consider planting pothos or another species of low-light plant, to fill in the bare spots.
How to Cut Back a Chinese Evergreen
Occasions for pruning Chinese evergreen plant are few and far between, but they do arise. Prune off any dead leaves in order to keep the houseplant looking its best. Trim them off as low as you can by reaching deep into the center of the plant. Another occasion for trimming Chinese evergreens comes in the spring, if the plant produces flowers. Blooms generally appear in the spring – watch for a spathe and spadix in the middle of the leaves.
You are probably helping the plant by removing these flowers since it lets the Chinese evergreen use that energy for foliage growth. Since the flowers are not extremely attractive, you will not suffer from their loss. If you feel badly pruning Chinese evergreen plant flowers off the plant, do it anyway. Remember that removing the blossoms is good for the longevity of the plant.
0
1
文章
Dummer. ゛☀
2017年08月10日
The variegated pineapple plant is grown for its foliage, not for its fruit. The gorgeous bright red, green and cream striped leaves are held rigidly off a low stem. Their bright fruit is attractive but rather bitter. The plants make lovely and interesting houseplants, or warm season potted outdoor plants. The pineapple flowering houseplant is a bromeliad and requires similar care. Care for the variegated pineapple is the same as an edible pineapple, but don’t expect fruiting overnight. Both types can take up to five years to produce fruit.
Pineapple Bromeliad Varieties
Bromeliads are a family of sometimes stemless, sometimes epiphytic plants. They may also be grown in an almost soil-free environment made up of other materials such as sand, peat and bark. Bromeliads are common in warm areas with high humidity. There are hundreds of varieties of pineapple. Not all of them produce a yellow fleshed fruit armored in green. There are also red and blue varieties. The best pineapple bromeliad varieties for home growers are the miniature types. These plants are easier to keep to container size, so you can move them in and protect them in case of freezing weather.
Variegated Pineapple Plant
Pineapples are only hardy in USDA zones 10 to 11. These warm season plants can be grown inside as striking houseplants. The variegated form is colorful and lively, well suited for a partially sunny room. Growing variegated pineapples in full sun is not recommended as the best color comes in lower light areas. The plant is a novelty plant and not as easy to find as the regular pineapple bromeliad varieties. Mature plants can produce a flower within a year of planting. To start your own pineapple flowering houseplant, harvest a fruit and cut the top off. Let the top dry on the counter for a day or two. Plant the base in a mixture of orchid bark and sand that is lightly moist. Keep somewhat moist until the top roots, taking care not to overwater, which will make the fruit top rot. You can also remove any offsets and plant them. Let these root and you will soon be growing variegated pineapples to share with friends and family.
Care for Variegated Pineapple
Pineapples require medium light, soil low in organic amendments and moderate moisture. The plant can tolerate short periods of drought with no ill effects. They can be prone to several pests, including aphids, whitefly and scale. Rinse off soft bodied pests and use a horticultural soap to combat the others. Fertilize every two weeks in spring until dormancy in fall. Use a diluted liquid plant fertilizer. Water thoroughly each time, but allow the surface of the soil to dry out before applying more water. Variegated pineapple plant must be kept where temperatures are between 65 and 82 F. (50 and 28 C.) with high humidity for best growth. Mimic the growing conditions of a Hawaiian island and you are guaranteed success with your pineapple flowering houseplant!
0
0
文章
Dummer. ゛☀
2017年08月10日
Boston fern (Nephrolepsis exaltata bostoniensis) is a dependable, old-fashioned charmer that decorates the environment with cascades of graceful, deep green fronds. Boston fern is a tropical plant that thrives with minimal care; however, light requirements for Boston ferns is a critical aspect of successful growing. Keep reading to learn about Boston fern light needs, including Boston fern light conditions.
How Much Light Does a Boston Fern Need?
Boston fern light needs vary depending on the time of year. The plant benefits from bright, indirect light during fall and winter. A location where the plant gets at least two hours of indirect sunlight per day, preferably in the morning or late afternoon, is ideal.
Boston fern light conditions must change when sunlight is more intense in spring and summer. During the sunny time of year, the fern needs a semi-shady location, such as a window with a northern exposure. Avoid direct, intense sunlight from a window with southern or western exposure unless the window is protected by a sheer curtain, or if the window is shaded by a tall outdoor tree. Consider two important factors when you think about Boston fern indoor light any time of year. Boston fern won’t tolerate bright sunlight or total shade.
First, avoid intense, direct light, which can scorch the fronds. Secondly, keep in mind that without adequate sunlight, the plant won’t thrive and is likely to drop its leaves. Now that you know about Boston fern light conditions, you can consider the plant’s other needs, which aren’t complicated. Water the plant deeply whenever the top inch of soil feels dry to the touch, then let the pot drain thoroughly before you return the plant to its drainage saucer. If the indoor air is dry, place the pot on a tray of wet pebbles to raise the humidity around the plant, but never let the pot sit in water.
Fertilize the fern every four to six weeks during spring and summer, using a water-soluble fertilizer diluted to one-quarter strength, or use organic fish emulsion. Mist the plant occasionally to clean dust from the leaves, but don’t overdo; damp fronds are more susceptible to disease. Snip old fronds at soil level to generate healthy new growth.
1
1
文章
Dummer. ゛☀
2017年08月10日
Boston ferns are fabulously popular houseplants. Hardy in USDA zones 9-11, they are kept indoors in pots in most regions. Capable of growing 3 feet (0.9 m) high and 4 feet (1.2 m) wide, Boston ferns can brighten any room with their lush green foliage. That’s why it can be so disheartening to see your vibrant green fern fronds turning black or brown. Keep reading to learn what causes a Boston fern with black fronds, and what to do about it.
Boston Fern Fronds Turning Black Isn’t Always Bad
There is one case in which a Boston fern with black fronds is perfectly natural, and it’s good to be able to spot it. You may see small black spots on the undersides of your fern’s leaves, lined up in regular rows. These spots are spores, and they’re the fern’s way of reproducing. Eventually, the spores will drop to the soil below and grow into reproductive structures. If you see these spots, don’t take any action! It’s a sign that your fern is healthy. Your fern will also experience some natural browning as it ages. As new growth emerges, the oldest leaves at the bottom of the fern will wither and turn brown to black to make way for new growth. This is totally normal. Cut away the discolored leaves to keep the plant looking fresh.
When Boston Fern Fronds Turning Black is Not Good
Boston fern fronds turning brown or black may also signal trouble, however. If your fern’s leaves are suffering from brown or black spots or strips, there may be nematodes in the soil. Add lots of compost to the soil – this will encourage the growth of beneficial fungi that should destroy the nematodes. If the infestation is bad, remove any infected plants. Small, but spreading, soft brown to black spots with an unpleasant odor are most likely a sign of bacterial soft rot. Destroy any infected plants.
Small, but spreading, soft brown to black spots with an unpleasant odor are most likely a sign of bacterial soft rot. Destroy any infected plants. Leaf tip burn manifests as browning and withering tips on fronds and leaves. Destroy any infected plants. Rhizoctonia Blight appears as irregular brownish-black spots that start near the crown of the fern but spread very rapidly. Spray with fungicide.
0
0
文章
Dummer. ゛☀
2017年08月10日
Why the Ming Aralia (Polyscias fruticosa) ever fell out of favor as a houseplant is beyond me. This plant is one of the easiest and loveliest houseplants available. With a little care and know how, Ming Aralia can bring green to your indoors.
How to Care for Ming Aralia Houseplants
Like most houseplants, Ming Aralia is a tropical plant, meaning it cannot survive temps below 50 F. (10 C.). In warmer climates, Ming Aralia makes an excellent outdoor shrub.
One important thing to keep in mind when growing Ming Aralia indoors is that it must be kept constantly moist. Even in the winter, when most houseplants need a reduction in the amount of water they receive, this plant’s soil should still be kept consistently moist (but not wet). Other than that one small detail, your Ming Aralia should require little upkeep.
Ming Aralia can grow to be 6 to 7 feet tall if properly cared for in an indoor environment, and is prone to grow up rather than out. For this reason, you may want to occasionally prune this plant. If possible, prune your Ming Aralia in the cooler months, as this is when the plant’s growth is reduced and the pruning will cause less damage to the plant. Controlled pruning of this plant can actually produce some pretty stunning results. Due to the naturally crooked growth of this plant, the lower stems can be trained into some interesting showpieces.
These plants also make nice bonsai specimens, but even when not used in this fashion they can add a certain Asian flair to a room. Ming Aralia needs medium, indirect light in an indoor environment. Make sure that the plant gets enough sunlight from a north- or east-facing window or a plant lamp.
If you wish to propagate this plant, all you need to do is take a cutting and place it in some damp soil. Keep the soil damp and the cutting should root in just a few weeks. For added chance of rooting success, place the pot and cutting in a plastic bag. Ming Aralia is certainly a plant that will make a splash in your house. The fine cut leaves and the interesting trunks make this a great addition to any indoor garden.
0
0
文章
Dummer. ゛☀
2017年08月09日
Identification
Cistus albidus grows up to 1.5m in height, although most plants are little more than half this height. The hairy pale grey-green leaves are oblong to elliptical and have three prominent veins. The flowers are 4 to 6 cm across and have five purplish-pink petals backed by five sepals.
The leaves of cistus plants are very tough. The flowers, by comparison, seem very fragile and have wafer-thin, crumpled looking petals: they are nontheless beautiful for that, and it is easy to see why cistus is considered such a well-loved addition to northern European gardens.
Habitat
In the UK these shrubs are much-loved garden plants, but it is in the Mediterranean region that they really come into their own: vast tracts of hillsides (particularly in Portugal and Spain) are smothered with various species of these members of the Rockrose family.
Blooming times
Grey-leaved Cistus produces flowers from March to June and can be found in maquis, garrigue, open woodland, on steep slopes and rocky ground. Some of the other cistus species to be found in the Mediterranean include Cistus ladanifer (Gum Cistus), and Cistus salviifoloius (Sage-leaved Cistus).
0
0
文章
Dummer. ゛☀
2017年08月09日
A walk on the wild side is not necessary if you want to enjoy the sight of masses of Red Valerian, because this wildflower is very much at home in urban settings too.
Identification
A perennial plant with braching stems and opposite grey-green lanceaolate leaves, stalked near the base of the plant and unstalked further up, Red Valerian grows to a height of 80cm. Stems are topped by dense panicles of red, pink or white flowers. (White and red forms often grow together - there is an example further down on this page.)
Individually the flowers are 8-10mm long and comprise a corolla in the form of a slender tube with five lobed petals of unequal length and a small spur at the base.
Distribution
Originally a wildflower of the Mediterranean region, this European wildflower has been introduced into the wild in northern Europe, mainly via garden escapes. In parts of Australia and North America where Red Valerian occurs it is an introduced alien species.
Habitat
Between the stonework of walls, bridges and other vertical surfaces seem to be very attractive to this pretty wildflower, which is most commonly seen in coastal districts. Red Valerian is a common sight on railway embankments and coastal paths and on some reservoir dam walls.
Blooming Times
The flowers first appear towards the end of May, andyou will find red valerian (which also has a white variety, as shown above) in flower right through to the end of September and in sheltered places right through to the end of the year.
Uses
The leaves of Red Valerian and roots can be eaten - the leaves either fresh in salads or lightly boiled, and he roots boiled in soups. Opinions differ as to whether either makes particularly good eating. Although Red Valerian is reported by some sources to have medicinal properties, this is probably due to confusion with Common Valerian, Valeriana officinalis.
0
0

