文章
Dummer. ゛☀
2017年09月01日

Silk tree mimosa (Albizia julibrissin) growing can be a rewarding treat once the silky blooms and fringe-like foliage grace the landscape. So what is a silk tree? Keep reading to learn more.
What is a Silk Tree?
Mimosa trees are a member of the Fabaceae family and are a popular ornamental tree in the home landscape. Also known as silk trees and Albizia silk trees, these beauties have a lovely feathery habit with wispy pink to rose aromatic flowers. Ideal for USDA planting zones 6 through 9, this tree provides light shade and adds a lovely burst of color amongst other deciduous or evergreen trees, or when used as a specimen. The fringed foliage ranges from bright green to chocolate brown, depending on the variety.
How to Grow a Silk Tree
Silk tree mimosa growing is really quite easy. Albizia silk trees need a little space to accommodate their arching habit, so be sure to plan for this accordingly when planting. Roots like to spread out as well, so it is wise not to plant this tree close to a sidewalk or other cement patio where it could cause disruption. Some people also prefer to locate mimosa trees away from gathering areas because flower and pod shed can be kind of messy. Mature trees open into a lovely “V” shape and reach about 30 feet high. Mimosa thrives in full sun and is not picky about soil type. The tree is easy to start from a seed pod or a young tree. Anyone who has a mimosa would be happy to share seed pods with you.
Silk Tree Care
Silk trees need just enough water to keep moist; they will even tolerate a short period of drought. A 2-inch layer of mulch will help to protect the tree and keep the soil moist. If you are getting regular rainfall, it is not necessary to water your tree. Fertilize your tree with compost or organic fertilizer in early spring before the leaves appear. Prune dead branches to keep the tree healthy. Keep an eye out for webworms, which seem to be attracted to this tree. In some regions, canker is a problem. If your tree develops canker, it is necessary to remove infected branches.
Container Growing
Mimosa also makes an excellent container plant. Provide a large container with plenty of loamy soil and excellent drainage. Smaller chocolate mimosa trees make excellent container specimens. Throw in some trailing plants for a beautiful patio or deck display. Water when dry and trim dead branches as needed.
0
0
成长记
Aria
2017年09月01日

Growing 😀

5
0
Aria:@Ueca I don't think it makes a difference 😀I looked up some videos and some people did it this way
Ueca:叶子放反也能发出来 😮 (they're upside-down)
文章
Dummer. ゛☀
2017年08月31日
Common in older landscapes because of their quick growth, even the slightest breeze can make the silver undersides of silver maple trees look like the whole tree is shimmering. Because of its wide use as a fast-growing tree, most of us have a silver maple or a few on our urban blocks. In addition to their use as fast-growing shade trees, silver maples were also widely planted in reforestation projects. Continue reading to learn more silver maple tree information.
Silver Maple Tree Information
Silver maples (Acer saccharinum) prefer to grow in moist, slightly acidic soil. They are moderately drought tolerant, but are more recognized for their ability to survive in standing water for long periods of time. Because of this water tolerance, silver maples were often planted along river banks or edges of other waterways for erosion control. They can tolerate high water levels in spring and receding water levels in midsummer.
In natural areas, their early spring blooms are important to bees and other pollinators. Their prolific seeds are eaten by grosbeaks, finches, wild turkeys, ducks, squirrels and chipmunks. Its leaves provide food for deer, rabbits, cecropia moth caterpillars and white tussock moth caterpillars.
Growing silver maple trees are prone to forming deep holes or cavities that provide homes for raccoons, opossums, squirrels, bats, owls and other birds. Near waterways, beavers often eat silver maple bark and use their limbs for building beaver dams and lodges.
How to Grow Silver Maple Trees
Hardy in zones 3-9, silver maple tree growth is about 2 feet or more per year. Their vase-shaped growth habit can top out at anywhere from 50 to 80 feet tall depending on location and can be 35 to 50 feet wide. While they were once widely used as quick growing street trees or shade trees for landscapes, silver maples are not so popular in recent years because their brittle limbs are prone to breakage from strong winds or heavy snow or ice. Silver maple’s large vigorous roots can also damage sidewalks and driveways, as well as sewer and drain pipes. The soft wood that is prone to forming holes or cavities can also be prone to fungus or grubs.
Another drawback to silver maples is that their prolific, winged seed pairs are highly viable and seedlings will quickly sprout up in any open soil without any special requirements, like stratification. This can make them a pest to agriculture fields and quite annoying to home gardeners. On the positive side, this makes silver maples very easy to propagate by seed. In recent years, red maples and silver maples have been bred together to create the hybrid Acer freemanii. These hybrids are fast growing like silver maples but more durable against strong winds and heavy snow or ice. They also have prettier fall colors, usually in reds and oranges, unlike the yellow fall color of silver maples.
If planting a silver maple tree is a project you’d like to undertake but without the downsides, then opt for one of these hybrid types instead. Varieties in the Acer freemanii include:
Autumn Blaze
Marmo
Armstrong
Celebration
Matador
Morgan
Scarlet Sentinel
Firefall
0
0
文章
Dummer. ゛☀
2017年08月31日
If you are seeking a beautiful medium to large sized maple tree, look no further than the Norway maple. This lovely plant is native to Europe and western Asia, and has become naturalized in some areas of North America. In some regions, growing a Norway maple tree can be a problem where it self-seeds and displaces other native vegetation. With good care and careful management, however, this tree can be a good shade or standalone specimen. Learn how to grow Norway maple trees and enjoy their ornamental classic look and ease of care.
Norway Maple Tree Info
Maple trees are classics of the landscape genre. Norway maple (Acer platanoides) has made its own place in the culture and is a common shade tree that resembles sugar maples. The plant has several seasons of interest and retains a compact crown and dense growth. Norway maple has high tolerance to pollution and is adaptable to many soils including clay, sand or acidic conditions. This elegant tree is a useful addition to the landscape, provided some care is taken to minimize seedlings, which are rampant the following season.
The Norway maple was introduced by John Bartram to Philadelphia in 1756. It quickly became a popular shade tree due to its adaptability and attractive form. However, in some areas of the United States, it has begun to replace native populations of maples and may be invasive from the northeastern U.S. south to Tennessee and Virginia. It is also a plant of concern in the Pacific Northwest.
Trees can grow up to 90 feet in height and have nicely rounded, compact crowns. Young trees have smooth bark, which becomes black and furrowed with age. The fall color is bright gold but one of the types of Norway maple trees, Crimson King, develops deep reddish fall tones. One of the important items of Norway maple tree info is regarding its root system. Roots can become a hazard due to the huge number of surface roots the plant produces.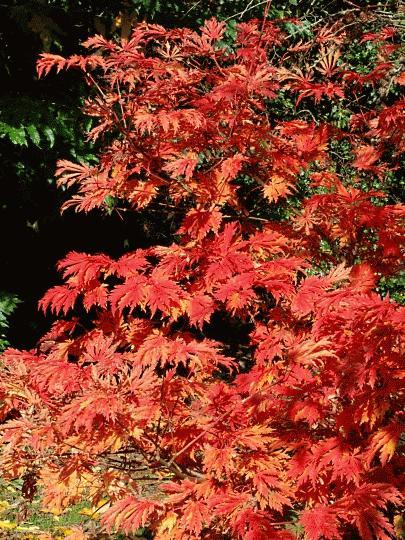
How to Grow Norway Maple Trees
Acer platanoides is hardy to United States Department of Agriculture zones 4 to 7. This remarkably adaptable tree performs well in either full sun or partial shade. While it prefers well drained, moist soil, it is drought tolerant for short periods of time, although some leaf drop may occur. Growing a Norway maple tree may require some training when the tree is young to help it develop a good strong central leader and stout scaffold. Plants transplant easily with little effect on the root system or foliage. Norway maple has good resistance to storm and ice damage and has a vigorous growth rate. These trees, if carefully managed, can quickly become attractive focal points of the shade garden.
Norway Maple Tree Care
One of the highlights of Norway maple tree care is managing the samaras, or seed fruits. These winged fruits can catch the wind and navigate far away from the parent tree. They germinate readily and can become an issue in rural settings or near native woods. Pruning at the end of the season, just before the samaras turn brown, can prevent wild seedlings from becoming a pest.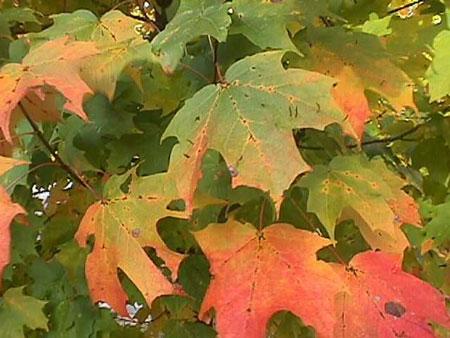
Other management is limited to supplemental watering in hot summers, once a year fertilizing with a good balanced food in early spring, and removing any damaged or diseased wood. These trees have few of the classic maple issues and are quite fine if left alone most of the time. While this adds to their popularity, caution should be observed in some regions where the plant is considered invasive.
0
0
文章
Dummer. ゛☀
2017年08月31日
What is a boxelder tree? Boxelder (Acer negundo) is a fast-growing maple tree native to this country. Although drought resistant, boxelder maple trees do not have a lot of ornamental appeal to homeowners. Read on for additional boxelder tree information.
Boxelder Tree Information
What is a boxelder tree? It’s an easy-to-grow, very adaptable maple. The wood of boxelder maple trees is soft and has no commercial value. Boxelder maple tree facts tell us that this maple usually grows on river banks or near water in the wild. These trees help to shelter wildlife and stabilize stream banks. However, in urban areas, they are considered a type of weed.
Some boxelder maple trees are male and some are female. The females bear blossoms that turn bright green when they are pollinated. They can add color to your spring garden. However, most experts do not recommend that gardeners begin boxelder maple tree growing. Nor are they very popular garden plants.
Boxelder maple tree facts tell us that these trees have brittle, weak wood. That means that the trees break easily in wind and ice storms. In addition, boxelder maple tree information confirms that the tree seeds, found in winged samaras, germinate very easily. This can make them a nuisance in a private garden. Finally, female trees attract boxelder bugs. These are insects some ½ inch long that don’t cause many problems in the garden. However, boxelder bugs are problematic as winter comes on. They like to overwinter indoors, and you’ll likely find them inside your house.
Boxelder Maple Tree Growing
If you decide to plant one of these trees, you’ll need to get information about boxelder maple tree growing. Given the tree’s tolerance and adaptability, boxelder maple trees are not difficult to grow in the proper climate. These trees can grow in almost any mild, cool or cold region in the United States. In fact, they thrive in U.S. Department of Agriculture plant hardiness zones 2 through 9.
Plant your boxelder near a stream or river, if possible. They tolerate most soils, including sand and clay, growing happily in dry or wet soil. However, they are sensitive to salt spray.
0
0
文章
Dummer. ゛☀
2017年08月31日
Leyland Cypress (x Cupressocyparis leylandii) is a large, fast-growing, evergreen conifer that can easily reach 60-80’ in height and 20’ wide. It has a natural pyramidal shape and elegant, dark green, fine-textured foliage. When they become too large or unsightly, trimming Leyland Cypress trees becomes necessary.
Leyland Cypress Pruning
Leyland Cypress is often used as a quick screen because it can grow up to 4 feet per year. It makes an excellent windbreak or property boundary border. Because it is so large, it can quickly outgrow its space. For this reason, the native East Coast specimen looks best on large lots where it is allowed to maintain its natural form and size.
Since Leyland Cypress grows so wide, do not plant them too close together. Space them at least 8 feet apart. Otherwise, the overlapping, scraping branches can wound the plant and, therefore, leave an opening for disease and pests. In addition to proper location and spacing, pruning Leyland Cypress is occasionally needed – especially if you don’t have enough room or if it’s outgrown the allotted space.
How to Trim a Leyland Cypress Tree
Pruning Leyland Cypress into a formal hedge is a common practice. The tree can take severe pruning and trimming. If you are wondering when to prune Leyland Cypress, then summer is your best time frame. During the first year, trim the top and sides to start forming the shape you desire. During the second and third year, trim just the side branches that have wandered out too far to maintain and encourage foliage density.
Leyland Cypress pruning changes once the tree reaches the desired height. At that point, annually trim the top six to twelve inches below the desired height. When it regrows, it will fill in more thickly.
0
0
文章
Dummer. ゛☀
2017年08月31日
Gardeners in need of quick privacy hedges love quick-growing Leyland cypress (x Cupressocyparis leylandii). When you plant them in an appropriate location and provide good culture, your shrubs may not suffer from Leyland cypress diseases. Read on for information about the main diseases of Leyland cypress trees, including tips on treating disease in Leyland cypress plants.
Preventing Leyland Cypress Diseases
Prevention is easier than cure when it comes to diseases of Leyland cypress trees. Your first, best steps toward keeping these attractive evergreens healthy is planting them in appropriate sites.
The second step is giving them the best care. A healthy, vigorous plant shakes off problems with more ease than a stressed plant. And Leyland cypress disease treatment is often impossible or ineffective. So save yourself the time and effort involved in treating disease in Leyland cypress. Plant these shrubs in a sunny location in soil offering excellent drainage. Space them far enough apart to let air pass between them. Provide water during times of drought and check your hardiness zone. Leyland cypress thrive in U.S. Department of Agriculture plant hardiness zones 6 through 10.
Diseases of Leyland Cypress Trees
If your shrubs are ill, you’ll have to learn something about the different Leyland cypress diseases to figure out what’s wrong. Diseases of Leyland cypress generally fall into three categories: blights, cankers and root rots.
Blight
The symptoms of needle blight diseases include needles browning and dropping. Usually, this begins on the lower branches. These are fungal diseases, and the spores spread from branch to branch by rain, wind and tools. Placing the shrubs far enough apart to allow air and sun to get through the branches helps prevent needle blight. If it’s too late for prevention, prune out infected branches. Thorough application of a fungicide can help but is difficult on tall specimens.
Canker
If your Leyland cypress needles turn red-brown or you see cankers on the trunks or branches, the shrubs may have a canker disease, like Seiridium or Botryosphaeria canker. Cankers are dry lesions, often sunken, on stems and branches. Surrounding bark can show a dark brown or purplish discoloration. Canker diseases are also caused by fungus, and usually only attack stressed plants. When it comes to treating disease in Leyland cypress, fungicides are not effective. The only Leyland cypress disease treatment for this is to prune out infected branches, being sure to sterilize the pruners. Then start a program of regular irrigation.
Root rot
Root rot diseases cause dying roots leading to yellowing foliage. It is often caused by inappropriate planting in an area where the soil does not drain well. Once a shrub has root rot, chemical Leyland cypress disease treatment is not effective. As with the other diseases, the best way of treating disease in Leyland cypress is to give the plants appropriate cultural care.
0
0
文章
Dummer. ゛☀
2017年08月31日
What is Indian rosewood? Yes, it’s that prized cabinet wood used to make fine furniture, but it’s also a very handsome shade tree with a fragrance that will turn your backyard into a sensory delight. If you are thinking of growing an Indian rosewood (Dalbergia sissoo), you’ll need to learn in advance the requirements for Indian rosewood care. Read on for other Dalbergia sissoo information and tips about inviting Indian rosewood trees into your garden.
What is Indian Rosewood?
Before you decide to plant Indian rosewood trees, you might ask: what is Indian rosewood? It’s a tree native to the Indian subcontinent. Its scientific name is Dalbergia sissoo, and it’s rich in common names too, including Dalbergia, Himalaya raintree and penny leaf tree. Dalbergia sissoo information tells us that rosewoods are attractive deciduous trees growing vigorously to some 60 feet tall and 40 feet wide. They do best in USDA hardiness zones 10 and 11, but can also be grown in zone 9 after establishment.
Growing an Indian Rosewood
Why grow an Indian rosewood tree? Many gardeners appreciate the rosewood trees for their powerful fragrance. The trees fill with tiny flowers in the springtime, inconspicuous in appearance but bearing a very strong, sweet fragrance. The flowers are followed by interesting pods, slender, flat and brown. The wood is prized for making fine furniture.
Indian Rosewood Care
If you start growing an Indian rosewood, you’ll find that the trees are not high maintenance. Indian rosewood care won’t take too much of your time. In fact, Dalbergia sissoo information notes that rosewood trees grow so readily that they are considered invasive in some parts of Florida. Plant Indian rosewood trees in a full sun area or under high shade. These trees tolerate a vast range of soil types, from very dry to very wet. Provide your tree with adequate irrigation when you plant it, and keep it up until the roots are well established.
Prune the tree into a well-formed, single leader tree. The wood is known to be brittle, so prune out branches with tight branch crotches to prevent them from breaking off down the road and injuring the tree.
0
0
文章
Dummer. ゛☀
2017年08月31日
For additional interest in the landscape, consider growing horse chestnuts. They’re perfect for adding drama either standing alone as a specimen planting or among other tree as a border planting.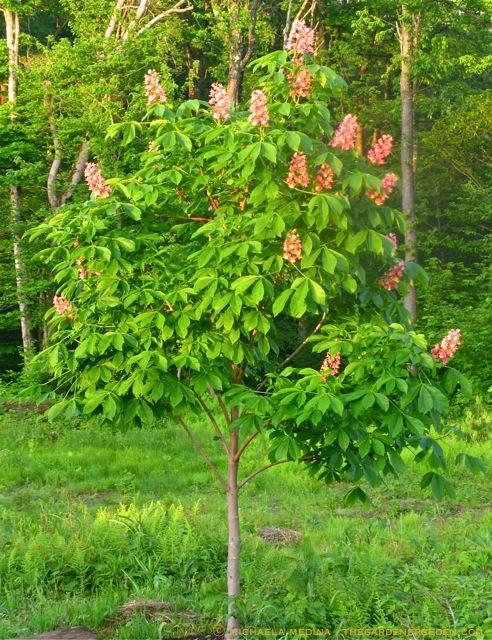
What are Horse Chestnuts?
You may be wondering, What are horse chestnuts? Horse chestnuts (Aesculus hippocastanum) are large flowering trees, similar to buckeyes, with showy, white blooms in spring. These are followed by attractive, spiny, green seedpods from midsummer through fall. In addition to their beautiful flowers and seedpods, horse chestnut trees also exhibit interesting bark with twisted limbs. One note of caution: do not confuse these ornamental tree with other chestnut trees (Castanea genus), which are edible. The fruit of horse chestnuts should not be eaten.
Growing a Horse Chestnut Tree
The most important factor when growing a horse chestnut tree is location. Horse chestnuts thrive in USDA plant hardiness zones 3-8 in areas having full sun and well-drained, but moist, humus-rich soil. These trees do not tolerate excessively dry conditions. Horse chestnut trees are usually planted in spring or fall, depending on climate. Since they are normally purchased as container or burlapped plants, the planting hole should be about three times their width and deep enough to accommodate them with the top of the rootball flush with the soil.
Once the tree is placed in the hole, ensure it is straight before adding some of the soil to anchor it in place. Fill the hole with water, allowing it to absorb before adding organic matter and remaining soil. Tamp down lightly to eliminate any air pockets and add a layer of mulch to help retain moisture and keep out weeds. Water newly planted trees regularly. Established trees require little care other than occasional pruning in late winter as needed.Growing Horse Chestnut Seeds or Conkers
The horse chestnut can also be grown from seeds or conkers. The spiny seedpods drop from the tree in fall when ripened and crack open to reveal the horse chestnut seeds inside. Horse chestnut seeds should be planted as soon as possible. Do not allow them to dry out. They also germinate rather quickly and are best sown outdoors in a cold frame. They can also be placed in a plastic bag outside for a couple of weeks. Once roots begin sprouting, plant them in pots of composted soil. Horse chestnut seedlings can be planted in their permanent locations the following spring or fall, or whenever they reach about a foot or so tall.
Growing a horse chestnut tree is easy and well worth the little effort involved. The tree makes a wonderful addition to the landscape for years of enjoyment.
0
0
文章
Dummer. ゛☀
2017年08月31日
If you are thinking of planting a Canadian hemlock tree in your garden, you’ll need information on the tree’s growing requirements. Read on for Canadian hemlock tree facts, including tips for Canadian hemlock care.
Canadian Hemlock Tree Facts
Canadian hemlock (Tsuga canadensis), also called eastern hemlock, is a member of the pine family and native to North America. You’ll see the trees in the wild growing on woody slopes, rocky ridges, and river valleys from eastern Canada south to Georgia and Alabama.
They have a slow to medium growth rate of up to 24 inches a year, maturing to 50 to 70 feet tall and 25 feet wide. Don’t worry about their roots. According to Canadian hemlock tree facts, the roots are not likely to invade pipes or raise sidewalks. If you are hesitant to plant this tree because you know hemlock is poisonous, stop worrying. No part of the Canadian hemlock is poisonous. The poisonous hemlocks you have heard about are perennial plants in the parsley family.
Canadian Hemlocks in the Landscape
Canadian hemlocks in the landscape have flat sprays of lacy evergreen foliage and graceful, pyramid shapes. Their elegance makes them excellent choices for specimen trees. However, the trees are very tolerant of shearing. This means that you can also keep them short or use them for privacy screens. When you are thinking about planting a Canadian hemlock tree, it’s important to make sure you live in a region where the species can thrive. In general, this species does well in cooler to cold climates, and thrives in U.S. Department of Agriculture plant hardiness zones 3 through 7.
If you are planting a Canadian hemlock tree, look for a site that offers some shade. The trees prefer partial shade, especially in areas with hot summers, but do require daily direct sun. If your region gets strong winds, pick a planting spot with wind protection. To offer the best Canadian hemlock care, plant your tree in well-drained loam or sand. The soil should be acidic rather than alkaline.
Care for Canadian Hemlock Trees
If you’ve been careful about your planting location, care for Canadian hemlock trees is not difficult. The most important part of Canadian hemlock care is proper irrigation. When the tree is young, it will require regular watering. As it matures, it still requires frequent irrigation during dry weather. Canadian hemlocks are not very drought tolerant. Care for Canadian hemlock trees can also require regular pruning if you wish to keep the tree a particular size or shape. It is not necessary for the trees’ health, however. Although these trees are hardy to zone 3, their roots do better with protection against winter chill. The best care for Canadian hemlock trees includes applying a thick winter mulch.
If you live in Virginia, Maryland or Pennsylvania, or other areas where infestations of woolly adelgid have been severe, remain vigilant. These are tiny, sap-sucking insects that can kill Canadian hemlocks. Treatment includes pesticides containing imidacloprid or dinotefuran.
0
0
文章
Dummer. ゛☀
2017年08月31日
Weeping hemlock (Tsuga canadensis ‘Pendula’), also known as Canadian hemlock, is an attractive evergreen tree with a graceful, weeping form. Read on to learn about planting a weeping hemlock in your garden.
Weeping Hemlock Growing
There are a number of weeping hemlock varieties available to gardeners, all known collectively as ‘Pendula.’ Sargent’s hemlock (‘Sargentii’) is one of the most popular. Others include ‘Bennett’ and ‘White Gentsch.’
A moderate grower, weeping hemlock reaches mature heights of about 10 to 15 feet, with a width of up to 30 feet, depending on how the tree is pruned. Weeping hemlock displays spreading branches and dense foliage with a delicate, lacy texture, but there’s nothing fragile about weeping hemlock trees, which grow in USDA plant hardiness zones 4 through 8. Weeping hemlock trees thrive in partial or full sunlight. Full shade produces a thin, unattractive plant. Weeping hemlock also needs average, well-drained, slightly acidic soil. It prefers moist conditions and doesn’t do well in dry soil or extremely hot weather. Also, plant weeping hemlock where the tree is protected from harsh winds.
Weeping Hemlock Tree Care
Water weeping hemlock trees regularly, especially in hot, dry weather because weeping hemlock is intolerant of drought. Water is especially important for young, newly planted trees and helps develop a long, sturdy root system. Prune weeping hemlock trees as needed in late winter or early spring to control size or maintain a desired shape. Feed weeping hemlock trees before new growth appears in spring, using a good quality, general-purpose fertilizer. Apply fertilizer according to label recommendations.
Treat aphids, scaleand spider mites with insecticidal soap spray. Repeat as needed. Don’t spray insecticidal soap if ladybugsor other beneficial insects are present on the leaves. Also, postpone spraying if temperatures are over 90 F. (32 C.), or if the sun is shining directly on the leaves.
0
0
文章
Dummer. ゛☀
2017年08月31日
Just what are Ginkgo biloba benefits, what is ginkgo and how can one grow these useful trees? Read on for the answers to these questions and tips for growing ginkgo trees.
Gingko trees are deciduous, hardy shade trees with unique fan-shaped leaves which are linked to a primitive family of trees commonly found 160 million years ago in China. Considered to be the world’s oldest living species of tree, geological evidence of ginkgos have been dated to the Mesozoic era, some 200 million years ago! Ginkgo trees are planted around temple sites in Japan and considered to be sacred. These trees produce an herbal product popular around the world, most specifically in Asian cultures.
Ginkgo Biloba Benefits
The ancient medicinal by-product resulting from ginkgo trees is derived from the seeds of the tree. Long touted for its benefits in improving memory/concentration (Alzheimer’s disease and dementia), Ginkgo biloba purported benefits also include relief from PMS symptoms, eye problems like macular degeneration, dizziness, leg pains associated with circulation issues, Tinnitus, and even MS symptoms. Ginkgo biloba is not regulated or sanctioned by the FDA and is listed as an herbal product. A note on Ginkgo trees seeds: avoid products that contain fresh or roasted seeds as they contain a toxic chemical which can result in seizures or even death.
How to Grow a Ginkgo Tree
Also called the maidenhair tree, ginkgo trees are long living, drought and pest resistant, and incredibly strong; so strong in fact, they were the only trees to survive following the Hiroshima atomic bomb attack. These trees may grow to a height of 80 feet; however, they are slow growers and as such will work well in many garden areas within USDA zones 4-9. Ginkgos have a gorgeous yellow fall color and have a spreading habitat which varies dependent upon the cultivar. Autumn Gold is a male cultivar with good fall color and both Fastigiata and Princeton Sentry® are columnar male forms. Male forms of gingko trees are mentioned, as the fruiting females tend to have an incredibly nasty odor described by many as smelling of, well, vomit. Hence, it is recommended that one plants only male trees.
Tips for Growing Ginkgo
Ginkgo trees are multi-purpose in their uses as they make wonderful shade trees, specimen plants (including amazing bonsai) and street trees. As street trees, they are tolerant of city conditions such as air pollution and road salt. Although they may need to be staked when saplings, once they have attained some size, staking is no longer required and the trees may also be transplanted with great ease and no fuss. As the tree is amazingly easy going about almost everything, including the pH of its soil, gingko tree care does not require a lot of finesse. When planting, ginkgo tree care will include setting in deep, well-draining soil in an area of full to partial sun.
Regular watering and a well balanced fertilizer regime is also recommended, at least until maturation — about the time it reaches 35 to 50 feet tall! Seriously though, gingko tree care is a simple process and will result in many years of shade from this ornamental botanical “dinosaur.”
0
0
文章
Dummer. ゛☀
2017年08月31日
The foxtail palm tree (Wodyetia bifurcata), an Australian native, is an adaptable, fast-growing specimen. In recent years, varieties of foxtail palm trees have become popular with landscapers and nurserymen in warmer zones of the United States. Grown in a wide range of soils, the only requirements are that soil be well draining and not highly acidic. Tolerant of salty sea spray and wind, the foxtail palm tree is an excellent choice for those who live on ocean fronts and other salt prone areas. Let’s take a look at how to grow foxtail palms in your garden.
How to Grow Foxtail Palms From Seed
Easily started from seed, the foxtail palm tree is suitable for container growing and may be used as an interior planting if correct growing conditions exist. Containers must be large enough to accommodate the large root system. Seeds may be started in small containers and transplanted when germination occurs. The attractive foxtail palm tree grows most rapidly in a full sun area, but may thrive in partially shaded areas as well. The foxtail palm tree prefers a humid environment which may be provided by nearby fountains or pebble trays in the immediate area where it is grown.
Seeds started in pots should be kept moist until germination occurs. Germination may occur as quickly as one month or take up to one year, but is most often accomplished within a three month time frame. Well drained soil and adequate watering, combined with appropriate fertilization ensure a low care beauty wherever it may be planted.
How to Take Care of Foxtail Palms
Easy maintenance is associated with the foxtail palm tree, as it is a self-cleaning specimen; meaning that spent leaves will die and drop from the tree as needed to facilitate new growth. While the foxtail palm tree is somewhat drought resistant, regular watering encourages optimum growth and a lush, exotic appearance. Regular watering is required until the tree is established, usually in one or two years. Caring for foxtail palms should include mulching, but mulch should not hug the trunk. Mulching helps retain moisture and discourages maintenance workers from accidentally injuring the trunk with mowers and trimmers. It also keeps weed growth down in the area of the foxtail palm tree.
Foxtail Palm Fertilizer
When feeding the foxtail palm tree, fertilizer should be heavy on nitrogen, which encourages lush green foliage growth. Foxtail palm fertilizer should be balanced and also contain micronutrients and trace elements. Controlled release fertilizer is preferable to rapid release, water soluble fertilizer, as the latter moves through the soil too quickly to benefit the deep and spreading root system. In areas where manganese toxicity may exist in the soil, such as some areas of Hawaii, a low pH may be corrected with the application of limestone. Foxtail palm fertilizer may be the pellet form and should be broadcast in the area under the tree’s canopy, taking care not to dump large amounts on newly forming roots which may burn. Avoid fertilizing against the trunk area.
Once they are properly located, caring for foxtail palms is relatively simple. Once you grow these specimens you will quickly learn how to take care of the foxtail palm. Through experience and experimentation you will determine which foxtail palm fertilizer is best for your conditions and which varieties of foxtail palm trees you prefer to grow.
0
0
文章
Dummer. ゛☀
2017年08月31日
Native to Australia, foxtail palm (Wodyetia bifurcata) is an attractive palm tree with a rounded, symmetrical shape and a smooth, grey trunk and tufted fronds that resemble foxtails. This Australian native is suitable for growing in USDA plant hardiness zones 10 and 11. Common means of propagation such as cuttings, division or air layering aren’t usually effective, so if you want to propagate a foxtail palm, seeds are your best option. That project often involves picking foxtail palm seeds and planting them when they’re fresh. Harvesting foxtail palm seeds is easy. Read on to find out how.
How to Collect Foxtail Palm Seeds
Bright red foxtail palm fruit, about the size of small tomatoes, grow in large clusters, with a single seed in each mature fruit. Picking foxtail palm seeds is best when the seeds are unblemished and overripe, as very ripe seeds are more likely to germinate. Soak the seeds in warm water for 48 to 72 hours to loosen the pulp. Change the water daily. Discard any seeds that float to the top and keep the ones that sink to the bottom. Floating seeds lack an endosperm and will not germinate. Rinse the seeds to remove any remaining pulp, then dip them in a solution of one part bleach to ten parts water. Rinse thoroughly.
At this point, it’s necessary to scarify, or rough up the seeds, which mimics the natural course of events when seeds drop from high in the tree. To scarify the seeds, rub them gently with sandpaper or a file, or nick the outer coating with the tip of a knife. Don’t apply too much pressure. Plant the seeds in your garden immediately, as foxtail palm seeds don’t store well. The fresher, the better. Alternatively, you can propagate a foxtail palm indoors.
How to Propagate a Foxtail Palm Indoors
Plant fresh foxtail palm seeds in a container filled with a moist, sandy, well-drained potting mix. The pot should be at least 6 inches (15 cm.) deep, although 10 to 12 inches (25-30 cm.) is even better. You can plant several seeds in a pot, not touching, or you can plant a single seed in a pot. Plant the seed horizontally. Some gardeners plant the seed with the top of the seeds exposed, others prefer to cover the seeds with about ¼ inch (.6 cm.) of potting mix. Place the pot in a plastic bag. Unless you have a greenhouse or you live in a very warm climate, you’ll need to place the pot on a heat mat set to 86 to 95 F. (30-35 C.). Germination generally takes one to three months, but may take as long as a year. The heat mat will speed the process substantially.
Keep the potting mix lightly moist at all times, but never soggy, as too much moisture will rot the seed. The seeds may look a little shriveled and worse for wear by the time germination occurs, and they may even look dead. Don’t give up. This is normal. Once the seed sprouts, move the pot to a warm, humid area in your house and mist the seedling often. A bathroom or kitchen is often a good location. Transplant the seedling outdoors in spring or summer when it has at least three to four sets of leaves.
0
0
文章
Dummer. ゛☀
2017年08月31日
The drake elm (also called Chinese elm or lacebark elm) is a quick-growing elm tree that naturally develops a dense, rounded, umbrella shaped canopy. For more drake elm tree information and details on caring for drake elm trees, read on.
Drake Elm Tree Information
When you read up on drake elm tree information, you’ll learn all about the tree’s exceptionally beautiful bark. It is green, gray, orange and brown, and it exfoliates in small thin plates. The trunk often forks, producing the same vase shape that American elms display.
Drake elms (Ulmus parvifolia ‘Drake’) are relatively small trees, generally staying under 50 feet tall. They are deciduous, but they shed leaves late and almost act like evergreens in warmer climates. The leaves of a drake elm are typical to most elm trees, some two inches long, toothed, with conspicuous veins. Most drake elm tree information will mention the tree’s small winged samara/seeds that appear in the spring. The samaras are papery, flat and even ornamental, drooping in dense and showy clusters.
Drake Elm Tree Care
If you are thinking of how nice your backyard would look with a drake elm tree growing in it, you’ll want to learn about caring for drake elm trees. First of all, remember that the typical drake elm tree grows about 50 feet tall and 40 feet wide, so if you have the intention to start drake elm tree growing, provide each tree with an adequate site. Keep in mind that these elms thrive in U.S. Department of Agriculture plant hardiness zones 5 through 9. Planting in a cooler or hotter region may not be a good idea.
If you are wondering how to grow a drake elm, it is not difficult if you plant the tree in an appropriate location and provide adequate care. Drake elm tree care includes plenty of sun, so find a full sun planting site. You’ll also want to give the tree adequate water during the growing season. Otherwise, drake elm tree growing is fairly easy. One thing to keep in mind is that drake elms reseed prodigiously. In some areas, drake elms are invasive, escaping cultivation and disrupting native plant populations.
If space is lacking or invasiveness is a concern, this tree also makes a great specimen for bonsai plantings.
0
0

