文章
Miss Chen
2017年08月29日

Knockout roses are an ever-blooming rose developed by Texas A&M University to withstand extreme Texas growing conditions such as drought, freezing temperatures and high humidity. Their popularity has spread as knockout roses are used in commercial and private landscapes with low maintenance requirements. Knockout roses generally are care free, but occasionally, especially between blooming periods, old flowers, battered foliage and a few dead limbs can make the knockout rose bush look like it's seen better days.

How to Revive Knockout Roses
Step 1
Remove weeds from around your knockout rose bush as far as 36 inches from the plant so that you can identify any weak or diseased limbs and see how to shape the plant. Also, rake old leaves and other garden debris from around the base of the plant.
Step 2
Prune out dead wood by cutting dead branches back to the point where they meet a main stem or point of origin. If the dead limb goes all the way to the ground without meeting a main stem, prune it at ground level.
Step 3
Shape the plant by removing spent flowers and unruly growth by cutting limbs at a 45-degree angle and 1/4 of an inch above an outward facing bud to train new growth outward. You can remove as much as half of a knockout rose bush when pruning, but severe pruning will delay the next blooming period for several weeks. This is because the plant blooms on new wood and requires a longer recovery period.

Step 4
Gently work two shovels of well-composted manure or compost into the top inch of the soil around the roots, and apply a rose fertilizer according to the instructions on the package. Spread fertilizer just outside the root zone, not on top of the root zone, as it will burn new roots that are close to the surface. Wate the compost and fertilizer well.
Step 5
Apply a two-inch deep layer of mulch around the base of the plant and six inches past the root zone. Leave a one-inch space between the mulch and the trunk of the knockout rose to prevent mildew from spreading to the bush as the compost decays. Keep it evenly moist until new growth appears.
How to Revive Knockout Roses
Step 1
Remove weeds from around your knockout rose bush as far as 36 inches from the plant so that you can identify any weak or diseased limbs and see how to shape the plant. Also, rake old leaves and other garden debris from around the base of the plant.
Step 2
Prune out dead wood by cutting dead branches back to the point where they meet a main stem or point of origin. If the dead limb goes all the way to the ground without meeting a main stem, prune it at ground level.
Step 3
Shape the plant by removing spent flowers and unruly growth by cutting limbs at a 45-degree angle and 1/4 of an inch above an outward facing bud to train new growth outward. You can remove as much as half of a knockout rose bush when pruning, but severe pruning will delay the next blooming period for several weeks. This is because the plant blooms on new wood and requires a longer recovery period.
Step 4
Gently work two shovels of well-composted manure or compost into the top inch of the soil around the roots, and apply a rose fertilizer according to the instructions on the package. Spread fertilizer just outside the root zone, not on top of the root zone, as it will burn new roots that are close to the surface. Wate the compost and fertilizer well.
Step 5
Apply a two-inch deep layer of mulch around the base of the plant and six inches past the root zone. Leave a one-inch space between the mulch and the trunk of the knockout rose to prevent mildew from spreading to the bush as the compost decays. Keep it evenly moist until new growth appears.
0
1
文章
Dummer. ゛☀
2017年08月29日

What is Lithodora? Botanically known as Lithodora diffusa, this plant is a hardy ground cover that produces masses of tiny, intensely blue, star-shaped flowers from late spring throughout most of summer. What to know more about growing Lithodora ground cover? Read on to find out.
Lithodora Plant Information
Lithodora planted in gardens reaches heights of only 6 to 10 inches (15-25 cm.), but a single plant can eventually spread 24 to 36 inches (61-91 cm.). You can easily grow Lithodora in gardens in USDA plant hardiness zones 6 through 10. In the more southern ranges, the dense covering of narrow, dark-green leaves remain green year round.
Lithodora ground cover is a great choice for rock gardens. It also works well in window boxes or containers. Lithodora is relatively easy to find in garden centers. Otherwise, plant Lithodora seeds directly in the garden, or start them indoors a few weeks ahead of time. You can also propagate cuttings from established plants in mid- to late summer.
Growing Lithodora Ground Cover
Acidic, well-drained soil is best for growing Lithodora in gardens. Sandy soil is fine, but the plant won’t tolerate heavy clay soil. Although Lithodora thrives in full sunlight, partial shade isn’t a problem. Afternoon shade is best in hot climates. As for the care of Lithodora, water the plant regularly and don’t allow the soil to become bone dry. However, beware of overwatering and avoid soggy, waterlogged soil. Apply mulch in autumn if you live in a cooler region. Prune Lithodora lightly if it looks straggly, or if the leaves are damaged by winter cold.
Lithodora generally requires no fertilizer unless the leaves turn pale greenish-yellow. If this occurs, provide a fertilizer for rhododendron, azalea or other acid-loving plants in late winter or very early spring. If you notice aphids, treat the plant with insecticidal soap spray. Otherwise, pests are usually not a problem.
2
1
文章
Dummer. ゛☀
2017年08月29日
Irish moss plants are versatile little plants that can add a touch of elegance to your landscape. Growing Irish moss fills a range of garden needs. It is simple to learn how to grow Irish moss. You’ll find growing Irish moss can put the finishing touch on many areas of the garden and beyond. Keep reading to learn more about the care of Irish moss in your garden.
Irish Moss Growing Zones and Info
A member of the Caryophyllaceae family, Irish moss (Sagina subulata), which is not a moss at all, is also called Corsican pearlwort or Scot’s moss. Irish moss plants perform in a manner similar to moss, however. They do need some light to maintain the most amazing of emerald green colors found in its foliage. This herbaceous perennial (evergreen in warmer zones) turns green as temperatures warm. Charming little white blooms appear sporadically throughout the growing season. For a similar plant with a more yellow tint, try Scotch moss, Sagina subulata Aurea.
Irish moss growing zones include USDA plant hardiness zones 4-10, depending on the variety you choose. Most areas of the United States can use Irish moss plants in some manner. Not a heat loving specimen, use Irish moss plants in a sunny to partially shaded area. In warmer Irish moss growing zones, plant where it is protected from the scorching sun. Irish moss may turn brown during summer’s hottest days, but greens up again as temperatures fall in autumn.
How to Grow Irish Moss
Plant Irish moss in spring, when danger of frost is passed. Space plants 12 inches apart when first planting. Soil should be fertile and have good drainage. Irish moss plants need regular watering, but should not have soggy roots.
Care for Irish moss is simple and includes cutting out browning patches in older mats. Growing Irish moss reaches only 1 to 2 inches in height and when used as a lawn replacement, does not need mowing. If you don’t wish for such a drastic makeover, consider the possibilities of growing Irish moss as a ground cover. Use the grass-like mats to spread around pavers or to edge a rock garden. Growing Irish moss is also attractive in containers. Uses of Irish moss are limited only by your imagination.
0
0
文章
Dummer. ゛☀
2017年08月29日
Growing native plants is an excellent way to preserve national flora and have the added bonus of thriving easily since the soils and conditions are designed for their success. There are few plants designed to grow well in almost any climate, both for their beauty and as fodder for cattle, pigs, and many species of butterfly. Frog fruit is one of them.
What is Frog Fruit?
I love plants with odd names. Frog fruit (Lippia nodiflora syn. Phyla nodiflora) is also called turkey tangle frog fruit. What is frog fruit? It is a native plant of North America and in the Verbena family of flowering herbaceous plants.
Frog fruit plants are low growing plants that develop only about 3 to 5 inches in height. They are found wild in the southern half of the United States through tropical regions. The plants produce a unique flower from May until October that matures to white blooms with five petals on 4-inch long spikes. Plants spread to nearly 3 feet and form a dense mat of semi-woody stems. Leaves are attractive with small notched indents along the edges.
The plant prefers dry soil and will die back when freezing temperatures occur, with total death after an extended freeze. In the wild, they are found in inhospitable locations such as ditches, beaches and fields. So can you grow frog fruit natives as part of a landscaped garden?
Can You Grow Frog Fruit in the Garden?
Frog fruit plants grow as evergreen perennials in warm to temperate zones and add a wild touch as ground covers and bedding borders. As an addition to the home garden, they make excellent low maintenance ground cover or brighten up hanging baskets as trailing plants. Frog fruit grows fairly quickly from seed directly sown after soil has warmed or from cuttings. In fact, the plant is so prolific at self-seeding that you may end up with an invasive tangle on your hands. Although evergreen in most native regions, it will lose leaves in temperate climates when cold temperatures arrive in fall. In most cases, it will re-sprout in spring, provided the root zone wasn’t exposed to serious freezing temperatures. Growing frog fruit as part of the native woodland garden provides food for deer and can be a good sacrificial plant if the animals are nuisances for other parts of the garden.
Frog Fruit Plant Care
Frog fruit plants are such hardy specimens that they really need little assistance to thrive. Trim back stems if they get into areas where they are not wanted. Since they prosper on almost any soil, the plants need little supplemental fertilizer. If you want increased blooms, use a liquid bloom food in spring. Water is an important part of frog fruit plant care. While they like dry soil and need good drainage, they will need additional moisture during the hottest months of summer for best growth. The plant’s ease of care and spring and summer beauty make growing frog fruit a winner for the garden and landscape.
0
0
文章
Dummer. ゛☀
2017年08月29日
In some places dichondra, a low growing plant and member of the morning glory family, is seen as a weed. In other places, however, it is valued as an attractive ground cover or even a substitute for a small lawn area. Let’s find out more about how to grow dichondra ground cover.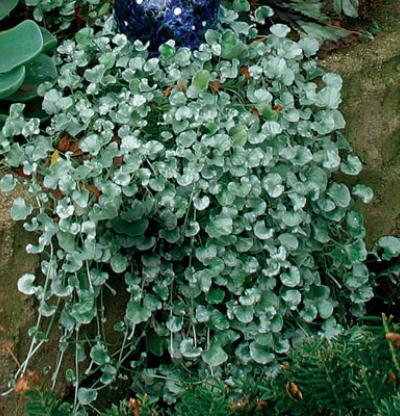
Dichondra Plant Info
Dichondra (Dichondra repens) is a perennial ground cover plant (in USDA zones 7-11) that has a somewhat upright, creeping habit with circular leaves. It is not usually over 2 inches in height and retains its bright green color in temperatures as low as 25 F. (-3 C.). When this ground cover becomes full, it appears as a dense carpet-like grass and is often planted in places where other turf-type grass does not grow well.
Silver dichondra is a green-silver annual ground cover that is often used in hanging baskets and pots. The cascading habit also makes this attractive plant perfect for rock walls or window boxes. This low maintenance plant with fan-shaped foliage, does well in full sun, requires only minimal care and is drought resistant.
How to Grow Dichondra
Proper preparation of the seedbed is essential to growing dichondra plants. A weed-free raked area is best. Dichondra prefers loose, clod-free and well-drained soil in partial shade to full sun. Seed should be lightly scattered over the loosened soil bed and watered until wet but not soggy. Depending on how sunny the planting area is, seeds may need to be watered a few times a day until they begin to sprout. Covering the seeds with a light layer of peat moss helps with moisture retention.
It is best to plant seed when the temperatures are in the 70’s (21 C.) during the day and the 50’s (10 C.) at night. This can be in either early spring or even early fall. The growing dichondra seeds will sprout within 7 to 14 days depending on conditions.
Dichondra Care
Once plants are established, a deep and infrequent watering is necessary. It is best to allow the plants to dry out slightly between watering. If using as a lawn alternative, the dichondra can be mowed to a suitable height. Most people find that mowing to around 1 ½ inches in the summer is best and requires cutting every two weeks. Provide ½ to 1 pound of nitrogen per month during the growing season for a healthy cover.
Apply a pre-emergent weed control on the ground cover to keep weeds at bay. Never use an herbicide containing 2-4D on dichondra plants, as they will die. Remove broadleaf weeds by hand for best results.
0
0
文章
Dummer. ゛☀
2017年08月29日
Creeping jenny plant, also known as moneywort or Lysimachia, is an evergreen perennial plant belonging to the Primulaceae family. For those looking for information on how to grow creeping jenny, this low-growing plant thrives in USDA zones 2 to 10. Creeping jenny is a ground cover that works well in rock gardens, between stepping stones, around ponds, in container plantings or for covering hard to grow areas in the landscape.
How to Grow Creeping Jenny
Growing creeping jenny is relatively easy. Before planting creeping jenny, check with your local extension office to be sure that it is not restricted in your area due to its invasive nature.
Creeping jenny is a hardy plant that will thrive in full sun or shade. Purchase plants from nurseries in the spring and choose a site, in the shade or sun that drains well. Space these plants 2 feet apart, as they grow rapidly to fill in empty areas. Do not plant creeping jenny unless you are prepared to deal with its rapidly spreading habit.
Care of Creeping Jenny Ground Cover
Once established, creeping jenny plant requires very little up keep. Most gardeners prune this fast-growing plant to keep its horizontal growth under control. You can also divide the plant for better air circulation or to control spreading in early spring. Creeping jenny requires regular water and does well with a little organic fertilizer when first planted. Apply mulch or organic compost around plants to help with moisture retention.
What Is the Difference Between Creeping Charlie and Creeping Jenny?
Sometimes when people are growing creeping jenny plant, they mistakenly think it’s the same thing as creeping charlie. Although they are similar in many ways, creeping charlie is a low-growing weed that often invades lawns and gardens, while creeping jenny is a ground cover plant that is, more often than not, a welcome addition to the garden or landscape.
Creeping charlie has four-sided stems that grow up to 30 inches. The roots of this invasive weed form nodes where the leaves join the stem. Creeping charlie also produces lavender flowers on 2-inch spikes. Most varieties of creeping jenny, on the other hand, reach a mature height of 15 inches with yellow-green, coin-like foliage that turns bronze in the winter and has inconspicuous flowers that bloom in early summer.
0
0
文章
Dummer. ゛☀
2017年08月29日
If you have a chunk of garden that you would like a ground cover for, barren strawberry plants might just be the answer. What are these plants? Read on for tips on growing and caring for barren strawberries.
Barren Strawberry Facts
Barren strawberry plants (Waldsteinia ternata) are thus named due to their imitable resemblance to edible strawberry plants. An evergreen, barren strawberry is a ground cover with a spread of 48 inches or more but a low height of 6 inches.
The foliage of barren strawberry plants is akin to that of edible strawberries with a wedge shape that turns to bronze in autumn. The plants have small yellow flowers, which again resemble those of edible strawberries, and appear in the spring. Native to Europe and northern Asia, barren strawberry is sometimes referred to as “dry strawberry” or “yellow strawberry.”
Growing Barren Strawberry Ground Cover
Barren strawberry is an herbaceous perennial that dies down over the winter and greens back up in the spring. It is suitable for USDA zones 4-9. In the mildest zones, the plants will remain as evergreen ground cover year round. This easy-to-grow perennial is suited to a wide range of soils and will thrive in full sun or part shade. The plant may be considered to be invasive by some, as it will rapidly spread via runners, much like edible strawberries. While barren strawberry is drought tolerant, it does not thrive in the hot temps of the South, better bets would be W. parviflora and W. lobata, which are native to that region. Use barren strawberry amongst stepping stones or along wooded paths in light shade to sun.
Caring for Barren Strawberry
As mentioned, barren strawberry is tolerant of minimal irrigation, but to avoid stressing the plant, a consistent amount is recommended. Otherwise, caring for barren strawberry is fairly maintenance and pest free. Propagation of barren strawberry is achieved through seeding; however, once the plant has established, it rapidly sends out runners, quickly filling any available space. Allow the seed heads to dry on the plant and then remove and collect the seeds.
Dry and store them. Sow barren strawberry directly outdoors in the fall or spring, or sow indoors before the last frost for spring transplants. After barren strawberry blooms in the spring, the plant, again like edible strawberry, bears fruit. The question is, is fruit of barren strawberry edible? Herein lies the greatest noticeable difference: barren strawberries are inedible.
0
0
文章
Dummer. ゛☀
2017年08月29日
While they are most commonly found growing in moist, wooded areas, sword ferns are quickly becoming popular in the home garden as well. These interesting plants are easy to grow with sword fern care being just as simple.
All About Sword Ferns
The sword fern (Polystichum munitum) plant is a lush evergreen ground cover known for its bright green, sword-shaped fronds. You’ll find the young fronds, or fiddleheads, appearing in early spring from their underground rhizomes with most plants eventually reaching 4 to 6 feet long. In addition to spreading through rhizomes, sword ferns will also reproduce via spores that are found along the backside of the fronds. These spores appear as brown spots, which are clustered together in groups.
How to Grow Sword Ferns
Learning how to grow sword ferns will be easier if you know how you want to use them in the landscape. Although most people prefer to grow them for ornamental purposes, they have other uses too. For instance, sword ferns make excellent ground cover plants. When planted on hillsides, they can be useful in preventing erosion. They work well with other perennial plantings as well, especially when used as understory plants. Sword ferns perform best in moist shady conditions. However, as long as there is good drainage, the sword fern can easily adapt to a number of soil conditions. They can even thrive in sun when given plenty of moisture.
Sword ferns transplant easily in the garden. And while some people may be lucky enough to have these plants growing naturally on their property already, there are various cultivars available through nurseries. Planting takes place in spring, as soon as the ground can be worked. The hole should be about twice as large as the root ball and it often helps to mix in some compost and other organic matter as well.
Sword Fern Care
Once established in the garden, caring for sword ferns is easy. They are drought resistant and usually don’t require much in the way of water, except during the first year after planting when they should be kept evenly moist. Sword fern plants will keep their foliage throughout winter and can be trimmed back in spring, if desired, though it’s usually better to only cut off dead foliage. Plants can also be divided in spring and transplanted to other areas of the garden.
In addition to their graceful appearance, ease of planting and caring for sword ferns makes them great choices for the landscape. So for those looking to add interest and texture to the garden or fill in open areas, the sword fern plant may be just what the plant doctor ordered.
0
0
文章
Dummer. ゛☀
2017年08月29日
Often seen growing in trees in southern regions, Spanish moss is normally viewed as a bad thing. Oh contraire. Trees with Spanish moss can actually be welcome additions by adding something different to the landscape. That being said, there are still those who would prefer to get rid of it. So what is Spanish moss and is Spanish moss removal for you? Continue reading to learn more about Spanish moss and then decide for yourself.
What is Spanish Moss?
What is Spanish moss anyway? Spanish moss is an epiphytic plant that makes its own food from nutrients and moisture that it captures from the air and absorbs from surface cracks and crevices on the host plant. It clings to the supporting tree by wrapping itself around the branches. So will Spanish moss kill a tree? Spanish moss is sometimes blamed for problems it didn’t cause. Spanish moss takes no nourishment or moisture from trees, and only uses them for protection and support. Therefore, since it doesn’t obtain nourishment from the host plant, it does little or no harm. In fact, a heavy growth of Spanish moss is often seen on trees that are declining in health, but it is not responsible for the decline, though is can, however, strain branches and make them weaker.
Spanish Moss Information
Spanish moss (Tillandsia usneoides) is not a true moss, but is a member of the bromeliad family along with tropical plants, such as pineapples. Trees with Spanish moss are a graceful and elegant sight. The tiny blue-green flowers are hard to see, but they give off a fragrance that is most noticeable at night. The plant drapes from the limbs of trees in masses that may be as much as 20 feet long. Several species of songbirds use Spanish moss as nesting materials, and some build their nests in the clumps. Bats may also live in clumps of Spanish moss, and reptiles and amphibians use the plant as a hiding place. Unfortunately, if you experience severe itching after handling Spanish moss, you’ve discovered chiggers, or redbugs, which also live in the plant.
Spanish Moss Removal
There is no chemical treatment to aid in Spanish moss removal, though herbicide sprays may be applied. The best way to remove Spanish moss is by hand. When the moss is growing on a tall tree, however, this can be a dangerous task and best left to a professional arborist. Even after thorough removal, Spanish moss grows back after a few years. You can reduce the growth rate of Spanish moss by providing the host tree with proper fertilization and watering.
But instead of attempting a frustrating and ultimately futile attempt to remove the moss, why not try to enjoy the way this mysterious and graceful plant enhances the garden.
0
0
文章
Dummer. ゛☀
2017年08月29日
What is a rice paper plant and what’s so great about it? Rice paper plant (Tetrapanax papyrifer) is a shrubby, fast-growing perennial with gigantic, tropical-looking, palmate leaves and clusters of showy white flowers that bloom in summer and fall. This is a super-huge plant that reaches widths of 5 to 8 feet (2 to 3 meters) and heights of up to 12 feet (4 meters). Growing rice paper plants is a piece of cake if you live in a climate with relatively mild winters free of long, hard freezes. Interested in learning how to grow a rice paper plant in your own garden? Read on for more information.
How to Grow a Rice Paper Plant
Consider your climate and growing zone before planting. You can grow rice paper plants year round with no worries if you live in the warm climates of USDA plant hardiness zone 9 and above.
Rice paper plants grow in zone 7 and 8 (and maybe even zone 6) with plenty of mulch to protect the roots during the winter. The top of the plant will freeze, but new shoots will grow back from the rhizomes in spring. Otherwise, rice paper plants grow in full sunlight or light shade. Nearly any type of soil is fine, but the plants thrive (and spread faster) in rich, moist, well-drained soil.
Rice Paper Plant Care
Care of rice paper plants is easy. Just keep the plant well watered and provide a balanced fertilizer every spring. Spread a thick layer of mulch around the plant in late fall if you live north of zone 8. Extend the mulch at least 18 inches (46 cm.) beyond the shoots to ensure the roots are protected.
A note about aggressiveness: Rice paper plants spread vigorously by runners beneath the soil, with new plants often popping up 10 or 15 feet (3 to 4.5 meters) away from the original plant. You may have a real jungle on your hands if you allow the plant to spread unchecked. Pull suckers as they appear. Dig up new, unwanted plants and dispose of them or give them away.
0
0
文章
Dummer. ゛☀
2017年08月29日
Looking for an ornamental grass that offers unique interest? Why not consider growing rattlesnake grass, also known as quaking grass. Read on to learn how to grow rattlesnake grass and take advantage of this fun plant.
Quaking Grass Information
What is rattlesnake grass? Native to the Mediterranean, this ornamental quaking grass (Briza maxima) consists of neat clumps that reach mature heights of 12 to 18 inches. Tiny blooms shaped like rattlesnake rattles dangle from slender, graceful stems rising above the grass, providing color and movement as they shimmer and rattle in the breeze — and gives rise to its common names. Also known as rattlesnake quaking grass, this plant is available both in perennial and annual varieties. Rattlesnake quaking grass is readily found in most garden centers and nurseries, or you can propagate the plant by scattering seeds on prepared soil. Once established, the plant self-seeds readily.
How to Grow Rattlesnake Grass
Although this hardy plant tolerates partial shade, it performs best and produces more blooms in full sunlight. Rattlesnake grass needs rich, moist soil. Dig 2 to 4 inches of mulch or compost into the planting area if the soil is poor or doesn’t drain well. Water regularly while new roots grow during the first year. Water deeply to saturate the roots, and then let the top 1 to 2 inches of soil dry before watering again. Once established, rattlesnake grass is drought tolerant and needs water only during hot, dry weather.
Rattlesnake quaking grass generally doesn’t require fertilizer and too much creates a floppy, weak plant. If you think your plant needs fertilizer, apply a dry general-purpose, slow-release fertilizer at planting time and as soon as new growth appears every spring. Use no more than one-fourth to one-half cup per plant. Be sure to water after applying fertilizer. To keep the plant neat and healthy, cut the grass down to a height of 3 to 4 inches before new growth emerges in spring. Don’t cut the plant down in autumn; the clumps of dry grass add texture and interest to the winter garden and protect the roots during the winter.
Dig and divide rattlesnake grass in spring if the clump looks overgrown or if the grass dies down in the center. Discard the unproductive center and plant the divisions in a new location, or give them to plant-loving friends.
0
0
文章
Dummer. ゛☀
2017年08月29日
Also known as striped and spotted wintergreen, Pipsissewa (Chimaphila maculata) is a low-growing plant distinguished by nodding, pale pink or waxy white blooms and forest-green foliage decorated with contrasting, creamy white stripes. This charming woodland plant isn’t difficult to grow and care of Pipssisewa plants is simple. Read on for more Pipsissewa plant info.
Growing Pipsissewa Plants
Pipsissewa plants are often gathered in the wild. Do your research first; the plants are vulnerable in some areas and may be protected by law. If harvesting Pipsissewa in the wild is acceptable, dig the rhizomes carefully from a large, healthy population. Take care not to disturb or trample the plant. If you’re lucky enough to have a friend with extra plants, you can easily start your own plants without threatening the native population. You can also propagate Pipsissewa plants by taking cuttings in June or by planting ripe seeds. The latter may not be the best option, however, as seeds often fail to germinate. If you decide to try propagation by seed, plant the seeds in moist peat moss mixed with a small amount of soil gathered from the area around the plant. With cuttings, it’s best to grow using some of the same planting medium from where it came, as the plant shares a mycorrhiza relationship for uptake of water and nutrients, and this will increase your chances of success.
Pipsissewa Uses in the Garden
Pipsissewa is a welcome addition to a wildflower or woodland garden, or as a ground cover in semi-shady areas. These plants also enjoy humus-rich soil similar to that found in wooded areas. Additionally, Pipsissewa leaves are edible and are often enjoyed for their crisp, refreshing texture, or brewed as tea, making them great additions for tea gardens too – as a word of caution, Pipsissewa wintergreen plants should not be confused with the wintergreen plant, Gaultheria procumbens.
Care of Pipsissewa Plants
Care of Pipsissewa plants involves keeping the soil relatively moist, as the plant doesn’t tolerate dry soil. Otherwise, this fuss-free little plant will grow for many years with no particular effort on your part.
1
0
sheepdog:this plant grew wild under the pine trees on my land in SC!
文章
Dummer. ゛☀
2017年08月28日
Dwarf mondo grass (Ophiopogon japonicus ‘Nana’) is a Japanese plant that has charmed the gardens of the world. A decorative, low growing plant, this plant looks best when grouped together but sometimes there may only be a few plants available. This is where dwarf mondo grass propagation comes in handy. There are two propagation methods available for dwarf mondo grass. One is planting dwarf mondo grass seeds and the other is division of your plant.
Dwarf Mondo Grass Seeds
If you decided to grow dwarf mondo grass seeds, be aware that they are finicky and you may have trouble getting them to grow. They may also not grow true to the parent plant. This is the more difficult of dwarf mondo grass propagation. Harvest seeds yourself and plant immediately. Seeds you buy will have a lower germination rate the less fresh they are. Plant your seeds in sterile potting soil and place the pots in a cold frame or other cool area. These seeds will germinate best in cooler temperatures. Keep the dwarf mondo grass seeds moist at all times. Wait two weeks to six months for seeds to germinate. They will germinate at irregular times. Some may sprout in two weeks, while others will take much longer.
Dwarf Mondo Grass Division
A much easier and sure fire way of dwarf mondo grass propagation is through division. This way you can plant dwarf mondo grass that is exactly like the parent and you will have a much more uniform look to your plants. For division, dig up a well established clump of dwarf mondo grass. Use your hands to break the clump into smaller clumps or use a sharp, clean knife to cut the clump into smaller clumps.
Plant the dwarf mondo grass clumps in the locations you would like them to grow in. Water them thoroughly and weep well watered for the first few weeks until them become established. The best time to divide your mondo grass in in the early spring or early fall.
1
0
sheepdog:divide and conquer!
文章
Dummer. ゛☀
2017年08月28日
Mondo grass is also known as monkey grass. It is an evergreen perennial that makes a great groundcover or standalone grass-like plant. These plants perform well in almost any soil and lighting condition. Mondo grass is a slow growing plant that can be divided to make more of them and requires minimal care once established. A truly attractive and outstanding landscape plant with a multitude of uses, it is well worth the gardener’s time to learn how to grow mondo grass.
Mondo Grass Information
Mondo grass can tolerate almost anything, including deer, but fails without adequate moisture. What is mondo grass? It is not a true grass but does have strappy leaves and a clumping habit. In summer it brightens up the area with lavender or white flowers that develop into glossy black fruit.
Growing mondo grass is easy, as the plant withstands neglect in regions where plentiful moisture is naturally available. Once established, you can pretty much forget about the plant unless you want to go check out its seasonal beauty, or it is time to divide it.
Imagine great grassy tussocks shrunk down to fairly land size and you can envision mondo grass. These small plants grow only 6 to 10 inches tall (15 to 25 cm.) and have a clumping or mounding nature depending upon variety. Ophiopogon japonicus is the scientific name and refers to the plant’s native region of Asia. The components of the name are derived from the Latin words for snake and beard, a reference to the spiky flowers. As a lawn substitute in shady to partially sunny locations, it is a great sod alternative that never needs mowing. Mondo grass spreads by stolons, or underground stems, and can slowly form dense colonies. Leaves are ½ inch wide (1.3 cm.) and glossy green or even variegated.
How to Grow Mondo Grass
Mondo grass care is extremely minimal but you do need to choose the correct site and prepare the bed for best results. Plants are light green in full sun but deeper green in shade. Either location works well provided soil is well draining and free of competitive weeds. You can separate clumps into sections, each with several stolons and plant 4 to 12 inches (10-30 cm.) apart depending on how quickly you want the area to fill in. Dwarf mondo should be planted 2 to 4 inches (5-10 cm.) apart. Cover roots and stolons with loose soil but avoid covering the crown of the plant. Keep soil moderately moist during establishment.
Mondo Grass Care
If you are growing mondo grass as a lawn, there is little you need to maintain it. Remove any weeds as they appear and keep the area moist in the dry season. After winter storms, leaves may be ragged and can be trimmed back a bit for best appearance. Divide clumps every 3 years if grown as standalone plants. Mondo grass needs very little fertilizing. A once annual feeding in spring with a diluted grass feed is sufficient. Any mondo grass information should list its pest and disease issues. Snailsand slugsmay be a problem as can the pest scale. Disease issues are fungal and form during wet, warm periods. Serious damage by any of these is unlikely. There are numerous cultivars from which to choose, with variant flower colors and size. There is even a black-leaved mondo, which is an excellent foil for both green-leaved plants and brightly colored flora.
0
0
文章
Dummer. ゛☀
2017年08月28日
For finely textured foliage in the shady to part sun garden or natural wooded area, consider growing lady fern plants (Athyrium filix-femina). Lady fern plants are reliable, native plants and easy to grow in a moist, partially shaded location. When you’ve learned how to grow a lady fern, you’ll want to include them in many shady areas of the landscape. Care of lady ferns is not difficult once the plant is established in the right location.
Lady Ferns in the Garden
Locating lady fern plants may require observation of the spot before planting. Lady ferns in the woodland garden do best in a lightly shaded spot or an area that gets dappled sunlight year round.
Plant them in a loamy soil that is slightly on the acidic side, amended with shredded oak leaves or other organic material that is well composted. Soil should be well-draining so that roots do not rot. Poultry grit may also be worked in to improve drainage. Planting lady ferns in the right place allows them to colonize and provide an attractive ground cover. Choose the proper cultivar for your area too. Athyrium filix-femina angustum (Northern lady fern) performs best in the upper United States, while Southern lady fern (Athyrium filix-femina asplenioides) takes the extreme summer heat of the south. Both have upright arching fronds that may reach 24 to 48 inches. More than 300 cultivars of lady fern plants are available commercially as well.
How to Grow a Lady Fern
Ferns may be propagated from spores, called sori and indusia, that grow on the back of the leaves. Starting ferns from spores can be a time consuming process, so start your lady fern plants from division of the rhizomes or by purchasing small plants. Divide lady ferns in the garden in spring. Then plant your lady ferns in the shady location where the soil has been amended, if necessary. Water regularly when planting lady ferns in a new spot. Once established, however, the plants are somewhat drought resistant.
Fertilize in spring when new growth appears as part of lady fern care. Ferns are easily injured by too much fertilizer. A pelleted, time-release type works best, applied once in spring. Planting lady ferns is a great choice for the woodlands, the pond or any moist shaded area. Get them started in the garden this year.
0
0

