文章
Dummer. ゛☀
2017年08月30日

Bismarck palm is a slow-growing, but ultimately massive palm tree, not for small yards. This is a landscaping tree for monumental scale, but in the right setting it can be a beautiful and regal tree to anchor a space and accent a building. Watering a new Bismarck palm is crucial for ensuring it grows and thrives.
About the Bismarck Palm
The Bismarck palm, Bismarckia nobilis, is a large sub-tropical palm tree. It is a solitary palm that is native to the island of Madagascar, but which does well in zones 9 through 11 in the U.S. thriving in areas like Florida and southern Texas. It grows slowly, but can go up to 50 feet (15 m.) high with a crown that can reach up to 20 feet (6 m.) across.
How to Water Newly Planted Bismarck Palms
A Bismarck palm is a big investment, both in time and money. The tree only grows one to two feet (30 to 60 cm.) per year, but over time it grows quite large. To ensure that it will be there for years to come, you need to know when to water Bismarck palms, and how. Not watering a new Bismarck palm could have disastrous consequences. Bismarck palm watering can be tricky. To get it right, you need to water your new palm so that its roots stay moist for the first four to six months, without letting it get waterlogged. Good drainage is crucial, so before you plant the tree, make sure the soil will drain well. A good basic guideline is to water the palm every day for the first month and then two to three times per week for the next several months. Continue watering once a week for about the first two years, until your palm is well established.
A good rule of thumb for the amount of water you should use at each watering is to go by the container the Bismarck palm came in. For example, if it arrived in a 25-gallon (95-liter) container, give your new tree 25 gallons of water each time, a little more in hotter weather or less in cooler weather. New Bismarck palm watering is a real commitment, but this is a grand tree that needs care to thrive, so don’t neglect it.
0
0
文章
Dummer. ゛☀
2017年08月30日
If you have a large property that needs some shade, consider growing beech trees. American beech (Fagus grandifolia) is a stately tree that makes a big impression when grown singly on an open site or when used to line driveways on large estates. Don’t try growing beech trees in an urban setting though. The branches on this huge tree extend low on the trunk, creating an obstacle to pedestrians, and the dense shade makes it nearly impossible to grow anything under the tree.
Beech Tree Identification
It’s easy to recognize a beech tree by its smooth, gray bark, which the tree keeps throughout its lifespan. In shady sites, beech trees have a massive, straight trunk that soars to a height of 80 feet or more. The crown stays small but dense in shade. The trees are shorter in full sun, but they develop a large, spreading crown.
Beech tree leaves are about 6 inches long and 2 ½ inches wide with saw-tooth edges and lots of side veins. The flowers generally go unnoticed. Small, yellow male flowers bloom in round clusters along the branches and tiny, red female flowers bloom at the ends of the branches in early spring. After pollination, the female flowers give way to edible beech nuts, which are enjoyed by a number of small mammals and birds. The American beech is the variety commonly seen in the United States, although there are several types of beech trees found throughout Europe and Asia. The American hornbeam (Carpinus caroliniana) is sometimes called blue beech, but it is an unrelated species of small tree or shrub.
Beech Tree Planting
Plant beech trees in a good, rich, acidic soil that isn’t compacted. It likes moist, well-drained soil. The dense crown spreads 40 to 60 feet at maturity, so give it plenty of room. Beech trees live 200 to 300 years, so choose the site carefully. Dig the planting hole two to three times wider than the root ball to loosen the soil around the planting area. This encourages the roots to spread into the surrounding soil rather than staying in the hole. If the soil isn’t particularly rich, add a few shovels full of compost to the fill dirt. Don’t add any other amendments at planting time.
Care of Beech Trees
Newly planted beech trees need plenty of moisture, so water them weekly in the absence of rain. Mature trees withstand moderate drought, but they’ll do best with a good soaking when you’ve been a month or more without a drenching rain. Spread a 2 or 3 inch layer of mulch over the root zone of young trees to help the soil retain moisture. Once the dense crown develops, mulch is no longer necessary, but it keeps the bare ground around the tree looking neat. Beech trees need regular fertilization. Spread the fertilizer over the root zone and then water it in. Use a pound of 10-10-10 fertilizer for each 100 square foot of the root zone. The root zone extends a foot or so beyond the canopy of the tree.
0
0
文章
Dummer. ゛☀
2017年08月30日
Homeowners love the claret ash tree (Fraxinus angustifolia subsp. oxycarpa) for its fast growth and its rounded crown of dark, lacy leaves. Before you start growing claret ash trees, be sure your backyard is big enough since these trees can grow 80 feet tall with a 30 foot spread. Read on for more claret ash tree information.
Claret Ash Tree Information
Claret ash trees are compact, fast growing, and their deep green leaves have a finer, more delicate look than other ash trees. The trees also offer a terrific autumn display, since the leaves turn maroon or crimson in fall. Claret ash growing conditions influence the ultimate height of the tree, and cultivated trees rarely exceed 40 feet in height. Generally, the tree’s roots are shallow and do not turn into problems for foundations or sidewalks. However, it is always wise to plant ash trees a good distance from homes or other structures.
Claret Ash Growing Conditions
Growing claret ash trees is easiest in USDA plant hardiness zones 5 through 7. When it comes to providing good claret ash care, don’t worry too much about the type of soil in your backyard. Claret ash trees accept sandy, loamy or clay soil. On the other hand, sunlight is critical. Plant claret ash trees in full sun for fastest growth. If you read up on claret ash tree information, you’ll find that the tree will not tolerate frost, high winds or salt spray. However, this ash is quite drought tolerant once established. Take care not to weed-whack around your young tree. Ash bark is very thin when the tree is young and it can be easily wounded.
Raywood Claret Ash
When you are growing claret as trees, you should consider ‘Raywood,’ an excellent Australian cultivar (Fraxinus oxycarpa ‘Raywood’). This cultivar is so popular that the claret ash is also called the Raywood ash tree. ‘Raywood’ thrives in USDA hardiness zones 5 through 8. It grows to 50 feet high with a 30 foot spread. You should use the same cultural practices for ‘Raywood’ that you would use generally for claret ash care, but be a little more generous with irrigation.
0
0
文章
Dummer. ゛☀
2017年08月30日
Rock cress is an herbaceous perennial and member of the Brassicaceae or mustard family. The flowers and leaves of rock cress are edible. Growing rock cress requires no special skill and this plant is well suited for the novice gardener. Rock cress has many uses in the garden but its most popular uses are as an attractive border in a rock garden or dangling down over a rock wall or ledge. Rock cresses are alpine plants and will thrive where other plants fail, such as on hills and slopes.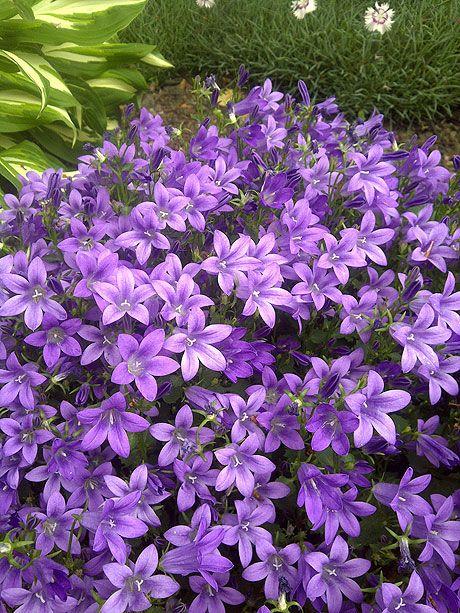
Purple rock cress ground cover (Aubrieta deltoidea) hugs the ground like a mat and displays rich purple flowers in April through the middle of May and has a lovely scent. Rock wall cress (Arabis caucasica) is more likely to bloom in white or pink. Both make attractive low mounds that look great at the edge of retaining wall where they get full sun and excellent drainage.
How to Grow Rock Cress
Rock cress plants are hardy in USDA plant hardiness zones 4-7. They are easily grown from seed and can be directly sown into the garden in early spring or started indoors four to six weeks before the date of your last expected frost. Rock cress prefers full sun but will tolerate some shade, especially in warmer climates. Space rock cress plants 15 to 18 inches apart and they will fill in quickly forming a mat in any open space.
Care of Rock Cress Plants
Regardless of the type you choose to grow, the care of rock cress plants is relatively minimal. Water new rock cress plants regularly and only when the soil is dry once they are established. Rock cress ground cover does well in fair soil that has good drainage, and is slightly acidic. Applying a light pine needle mulch helps retain moisture and increase acidity. A high nitrogen fertilizer can be applied when first planting and a phosphorus fertilizer just after blooming. Rock cress will bloom the second spring after planting and every year after that. Regular pruning to remove dead flowers will keep the plant healthy and encourage new growth.
It is seldom necessary to treat rock cress for pests or disease. Now that you know the basics on how to grow rock cress ground cover, you can add an attractive touch to a rock garden or wall
0
0
文章
Dummer. ゛☀
2017年08月30日
Pinkhead knotweed plants (Polygonum capitatum or Persicaria capitata) are considered excellent low-growing groundcover by some gardeners. They are also called invasive pests by others. If you read up on pink knotweed information, you’ll find that the plant is banned in England and considered invasive in California. This is because of its tendency to spread where it wasn’t invited. So can you grow pinkhead knotweed, or should you? Read on for more pink knotweed information.
Pink Knotweed Information
What is pink knotweed? It’s a tough plant that stays under 6 inches tall but spreads horizontally to up to 5 feet. It thrives in almost any soil, including dry and sandy soil, and grows in both sun and partial shade in U.S. Department of Agriculture plant hardiness zones 8 through 11.
The lance-shaped leaves of the pinkhead knotweed plants are between 2 and 11 inches long, edged with dark red, and marked with burgundy chevrons. The leaves grow on prostrate red stems that root at the nodes. In mild regions, the leaves are evergreen, staying on the plant all year long.
The pink pompom flowers, each about 2 inches long, bloom from spring through the first freeze. They cluster in globe-shaped flower spikes above the foliage. Another way to answer the question “What is pink knotwood?” is to call it a cousin of Japanese knotweed. It lacks the exotic beauty of Japanese knotwood, but still looks appealing growing in the backyard as groundcover.
Where Can You Grow Pink Knotweed?
Groundcover is only one of the many potential pink knotweed uses for those choosing to grow the plant. You can also use pink knotweed in potted arrangements, grow them in baskets, or use them as edging in a border. The plant looks especially lovely in raised beds or containers where it can spill over the edges (and control its spread). Pinkhead knotweed plants are easy to grow in your garden or backyard. If you live in a region with a long growing season, start the seeds outdoors in weed-free soil once the risk of frost is passed. In areas with short growing seasons, start them indoors.
Fill small pots with good seed-starting soil. Moisten the soil and press in the seeds. Keep the soil moist until you see the seeds sprout. If you start them inside, harden off the young plants for at least 10 days before you transplant them outdoors.
0
0
文章
Dummer. ゛☀
2017年08月30日
Pachysandra is a favorite ground cover plant in hard-to-plant areas such as under trees, or in shady areas with poor or acidic soil. Unlike other plants, pachysandra ground cover does not mind competing for its nutrients, and growing pachysandra plants is easy if you have an abundance of shade in your landscape. Learn more about how to plant pachysandra and its care so you can enjoy the small white, fragrant flowers (which appear in the spring) of this low maintenance plant.
How to Plant Pachysandra
There are several varieties of pachysandra available to choose from. The recommended pachysandra growing zone for U.S. Department of Agriculture is 4 through 7.
Pachysandra is easily transplanted from garden flats or divisions in the spring. Space the plants 6 to 12 inches apart to accommodate their spread. Pachysandra prefers soil that is moist and amended with rich organic matter. Make sure the planting area is clear from debris before planting and that the soil is loose. Holes for new plants should be 4 inches deep and 6 inches wide. Pachysandra ground cover has evergreen leaves that will burn in the sun. It is always best to plant on an overcast day and in shady locations. Water new plants thoroughly and provide 2 inches of mulch to help with water retention.
Pachysandra Plant Care
Pachysandra requires only minimal care to look its best. New plants can be pinched back for several years to encourage bushiness. Keep areas of pachysandra free from weeds and monitor young plants during dry weather. Once plants are established, they can handle some period of drought; however, young plants require adequate moisture in order to become established.
Now that you know a little more about pachysandra plant care, you can enjoy this low-growing beauty in the shady spots of your landscape.
0
0
文章
Dummer. ゛☀
2017年08月30日
Mazus ground cover is a very tiny perennial plant, growing only two inches tall. It forms a dense mat of foliage that stays green throughout spring and summer, and well into fall. In the summer, it is dotted with tiny blue flowers. Learn to grow mazus in this article.
Mazus Reptans Information
Mazus (Mazus reptans) spreads quickly by means of creeping stems that take root where they touch the ground. Even though the plants spread aggressively to fill in bare spots, they aren’t considered invasive because they don’t become a problem in wild areas.
Native to Asia, Mazus reptans is a tiny perennial that can make a big impact in the landscape. It’s the perfect, quick-growing groundcover for small areas. Plant it at the rate of six plants per square yard for the fastest coverage. You can also grow it in shaped patches with the aid of barriers to stop the spread. Mazus grows well in rock gardens and in the gaps between the rocks in a rock wall. It tolerates light foot traffic so you can plant it in between stepping stones too.
Mazus Reptans Care
Creeping mazus plants need a location in full sun or partial shade. It tolerates moderate to high moisture levels, but the roots shouldn’t stand in water. It can live in soil with low fertility, but the ideal location has fertile, loamy soil. It is suitable for U.S. Department of Agriculture plant hardiness zones 5 through 7 or 8. To grow mazus where you now have a lawn, first remove the grass. Mazus will not outcompete lawn grass, so you need to make sure you take up all the grass and get as much of the roots as possible. You can do this with a flat shovel that has a fairly sharp edge.
Mazus may not require annual fertilization. This is especially true if the soil is rich. Spring is the best time to fertilize the plants if necessary, however. Apply 1 to 1.5 pounds of 12-12-12 fertilizer per 100 square feet. Rinse the leaves thoroughly after applying fertilizer to prevent leaf burn. Growing Mazus reptans is made easy by the fact that it seldom suffers from disease or insect infestation.
0
0
文章
Dummer. ゛☀
2017年08月30日
Trees make attractive focal points in any landscaping design, but the ground around their trunks can often be a problem. Grass might have a hard time growing around roots and the shade a tree offers can discourage even the hardiest of flowers. Instead of leaving the circle around your tree a line of bare earth, why not install a ring of attractive ground cover? These plants thrive on neglect, requiring less sunlight and moisture than most other garden plants. Surround your trees with circles of ground cover and you’ll give your landscape a professional, finished look.
Ground Cover Plants
Choose your ground cover plants according to the trees around which they’ll live. Some trees, like the Norway maple, have very thick coverage and offer almost no sunlight underneath. Others have sparser branches and smaller leaves, giving you more options to choose from. Find out how large each plant type will eventually spread to determine how many plants you will need to cover the entire area around the tree.
Some good choices for ground cover plants under trees include:
Ajuga
Lungwort
Foamflower
Creeping juniper
Liriope and monkey grass
Periwinkle
Pachysandra
Wild violets
Tips for Planting Ground Covers under a Tree
Like any other part of the landscape you install, planting ground covers under a tree starts with preparing the planting spot. You can plant ground coverage for trees at any time of the year, but early in the spring and later in the fall are the best. Mark a circle around the grass at the base of the tree to indicate the size of your proposed bed. Lay a hose on the ground to indicate the size of the bed, or mark the grass with spray paint. Dig the soil inside the circle and remove all the grass and weeds growing inside.
Use a trowel to dig individual holes for planting the ground cover plants. Stagger the holes instead of digging them in a grid design, for the best eventual coverage. Drop a handful of all-purpose fertilizer in each hole before placing the plants in place. Leave enough room between plants to allow them to fill in the spaces when full grown. Lay a layer of bark or other organic mulch in between the plants to help retain moisture and to shade out any emerging roots.
Water the plants once a week until they begin spreading and have established themselves. At this point, natural rainfall should provide all the water your ground cover under trees should need, except in extremely dry period of drought.
0
0
文章
Dummer. ゛☀
2017年08月29日
Bronze Dutch clover plants (Trifolium repens Atropurpureum) look much like standard, low-growing clover – with a colorful twist; bronze Dutch clover plants produce a carpet of dark red leaves with contrasting green edges. Like familiar clover plants, bronze Dutch clover displays white blooms throughout most of the summer months. Read on to learn all you need to know about growing bronze Dutch clover.
Growing Bronze Dutch Clover
Bronze Dutch clover is easy to grow as long as you can provide well drained, lightly moist soil. The plants tolerate both full sunlight and partial shade, although afternoon shade is beneficial for growing bronze Dutch clover in hot climates. However, too much shade will produce green plants, and a few hours of daily sunlight brings out the red in the leaves.
Bronze Dutch Clover Lawns
Bronze Dutch clover spreads by runners both above and below ground, which means bronze Dutch clover plants expand easily, choking out weeds and controlling erosion in the process. The sturdy plants, which reach heights of 3 to 6 inches, tolerate moderate foot traffic. Although bronze Dutch clover lawns are spectacular, this plant is also stunning in woodland gardens, rock gardens, around ponds, over retaining walls, or in containers.
Caring for Dutch Clover
Work an inch or two of compost or manure into the ground at planting time to get the young plants off to a good start. Thereafter, clover produces its own nitrogen and requires no supplemental fertilizer. Similarly, clover produces its own living mulch and requires no extra mulch of any sort. Once established, bronze Dutch clover requires little attention. However, young plants benefit from regular irrigation to help the roots establish themselves. Two waterings per week is adequate in most climates, less if you live in a rainy climate. Mow the plants occasionally, as bronze Dutch clover lawns are most attractive when maintained at about 3 inches.
Is Bronze Dutch Clover Invasive?
All clovers are a valuable source of nectar for honeybees and other pollinators. However, improperly maintained plants may become invasive in certain habitats. Check with your local Cooperative Extension Service or your state’s Department of Agriculture before planting Bronze Dutch clover.
0
0
文章
Miss Chen
2017年08月29日

How to Care for Roses. Roses have an undeserved reputation for being fussy, hard-to-care-for plants. But after all, they're just shrubs. Some roses do require more maintenance than others, but growing roses is something even a beginner can do.

Spring Rose Care
Step 1
Prune roses in early spring once the rose starts to show signs of new growth, usually in the form of tiny red buds swelling. These buds will become new branches.
Step 2
Cut out any obviously dead or damaged branches first. Then cut out all but four or five healthy stems, each ideally about as thick as a pencil.
Step 3
Cut the rose bush back by 1/3 to 1/2, depending on how tall you want it to be. Make these cuts right above an outward facing bud - that is, a red bud that's on the outside of the rose bush. This directs the bud to grow up and out, leaving the center of the rose bush open for a prettier shape and better air circulation.

Step 4
Fertilize roses regularly during the growing season. Roses are hungry plants, demanding lots of nutrients for best growth and flowering. Each rose grower has his or her own favorite method. One of the easiest is to buy a slow-release granular rose food and work it into the soil so it can feed the plant all season long. Otherwise, you'll want to fertilize the rose with a liquid fertilizer every three to four weeks during the growing season (stop in early autumn) or according to package directions.
Step 5
Water diligently. Roses need a steady source of water during the growing season, about 1 inch a week from rain or watering. In arid regions of the country, if you have several roses, consider installing a do-it-yourself drip irrigation system.
Summer Rose Care
Step 6
Mulch. Roses need less weeding and watering and have fewer diseases if you mulch. Lay down 1 to 2 inches of organic mulch, such as wood chips, pine needles, grass clippings or other biodegradable material.
Step 7
Deadhead. This simply means trimming spent roses off the shrub to encourage it to produce more. While some roses bloom only in one big flush in June, others are bred to keep producing off and on all season long.
Step 8
Spray. If your rose becomes diseased or has an insect infestation, you may want to deal with it by spraying. (However, first try simply trimming off the diseased portion of the plant and giving the plant a good strong blast from a hose.) If you choose to spray, first identify the problem by trimming off the diseased part and taking it to a reliable garden center, where the staff can prescribe the correct pesticide or herbicide.
Fall and Winter Rose Care
Step 9
Stop fertilizing roses in early autumn, at least one month before your region's first annual frost date. Fertilizing too long into autumn encourages roses to produce tender new growth that will get nipped by cold.
Step 10
Protect roses as needed in late autumn, after your region's first hard freeze. In regions where temperatures don't fall below 20 degrees F (USDA zone 9 and warmer), no additional winter protection is needed. In cooler regions where temperatures don't fall below 10 degrees below zero (zones 6 to 8), a simple mounding of several inches of soil over the base of the rose should suffice. In cold-winter regions where temperatures get colder than 10 degrees below zero (zone 5 and colder), mound to about a foot about a month after your region's last average frost date; additionally, two weeks later, the entire plant should be wrapped in burlap to protect the upper parts.
Spring Rose Care
Step 1
Prune roses in early spring once the rose starts to show signs of new growth, usually in the form of tiny red buds swelling. These buds will become new branches.
Step 2
Cut out any obviously dead or damaged branches first. Then cut out all but four or five healthy stems, each ideally about as thick as a pencil.
Step 3
Cut the rose bush back by 1/3 to 1/2, depending on how tall you want it to be. Make these cuts right above an outward facing bud - that is, a red bud that's on the outside of the rose bush. This directs the bud to grow up and out, leaving the center of the rose bush open for a prettier shape and better air circulation.
Step 4
Fertilize roses regularly during the growing season. Roses are hungry plants, demanding lots of nutrients for best growth and flowering. Each rose grower has his or her own favorite method. One of the easiest is to buy a slow-release granular rose food and work it into the soil so it can feed the plant all season long. Otherwise, you'll want to fertilize the rose with a liquid fertilizer every three to four weeks during the growing season (stop in early autumn) or according to package directions.
Step 5
Water diligently. Roses need a steady source of water during the growing season, about 1 inch a week from rain or watering. In arid regions of the country, if you have several roses, consider installing a do-it-yourself drip irrigation system.
Summer Rose Care
Step 6
Mulch. Roses need less weeding and watering and have fewer diseases if you mulch. Lay down 1 to 2 inches of organic mulch, such as wood chips, pine needles, grass clippings or other biodegradable material.
Step 7
Deadhead. This simply means trimming spent roses off the shrub to encourage it to produce more. While some roses bloom only in one big flush in June, others are bred to keep producing off and on all season long.
Step 8
Spray. If your rose becomes diseased or has an insect infestation, you may want to deal with it by spraying. (However, first try simply trimming off the diseased portion of the plant and giving the plant a good strong blast from a hose.) If you choose to spray, first identify the problem by trimming off the diseased part and taking it to a reliable garden center, where the staff can prescribe the correct pesticide or herbicide.
Fall and Winter Rose Care
Step 9
Stop fertilizing roses in early autumn, at least one month before your region's first annual frost date. Fertilizing too long into autumn encourages roses to produce tender new growth that will get nipped by cold.
Step 10
Protect roses as needed in late autumn, after your region's first hard freeze. In regions where temperatures don't fall below 20 degrees F (USDA zone 9 and warmer), no additional winter protection is needed. In cooler regions where temperatures don't fall below 10 degrees below zero (zones 6 to 8), a simple mounding of several inches of soil over the base of the rose should suffice. In cold-winter regions where temperatures get colder than 10 degrees below zero (zone 5 and colder), mound to about a foot about a month after your region's last average frost date; additionally, two weeks later, the entire plant should be wrapped in burlap to protect the upper parts.
2
1
文章
Dummer. ゛☀
2017年08月29日
Creeping phlox (Phlox subulata) produces a colorful spring carpet of soft pastel hues. Little expert knowledge is needed on how to plant and care for creeping phlox. Growing creeping phlox over a rockery or in tough soil conditions provides a nearly carefree ground cover or cascading plant. Consider growing it in between pavers, in a planter or just as a part of a bright spring bed as well.
About Creeping Phlox
A perennial nature and semi-evergreen habit are important facts about creeping phlox. These plants have needle-like foliage with small starry, five-pointed flowers in red, lavender, pink, white or bluish-purple. Creeping phlox blooms in spring and produces long, spreading stems, which become woody with age. These thicker growths cease to produce flowers over time and may be cut out of the plant to encourage the newer, softer stems that do bloom. In addition, the plant has a moderate growth rate and can get 4 to 6 inches high with a 2 foot spread.
Creeping Phlox Planting Instructions
Learning how to plant and care for creeping phlox is quite simple. The plant has an easy going nature and thrives in a variety of conditions. Almost any soil is suitable for growing creeping phlox as long as it is in full sun to partial shade. For best results, however, plant it in a sunny location where soils are moist but well drained. Dig in some organic soil amendments to enrich the soil and water the plant until it is established. Plant creeping phlox at soil level and avoid burying the stem in the earth. Follow these easy creeping phlox planting instructions for years of early spring color.
Care of Creeping Phlox
Little special care or maintenance is necessary when growing creeping phlox. The plant benefits from an early spring application of fertilizer to encourage new growth and flowering. Even established plants should have supplemental watering in hot summer periods and plants along rockeries may show signs of scorching due to the hot surroundings. The stems can be cut back after flowering to promote a second bloom. Care of creeping phlox may also include cutting the plant back in late winter to allow for rejuvenation and to produce young, more compact stems. Watching for mites and other pests and dealing with these infestations as soon as they are spotted using an organic insecticidal soap is also important for the plant’s care.
Creeping Phlox Propagation
The plant can also be divided to provide more growing creeping phlox plants. Simply dig the plant up, preserving the root ball. Cut through the center of the plant and through the roots with a sharp soil knife or even a spade. Replant one-half of the phlox in the original hole and plant the other anywhere you want more of the colorful ground cover. The process can be done every few years to create healthier plants. You can also take stem cuttings for rooting in summer or fall. Dip these in a plant hormone and plant in a soil-less medium to take root.
0
0
文章
Miss Chen
2017年08月29日
Most cultivated rose varieties (Rosa spp.) are hybrids, rather than the natural "species" roses found growing in the wild. These wild rose species tend to grow vigorously, and require regular pruning to keep them in check. The best time for pruning wild roses is after they bloom. Wear gloves when pruning, because wild roses typically have many thorns.

Wild Roses
One wild rose so common it grows as a weed in some areas is the multiflora, or rambler, rose (Rosa multiflora). This plant grows in U.S. Department of Agriculture plant hardiness zones 5 through 8, and may occasionally grow outside this range. It is considered an invasive plant, but can be kept under control by removing new canes that sprout up throughout the growing season. Other species roses that grow wild, but don't spread as fast, require less severe pruning. They may grow in USDA zones 2 through 11, depending on the species.
Pruning Goals
Most cultivated roses are grafted onto a host rootstock, but wild roses grow on their own roots and send up new canes directly from the soil rather than a graft union. When pruning these roses, the main goals are to remove dead or diseased canes and give the plant an attractive shape. To thin the rose clump, remove entire canes at soil level. To encourage new growth or shape the rose, cut canes at a 45-degree angle right above the place where a healthy leaf meets the cane. The leaf chosen should be growing outward from the center of the rose plant. When cutting flowers or pruning canes, remove only about 25 percent of the rose plant's height.

When to Prune
Most pruning for wild roses should be done after the plant flowers. This pruning focuses on removing unwanted shoots and choosing four to eight canes that will be allowed to grow and flower next year. Wild roses, including multiflora rose, bloom on last year's wood, so heavy pruning in the fall or spring would remove the canes that will produce blooms. In fall, remove spindly growth and root suckers that have developed over the summer. In spring, remove only canes that died over the winter.
Pruning Tips
Use a pair of clean, sharp pruning shears or a pruning knife when working with roses. After pruning, cover the cut ends with pruning paint or white glue to seal the ends of the canes, advises University of Illinois Extension. This helps prevent disease and insect infestation, particularly cane borers. It is a good precaution to disinfect pruning tools after each use, to prevent the spread of diseases among plants. Do this by soaking the tools in a solution of 1 part bleach to 3 parts water for five minutes. After soaking, rinse tools with clean water and allow them to air-dry before using or storing.
Wild Roses
One wild rose so common it grows as a weed in some areas is the multiflora, or rambler, rose (Rosa multiflora). This plant grows in U.S. Department of Agriculture plant hardiness zones 5 through 8, and may occasionally grow outside this range. It is considered an invasive plant, but can be kept under control by removing new canes that sprout up throughout the growing season. Other species roses that grow wild, but don't spread as fast, require less severe pruning. They may grow in USDA zones 2 through 11, depending on the species.
Pruning Goals
Most cultivated roses are grafted onto a host rootstock, but wild roses grow on their own roots and send up new canes directly from the soil rather than a graft union. When pruning these roses, the main goals are to remove dead or diseased canes and give the plant an attractive shape. To thin the rose clump, remove entire canes at soil level. To encourage new growth or shape the rose, cut canes at a 45-degree angle right above the place where a healthy leaf meets the cane. The leaf chosen should be growing outward from the center of the rose plant. When cutting flowers or pruning canes, remove only about 25 percent of the rose plant's height.
When to Prune
Most pruning for wild roses should be done after the plant flowers. This pruning focuses on removing unwanted shoots and choosing four to eight canes that will be allowed to grow and flower next year. Wild roses, including multiflora rose, bloom on last year's wood, so heavy pruning in the fall or spring would remove the canes that will produce blooms. In fall, remove spindly growth and root suckers that have developed over the summer. In spring, remove only canes that died over the winter.
Pruning Tips
Use a pair of clean, sharp pruning shears or a pruning knife when working with roses. After pruning, cover the cut ends with pruning paint or white glue to seal the ends of the canes, advises University of Illinois Extension. This helps prevent disease and insect infestation, particularly cane borers. It is a good precaution to disinfect pruning tools after each use, to prevent the spread of diseases among plants. Do this by soaking the tools in a solution of 1 part bleach to 3 parts water for five minutes. After soaking, rinse tools with clean water and allow them to air-dry before using or storing.
0
0
文章
Dummer. ゛☀
2017年08月29日
Brass buttons is the common name given to the plant Leptinella squalida. This very low growing, vigorously spreading plant is a good choice for rock gardens, the spaces between flagstones, and lawns where turf won’t grow. Keep reading to learn more Leptinella information, including the growing and care of brass button plants.
Leptinella Information
Brass buttons gets its name from the small yellow to green flowers it produces in the spring. The plant is in the daisy family, and its flowers look very much like the centers of daisy flowers, minus the long white petals. These small, hard looking flowers are said to resemble buttons.
Leptinella brass button plants are native to New Zealand but are widespread now. They are hardy from USDA zones 4 through 9, though just what that means depends on the zone. In 9 and 10, the plants are evergreen and will last all year. In colder climates, the leaves may die back. If protected by snow or mulch, the leaves will turn brown but stay in place. If exposed to the cold winter air, the leaves will die and new ones will grow in the spring. This is fine, though the new leaf growth will take a month or two to come back and the plant won’t be as attractive in the spring.
Growing Brass Buttons
Growing brass buttons in the garden is very easy. In cooler climates, the plants like full sun, but in hotter areas, they fare better with partial light shade. They will grow in a wide range of soils, though they prefer well drained, rich soil with frequent watering. They spread aggressively through runners just underground. You may need to dig them up and separate them every now and again in order to keep them in check.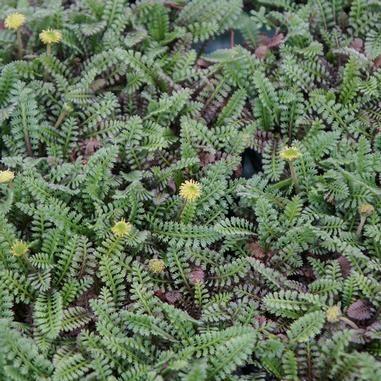
While some varieties boast green leaves, one particular variety that is very popular is called Platt’s Black, named for the garden of Jane Platt in which the plant was first documented. This variety has dark, almost black leaves with green tips and very dark flowers. Growing black brass buttons in the garden is a matter of personal taste – some gardeners think it looks on the verge of death, while others think it looks fascinating, especially interspersed with a bright green variety. Either way, the plant makes an exceptional specimen in the garden.
0
0
文章
Miss Chen
2017年08月29日
Tree roses are not trees but roses that have been grafted onto a trunk that has been grafted onto a rose rootstock. While they look exotic, tree roses have the same growing requirements as regular roses and are bothered by the same pests and diseases. Tree roses come in two shapes, a compact lollipop or a weeping form. The grafts of both forms need to be protected from swaying in strong winds and winter damage because of freezing temperatures. Tree roses create an interesting look in an otherwise blah area of your garden, and with care, can thrive for years.

Growing a tree rose
Step 1
Select a tree rose cultivar hardy in your zone. If you don't live in a hardiness area, tree roses may be grown in containers and overwintered indoors. Tree roses should be planted in spring after the danger of frost has passed.
Step 2
Choose a spot of well-drained soil with a pH of 6.0 to 7.0. The site should receive at least six hours of full sun a day. Eastern exposure is best as the morning sun evaporates dew from the leaves, but a southern or western exposure also will work. Avoid northern exposures.
Step 3
Dig a hole twice as wide and deep as your tree rose's root ball. Mix the soil removed from the hole with compost until you have a 50/50 mix of soil and compost. Refill the hole with the compost-soil mix until it is just large enough to accommodate the root ball and places the graft between the rootstock and the trunk stock 2 to 3 inches above the soil.
Step 4
Place the tree rose in the hole and backfill with soil. Make sure the tree rose remains straight as you fill the hole.
Step 5
Insert a stake into the soil just outside the root ball. Attach the tree rose to the stake with at least two elasticized tree ties. Place the ties 2 to 4 inches above the graft between the root stock and the trunk stock and 1 to 2 inches below the graft between the trunk stock and the rose.
Step 6
Apply mulch 1 to 3 inches deep around your tree rose. Pull it back from the trunk to prevent damage. Make sure the mulch does not cover the graft between the root stock and the trunk stock.

Step 7
If you are growing your tree rose in a container, place rocks or pieces of broken clay pots in the bottom of the container. Fill the container, sized for your mature tree rose, with a general-use potting soil. Plant and stake the tree rose as you would in the garden.
Step 8
Deadhead your tree rose when blooms fade. In the spring, just after bud break, prune off dead and broken branches. Prune back foliage that has powdery mildew or black spot.
Step 9
Give your tree rose a deep watering three to four times a week. Water the soil around the tree rose. Do not get the foliage wet as this will promote powdery mildew and black spot.
Step 10
Fertilize your tree rose three times a year -- in early spring when flower buds are swelling, again just after your tree rose begins to flower and then in late summer after most of the blooms have faded. Use a liquid rose food; follow package directions for rate of application.
Step 11
When your tree rose loses its leaves in the fall, wrap the entire plant with burlap, leave the top open and secure with twine. Or you can just dig up your tree rose and store it in dampened peat moss in a warm garage or basement. If your tree rose is planted in a container, bring the container inside for the winter.
Growing a tree rose
Step 1
Select a tree rose cultivar hardy in your zone. If you don't live in a hardiness area, tree roses may be grown in containers and overwintered indoors. Tree roses should be planted in spring after the danger of frost has passed.
Step 2
Choose a spot of well-drained soil with a pH of 6.0 to 7.0. The site should receive at least six hours of full sun a day. Eastern exposure is best as the morning sun evaporates dew from the leaves, but a southern or western exposure also will work. Avoid northern exposures.
Step 3
Dig a hole twice as wide and deep as your tree rose's root ball. Mix the soil removed from the hole with compost until you have a 50/50 mix of soil and compost. Refill the hole with the compost-soil mix until it is just large enough to accommodate the root ball and places the graft between the rootstock and the trunk stock 2 to 3 inches above the soil.
Step 4
Place the tree rose in the hole and backfill with soil. Make sure the tree rose remains straight as you fill the hole.
Step 5
Insert a stake into the soil just outside the root ball. Attach the tree rose to the stake with at least two elasticized tree ties. Place the ties 2 to 4 inches above the graft between the root stock and the trunk stock and 1 to 2 inches below the graft between the trunk stock and the rose.
Step 6
Apply mulch 1 to 3 inches deep around your tree rose. Pull it back from the trunk to prevent damage. Make sure the mulch does not cover the graft between the root stock and the trunk stock.
Step 7
If you are growing your tree rose in a container, place rocks or pieces of broken clay pots in the bottom of the container. Fill the container, sized for your mature tree rose, with a general-use potting soil. Plant and stake the tree rose as you would in the garden.
Step 8
Deadhead your tree rose when blooms fade. In the spring, just after bud break, prune off dead and broken branches. Prune back foliage that has powdery mildew or black spot.
Step 9
Give your tree rose a deep watering three to four times a week. Water the soil around the tree rose. Do not get the foliage wet as this will promote powdery mildew and black spot.
Step 10
Fertilize your tree rose three times a year -- in early spring when flower buds are swelling, again just after your tree rose begins to flower and then in late summer after most of the blooms have faded. Use a liquid rose food; follow package directions for rate of application.
Step 11
When your tree rose loses its leaves in the fall, wrap the entire plant with burlap, leave the top open and secure with twine. Or you can just dig up your tree rose and store it in dampened peat moss in a warm garage or basement. If your tree rose is planted in a container, bring the container inside for the winter.
0
1
文章
Dummer. ゛☀
2017年08月29日
The common periwinkle plant (Vinca minor) is often spotted creeping down steep hillsides and banks, offering a green and growing affect in areas which might otherwise be bare. The periwinkle plant is exceptional as an erosion control specimen. Periwinkle is also used as a spreading shrub in USDA garden zones 4 to 8. Periwinkle is often also called creeping vinca. Periwinkle is most often grown as a ground cover. The periwinkle plant takes its common name from the attractive blooms that dot the foliage in April to May, appearing in the color of periwinkle blue. More than 30 varieties of this plant exist, some with variegated foliage and other colors of blooms. When planting periwinkle, choose what best suits your landscape.
How to Grow Periwinkle Plants
This broadleaf evergreen plant grows easily and periwinkle care most often involves keeping the prolific spreader in check. Periwinkle, once established, is drought resistant and needs little other care if properly sited in the landscape. Periwinkle care after planting may include the removal of tall weeds in the area. Once established, growing periwinkle will likely shade out future growth of weeds and eliminate this chore.
The periwinkle plant grows best in a partially shaded area in acidic soil; however, it can thrive in a variety of sunlight and soil conditions. Growing periwinkle in partial shade creates more vigorous growth. In many instances, extreme vigor may not be desirable unless the periwinkle plant needs to cover a large area. One small plant can spread to 8 feet across. Growing periwinkle as a ground cover is common as it rarely reaches more than 4 inches in height. Periwinkle is best used for controlling erosion as described above. Do not plant near other specimens in the flower bed or garden, as it may overtake and choke out valuable plantings. This plant may be used as a climber on a non-living support and is useful for blocking views when used in this way.
Before planting periwinkle, make sure it is what you want in the area, as it is difficult to remove once established. Periwinkle appears low on the exotic invasive list, but can escape cultivation in the garden. It is rarely found escaping into undisturbed woodlands. Now that you know how to grow periwinkle and manage its growth, you can make an informed decision before planting the specimen in your landscape. Periwinkle ground cover should not be confused with annual periwinkle, as annual periwinkle (Catharanthus roseus) is a different plant.
0
0

