文章
Juze
2017年05月22日

Learn how to grow an apple tree in container in this article. Growing apple trees in pots require some care and maintenance that is given below.

How to Choose a Right Apple Tree
Growing apple tree from seeds is a bad idea. Instead, buy a dwarf or semi-dwarf grafted tree from a nursery. For choosing a right apple tree for your home you need to know a few things. Apple trees are grown from grafting on a rootstock as this has so many benefits. If you are unaware about apple rootstock grafting you might like to read more on this on the official website of Ministry Of Agriculture Food And Rural Affairs (Ontario) and a very informative article of Cornell University.
Basically, dwarf apple trees are those apple trees in which dwarf rootstocks are grafted to control their height, size and to improve fruit production and resistance against diseases and pests. When you go to a nursery or shop online, search for rootstock choices like M27, M26, Bud9, G16 or M9. Apple trees grown on these rootstocks are dwarf and don’t grow above 8 ft usually. You can also look for semi-dwarf trees it is also possible to grow them in containers.
If you want to know more about rootstock choices read this educational article on Pennsylvania State University’s website.
Buy Self Fertile Variety
Apple trees require cross pollination you’ll need to buy two apple trees for pollination. If you’re going to plant only one plant, buy a self-pollinating variety.
Consider Chilling Period too
In order to set flowers, apple trees require an annual cycle of cold weather in winter, which is called chilling. A chilling period requirement of an apple tree is measured from the total number of hours it gets per year when the temperature remains below 45 F (7 C) but above the freezing point.
Average chilling hour requirements for apple tree varieties are around 800-1000 hours.
If you live in a mild winter climate where simply choose low apple cultivars and if you live in a harsh winter climate choose high chill apple varieties. This simple will improve the productivity of your apple tree growing in containers.
Choosing a Pot
Don’t start growing apple tree in a too large pot initially. A standard size pot (5-6 gallon) that is 12 inches deep and wide is great to start with. Gradually change the size of the container each year or when you identify that the plant is root bound. You’ll find out if the plant is rootbound or not when it’ll stop its vertical growth.
You can upgrade your pot in sequence, choosing one size bigger pot than the previous one each time. Keep in mind, don’t plant the plant in a too big pot directly. Once your apple tree in a pot reaches desired height that you wanted, stop changing the pots. A 20-25 gallon pot would be sufficient as a final one. After that, you’ll have to do regular pruning and root trimming time to time to maintain it.
Requirements for Growing Apple Trees in Pots

Position
Like other fruit trees, apple tree loves to grow in sun. For your potted apple tree, choose a sunny location but less windy. In hot summer days (in warmer regions, USDA Zone 8-9) move the container to a place that is shaded from the afternoon sun. Also, keep in mind you maintain good air circulation around your apple tree. If you are growing it on your balcony or rooftop garden, don’t place it very closely near the walls.
Temperature
Growing apple tree requires cool winter and moderate summer. You can’t grow apple trees where the temperature remains the same or too hot. Apple tree can tolerate extremely low temperatures by going dormant in winter.
Watering
Growing apple trees in pots require regular watering. Generally, you should water more abundantly during the formation of flower buds and moderately all the other time, reduce watering in winter.
Water deeply to promote the growth of healthy roots. In any case, avoid the chance of overwatering the plant. Commonly the apple trees growing in containers die due to root rot that occurs in waterlogged soil and excess watering. Also, avoid overhead watering as wetting the foliage favors the growth of powdery mildew.
Soil
Apples prefer deep, fertile and well-draining soil, avoid waterlogging soil. On the ground, sandy loam to sandy clay loam soil is preferred. For growing an apple tree in a container use a potting mix that is rich in organic matter with slightly acidic to neutral pH (6-6.8).
Apple Tree Care

Fertilizer
Fertilize your apple tree with half-strength balanced liquid fertilizer when the tree is young in every 2 weeks during the growing season. Apply any fruit fertilizer once the tree gets older. Start to reduce the feeding of fertilizers from late fall and stop fertilizing in winter.
Repotting
Repot the young apple tree in a year or so. Repot in one size bigger pot, after spreading roots from sides and bottom.
Overwintering
When growing apple trees in pots you must know that during hard frosts and too cold temperatures you’ll need to protect the roots of the plant. For this, wrap the container with bubble wrap.
Pruning Dwarf Apple Tree
Pruning is an essential part of apple tree care. But a dwarf apple tree requires less pruning than semi-dwarf or standard size tree. Pruning must be done to control the shape and size of your plant. Dead, damaged or diseased branches must be pruned time to time. Also, prune off the branches that are crossing each other or growing inside towards the main trunk. The best time for pruning is late winter and summer.
Pollination
Most of the apple tree varieties require cross pollination in order to fruit, which means you have to buy at least two apple trees. But the best way to avoid this is to buy a self-fertile variety.
Picking Flowers and Fruit Thinning
Dwarf apple trees start to produce flowers in 2-3 years. In the first flowering year remove all blooms to prevent the tree from setting fruits. This way you’ll allow the plant to direct its energy in growing.
Fruit thinning allows the plant to grow better quality fruits. Wait for a few weeks after fruit setting and remove the fruits that are growing too closely.
Pests and diseases
Apple tree in a container, unfortunately, hit by the same pests and diseases that target it on the ground. Aphids, moths, apple blossom weevil, scab, powdery mildew, brown rot and a few more. However, the plants in a container, usually are close to home, usually in a limited space so it is easy to take care of them.
Harvesting
To know about harvesting apples, read this article.

How to Choose a Right Apple Tree
Growing apple tree from seeds is a bad idea. Instead, buy a dwarf or semi-dwarf grafted tree from a nursery. For choosing a right apple tree for your home you need to know a few things. Apple trees are grown from grafting on a rootstock as this has so many benefits. If you are unaware about apple rootstock grafting you might like to read more on this on the official website of Ministry Of Agriculture Food And Rural Affairs (Ontario) and a very informative article of Cornell University.
Basically, dwarf apple trees are those apple trees in which dwarf rootstocks are grafted to control their height, size and to improve fruit production and resistance against diseases and pests. When you go to a nursery or shop online, search for rootstock choices like M27, M26, Bud9, G16 or M9. Apple trees grown on these rootstocks are dwarf and don’t grow above 8 ft usually. You can also look for semi-dwarf trees it is also possible to grow them in containers.
If you want to know more about rootstock choices read this educational article on Pennsylvania State University’s website.
Buy Self Fertile Variety
Apple trees require cross pollination you’ll need to buy two apple trees for pollination. If you’re going to plant only one plant, buy a self-pollinating variety.
Consider Chilling Period too
In order to set flowers, apple trees require an annual cycle of cold weather in winter, which is called chilling. A chilling period requirement of an apple tree is measured from the total number of hours it gets per year when the temperature remains below 45 F (7 C) but above the freezing point.
Average chilling hour requirements for apple tree varieties are around 800-1000 hours.
If you live in a mild winter climate where simply choose low apple cultivars and if you live in a harsh winter climate choose high chill apple varieties. This simple will improve the productivity of your apple tree growing in containers.
Choosing a Pot
Don’t start growing apple tree in a too large pot initially. A standard size pot (5-6 gallon) that is 12 inches deep and wide is great to start with. Gradually change the size of the container each year or when you identify that the plant is root bound. You’ll find out if the plant is rootbound or not when it’ll stop its vertical growth.
You can upgrade your pot in sequence, choosing one size bigger pot than the previous one each time. Keep in mind, don’t plant the plant in a too big pot directly. Once your apple tree in a pot reaches desired height that you wanted, stop changing the pots. A 20-25 gallon pot would be sufficient as a final one. After that, you’ll have to do regular pruning and root trimming time to time to maintain it.
Requirements for Growing Apple Trees in Pots

Position
Like other fruit trees, apple tree loves to grow in sun. For your potted apple tree, choose a sunny location but less windy. In hot summer days (in warmer regions, USDA Zone 8-9) move the container to a place that is shaded from the afternoon sun. Also, keep in mind you maintain good air circulation around your apple tree. If you are growing it on your balcony or rooftop garden, don’t place it very closely near the walls.
Temperature
Growing apple tree requires cool winter and moderate summer. You can’t grow apple trees where the temperature remains the same or too hot. Apple tree can tolerate extremely low temperatures by going dormant in winter.
Watering
Growing apple trees in pots require regular watering. Generally, you should water more abundantly during the formation of flower buds and moderately all the other time, reduce watering in winter.
Water deeply to promote the growth of healthy roots. In any case, avoid the chance of overwatering the plant. Commonly the apple trees growing in containers die due to root rot that occurs in waterlogged soil and excess watering. Also, avoid overhead watering as wetting the foliage favors the growth of powdery mildew.
Soil
Apples prefer deep, fertile and well-draining soil, avoid waterlogging soil. On the ground, sandy loam to sandy clay loam soil is preferred. For growing an apple tree in a container use a potting mix that is rich in organic matter with slightly acidic to neutral pH (6-6.8).
Apple Tree Care

Fertilizer
Fertilize your apple tree with half-strength balanced liquid fertilizer when the tree is young in every 2 weeks during the growing season. Apply any fruit fertilizer once the tree gets older. Start to reduce the feeding of fertilizers from late fall and stop fertilizing in winter.
Repotting
Repot the young apple tree in a year or so. Repot in one size bigger pot, after spreading roots from sides and bottom.
Overwintering
When growing apple trees in pots you must know that during hard frosts and too cold temperatures you’ll need to protect the roots of the plant. For this, wrap the container with bubble wrap.
Pruning Dwarf Apple Tree
Pruning is an essential part of apple tree care. But a dwarf apple tree requires less pruning than semi-dwarf or standard size tree. Pruning must be done to control the shape and size of your plant. Dead, damaged or diseased branches must be pruned time to time. Also, prune off the branches that are crossing each other or growing inside towards the main trunk. The best time for pruning is late winter and summer.
Pollination
Most of the apple tree varieties require cross pollination in order to fruit, which means you have to buy at least two apple trees. But the best way to avoid this is to buy a self-fertile variety.
Picking Flowers and Fruit Thinning
Dwarf apple trees start to produce flowers in 2-3 years. In the first flowering year remove all blooms to prevent the tree from setting fruits. This way you’ll allow the plant to direct its energy in growing.
Fruit thinning allows the plant to grow better quality fruits. Wait for a few weeks after fruit setting and remove the fruits that are growing too closely.
Pests and diseases
Apple tree in a container, unfortunately, hit by the same pests and diseases that target it on the ground. Aphids, moths, apple blossom weevil, scab, powdery mildew, brown rot and a few more. However, the plants in a container, usually are close to home, usually in a limited space so it is easy to take care of them.
Harvesting
To know about harvesting apples, read this article.
2
0
文章
Micky
2017年05月22日

Learn how to grow Ginko Biloba tree, growing ginkgo biloba tree is easy. This beautiful ornamental tree will soon become one of the most beautiful trees in your garden, once established.

USDA zones — 4-9
Other Names — Fossil Tree, Maidenhair Tree, Japanese Silver Apricot, Baiguo, Bai Guo Ye, Kew Tree, Yinhsing, The Tree of Forty Crowns
Difficulty — Easy
How to Grow Ginkgo Biloba Propagation
Ginkgo tree can be propagated from seeds or by cuttings.
Propagation from cuttings is better. To propagate it from cuttings, cut around 10 cm long cutting and plant it in a pot with potting soil lightened with perlite.
Cover it with plastic sheet and water regularly. After cutting has rooted, slowly acclimatize it without the sheet and transplant it into bigger pot or on the ground when it has outgrown the current pot.
Also Read: Ginkgo Biloba Tree Facts
Planting Ginkgo Biloba Tree
Female trees form fleshy fruits and their smell quickly becomes nauseating. Ether avoid planting them or plant them away from your home.
Plant ginkgo tree in the fall or spring. Prepare planting hole that is of the same depth and twice wide of the rootball. Bury the rootball in hole and water thoroughly. Protect young plants from drought and harsh sun.
Requirements for Growing Ginkgo Biloba TreePosition
It has good tolerance to the temperate climate and can withstand a semi-continental condition. It needs full sun or very light shade. It is also resistant to winds.
Soil
No specific soil type is required for growing ginkgo biloba tree. However, soil should be well drained but in a way that it must not dry out quickly, also note that the tree grows long taproot and requires deep soil.
It is best to plant it in light, rich soil. It supports mildly calcareous soil but prefers neutral, silty and slightly clayey soil. Add sand if needed to alleviate the heavy clay rich soil and compost to amend the poor substrate.
Watering
Water Ginkgo biloba tree regularly until it establishes in the first 3 years of growth. Keeping the soil moist as its growth is slower in dry soil but avoid damp and heavy soil.
Ginkgo Biloba Tree CareFertilizer
Generally, fertilizer is not required but to give a boost you can fertilize it in spring using a slow-release balanced fertilizer containing nitrogen, phosphorus and potassium (N-P-K), according to the label instructions. A balanced 10-10-10 fertilizer is suitable. Annual application of compost or manure is also helpful for plant.
Mulching
Mulching is essential for growing ginkgo biloba tree. In summer to preserve moisture and in winter to protect the roots from the cold.
Pruning
Ginkgo biloba is a beautiful tree, it does not require additional pruning unless you want to control its shape or size.
Pests and Diseases
1
0
文章
Micky
2017年05月22日


Learn how to grow pecan trees. Planting and growing pecan trees is easy but it requires lot of space as the tree grows tall and wide.
USDA Zones— 5 to 9
Difficulty— Easy
Scientific Name— Carya illinoinensis
Pecan Tree Information
Pecan trees are native to America and Mexico and grow mostly in Georgia and grows in Florida to Illinois, even to the west of Texas. Pecan trees are rather large, a mature pecan tree can grow up to 40 m tall with a spread of 12 – 20 m. If you’ve large yard you can grow pecan trees as they are not suitable for small backyards or garden. These trees are the source of many medium-sized pecans that are eaten fresh or used to create sweet desserts and candies, including pecan pie, caramel-pecan tarts, pecan pie, pecan pralines and many others.
Planting Pecan TreesBefore planting remove all the dead and entangled roots and prune off 1/2 part of the plant. This will encourage the vigorous growth and healthy roots.Space candy pecan no closer than 40 feet (if planting in a garden). For planting pecan trees in orchard, a suitable distance is 40 – 50 feet.Grow at least two pecan trees to ensure that most of flowers produce nuts. Although self-pollination in candy pecan is possible, but it is preferred that at least two or three trees are planted nearby for maximum nut production.For planting pecan tree, dig a hole at least 2 feet wide and 2 feet deep as pecan trees have extensive root system. Fill the hole with well-drained soil. Pecan trees can generally be grown easily and efficiently in a variety of soil types, except the soil which drains poorly.Requirements for Growing Pecan TreesLocation
Location should be sunny and open as pecan tree spreads a lot and grow taller.
Soil
Growing pecan trees is possible in variety of soil types, but for optimum growth soil should be well drained, deep and rich in organic matter with pH level slightly acidic to neutral.
Water
Pecan tree grows in slightly moist soil. Regular and deep watering is important for growing pecan trees. In first three years water deeply, once a week (avoid during rain), reduce watering in winter. During fruit production watering should be increased.
Pecan Tree CareFertilizer
In the spring fertilize it with compost or farm manure, also apply fertilizer that is rich in potassium and phosphorus around the tree, 5-10-15 is suitable. After first year of planting, apply balanced fertilizer in spring and in summer use zinc sulphate, which is essential for healthy growth and production of pecan trees.
Mulching
Mulching is important for pecan trees as they require evenly moist soil, mulching also reduces the competitive weeds.
Harvest
A grafted tree start to produce fruit in 3 to 4 years after planting. It is an alternate fruit bearing tree, it means it bears heavy fruit one year and light in the next year. Pecan trees bear fruits in fall and are ready to harvest when the husk loose its green color and start to split.
Pecan Tree Diseases and Pests
0
0
文章
Juze
2017年05月22日

Learn how to grow pomegranate tree in pot. If you’ve grown citrus in pot, growing pomegranates in containers can not be difficult for you. Moreover, pomegranate is more cold hardy and easy to grow.
*Pomegranate is one of the nicest fruit trees and perhaps the easiest to grow in pots because it has shallow root system when compared to other fruit trees.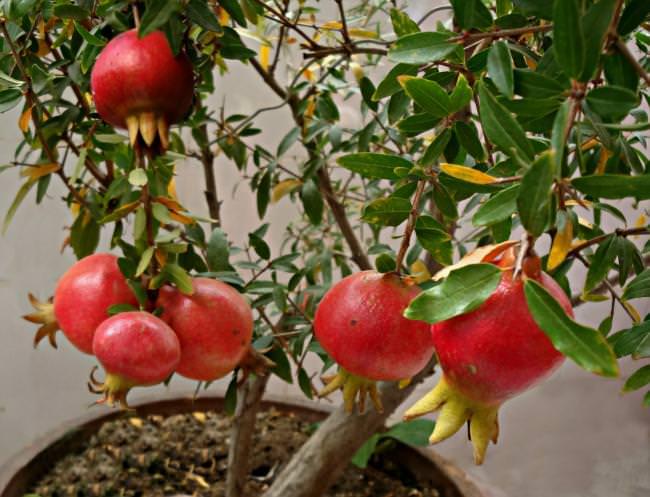
Pomegranate tree if grown under optimal conditions, live up to 200 years. It is native to Middle East (Iran) and South Asia. It is a shrub or small tree that might grow up to 6 m (20 ft) but usually reduced to 2 m.
USDA Hardiness Zones — 9b – 11, *can be grown below zone 9 in containers
Difficulty — Easy
Soil pH — Neutral
Other Names — Punic apple, Granatapfel, Granada, Grenade, Melograno, Melagrana, Anardana, Anar, Dadima, Fruit du, Pomme Grenade, Punica granatum, Roma, Shi Liu Gen Pi and Shi Liu Pi.
Appearance
The exotic container plant is adorned with five to eight centimeters long lance shaped leaves that are shiny and bronze in color from the bud, which later turn green.
Pomegranate flowers are delicate, bell-shaped and show up in the wild bright red. Its flowers are up to 3 centimeters wide. Ornamental varieties can have flowers in pink, cream, and even white.
In addition to the decorative foliage and flowers, it is mainly the fruits that make the pomegranate tree so desirable. They have the size of apples and a yellow-brown to reddish-brown shell. The juicy, red pulp inside the fruit enveloping the countless seeds that tastes aromatic and sweet.
Dwarf Pomegranate VarietiesFruiting Varieties‘Nana’ – The most interesting variety among the pomegranates trees is the dwarf variety ‘Nana’. It grows compact, floriferous and is considered robust and cold hardy, it grows in USDA Zones 7 to 11. As a container plant it grows up to only about 1 m tall, forms orange to garnet red flowers that produce small fruits with viable seeds.‘Provence’ – When most of the pomegranate varieties are not much cold hardy, provence is one you can look at. It can tolerate temperature down to 5 F (-15 C) and can be grown in cold climate.‘State fair’ – State fair is manageable variety for containers. It grows up to 1 . 5 m tall and grown in USDA Zones 7 to 11.Ornamental Varieties‘Flore Pleno’ – It is fruitless variety of pomegranate, the name translates as “double flower”. In summer, it produces countless beautiful orange-red flowers.Punica granatum ‘Madame Legrelle’ – A well-known ornamental variety. Special thing about this variety of pomegranate is its extraordinary, dense double flowers that come in shiny orange to salmon colors with white border.
Pomegranate is a manageable plant, you can also try large varieties.
Propagation and Growing Pomegranates in Containers
Pomegranate plants can be propagated by cuttings or by seeds in spring to summer when temperature remains in range of 68 F (20 C) but it is better to buy a 2 – 3 year old plant from nursery or online. This way you don’t have to wait long for fruits.
Propagation by seeds
Buy as ripe pomegranate as possible. Separate and clean seeds from the pulp by rubbing them from paper towel, let them dry up for a few days before sowing.
Plant the seeds no more than ¼ inches deep in light seed-starting mix. Place the pots in a bright location, optionally inside a plastic bag or greenhouse that maintains a temperature around 68 F (20 C). Always keep the soil moist. Seeds will germinate within 1 – 6 weeks depending more on the variety and climate.
Propagation by cuttings
Take several 8 to 10 inch-long cuttings. Plant the cutting in a well drained potting mix. It roots easily and quickly at ambient temperature of 20 degrees Celsius and high humidity.
*If you’re living in tropics, growing pomegranates is extremely easy for you, you can grow pomegranate in any season except peak summer. All other growing requirements given below are similar.
Choosing a pot
Pot should be appropriate to the size of plant, increase the pot size by repotting as your plant grow. Also care about to have sufficient holes in the base of pot you’re using for proper drainage.
Requirements for Growing Pomegranates in Pots
If you’ve grown citrus in pot, growing pomegranates in pot can not be difficult for you. Moreover, pomegranate is more cold hardy and easy to grow. It requires a lot of water and fertilizer. It is also frost sensitive but after all of this care it rewards you with iron rich, fresh juicy fruits.
Location
Choose a sunniest location to keep your pomegranate plant happy and healthy. The more sun it will receive, the more it will fruit. However, it also thrives in partial shade but it makes the plant to bloom and fruit lesser. It is also possible to cultivate pomegranate tree near a windowsill if it receives full sun.
Soil
Soil should be loamy, rich in organic content, loose and permeable.
Watering
In the growing period its water requirement is medium to high. Therefore, it should be watered regularly and deeply. Soil must be kept moist but not wet or waterlogged.
In the winter watering should be reduced.
Pomegranate Tree CareFertilizer
During the growing season pomegranate tree is fertilized regularly, fertilize after every two week using half strength liquid 8-8-8 fertilizer according to the manufacturer’s instructions.
Pomegranate tree in pot often becomes zinc deficient, which is indicated by yellowing leaves. To overcome this, you can spray diluted zinc solution on foliage.
Application of compost or manure is also beneficial. Take care not to over fertilize it as it can cause the tree to produce lots of foliage and comparatively less flowers.
Overwintering Pomegranate
Overwintering pomegranate is similar to citrus. It is a deciduous tree that worships sun. Most of its species are sensitive to frost. But to low temperatures, the plant has developed a protective mechanism.
It sheds its leaves and become dormant below freezing temperature. There are only a few pomegranate tree varieties that survive really freezing temperatures with more than -10 C without damage.
If the pomegranate is cultivated in a pot in a cold climate below USDA Zone 9, it is important to prune it in the fall. Best place to keep pomegranate plant in winter is the garage or basement that remains warm. Temperature while keeping it indoors should not fall below 37 F (3 C). However, the optimum low temperature for most of the pomegranate varieties is 7 C (45 F).
If you’re able to keep your pomegranate tree in temperature around 55 F (15 C) indoors and allow it to take at least 4 hours of sunlight, it will not shed its leaves and go dormant. During the period of dormancy the pomegranate hardly needs fertilizer or water. However, the plant in winter should not dry out completely.
In spring, bring back the plant to a warm and bright place so that it’ll gradually acclimate the climate. A window that is oriented to South is good. Just when the plant show the first sign of growth and forms a few fully developed leaves, you can again start to fertilize it and give more water. Once the temperature comes in range of 7 C (45 F) place it outside.
Pruning
Pruning is necessary to give and maintain desired shape of your pomegranate tree and encourage flowering and fruiting. Pruning it best done after all danger of frost has passed when the tree is about to start growing.
Prune off weak, dead and undesirable branches to direct tree’s energy to right part and shorten long branches to encourage flowering.
Repotting
Repot your pomegranate tree when it becomes slightly root bound. Right time to repot is when there are no flowers or fruits on the plant, especially when it start its growth in the beginning of growing season.
Diseases, pests and other problems
Pomegranate tree is not very vulnerable when it comes to pests and diseases. It is mostly attacked by fruitflies, whiteflies and pomegranate butterflies.
Fruit crack is one problem that is common in all pomegranate varieties. It occurs due to fluctuation or lack of moisture in substrate at the time of fruiting.
Harvesting
If pomegranate is grown from seeds fruits will begin to form in third year.
Generally the fruit will ripen in three to six months after the appearance of flowers.
*Pomegranate is one of the nicest fruit trees and perhaps the easiest to grow in pots because it has shallow root system when compared to other fruit trees.

Pomegranate tree if grown under optimal conditions, live up to 200 years. It is native to Middle East (Iran) and South Asia. It is a shrub or small tree that might grow up to 6 m (20 ft) but usually reduced to 2 m.
USDA Hardiness Zones — 9b – 11, *can be grown below zone 9 in containers
Difficulty — Easy
Soil pH — Neutral
Other Names — Punic apple, Granatapfel, Granada, Grenade, Melograno, Melagrana, Anardana, Anar, Dadima, Fruit du, Pomme Grenade, Punica granatum, Roma, Shi Liu Gen Pi and Shi Liu Pi.
Appearance
The exotic container plant is adorned with five to eight centimeters long lance shaped leaves that are shiny and bronze in color from the bud, which later turn green.
Pomegranate flowers are delicate, bell-shaped and show up in the wild bright red. Its flowers are up to 3 centimeters wide. Ornamental varieties can have flowers in pink, cream, and even white.
In addition to the decorative foliage and flowers, it is mainly the fruits that make the pomegranate tree so desirable. They have the size of apples and a yellow-brown to reddish-brown shell. The juicy, red pulp inside the fruit enveloping the countless seeds that tastes aromatic and sweet.
Dwarf Pomegranate VarietiesFruiting Varieties‘Nana’ – The most interesting variety among the pomegranates trees is the dwarf variety ‘Nana’. It grows compact, floriferous and is considered robust and cold hardy, it grows in USDA Zones 7 to 11. As a container plant it grows up to only about 1 m tall, forms orange to garnet red flowers that produce small fruits with viable seeds.‘Provence’ – When most of the pomegranate varieties are not much cold hardy, provence is one you can look at. It can tolerate temperature down to 5 F (-15 C) and can be grown in cold climate.‘State fair’ – State fair is manageable variety for containers. It grows up to 1 . 5 m tall and grown in USDA Zones 7 to 11.Ornamental Varieties‘Flore Pleno’ – It is fruitless variety of pomegranate, the name translates as “double flower”. In summer, it produces countless beautiful orange-red flowers.Punica granatum ‘Madame Legrelle’ – A well-known ornamental variety. Special thing about this variety of pomegranate is its extraordinary, dense double flowers that come in shiny orange to salmon colors with white border.
Pomegranate is a manageable plant, you can also try large varieties.
Propagation and Growing Pomegranates in Containers
Pomegranate plants can be propagated by cuttings or by seeds in spring to summer when temperature remains in range of 68 F (20 C) but it is better to buy a 2 – 3 year old plant from nursery or online. This way you don’t have to wait long for fruits.
Propagation by seeds
Buy as ripe pomegranate as possible. Separate and clean seeds from the pulp by rubbing them from paper towel, let them dry up for a few days before sowing.
Plant the seeds no more than ¼ inches deep in light seed-starting mix. Place the pots in a bright location, optionally inside a plastic bag or greenhouse that maintains a temperature around 68 F (20 C). Always keep the soil moist. Seeds will germinate within 1 – 6 weeks depending more on the variety and climate.
Propagation by cuttings
Take several 8 to 10 inch-long cuttings. Plant the cutting in a well drained potting mix. It roots easily and quickly at ambient temperature of 20 degrees Celsius and high humidity.
*If you’re living in tropics, growing pomegranates is extremely easy for you, you can grow pomegranate in any season except peak summer. All other growing requirements given below are similar.
Choosing a pot
Pot should be appropriate to the size of plant, increase the pot size by repotting as your plant grow. Also care about to have sufficient holes in the base of pot you’re using for proper drainage.
Requirements for Growing Pomegranates in Pots

If you’ve grown citrus in pot, growing pomegranates in pot can not be difficult for you. Moreover, pomegranate is more cold hardy and easy to grow. It requires a lot of water and fertilizer. It is also frost sensitive but after all of this care it rewards you with iron rich, fresh juicy fruits.
Location
Choose a sunniest location to keep your pomegranate plant happy and healthy. The more sun it will receive, the more it will fruit. However, it also thrives in partial shade but it makes the plant to bloom and fruit lesser. It is also possible to cultivate pomegranate tree near a windowsill if it receives full sun.
Soil
Soil should be loamy, rich in organic content, loose and permeable.
Watering
In the growing period its water requirement is medium to high. Therefore, it should be watered regularly and deeply. Soil must be kept moist but not wet or waterlogged.
In the winter watering should be reduced.
Pomegranate Tree CareFertilizer
During the growing season pomegranate tree is fertilized regularly, fertilize after every two week using half strength liquid 8-8-8 fertilizer according to the manufacturer’s instructions.
Pomegranate tree in pot often becomes zinc deficient, which is indicated by yellowing leaves. To overcome this, you can spray diluted zinc solution on foliage.
Application of compost or manure is also beneficial. Take care not to over fertilize it as it can cause the tree to produce lots of foliage and comparatively less flowers.
Overwintering Pomegranate
Overwintering pomegranate is similar to citrus. It is a deciduous tree that worships sun. Most of its species are sensitive to frost. But to low temperatures, the plant has developed a protective mechanism.
It sheds its leaves and become dormant below freezing temperature. There are only a few pomegranate tree varieties that survive really freezing temperatures with more than -10 C without damage.
If the pomegranate is cultivated in a pot in a cold climate below USDA Zone 9, it is important to prune it in the fall. Best place to keep pomegranate plant in winter is the garage or basement that remains warm. Temperature while keeping it indoors should not fall below 37 F (3 C). However, the optimum low temperature for most of the pomegranate varieties is 7 C (45 F).
If you’re able to keep your pomegranate tree in temperature around 55 F (15 C) indoors and allow it to take at least 4 hours of sunlight, it will not shed its leaves and go dormant. During the period of dormancy the pomegranate hardly needs fertilizer or water. However, the plant in winter should not dry out completely.
In spring, bring back the plant to a warm and bright place so that it’ll gradually acclimate the climate. A window that is oriented to South is good. Just when the plant show the first sign of growth and forms a few fully developed leaves, you can again start to fertilize it and give more water. Once the temperature comes in range of 7 C (45 F) place it outside.
Pruning
Pruning is necessary to give and maintain desired shape of your pomegranate tree and encourage flowering and fruiting. Pruning it best done after all danger of frost has passed when the tree is about to start growing.
Prune off weak, dead and undesirable branches to direct tree’s energy to right part and shorten long branches to encourage flowering.
Repotting
Repot your pomegranate tree when it becomes slightly root bound. Right time to repot is when there are no flowers or fruits on the plant, especially when it start its growth in the beginning of growing season.
Diseases, pests and other problems

Pomegranate tree is not very vulnerable when it comes to pests and diseases. It is mostly attacked by fruitflies, whiteflies and pomegranate butterflies.
Fruit crack is one problem that is common in all pomegranate varieties. It occurs due to fluctuation or lack of moisture in substrate at the time of fruiting.
Harvesting
If pomegranate is grown from seeds fruits will begin to form in third year.
Generally the fruit will ripen in three to six months after the appearance of flowers.
1
0
文章
Micky
2017年05月22日

Learn how to plant thuja, it’s one of the fast growing privacy trees you’d like to plant in your garden.
Thuja is a small genus belonging to the group of conifers and to the family of Cupressaceae. It is native to North America and Asia. It has a columnar habit and flattened branches. Some of its varieties can reach up to 200 feet tall in favorable climate.
USDA Zones — 3 – 11
Propagation Method — Seeds, vegetative propagation
Difficulty — Easy
Soil pH — 6 – 8
Varieties and How to Plant Thuja
There are three species most widespread: Thuja green giant, which is a hybrid of thuja plicata and Thuja standishii– the most popular cultivar that reaches height of 18 to 25 m and has very rapid growth and ornamental use. The tops of its branches are solid to the touch and its foliage are mildly fragrant.
Thuja occidentalis, also called as white cedar is famous for its amazing ornamental foliage. It’s a beautiful small tree that gives rustic appearance. It grows between to 10 to 20 meters high.
Thuja plicata is also referred as giant or western arborvitae. It grows up to amazing height of 55 to 60 m (180 to 200 ft).
Propagation
It can be propagated from seeds, cuttings and air layering. Propagate in summer using fresh cuttings.
Position for Growing Arborvitae
Thuja grows easily in both full sun and partial shade. However, exposure to cold harsh winds can be damaging to young plants.
RequirementsSoil
Thuja grows in most soil types. But the best soil for it is fertile soil that has ability to retain moisture. It also tolerates very chalky soils.
Watering
Water thuja deeply. Soil around it should be kept moist and covered, constantly, from a mulch of organic material.
Fertilizer
It needs regular fertilization to grow fast. Feed it with balanced liquid fertilizer in the beginning of growing season to kick start the growth.
Thuja CarePruning
It doesn’t require pruning as it naturally grows in columnar shape. Although if you are growing this for hedge prune regularly to maintain shape. It can tolerate excessive pruning without any problem.
Pests and Diseases
Thuja is a small genus belonging to the group of conifers and to the family of Cupressaceae. It is native to North America and Asia. It has a columnar habit and flattened branches. Some of its varieties can reach up to 200 feet tall in favorable climate.

USDA Zones — 3 – 11
Propagation Method — Seeds, vegetative propagation
Difficulty — Easy
Soil pH — 6 – 8
Varieties and How to Plant Thuja
There are three species most widespread: Thuja green giant, which is a hybrid of thuja plicata and Thuja standishii– the most popular cultivar that reaches height of 18 to 25 m and has very rapid growth and ornamental use. The tops of its branches are solid to the touch and its foliage are mildly fragrant.
Thuja occidentalis, also called as white cedar is famous for its amazing ornamental foliage. It’s a beautiful small tree that gives rustic appearance. It grows between to 10 to 20 meters high.
Thuja plicata is also referred as giant or western arborvitae. It grows up to amazing height of 55 to 60 m (180 to 200 ft).
Propagation
It can be propagated from seeds, cuttings and air layering. Propagate in summer using fresh cuttings.
Position for Growing Arborvitae
Thuja grows easily in both full sun and partial shade. However, exposure to cold harsh winds can be damaging to young plants.
RequirementsSoil
Thuja grows in most soil types. But the best soil for it is fertile soil that has ability to retain moisture. It also tolerates very chalky soils.
Watering
Water thuja deeply. Soil around it should be kept moist and covered, constantly, from a mulch of organic material.
Fertilizer
It needs regular fertilization to grow fast. Feed it with balanced liquid fertilizer in the beginning of growing season to kick start the growth.
Thuja CarePruning
It doesn’t require pruning as it naturally grows in columnar shape. Although if you are growing this for hedge prune regularly to maintain shape. It can tolerate excessive pruning without any problem.
Pests and Diseases
1
0
成长记
riverrun
2017年04月06日
I had to cut Sainties smallest leaves because they dried out completely :( Now i spray him every day 3x. I read that its almost impossible to keep these cocos nucifera trees alive inside, or in Germany in general. They really need their hot sun and moist air. And still they are sold as regular house plants because ppl fall for their beauty and spend money (like me😅) even though they are very likely to die. So now I just hope to get him through summer 🖒💚🏝


3
0
Fynn:A Chinenese cup?
文章
Gina
2017年03月15日

If you need more gardening space, or you just want to try something a little more unique and interesting, consider a vertical garden. There is nothing new about the idea of going up in garden design… hanging planters, trees and arbors and porticos are all examples of taking things skyward. But these DIY vertical gardens are clever and smart, and give your garden a creative edge. So the next time you’re trying to figure out how to find enough space to grow those herbs, or what you can do to liven up a ho-hum garden space, go vertical! Our feature photo below, is a modern, space saving DIY vertical garden from Chris at ‘Man Made DIY’. He grew veggies in it, but anything is fair game!

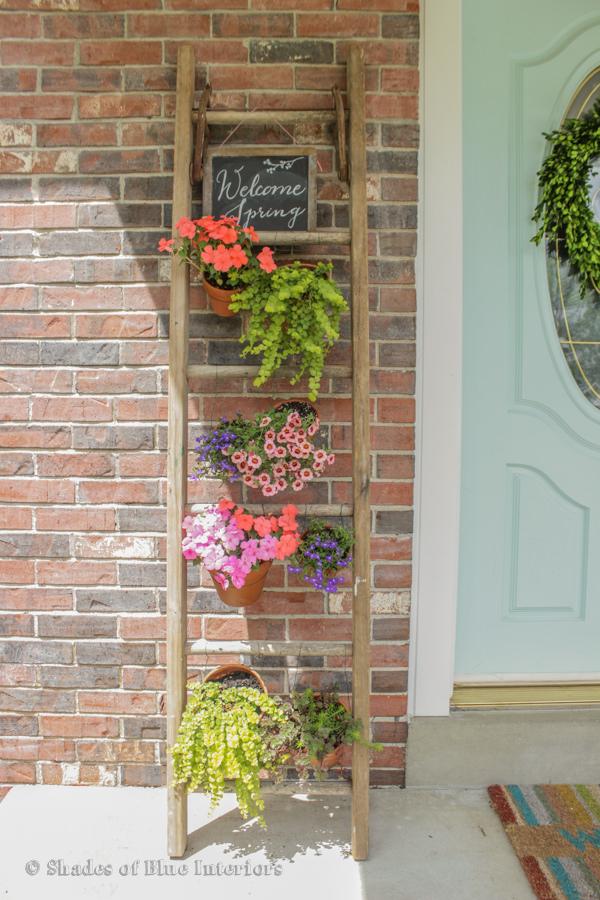
Rachel at ‘Shades of Blue Interiors’ wanted a pop of color for her small front porch. Her DIY ladder vertical garden brought that color to eye level and added charm to her porch as well! This is an easy project with inexpensive materials. The key would be an attractive wooden ladder! If you don’t have an authentically old one, consider picking up a cheap wood ladder at a home improvement store and staining it.
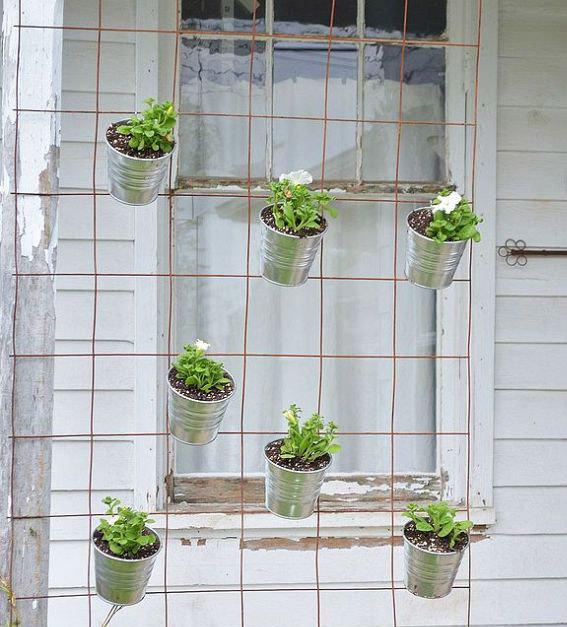
Got a roll of rusty metal fence? Or already have a fence that could use a spruce up? Punch holes in simple metal or plastic containers, and hang onto the fence with an s-hook. Plant with your fav flowers or herbs! Remember, keep the containers small enough so that the fence will hold the weight when they are full of soil. This project is from Jill at ‘Sew a Fine Seam‘.
Make succulent frames with this tutorial from ‘Sunset‘. This is a fun project that can turn a patio or balcony space into a really special garden area, even if you have only concrete flooring! Photo from ‘Sky Parlour‘.

‘AKA Design’ built an arbor support for their DIY vertical garden. I love these kinds of container gardens because they are so versatile. This could be all moss, ferns, succulents, herbs, or flowers. Use a color theme or all the colors you can. Trailing plants or mounding ones. Having the same pot throughout ties it all together. Great tutorial!

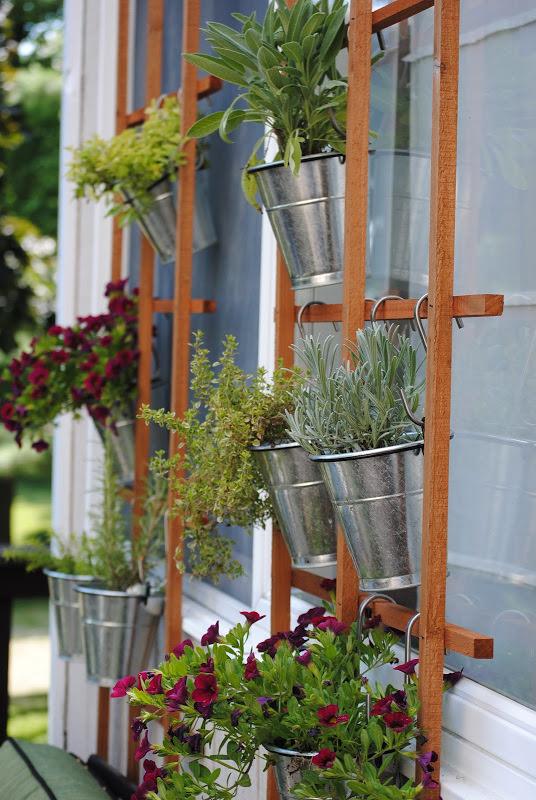
This vertical herb garden trellis wall from Carrie at ‘Making Lemonade’ is perfect for adding some shade to a window with none, or just making fresh herbs easily accessible from the kitchen door! Simple project anyone can do with ordinary trellis from the home improvement store and some Ikea pots. Plus, I love her theory on how important it is to take care of yourself! (Go read it, the whole deck makeover is so cute!)
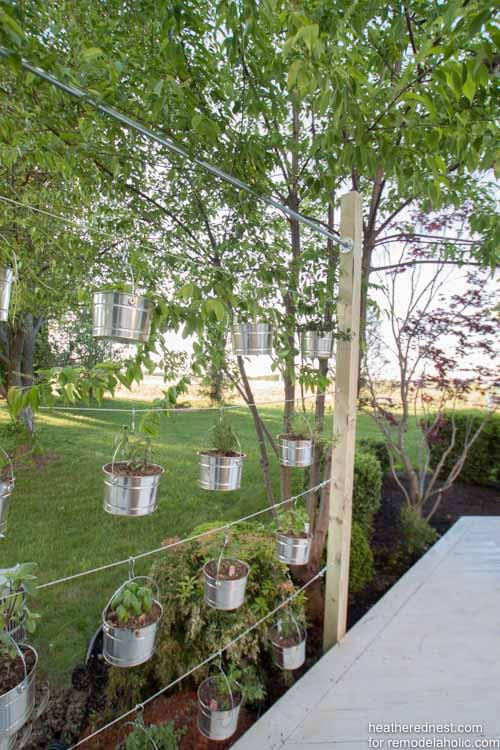
Love this DIY suspended vertical garden from ‘The Heathered Nest’ via ‘Remodelaholic’. This project is made with some simple pots and galvanized wire, and they walk you through it step by step. They even make suggestions on how you can customize it!
This DIY outdoor succulent wall garden from ‘Sugar & Cloth’ was made using an unfinished hand rail and used paint tins! Love how clever this is.

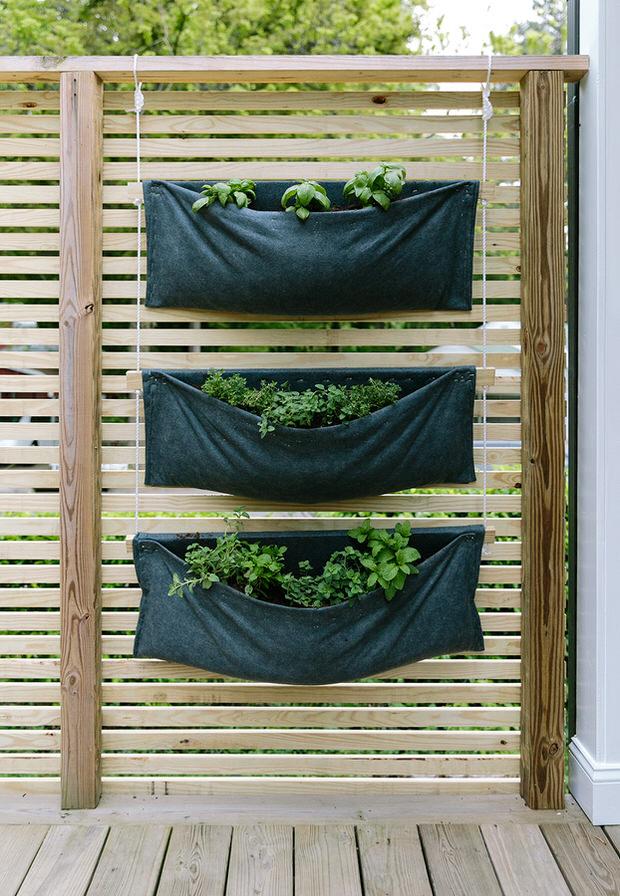
Lovin’ on this DIY simple modern vertical wall garden from ‘The Fresh Exchange’. Would love to grow container veggies in this! This is made with felt from the fabric store, believe it or not!
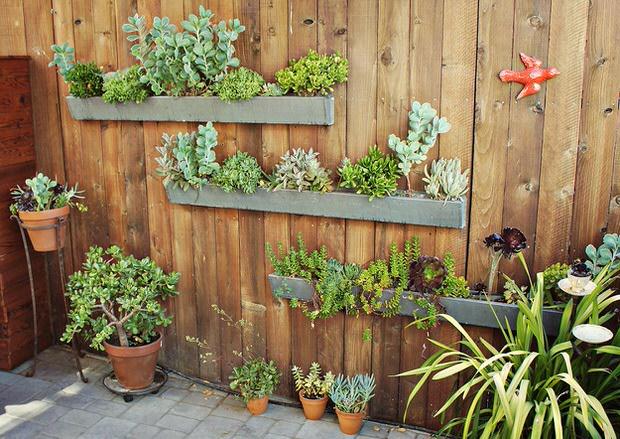
This vertical garden DIY is from ‘Numi Tea Blog’, and is made from ordinary rain gutters. I wonder if we could figure out a way to mount these to a stone block wall? :)
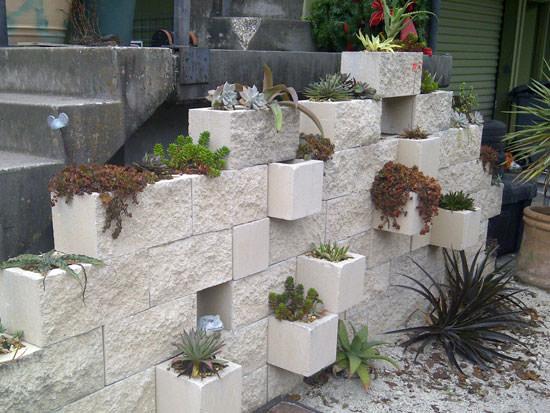
Make a cinderblock garden! You can visit our tutorial for our DIY cinder clock vertical planter to get all the instructions. This photo from ‘The Rainforest Garden‘.
Last, learn how to plant a vertical garden from ‘Front & Main’, the blog of ‘West Elm’. This project would look amazing indoors or out on a covered patio. Simple and awesome!
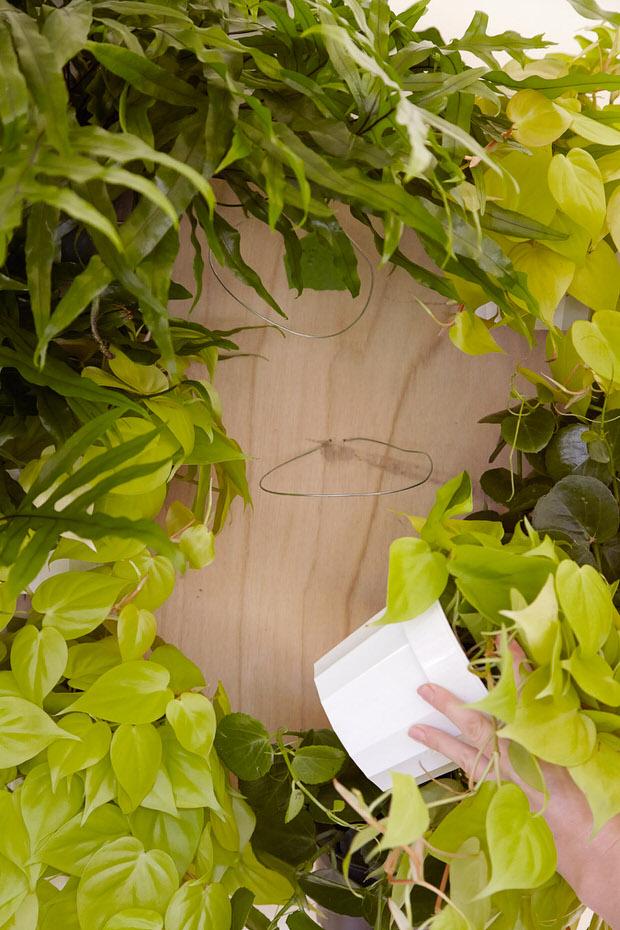

Get creative! No matter how small or boring your garden space, there is always a way to create your own amazing little bit of green earth!

Rachel at ‘Shades of Blue Interiors’ wanted a pop of color for her small front porch. Her DIY ladder vertical garden brought that color to eye level and added charm to her porch as well! This is an easy project with inexpensive materials. The key would be an attractive wooden ladder! If you don’t have an authentically old one, consider picking up a cheap wood ladder at a home improvement store and staining it.

Got a roll of rusty metal fence? Or already have a fence that could use a spruce up? Punch holes in simple metal or plastic containers, and hang onto the fence with an s-hook. Plant with your fav flowers or herbs! Remember, keep the containers small enough so that the fence will hold the weight when they are full of soil. This project is from Jill at ‘Sew a Fine Seam‘.

Make succulent frames with this tutorial from ‘Sunset‘. This is a fun project that can turn a patio or balcony space into a really special garden area, even if you have only concrete flooring! Photo from ‘Sky Parlour‘.

‘AKA Design’ built an arbor support for their DIY vertical garden. I love these kinds of container gardens because they are so versatile. This could be all moss, ferns, succulents, herbs, or flowers. Use a color theme or all the colors you can. Trailing plants or mounding ones. Having the same pot throughout ties it all together. Great tutorial!

This vertical herb garden trellis wall from Carrie at ‘Making Lemonade’ is perfect for adding some shade to a window with none, or just making fresh herbs easily accessible from the kitchen door! Simple project anyone can do with ordinary trellis from the home improvement store and some Ikea pots. Plus, I love her theory on how important it is to take care of yourself! (Go read it, the whole deck makeover is so cute!)

Love this DIY suspended vertical garden from ‘The Heathered Nest’ via ‘Remodelaholic’. This project is made with some simple pots and galvanized wire, and they walk you through it step by step. They even make suggestions on how you can customize it!

This DIY outdoor succulent wall garden from ‘Sugar & Cloth’ was made using an unfinished hand rail and used paint tins! Love how clever this is.

Lovin’ on this DIY simple modern vertical wall garden from ‘The Fresh Exchange’. Would love to grow container veggies in this! This is made with felt from the fabric store, believe it or not!

This vertical garden DIY is from ‘Numi Tea Blog’, and is made from ordinary rain gutters. I wonder if we could figure out a way to mount these to a stone block wall? :)

Make a cinderblock garden! You can visit our tutorial for our DIY cinder clock vertical planter to get all the instructions. This photo from ‘The Rainforest Garden‘.

Last, learn how to plant a vertical garden from ‘Front & Main’, the blog of ‘West Elm’. This project would look amazing indoors or out on a covered patio. Simple and awesome!


Get creative! No matter how small or boring your garden space, there is always a way to create your own amazing little bit of green earth!
1
1
文章
Abigal
2017年02月23日

I wanted to touch base about pruning #trees at this time of year, because as soon as the holidays are over, many of you do exactly that. And if you have run across any of the “guides” on pruning trees written by the extension programs of state universities, you may have had your head spin around. Here are all the simple guidelines on how, and when to prune your trees.

When to Prune Trees
For all of you who pull out the clippers and loppers right after Christmas, don’t! Most trees will come out healthier on the other end if you wait until after the coldest part of winter has passed, but before vigorous growth starts in early spring. For most people that’s February to March. That having been said, it’s ok to do minor pruning to weed out dead branches, etc… at any time of year. Note: it is okay to still prune fruit trees if they have started to flower. In fact, fruit trees tend to get some winter kill of branches, and waiting for the first flowers will help you determine which branches are dead and need to be removed.
How to Prune Large Trees
Short answer? Don’t. Large trees need an arborist or tree trimming service for both safety and health of the tree. Fortunately, large trees rarely need to be pruned yearly!
How to Prune Small Trees
You prune decorative garden trees for two reasons… First, is to improve the health of the tree. Pruning creates more compact and healthy growth, and opens up the crown for good air circulation. Second, to improve the appearance of the tree. Every time you make a cut in your tree, first think about which one of those objectives you are trying to achieve… if your cut fits with one of those two, it’s a good cut.

Note: Make sure your pruners and loppers are sharp and clean. You don’t want to invite fungus or disease.
To prune a small tree for health, first you want to remove any dead or unhealthy branches. Make your cuts just outside the collar of the branch…don’t cut too close to the trunk, and on the other side, don’t leave a stub. Below is an example of a proper cut. If branches cross over or are too thick, prune them out to allow the branches you leave room to grow and flourish. Most people are not aggressive enough in thinning out branches.
Now prune for shape and size. Step back and look at your tree, and know what it’s natural shape should be. For instance, is it a weeping tree, or a graceful vase shape? Make sure you remove branches that are interfering with the shape you want your tree to take. Step back after every cut and re-evaluate. Try to remove most of your branches at the trunk, but if you need to shorten a branch, don’t cut it in the middle… make your cut a quarter inch above a bud.
How to Prune Fruit Trees

Pruning fruit trees is slightly different in that the main purpose is to encourage stronger growth of the fruit itself, not size of the tree. This involves creating a more compact tree and only leaving the strongest branches, which results in large and more flavorful fruit.
According to Dr. Lee Reich, author of “Landscaping with Fruits”, “You need to make thinning cuts and heading cuts—to keep the center of the tree open and to stimulate new growth for the following year. And in general you need to cut more than you probably think you should.”
Also suggested by Dr. Reich is a good visual tool for deciding whether you have thinned your fruit trees far enough…another place most people are not aggressive enough. He calls it his “cat tossing method”. Yes, I find this disturbing, but it’s a good visual… He says if when you are finished pruning, you could toss a cat through the branches, you’ve done enough. Not the analogy I would use, and I’m torn between laughing at the craziness of it, and feeling really disturbed. But there you are, one of the leading authorities on pruning. How about this, he offers an alternative for those of us a bit sensitive… If a large bird can fly through the branches, you are good. Why didn’t you just say that in the first place, Dr. Reich? :) His basic rule for thinning fruit on apple and peach trees is that for every 20 blossoms, only one should remain. Yep, that aggressive.
So prune your trees at the right time, with the right technique. It will improve their curb appeal, their flowering and fruiting, and their health. It’s not hard, just take it one cut at a time!

When to Prune Trees
For all of you who pull out the clippers and loppers right after Christmas, don’t! Most trees will come out healthier on the other end if you wait until after the coldest part of winter has passed, but before vigorous growth starts in early spring. For most people that’s February to March. That having been said, it’s ok to do minor pruning to weed out dead branches, etc… at any time of year. Note: it is okay to still prune fruit trees if they have started to flower. In fact, fruit trees tend to get some winter kill of branches, and waiting for the first flowers will help you determine which branches are dead and need to be removed.
How to Prune Large Trees
Short answer? Don’t. Large trees need an arborist or tree trimming service for both safety and health of the tree. Fortunately, large trees rarely need to be pruned yearly!
How to Prune Small Trees
You prune decorative garden trees for two reasons… First, is to improve the health of the tree. Pruning creates more compact and healthy growth, and opens up the crown for good air circulation. Second, to improve the appearance of the tree. Every time you make a cut in your tree, first think about which one of those objectives you are trying to achieve… if your cut fits with one of those two, it’s a good cut.

Note: Make sure your pruners and loppers are sharp and clean. You don’t want to invite fungus or disease.
To prune a small tree for health, first you want to remove any dead or unhealthy branches. Make your cuts just outside the collar of the branch…don’t cut too close to the trunk, and on the other side, don’t leave a stub. Below is an example of a proper cut. If branches cross over or are too thick, prune them out to allow the branches you leave room to grow and flourish. Most people are not aggressive enough in thinning out branches.
Now prune for shape and size. Step back and look at your tree, and know what it’s natural shape should be. For instance, is it a weeping tree, or a graceful vase shape? Make sure you remove branches that are interfering with the shape you want your tree to take. Step back after every cut and re-evaluate. Try to remove most of your branches at the trunk, but if you need to shorten a branch, don’t cut it in the middle… make your cut a quarter inch above a bud.
How to Prune Fruit Trees

Pruning fruit trees is slightly different in that the main purpose is to encourage stronger growth of the fruit itself, not size of the tree. This involves creating a more compact tree and only leaving the strongest branches, which results in large and more flavorful fruit.
According to Dr. Lee Reich, author of “Landscaping with Fruits”, “You need to make thinning cuts and heading cuts—to keep the center of the tree open and to stimulate new growth for the following year. And in general you need to cut more than you probably think you should.”
Also suggested by Dr. Reich is a good visual tool for deciding whether you have thinned your fruit trees far enough…another place most people are not aggressive enough. He calls it his “cat tossing method”. Yes, I find this disturbing, but it’s a good visual… He says if when you are finished pruning, you could toss a cat through the branches, you’ve done enough. Not the analogy I would use, and I’m torn between laughing at the craziness of it, and feeling really disturbed. But there you are, one of the leading authorities on pruning. How about this, he offers an alternative for those of us a bit sensitive… If a large bird can fly through the branches, you are good. Why didn’t you just say that in the first place, Dr. Reich? :) His basic rule for thinning fruit on apple and peach trees is that for every 20 blossoms, only one should remain. Yep, that aggressive.
So prune your trees at the right time, with the right technique. It will improve their curb appeal, their flowering and fruiting, and their health. It’s not hard, just take it one cut at a time!
1
0
求助
Janinaandersson
2017年01月13日

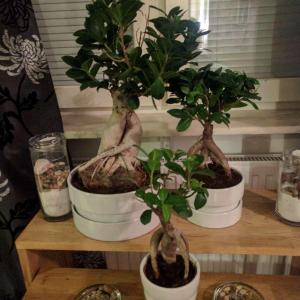
how do i take the best Care of this Beautiful trees?

4
0
Erin:Ginseng Ficus, also called Ficus microcarpa, Ficus retusa, and banyan fig, is not the medicinal ginseng plant, but a type of fig. You will be pleasantly surprised to find that a Ginseng Ficus bonsai tree is not only great looking but extremely easy to care for.
This particular tree does not need much attention. You will only need to water it once or twice a week at most. If you over-water it occasionally, this bonsai will adjust.; if you forget to water it on occasion, it will not get mad at you and shrivel up. You will know if you are not giving it enough water because the dark green leaves will start to turn yellow. The best way to keep your Ginseng Ficus moist and happy is to mist it with a spray bottle every day.
sunnyzou:Place:The houseplant can also go outdoors in the summer, preferably in shade.
Temperature: The plant likes to spend the winter in a cool position, at about 12℃.
Water:Give your Ficus Ginseng a moderate amount of water, more in summer than in winter. Don’t leave any water in the saucer, the plant doesn’t like that.
Spray: If the central heating setting is high, spray the Ficus Ginseng now and again with water.
Food:Give your Ficus Ginseng some plant food regularly.
Prune:If you wish, you can prune the plant to give it some shape.
我是小花:banyan


