文章
Miss Chen
2017年12月10日

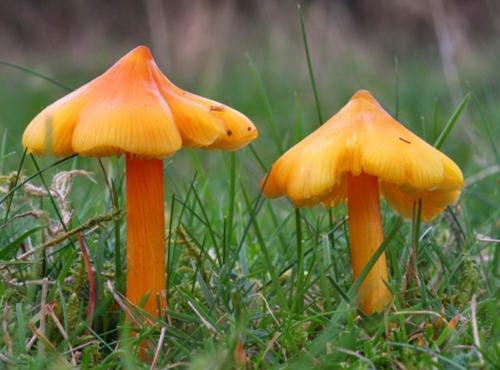
Mushroom hunters forge through damp wooded areas searching for the prized edible mushroom. They must be skilled in the identification process, because some mushrooms are deadly. There are over 3,000 species of mushroom throughout the world. It is a fungus, and unlike other plants, has no chlorophyll to help it manufacture food. The cap of the mushroom--the part we typically eat--is actually the fruiting part of the mushroom, and is vital to its reproduction process. The cap will last only a few days, but during that time it will create millions of spores. Spores are single cells, each capable of developing into a mushroom.
Cells Produce Spores
The cells that produce spores on the fruiting body are either asci or basidia. With asci cells, spores are produced internally, and in the basidia they are produced externally. Spores are released when either the tip of the asci breaks off or the spores break off from the basidia. After the spores are released, they are carried by the wind, and it is possible for them to land far from the parent mushroom. After the spores are released, the cap or fruiting part of the mushroom dies.
Asci and Basidia Cells
The asci cells are located on the internal surface of the cup fungi. When the asci breaks open, the spores are released. Gilled mushrooms, boletes and puffballs all have basidia cells. In the gilled mushrooms, they are located on the bottom of the cap, from which the spores are dropped. In the boletes, they are located in tubes contained in the flesh of the mushroom cap, with pores that release the spores. In the puffball, they are located in the body of the cap, and the spores release when the shell of the cap breaks open.

The Cycle Continues
For a spore to survive and grow into a new mushroom, it must land in an environment that is appropriate for mushroom cultivation. The soil should be damp and moist. Mushrooms thrive in areas that are grassy and wooded. After landing in such an environment, the spore will grow hair-like filaments that are called hypha. From the hyphae, the mushroom's mycelium will grow. This is the part of the mushroom that grows below the soil. From the mycelium a stalk or stem will grow, and atop the stem will grow the fruiting cap. When the hypha of one spore meets with the hypha from another spore, a mating or germination process begins that results in the production of more spores.

Cells Produce Spores
The cells that produce spores on the fruiting body are either asci or basidia. With asci cells, spores are produced internally, and in the basidia they are produced externally. Spores are released when either the tip of the asci breaks off or the spores break off from the basidia. After the spores are released, they are carried by the wind, and it is possible for them to land far from the parent mushroom. After the spores are released, the cap or fruiting part of the mushroom dies.
Asci and Basidia Cells
The asci cells are located on the internal surface of the cup fungi. When the asci breaks open, the spores are released. Gilled mushrooms, boletes and puffballs all have basidia cells. In the gilled mushrooms, they are located on the bottom of the cap, from which the spores are dropped. In the boletes, they are located in tubes contained in the flesh of the mushroom cap, with pores that release the spores. In the puffball, they are located in the body of the cap, and the spores release when the shell of the cap breaks open.

The Cycle Continues
For a spore to survive and grow into a new mushroom, it must land in an environment that is appropriate for mushroom cultivation. The soil should be damp and moist. Mushrooms thrive in areas that are grassy and wooded. After landing in such an environment, the spore will grow hair-like filaments that are called hypha. From the hyphae, the mushroom's mycelium will grow. This is the part of the mushroom that grows below the soil. From the mycelium a stalk or stem will grow, and atop the stem will grow the fruiting cap. When the hypha of one spore meets with the hypha from another spore, a mating or germination process begins that results in the production of more spores.
0
0
文章
Miss Chen
2017年12月05日

Enoki mushrooms, Flammulina velutipes, sprout white bodies with thin stems and traditional mushroom caps. Like other mushrooms species, including shiitakes and oysters, enokis are sometimes used medicinally, to treat liver infections and boost immune system responses. Some even believe that these tiny mushrooms can help reduce tumors. Growing these enokis at home requires careful application of warmth, cold and humidity at different times during the growth cycle.

Step 1
Clean and sterilize clear plastic bottles or cylinders, each measuring about 8 inches tall. Wash the bottles with antibacterial soap and rinse thoroughly with warm water to ensure that no residual soap remains.
Step 2
Mix aged hardwood sawdust or professional mushroom growth medium with enoki spawn. You can find the spawn, as well as growing mediums, at garden centers, nurseries or mushroom-specialty retailers. The spawn must be thoroughly mixed into the medium to encourage growth.
Step 3
Fill the plastic bottles with the inculcated growing medium. Store the bottles in an area with temperatures ranging between 72 and 77 degrees F and a relative humidity above 90 percent. Light exposure does not matter; the humidity and high temperature will encourage the spawn to grow.
Step 4
Check the bottles after two weeks of growth. You should see thin strands of mycelium starting to spread throughout the bottle; this is essentially the mushroom roots. Keep the enoki spawn in the warm, humid environment until the mycelium has completely covered the growing medium; this can take anywhere from two weeks to a month.

Step 5
Transport the bottles to a cool area, with temperatures ranging between 50 and 65 degrees F. Humidity can drop as low as is necessary in this cooler place. Again, sun exposure does not matter. The sudden change in atmosphere will cause the mycelium to produce the characteristic mushroom bodies; these can be harvested within 60 days of initial production.

Step 1
Clean and sterilize clear plastic bottles or cylinders, each measuring about 8 inches tall. Wash the bottles with antibacterial soap and rinse thoroughly with warm water to ensure that no residual soap remains.
Step 2
Mix aged hardwood sawdust or professional mushroom growth medium with enoki spawn. You can find the spawn, as well as growing mediums, at garden centers, nurseries or mushroom-specialty retailers. The spawn must be thoroughly mixed into the medium to encourage growth.
Step 3
Fill the plastic bottles with the inculcated growing medium. Store the bottles in an area with temperatures ranging between 72 and 77 degrees F and a relative humidity above 90 percent. Light exposure does not matter; the humidity and high temperature will encourage the spawn to grow.
Step 4
Check the bottles after two weeks of growth. You should see thin strands of mycelium starting to spread throughout the bottle; this is essentially the mushroom roots. Keep the enoki spawn in the warm, humid environment until the mycelium has completely covered the growing medium; this can take anywhere from two weeks to a month.

Step 5
Transport the bottles to a cool area, with temperatures ranging between 50 and 65 degrees F. Humidity can drop as low as is necessary in this cooler place. Again, sun exposure does not matter. The sudden change in atmosphere will cause the mycelium to produce the characteristic mushroom bodies; these can be harvested within 60 days of initial production.
1
1
文章
Miss Chen
2017年12月05日

Morel mushrooms belong to the Morchella genus, which contains at least six species. Cooks highly prize these mushrooms for their delicate, earthy flavor, especially in French cuisine. Morel mushrooms are difficult to grow on a large scale, so mushroom hunters meet commercial needs by harvesting wild morel mushrooms. Private gardeners also grow morel mushrooms indoors, although these mushrooms are slow to produce the fruiting bodies commonly known as caps.

Step 1
Punch drainage holes in the bottom of a shallow metal tray such as a cake pan to use as a fruiting tray. Clean the tray with a 5 percent solution of bleach to sterilize the pan.
Step 2
Prepare a substrate containing 50 percent organic compost, 30 percent potting soil and 20 percent sand. Add enough powdered limestone to this mixture to raise the soil pH to 7.2. Fill the trays to a depth of 2 inches with the substrate.
Step 3
Soak the substrate with water and allow it to drain completely. Add the morel mushroom spawn to the substrate according to the manufacturer's instructions.
Step 4
Place the fruiting tray indoors in a temperature-controlled growing room with no light. Maintain a temperature between 65 and 70 degrees Fahrenheit with at least 90 percent humidity. Hard lumps of mycelium known as schlerotia should form on the surface of the substrate in four to six weeks.

Step 5
Refrigerate the fruiting tray at 39 degrees Fahrenheit for two weeks. Slowly add 2 oz. of water to the fruiting tray for every square foot of the tray's surface area. Allow the water to drain from the fruiting tray for a full day.
Step 6
Place the fruiting tray back in the growing room. Keep the relative humidity of the room above 90 percent and maintain it at a temperature of about 72 degrees Fahrenheit. Use grow lights to provide 12 hours of light and 12 hours of darkness. The stalks of the morel mushrooms should appear within one week. Harvest the mushroom caps as they grow.

Step 1
Punch drainage holes in the bottom of a shallow metal tray such as a cake pan to use as a fruiting tray. Clean the tray with a 5 percent solution of bleach to sterilize the pan.
Step 2
Prepare a substrate containing 50 percent organic compost, 30 percent potting soil and 20 percent sand. Add enough powdered limestone to this mixture to raise the soil pH to 7.2. Fill the trays to a depth of 2 inches with the substrate.
Step 3
Soak the substrate with water and allow it to drain completely. Add the morel mushroom spawn to the substrate according to the manufacturer's instructions.
Step 4
Place the fruiting tray indoors in a temperature-controlled growing room with no light. Maintain a temperature between 65 and 70 degrees Fahrenheit with at least 90 percent humidity. Hard lumps of mycelium known as schlerotia should form on the surface of the substrate in four to six weeks.

Step 5
Refrigerate the fruiting tray at 39 degrees Fahrenheit for two weeks. Slowly add 2 oz. of water to the fruiting tray for every square foot of the tray's surface area. Allow the water to drain from the fruiting tray for a full day.
Step 6
Place the fruiting tray back in the growing room. Keep the relative humidity of the room above 90 percent and maintain it at a temperature of about 72 degrees Fahrenheit. Use grow lights to provide 12 hours of light and 12 hours of darkness. The stalks of the morel mushrooms should appear within one week. Harvest the mushroom caps as they grow.
0
0
文章
Miss Chen
2017年12月04日

In general, fungi have a very short life span, though it differs greatly from species to species. Some types may live as short as a day, while others survive anywhere between a week and a month. The life cycle of a fungus begins as a spore and lasts until germination.

Spore Development
Fungi begin their life as spores that are released from a fully grown fungi. After they are released, the cells of the spore divide and spread into hyphae. When hyphae formed from spores released by two different fungi meet, they may fuse together to create a single cell with two nuclei.
Mushroom
Once the two-nucleus cells, also called dikaryons, have matured, they develop into a fruiting body known as a mushroom. The nuclei of the cells in the mushroom will undergo further divisions and eventually form haploid cells--cells with a single set of chromosomes--that then divide through meiosis and create spores.

Death
Once a fungus has completed creating spores through meiosis, it effectively dies. The spores spread and the remaining stalk and hyphae do not got through another fruiting process. The remnants of the fungus then decompose in the soil.

Spore Development
Fungi begin their life as spores that are released from a fully grown fungi. After they are released, the cells of the spore divide and spread into hyphae. When hyphae formed from spores released by two different fungi meet, they may fuse together to create a single cell with two nuclei.
Mushroom
Once the two-nucleus cells, also called dikaryons, have matured, they develop into a fruiting body known as a mushroom. The nuclei of the cells in the mushroom will undergo further divisions and eventually form haploid cells--cells with a single set of chromosomes--that then divide through meiosis and create spores.

Death
Once a fungus has completed creating spores through meiosis, it effectively dies. The spores spread and the remaining stalk and hyphae do not got through another fruiting process. The remnants of the fungus then decompose in the soil.
0
0
文章
Miss Chen
2017年12月03日

According to the West Virginia Department of Natural Resources more than 1,700 species of mushrooms grow in fields and wooded areas of the state. Six varieties of morels have been documented growing in deciduous forests throughout the state during a brief period between mid-April and mid-May. If you are planning to hunt morels, do you homework or hunt with a knowledgeable person to avoid collecting the poisonous conifer false morel.

Canaan Valley
Located in the northeastern portion of West Virginia, the Canaan Valley is a forested areas known to have morels. Since these mushrooms grow wild and tend to grow where annual conditions are optimal, there is no one area designated as morel country. Morels have been found by locals in many areas of the valley and some finds are concentrated around higher forest elevations near 3,000 feet after the snow pack has disappeared.
Eastern Panhandle
The Eastern Panhandle of West Virginia consists of the areas around Martinsburg. Morels have been found in rural forested areas north and east of town by local recreational morel hunters. Morels are also located in the forested regions that border the Maryland state line.

Monongahela National Forest
The Monongahela National Forest covers a 919,000-acre area in the central part of West Virginia. The Forest takes up parts of 10 West Virginia counties. The higher western elevations of the forest leading up to the highest point at 4,863-foot Spruce Knob, have been known to produce morels in the wet early spring months of mid-April through mid-May. Look for morels near trees that attract the fungi, such as elm and ash, two of the 75 types of trees found in the national forest. elm trees may be a safer bet since some of West Virginia's ash population has been killed and removed due to ash borer beetles.
Monongahela National Forest 200 Sycamore St. Elkins, WV 26241 304-636-1800 fs.usda.gov

Canaan Valley
Located in the northeastern portion of West Virginia, the Canaan Valley is a forested areas known to have morels. Since these mushrooms grow wild and tend to grow where annual conditions are optimal, there is no one area designated as morel country. Morels have been found by locals in many areas of the valley and some finds are concentrated around higher forest elevations near 3,000 feet after the snow pack has disappeared.
Eastern Panhandle
The Eastern Panhandle of West Virginia consists of the areas around Martinsburg. Morels have been found in rural forested areas north and east of town by local recreational morel hunters. Morels are also located in the forested regions that border the Maryland state line.

Monongahela National Forest
The Monongahela National Forest covers a 919,000-acre area in the central part of West Virginia. The Forest takes up parts of 10 West Virginia counties. The higher western elevations of the forest leading up to the highest point at 4,863-foot Spruce Knob, have been known to produce morels in the wet early spring months of mid-April through mid-May. Look for morels near trees that attract the fungi, such as elm and ash, two of the 75 types of trees found in the national forest. elm trees may be a safer bet since some of West Virginia's ash population has been killed and removed due to ash borer beetles.
Monongahela National Forest 200 Sycamore St. Elkins, WV 26241 304-636-1800 fs.usda.gov
0
0
求助
Nathaniel Ziering
2017年12月02日

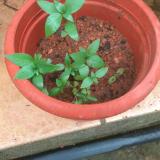
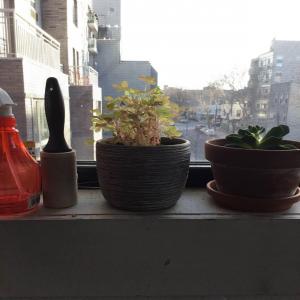
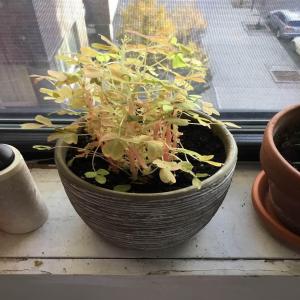
What kind of plant is this? I forgot what I purchased (again); believe was doing better with indirect sunlight but looking for species confirmation.


0
0
sunnyzou:Oxalis corniculata
文章
Miss Chen
2017年11月29日

Morel mushrooms belong to the Morchella genus, which contains at least six species. Cooks highly prize these mushrooms for their delicate, earthy flavor, especially in French cuisine. Morel mushrooms are difficult to grow on a large scale, so mushroom hunters meet commercial needs by harvesting wild morel mushrooms. Private gardeners also grow morel mushrooms indoors, although these mushrooms are slow to produce the fruiting bodies commonly known as caps.

Step 1
Punch drainage holes in the bottom of a shallow metal tray such as a cake pan to use as a fruiting tray. Clean the tray with a 5 percent solution of bleach to sterilize the pan.
Step 2
Prepare a substrate containing 50 percent organic compost, 30 percent potting soil and 20 percent sand. Add enough powdered limestone to this mixture to raise the soil pH to 7.2. Fill the trays to a depth of 2 inches with the substrate.
Step 3
Soak the substrate with water and allow it to drain completely. Add the morel mushroom spawn to the substrate according to the manufacturer's instructions.
Step 4
Place the fruiting tray indoors in a temperature-controlled growing room with no light. Maintain a temperature between 65 and 70 degrees Fahrenheit with at least 90 percent humidity. Hard lumps of mycelium known as schlerotia should form on the surface of the substrate in four to six weeks.

Step 5
Refrigerate the fruiting tray at 39 degrees Fahrenheit for two weeks. Slowly add 2 oz. of water to the fruiting tray for every square foot of the tray's surface area. Allow the water to drain from the fruiting tray for a full day.
Step 6
Place the fruiting tray back in the growing room. Keep the relative humidity of the room above 90 percent and maintain it at a temperature of about 72 degrees Fahrenheit. Use grow lights to provide 12 hours of light and 12 hours of darkness. The stalks of the morel mushrooms should appear within one week. Harvest the mushroom caps as they grow.

Step 1
Punch drainage holes in the bottom of a shallow metal tray such as a cake pan to use as a fruiting tray. Clean the tray with a 5 percent solution of bleach to sterilize the pan.
Step 2
Prepare a substrate containing 50 percent organic compost, 30 percent potting soil and 20 percent sand. Add enough powdered limestone to this mixture to raise the soil pH to 7.2. Fill the trays to a depth of 2 inches with the substrate.
Step 3
Soak the substrate with water and allow it to drain completely. Add the morel mushroom spawn to the substrate according to the manufacturer's instructions.
Step 4
Place the fruiting tray indoors in a temperature-controlled growing room with no light. Maintain a temperature between 65 and 70 degrees Fahrenheit with at least 90 percent humidity. Hard lumps of mycelium known as schlerotia should form on the surface of the substrate in four to six weeks.

Step 5
Refrigerate the fruiting tray at 39 degrees Fahrenheit for two weeks. Slowly add 2 oz. of water to the fruiting tray for every square foot of the tray's surface area. Allow the water to drain from the fruiting tray for a full day.
Step 6
Place the fruiting tray back in the growing room. Keep the relative humidity of the room above 90 percent and maintain it at a temperature of about 72 degrees Fahrenheit. Use grow lights to provide 12 hours of light and 12 hours of darkness. The stalks of the morel mushrooms should appear within one week. Harvest the mushroom caps as they grow.
0
0
文章
Miss Chen
2017年11月28日

Considered by some to be a delicacy surpassed only by truffles, morel mushrooms are one of the most highly coveted species of wild fungi. Because of their preference for growing in moist, but not wet areas, morel mushrooms grow predominantly in the wild in shaded areas of south facing slopes. As morels are one of the most easily recognizable of all wild mushroom species, you can easily tell if it's a morel mushroom by looking for a few unique characteristics.

Step 1
Look for an elongated, cone shaped cap. Morels have a cap that flares out from the top of the stem and almost immediately begins to taper to a rounded top.
Step 2
Examine the distinctively identifying irregular honeycomb, latticework structure covering the entire cap of the mushroom. The raised lattice-like ridges are highly discernable with deep, clearly defined cavities between ridges. This honeycomb characteristic alone is enough to positively identify a morel mushroom, as no other species of wild mushroom has this trait.
Step 3
Cut the morel lengthwise, down the middle of the stem and cap, with a knife. Both the stem and cap on morels are completely hollow.

Step 4
Inspect the cut stem of the mushroom. Neophyte mushroom hunters sometimes mistake "false morels" for actual morels. However, confusion is easily eliminated. False morels have a smooth, irregular shaped, wavy cap somewhat resembling brain matter. Additionally, the stem of false morels is solid and continues all the way to the top of the mushroom's cap. The stem of a true morel ends where the stem joins the base of its cap.

Step 1
Look for an elongated, cone shaped cap. Morels have a cap that flares out from the top of the stem and almost immediately begins to taper to a rounded top.
Step 2
Examine the distinctively identifying irregular honeycomb, latticework structure covering the entire cap of the mushroom. The raised lattice-like ridges are highly discernable with deep, clearly defined cavities between ridges. This honeycomb characteristic alone is enough to positively identify a morel mushroom, as no other species of wild mushroom has this trait.
Step 3
Cut the morel lengthwise, down the middle of the stem and cap, with a knife. Both the stem and cap on morels are completely hollow.

Step 4
Inspect the cut stem of the mushroom. Neophyte mushroom hunters sometimes mistake "false morels" for actual morels. However, confusion is easily eliminated. False morels have a smooth, irregular shaped, wavy cap somewhat resembling brain matter. Additionally, the stem of false morels is solid and continues all the way to the top of the mushroom's cap. The stem of a true morel ends where the stem joins the base of its cap.
0
0
文章
Miss Chen
2017年11月28日

Enoki mushrooms, Flammulina velutipes, sprout white bodies with thin stems and traditional mushroom caps. Like other mushrooms species, including shiitakes and oysters, enokis are sometimes used medicinally, to treat liver infections and boost immune system responses. Some even believe that these tiny mushrooms can help reduce tumors. Growing these enokis at home requires careful application of warmth, cold and humidity at different times during the growth cycle.

Step 1
Clean and sterilize clear plastic bottles or cylinders, each measuring about 8 inches tall. Wash the bottles with antibacterial soap and rinse thoroughly with warm water to ensure that no residual soap remains.
Step 2
Mix aged hardwood sawdust or professional mushroom growth medium with enoki spawn. You can find the spawn, as well as growing mediums, at garden centers, nurseries or mushroom-specialty retailers. The spawn must be thoroughly mixed into the medium to encourage growth.
Step 3
Fill the plastic bottles with the inculcated growing medium. Store the bottles in an area with temperatures ranging between 72 and 77 degrees F and a relative humidity above 90 percent. Light exposure does not matter; the humidity and high temperature will encourage the spawn to grow.

Step 4
Check the bottles after two weeks of growth. You should see thin strands of mycelium starting to spread throughout the bottle; this is essentially the mushroom roots. Keep the enoki spawn in the warm, humid environment until the mycelium has completely covered the growing medium; this can take anywhere from two weeks to a month.
Step 5
Transport the bottles to a cool area, with temperatures ranging between 50 and 65 degrees F. Humidity can drop as low as is necessary in this cooler place. Again, sun exposure does not matter. The sudden change in atmosphere will cause the mycelium to produce the characteristic mushroom bodies; these can be harvested within 60 days of initial production.

Step 1
Clean and sterilize clear plastic bottles or cylinders, each measuring about 8 inches tall. Wash the bottles with antibacterial soap and rinse thoroughly with warm water to ensure that no residual soap remains.
Step 2
Mix aged hardwood sawdust or professional mushroom growth medium with enoki spawn. You can find the spawn, as well as growing mediums, at garden centers, nurseries or mushroom-specialty retailers. The spawn must be thoroughly mixed into the medium to encourage growth.
Step 3
Fill the plastic bottles with the inculcated growing medium. Store the bottles in an area with temperatures ranging between 72 and 77 degrees F and a relative humidity above 90 percent. Light exposure does not matter; the humidity and high temperature will encourage the spawn to grow.

Step 4
Check the bottles after two weeks of growth. You should see thin strands of mycelium starting to spread throughout the bottle; this is essentially the mushroom roots. Keep the enoki spawn in the warm, humid environment until the mycelium has completely covered the growing medium; this can take anywhere from two weeks to a month.
Step 5
Transport the bottles to a cool area, with temperatures ranging between 50 and 65 degrees F. Humidity can drop as low as is necessary in this cooler place. Again, sun exposure does not matter. The sudden change in atmosphere will cause the mycelium to produce the characteristic mushroom bodies; these can be harvested within 60 days of initial production.
0
0
文章
Miss Chen
2017年11月27日

Considered by some to be a delicacy surpassed only by truffles, morel mushrooms are one of the most highly coveted species of wild fungi. Because of their preference for growing in moist, but not wet areas, morel mushrooms grow predominantly in the wild in shaded areas of south facing slopes. As morels are one of the most easily recognizable of all wild mushroom species, you can easily tell if it's a morel mushroom by looking for a few unique characteristics.

Step 1
Look for an elongated, cone shaped cap. Morels have a cap that flares out from the top of the stem and almost immediately begins to taper to a rounded top.
Step 2
Examine the distinctively identifying irregular honeycomb, latticework structure covering the entire cap of the mushroom. The raised lattice-like ridges are highly discernable with deep, clearly defined cavities between ridges. This honeycomb characteristic alone is enough to positively identify a morel mushroom, as no other species of wild mushroom has this trait.
Step 3
Cut the morel lengthwise, down the middle of the stem and cap, with a knife. Both the stem and cap on morels are completely hollow.

Step 4
Inspect the cut stem of the mushroom. Neophyte mushroom hunters sometimes mistake "false morels" for actual morels. However, confusion is easily eliminated. False morels have a smooth, irregular shaped, wavy cap somewhat resembling brain matter. Additionally, the stem of false morels is solid and continues all the way to the top of the mushroom's cap. The stem of a true morel ends where the stem joins the base of its cap.

Step 1
Look for an elongated, cone shaped cap. Morels have a cap that flares out from the top of the stem and almost immediately begins to taper to a rounded top.
Step 2
Examine the distinctively identifying irregular honeycomb, latticework structure covering the entire cap of the mushroom. The raised lattice-like ridges are highly discernable with deep, clearly defined cavities between ridges. This honeycomb characteristic alone is enough to positively identify a morel mushroom, as no other species of wild mushroom has this trait.
Step 3
Cut the morel lengthwise, down the middle of the stem and cap, with a knife. Both the stem and cap on morels are completely hollow.

Step 4
Inspect the cut stem of the mushroom. Neophyte mushroom hunters sometimes mistake "false morels" for actual morels. However, confusion is easily eliminated. False morels have a smooth, irregular shaped, wavy cap somewhat resembling brain matter. Additionally, the stem of false morels is solid and continues all the way to the top of the mushroom's cap. The stem of a true morel ends where the stem joins the base of its cap.
0
0
文章
Miss Chen
2017年11月27日

Enoki mushrooms, Flammulina velutipes, sprout white bodies with thin stems and traditional mushroom caps. Like other mushrooms species, including shiitakes and oysters, enokis are sometimes used medicinally, to treat liver infections and boost immune system responses. Some even believe that these tiny mushrooms can help reduce tumors. Growing these enokis at home requires careful application of warmth, cold and humidity at different times during the growth cycle.

Step 1
Clean and sterilize clear plastic bottles or cylinders, each measuring about 8 inches tall. Wash the bottles with antibacterial soap and rinse thoroughly with warm water to ensure that no residual soap remains.
Step 2
Mix aged hardwood sawdust or professional mushroom growth medium with enoki spawn. You can find the spawn, as well as growing mediums, at garden centers, nurseries or mushroom-specialty retailers. The spawn must be thoroughly mixed into the medium to encourage growth.
Step 3
Fill the plastic bottles with the inculcated growing medium. Store the bottles in an area with temperatures ranging between 72 and 77 degrees F and a relative humidity above 90 percent. Light exposure does not matter; the humidity and high temperature will encourage the spawn to grow.

Step 4
Check the bottles after two weeks of growth. You should see thin strands of mycelium starting to spread throughout the bottle; this is essentially the mushroom roots. Keep the enoki spawn in the warm, humid environment until the mycelium has completely covered the growing medium; this can take anywhere from two weeks to a month.
Step 5
Transport the bottles to a cool area, with temperatures ranging between 50 and 65 degrees F. Humidity can drop as low as is necessary in this cooler place. Again, sun exposure does not matter. The sudden change in atmosphere will cause the mycelium to produce the characteristic mushroom bodies; these can be harvested within 60 days of initial production.

Step 1
Clean and sterilize clear plastic bottles or cylinders, each measuring about 8 inches tall. Wash the bottles with antibacterial soap and rinse thoroughly with warm water to ensure that no residual soap remains.
Step 2
Mix aged hardwood sawdust or professional mushroom growth medium with enoki spawn. You can find the spawn, as well as growing mediums, at garden centers, nurseries or mushroom-specialty retailers. The spawn must be thoroughly mixed into the medium to encourage growth.
Step 3
Fill the plastic bottles with the inculcated growing medium. Store the bottles in an area with temperatures ranging between 72 and 77 degrees F and a relative humidity above 90 percent. Light exposure does not matter; the humidity and high temperature will encourage the spawn to grow.

Step 4
Check the bottles after two weeks of growth. You should see thin strands of mycelium starting to spread throughout the bottle; this is essentially the mushroom roots. Keep the enoki spawn in the warm, humid environment until the mycelium has completely covered the growing medium; this can take anywhere from two weeks to a month.
Step 5
Transport the bottles to a cool area, with temperatures ranging between 50 and 65 degrees F. Humidity can drop as low as is necessary in this cooler place. Again, sun exposure does not matter. The sudden change in atmosphere will cause the mycelium to produce the characteristic mushroom bodies; these can be harvested within 60 days of initial production.
0
0
文章
Miss Chen
2017年11月27日

Morel mushrooms belong to the Morchella genus, which contains at least six species. Cooks highly prize these mushrooms for their delicate, earthy flavor, especially in French cuisine. Morel mushrooms are difficult to grow on a large scale, so mushroom hunters meet commercial needs by harvesting wild morel mushrooms. Private gardeners also grow morel mushrooms indoors, although these mushrooms are slow to produce the fruiting bodies commonly known as caps.

Step 1
Punch drainage holes in the bottom of a shallow metal tray such as a cake pan to use as a fruiting tray. Clean the tray with a 5 percent solution of bleach to sterilize the pan.
Step 2
Prepare a substrate containing 50 percent organic compost, 30 percent potting soil and 20 percent sand. Add enough powdered limestone to this mixture to raise the soil pH to 7.2. Fill the trays to a depth of 2 inches with the substrate.
Step 3
Soak the substrate with water and allow it to drain completely. Add the morel mushroom spawn to the substrate according to the manufacturer's instructions.
Step 4
Place the fruiting tray indoors in a temperature-controlled growing room with no light. Maintain a temperature between 65 and 70 degrees Fahrenheit with at least 90 percent humidity. Hard lumps of mycelium known as schlerotia should form on the surface of the substrate in four to six weeks.

Step 5
Refrigerate the fruiting tray at 39 degrees Fahrenheit for two weeks. Slowly add 2 oz. of water to the fruiting tray for every square foot of the tray's surface area. Allow the water to drain from the fruiting tray for a full day.
Step 6
Place the fruiting tray back in the growing room. Keep the relative humidity of the room above 90 percent and maintain it at a temperature of about 72 degrees Fahrenheit. Use grow lights to provide 12 hours of light and 12 hours of darkness. The stalks of the morel mushrooms should appear within one week. Harvest the mushroom caps as they grow.

Step 1
Punch drainage holes in the bottom of a shallow metal tray such as a cake pan to use as a fruiting tray. Clean the tray with a 5 percent solution of bleach to sterilize the pan.
Step 2
Prepare a substrate containing 50 percent organic compost, 30 percent potting soil and 20 percent sand. Add enough powdered limestone to this mixture to raise the soil pH to 7.2. Fill the trays to a depth of 2 inches with the substrate.
Step 3
Soak the substrate with water and allow it to drain completely. Add the morel mushroom spawn to the substrate according to the manufacturer's instructions.
Step 4
Place the fruiting tray indoors in a temperature-controlled growing room with no light. Maintain a temperature between 65 and 70 degrees Fahrenheit with at least 90 percent humidity. Hard lumps of mycelium known as schlerotia should form on the surface of the substrate in four to six weeks.

Step 5
Refrigerate the fruiting tray at 39 degrees Fahrenheit for two weeks. Slowly add 2 oz. of water to the fruiting tray for every square foot of the tray's surface area. Allow the water to drain from the fruiting tray for a full day.
Step 6
Place the fruiting tray back in the growing room. Keep the relative humidity of the room above 90 percent and maintain it at a temperature of about 72 degrees Fahrenheit. Use grow lights to provide 12 hours of light and 12 hours of darkness. The stalks of the morel mushrooms should appear within one week. Harvest the mushroom caps as they grow.
0
0


