Lucky Coyote
2018年05月09日

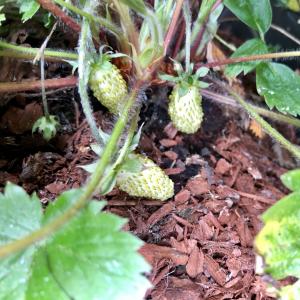
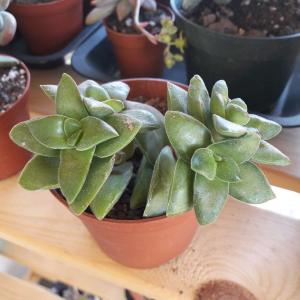
there are these peculiar flowers that started growing in my area this spring :3 the strange this is that they look strikingly similar to young corn unt they bloom


3
0
成长记
Lucky Coyote
2018年05月09日

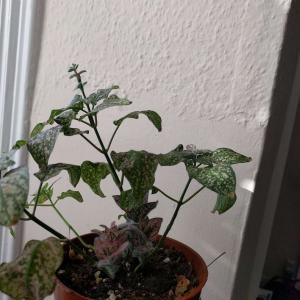
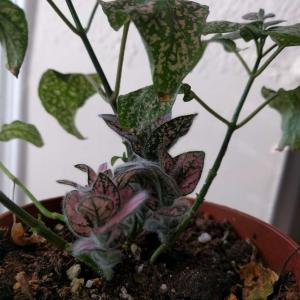
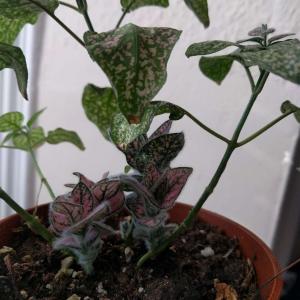
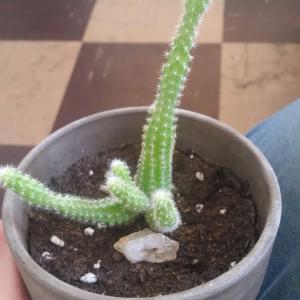
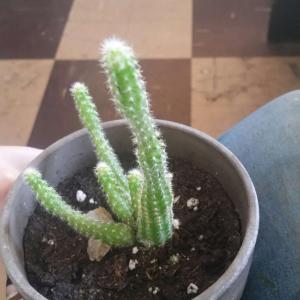
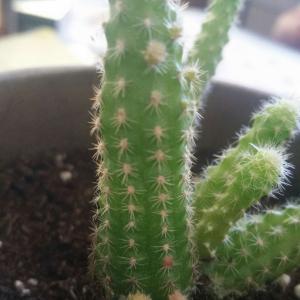
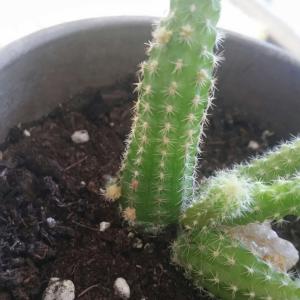
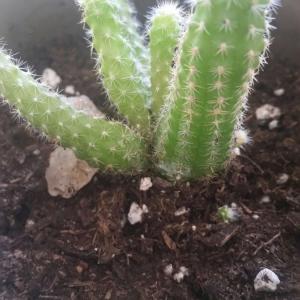
actually doing very well after I transplanted it into my new soil mix :3 I'm a little confused about what those red bulbs growing out of its side, but otherwise amazing.


0
0
文章
Miss Chen
2018年04月29日

If you're a vegetable gardener who enjoys growing green beans (Phaseolus vulgaris), you can choose from dozens of different varieties, all flavorful when picked at their peak from a home garden. For a bean that's equally good picked young or at a more mature stage, try a flat-podded green bean variety. Often called Italian beans, the plants thrive and produce a heavy crop when given sun, well-drained soil and a bit of extra care.

Getting Started
Like all green beans, Italian beans are frost-sensitive and grow as annuals in all parts of the United States. If winter temperatures drop below freezing and spring is cool where you live, wait until all danger of frost has passed and your soil temperature is at least 60 degrees Fahrenheit, to ensure seed germination by eight to 10 days after planting.
You can choose Italian beans that grow as tall vines -- pole beans -- or as more upright plants -- bush beans. For example, a cultivar called 'Romano' is a pole bean that's 6 to 9 feet tall and yields beans in about 60 days, while a bush variety of 'Roma II' is only about 20 inches tall and takes 53 days to produce beans for harvest. If you grow a pole type, space seeds about 4 to 6 inches apart in rows, or plant in small hills, with four to six seeds per hill. Space rows about 3 feet apart and allow 30 inches between hills. For bush beans, plant in rows with 2 to 4 inches between seeds and 18 to 24 inches between rows. For any type, plant seeds about 1 inch deep and water well after planting.
Sun, Soil and Water
For strong plants that produce a heavy crop of beans, choose a planting spot that gets full sun for most of the day. These plants grow in any type of garden soil that's well-drained and don't require fertilization. Instead of fertilizing, boost the soil's fertility by adding about 2 inches of compost to your planting area before seeding, mixing it into the soil well.

The plants do best when they receive even moisture. One inch of water each week, including rain, is ideal. Good moisture is especially important during blooming and when pods start forming, so provide extra water during dry spells. Water with a soaker hose or drip irrigation to keep foliage dry and prevent fungal growth. Adding about 2 inches of mulch under the plants also helps conserve soil moisture.
Other Requirements
If you grow pole-type Italian beans, provide a trellis or fence at least 5 feet tall to keep vines off the soil, but set this in place before planting to avoid damaging plant roots. The plants produce tendrils that naturally adhere to wire or string.

Getting Started
Like all green beans, Italian beans are frost-sensitive and grow as annuals in all parts of the United States. If winter temperatures drop below freezing and spring is cool where you live, wait until all danger of frost has passed and your soil temperature is at least 60 degrees Fahrenheit, to ensure seed germination by eight to 10 days after planting.
You can choose Italian beans that grow as tall vines -- pole beans -- or as more upright plants -- bush beans. For example, a cultivar called 'Romano' is a pole bean that's 6 to 9 feet tall and yields beans in about 60 days, while a bush variety of 'Roma II' is only about 20 inches tall and takes 53 days to produce beans for harvest. If you grow a pole type, space seeds about 4 to 6 inches apart in rows, or plant in small hills, with four to six seeds per hill. Space rows about 3 feet apart and allow 30 inches between hills. For bush beans, plant in rows with 2 to 4 inches between seeds and 18 to 24 inches between rows. For any type, plant seeds about 1 inch deep and water well after planting.
Sun, Soil and Water
For strong plants that produce a heavy crop of beans, choose a planting spot that gets full sun for most of the day. These plants grow in any type of garden soil that's well-drained and don't require fertilization. Instead of fertilizing, boost the soil's fertility by adding about 2 inches of compost to your planting area before seeding, mixing it into the soil well.

The plants do best when they receive even moisture. One inch of water each week, including rain, is ideal. Good moisture is especially important during blooming and when pods start forming, so provide extra water during dry spells. Water with a soaker hose or drip irrigation to keep foliage dry and prevent fungal growth. Adding about 2 inches of mulch under the plants also helps conserve soil moisture.
Other Requirements
If you grow pole-type Italian beans, provide a trellis or fence at least 5 feet tall to keep vines off the soil, but set this in place before planting to avoid damaging plant roots. The plants produce tendrils that naturally adhere to wire or string.
0
0
文章
Miss Chen
2018年04月29日

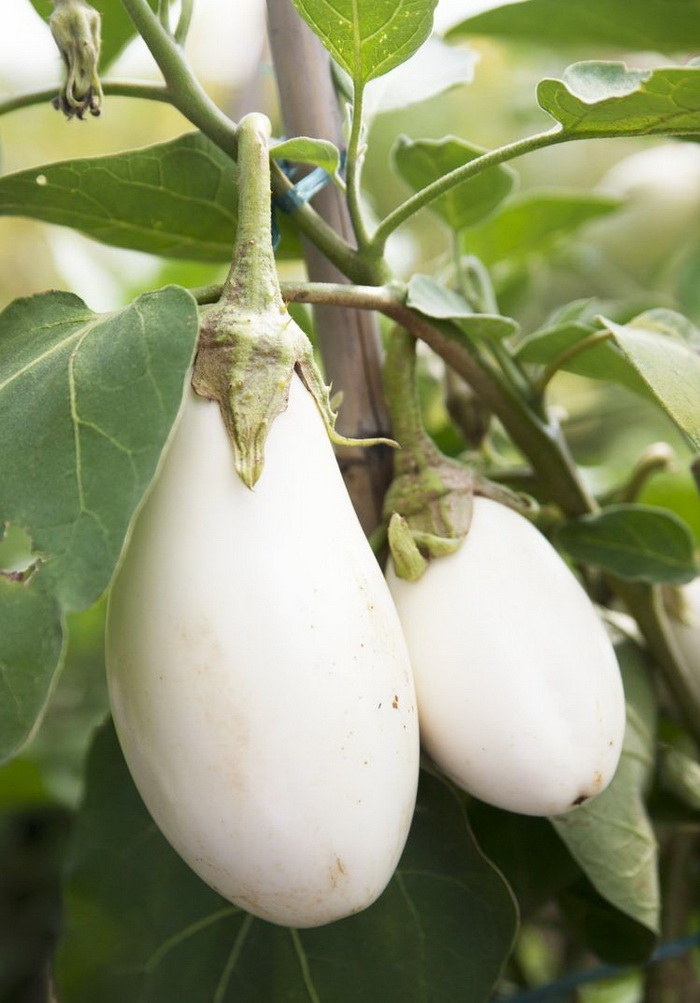
When growing exotics like white eggplants (Solanum melongena var. esculentum), it's not always easy to tell when the fruit is ready for picking, but even these ghostly varieties tell you when to harvest with their subtle signs.
White vs. Purple Eggplants
Eggplants, both the traditional purple varieties and the exotic-looking white ones belong to the group of culinary or edible eggplants listed under the scientific name Solanum melongena var. esculentum, or alternately Solanum esculentum__. They are frost-tender perennials which grow in U.S. Department of Agriculture plant hardiness zones 9 through 12. In the vegetable garden eggplants typically are treated as annuals in all climates.
Identifying Ripe Eggplants
White edible eggplants turn ivory or white when ripe and have a glossy sheen. Once overripe, the skin starts to take on a yellow hue and loses its shine. Ripe white eggplants feel firm to the touch with a slight give when pressed. Cut one open and the seeds will look white or cream. Once the seeds start to darken, the white eggplant is overripe. White eggplants take about 75 days from planting to harvest, with some variation depending on the individual variety. Overripe eggplants get spongy and take on a bitter taste.
How to Harvest
Step 1
Put on gloves to protect your hands from the slightly prickly eggplant stems.
Step 2
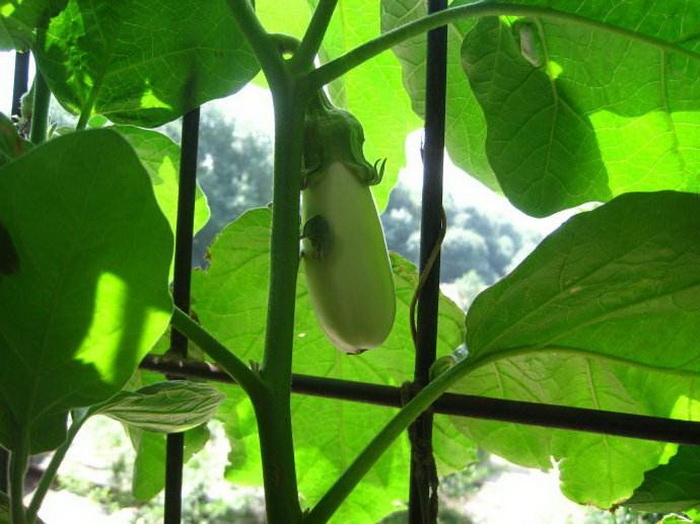
Hold the ripe white eggplant in one hand and cut through the thick stem right above the point where it attaches to the fruit. Eggplants have a green hat-shaped stem that grows over the top part of the fruit. Make your cut right above this point.
Step 3
Sanitize your knife blade before harvesting other garden vegetables by soaking it for five minutes in a container filled with equal parts rubbing alcohol and water. Allow the blade to dry before closing or storing.
Edible White Eggplant Varieties
'Casper' (Solanum melongena var. esculentum 'Casper') is an ivory or cream white eggplant variety with mature fruits that grow 5 to 6 inches long. It has a delicate flavor and texture. 'Casper' takes 70 days to mature for harvest.
'Easter Egg' (Solanum melongena var. esculentum 'Easter Egg') looks a bit like an egg with its slightly oblong, rounded shape and white skin. This little edible eggplant that also has ornamental value and is ready for harvest 52 to 64 days after planting.
The hybrid variety 'Gretel' (Solanum melongena var. _esculentum 'Gretel'_) is a miniature white eggplant with a mature size of 3 to 4 inches long. You can start harvesting 'Gretel' 55 days after planting. If you're looking for an eggplant to grow in a container, try this dwarf variety.
'Comet' (Solanum melongena var. esculentum 'Comet'), a hybrid eggplant variety that ripens to pure white, has 10-inch-long, 2-inch-diameter fruits. 'Comet' has thin, delicate skin and takes 70 days from planting to harvest.
'White Star' (Solanum melongena var. _esculentum 'White Star'),_ is a hybrid type with oblong, white-skinned fruit. This mild, slightly sweet eggplant variety takes 75 days from planting to harvest.

White vs. Purple Eggplants
Eggplants, both the traditional purple varieties and the exotic-looking white ones belong to the group of culinary or edible eggplants listed under the scientific name Solanum melongena var. esculentum, or alternately Solanum esculentum__. They are frost-tender perennials which grow in U.S. Department of Agriculture plant hardiness zones 9 through 12. In the vegetable garden eggplants typically are treated as annuals in all climates.
Identifying Ripe Eggplants
White edible eggplants turn ivory or white when ripe and have a glossy sheen. Once overripe, the skin starts to take on a yellow hue and loses its shine. Ripe white eggplants feel firm to the touch with a slight give when pressed. Cut one open and the seeds will look white or cream. Once the seeds start to darken, the white eggplant is overripe. White eggplants take about 75 days from planting to harvest, with some variation depending on the individual variety. Overripe eggplants get spongy and take on a bitter taste.
How to Harvest
Step 1
Put on gloves to protect your hands from the slightly prickly eggplant stems.
Step 2
Hold the ripe white eggplant in one hand and cut through the thick stem right above the point where it attaches to the fruit. Eggplants have a green hat-shaped stem that grows over the top part of the fruit. Make your cut right above this point.

Step 3
Sanitize your knife blade before harvesting other garden vegetables by soaking it for five minutes in a container filled with equal parts rubbing alcohol and water. Allow the blade to dry before closing or storing.
Edible White Eggplant Varieties
'Casper' (Solanum melongena var. esculentum 'Casper') is an ivory or cream white eggplant variety with mature fruits that grow 5 to 6 inches long. It has a delicate flavor and texture. 'Casper' takes 70 days to mature for harvest.
'Easter Egg' (Solanum melongena var. esculentum 'Easter Egg') looks a bit like an egg with its slightly oblong, rounded shape and white skin. This little edible eggplant that also has ornamental value and is ready for harvest 52 to 64 days after planting.
The hybrid variety 'Gretel' (Solanum melongena var. _esculentum 'Gretel'_) is a miniature white eggplant with a mature size of 3 to 4 inches long. You can start harvesting 'Gretel' 55 days after planting. If you're looking for an eggplant to grow in a container, try this dwarf variety.
'Comet' (Solanum melongena var. esculentum 'Comet'), a hybrid eggplant variety that ripens to pure white, has 10-inch-long, 2-inch-diameter fruits. 'Comet' has thin, delicate skin and takes 70 days from planting to harvest.
'White Star' (Solanum melongena var. _esculentum 'White Star'),_ is a hybrid type with oblong, white-skinned fruit. This mild, slightly sweet eggplant variety takes 75 days from planting to harvest.
0
0
文章
Miss Chen
2018年04月26日

Shallots have a delicate and slightly sweet taste similar to both onions and garlic. Since purchasing market shallots tends to be expensive, gardeners are discovering the ease and simplicity of growing shallots themselves. Shallots offer the grower an inexpensive way to have a ready supply of this onion relative for a fraction of the store price. Shallots grow in a similar fashion to garlic. Gardeners are able to move shallots grown in containers to different locations to protect them from excessive heat.

Step 1
Prepare the shallot containers four to six weeks before the last frost. One shallot clove grows comfortably in a container 6 inches in diameter. The containers must have adequate drainage holes in the bottom. If the containers do not, use a drill bit on a power drill to make the required drainage holes.
Step 2
Fill the containers with a mixture containing equal parts potting soil and leaf mold. Substitute bagged compost, sold at garden centers, for the leaf mold if the organic matter is unavailable.
Step 3
Separate the individual shallot cloves from the larger shallot bulb with gentle pressure from your thumb.

Step 4
Insert one shallot clove, root-end downward, into the potting mixture. Plant the clove shallowly so the tip is level with the soil. Shallot cloves buried too deeply under the soil find it difficult to produce sprouts strong enough to break through.
Step 5
Transport the shallot containers to an area in full sun. Shallots prefer full sun but also thrive in partial shade if the afternoon heat of summer becomes extreme.
Step 6
Water the shallot cloves with a gentle spray to avoid displacing the soil and exposing more clove than necessary. Continue to water the shallots once per day to avoid the soil from drying out.
Step 7
Feed the shallots a diluted solution of general fertilizer during the middle of the growing season, following package instructions. Most fertilizer guidelines instruct you to use equal parts fertilizer and water for proper dilution.
Step 8
Harvest the shallots when the green foliage has yellowed and wilted over. Scoop the shallot bulbs out of the soil by using your hands or a garden fork to raise them above the dirt.

Step 1
Prepare the shallot containers four to six weeks before the last frost. One shallot clove grows comfortably in a container 6 inches in diameter. The containers must have adequate drainage holes in the bottom. If the containers do not, use a drill bit on a power drill to make the required drainage holes.
Step 2
Fill the containers with a mixture containing equal parts potting soil and leaf mold. Substitute bagged compost, sold at garden centers, for the leaf mold if the organic matter is unavailable.
Step 3
Separate the individual shallot cloves from the larger shallot bulb with gentle pressure from your thumb.

Step 4
Insert one shallot clove, root-end downward, into the potting mixture. Plant the clove shallowly so the tip is level with the soil. Shallot cloves buried too deeply under the soil find it difficult to produce sprouts strong enough to break through.
Step 5
Transport the shallot containers to an area in full sun. Shallots prefer full sun but also thrive in partial shade if the afternoon heat of summer becomes extreme.
Step 6
Water the shallot cloves with a gentle spray to avoid displacing the soil and exposing more clove than necessary. Continue to water the shallots once per day to avoid the soil from drying out.
Step 7
Feed the shallots a diluted solution of general fertilizer during the middle of the growing season, following package instructions. Most fertilizer guidelines instruct you to use equal parts fertilizer and water for proper dilution.
Step 8
Harvest the shallots when the green foliage has yellowed and wilted over. Scoop the shallot bulbs out of the soil by using your hands or a garden fork to raise them above the dirt.
0
0
成长记
Naisk
2018年04月25日

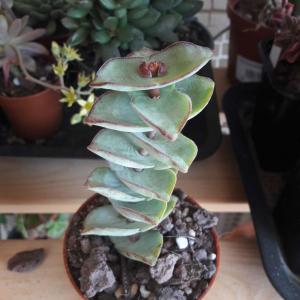
The wind threw them off the shelf, I kept the broken one and sold the 3 other. Two heads are now growing :)

0
0
文章
Miss Chen
2018年04月19日

You can create a low-cost patio garden by growing cucumbers in a 5-gallon bucket. The process requires few supplies and works as well as using more expensive containers sold at garden supply stores. You can purchase a new bucket from a home supply store or recycle one used for food storage, although you want to avoid using buckets that previously contained chemicals to prevent passing toxic residue to the cucumbers you are consuming. This technique also works well for other vegetable plants, including peppers, squash and tomatoes.

Step 1
Wash the 5-gallon bucket with soap and water to remove all dirt and residue. Rinse the bucket well and let it air-dry.
Step 2
Drill six to eight half-inch-diameter drainage holes through the bottom of the bucket to prevent water pooling around the roots. Space the holes evenly for best results with drainage.
Step 3
Fill the bucket two inches from the top with a well-draining vegetable potting soil available at garden supply stores.
Step 4
Mix a slow-release vegetable fertilizer into the soil to provide nutrients throughout the growing season. A second option for fertilizer is to apply a 20-20-20 water-soluble fertilizer to the soil every other week from planting to harvest.

Step 5
Dig a 4-inch-deep hole in the center of the bucket. Remove the cucumber seedling from the growing container and set the root ball into the hole so the first set of leaves is just above the soil level.
Step 6
Place the bucket in an area that receives full sun. Set the bucket on two bricks or wood blocks to keep the bottom elevated for proper drainage.
Step 7
Soak the soil with water until it flows out the bottom drainage holes. Apply water to the soil, instead of pouring it over the plant. Monitor the soil moisture and provide supplemental water three or four times a week to keep it evenly moist. Container growing environments dry out quickly during periods of no rain.
Step 8
Harvest the cucumbers once they reach a mature length to stimulate new blossom and cucumber growth. Read the information listed on the seedling package or seed packet to determine the approximate mature length of the variety planted.

Step 1
Wash the 5-gallon bucket with soap and water to remove all dirt and residue. Rinse the bucket well and let it air-dry.
Step 2
Drill six to eight half-inch-diameter drainage holes through the bottom of the bucket to prevent water pooling around the roots. Space the holes evenly for best results with drainage.
Step 3
Fill the bucket two inches from the top with a well-draining vegetable potting soil available at garden supply stores.
Step 4
Mix a slow-release vegetable fertilizer into the soil to provide nutrients throughout the growing season. A second option for fertilizer is to apply a 20-20-20 water-soluble fertilizer to the soil every other week from planting to harvest.

Step 5
Dig a 4-inch-deep hole in the center of the bucket. Remove the cucumber seedling from the growing container and set the root ball into the hole so the first set of leaves is just above the soil level.
Step 6
Place the bucket in an area that receives full sun. Set the bucket on two bricks or wood blocks to keep the bottom elevated for proper drainage.
Step 7
Soak the soil with water until it flows out the bottom drainage holes. Apply water to the soil, instead of pouring it over the plant. Monitor the soil moisture and provide supplemental water three or four times a week to keep it evenly moist. Container growing environments dry out quickly during periods of no rain.
Step 8
Harvest the cucumbers once they reach a mature length to stimulate new blossom and cucumber growth. Read the information listed on the seedling package or seed packet to determine the approximate mature length of the variety planted.
0
1
文章
Miss Chen
2018年04月17日

If you want an abundant crop of orange pumpkins for use at Halloween or for making pies for Thanksgiving, Ohioans must prepare a garden plot and plant after danger of frost passes in spring. Depending on pumpkin cultivar, a warm growing period of 100 to 120 days allows the pumpkin vine to flower and develop harvestable fruits. If possible, time the spring planting so that the pumpkins ripen on the vine in early October.

Planting Time
Pumpkins do not tolerate frost. Across the vast majority of Ohio, the last frost in spring occurs anytime from April 21 to May 10, depending on latitude and elevation. Contact your local cooperative extension office to learn of the last spring frost date in your county, or speak to staff at your local garden center. Wait an additional two to four weeks after your area's last frost date to allow the garden soil to sufficiently warm to at least 65 degrees Fahrenheit. An appropriate pumpkin planting time frame is from mid-May to early June in most parts of Ohio.
Timing Considerations
Because pumpkins take 100 to 120 days from germination to harvest, you don't want to plant pumpkin seeds or transplants too early in spring. Although you must avoid frost, cool soil temperatures inhibit growth and may lead to root rot. Pumpkins tend to soften and rot on the vine if they ripen too early, such as in late August or September. Aim for pumpkins to pick around October 1. Look at the pumpkin seed packet for the "days to harvest" data. Count backward that number of days from the target October harvest date. This provides you the ideal sowing date in your Ohio locale.
Planting Pumpkin Seeds
Sow pumpkin seeds in hills. A hill is a shallow planting basin about 1 inch deep and 6 to 10 inches wide. Place four or five pumpkin seeds in the hill and cover with 1 inch of soil. Additional hills need to be spaced 6 to 10 feet apart. Hills oriented in long rows need about 15 feet between rows. This allows room for the sprawling vines to grow and still receive ample sunlight.

Growing Giant Pumpkins
Everyone admires a gigantic pumpkin to use as a jack-o' lantern around Halloween. The pumpkin varieties that produce the largest fruits need at least 120 days to germinate, grow and produce ripe pumpkins. According to David A. Mangione of the Ohio State University Extension, it's behooving to start seeds of these long-maturation pumpkins indoors about two weeks before planting them outdoors. He suggests sowing seeds indoors in late April and transplanted them outdoors in May or June when soil is warm and frosts no longer occur.

Planting Time
Pumpkins do not tolerate frost. Across the vast majority of Ohio, the last frost in spring occurs anytime from April 21 to May 10, depending on latitude and elevation. Contact your local cooperative extension office to learn of the last spring frost date in your county, or speak to staff at your local garden center. Wait an additional two to four weeks after your area's last frost date to allow the garden soil to sufficiently warm to at least 65 degrees Fahrenheit. An appropriate pumpkin planting time frame is from mid-May to early June in most parts of Ohio.
Timing Considerations
Because pumpkins take 100 to 120 days from germination to harvest, you don't want to plant pumpkin seeds or transplants too early in spring. Although you must avoid frost, cool soil temperatures inhibit growth and may lead to root rot. Pumpkins tend to soften and rot on the vine if they ripen too early, such as in late August or September. Aim for pumpkins to pick around October 1. Look at the pumpkin seed packet for the "days to harvest" data. Count backward that number of days from the target October harvest date. This provides you the ideal sowing date in your Ohio locale.
Planting Pumpkin Seeds
Sow pumpkin seeds in hills. A hill is a shallow planting basin about 1 inch deep and 6 to 10 inches wide. Place four or five pumpkin seeds in the hill and cover with 1 inch of soil. Additional hills need to be spaced 6 to 10 feet apart. Hills oriented in long rows need about 15 feet between rows. This allows room for the sprawling vines to grow and still receive ample sunlight.

Growing Giant Pumpkins
Everyone admires a gigantic pumpkin to use as a jack-o' lantern around Halloween. The pumpkin varieties that produce the largest fruits need at least 120 days to germinate, grow and produce ripe pumpkins. According to David A. Mangione of the Ohio State University Extension, it's behooving to start seeds of these long-maturation pumpkins indoors about two weeks before planting them outdoors. He suggests sowing seeds indoors in late April and transplanted them outdoors in May or June when soil is warm and frosts no longer occur.
0
0
文章
Miss Chen
2018年04月17日

Growing lettuce (Lactuca sativa) in your garden means you can have the freshest leaves for perfectly crisp salads. To enjoy the best-tasting fruits of your labors, it all comes down to picking the lettuce leaves at the right time and storing the lettuce correctly after you've harvested it.

Check Your Calendar
How long it is since you sowed the seeds provides a quick way to estimate when lettuce should be ready for harvesting.
A crisphead lettuce variety, which grows into a hard, tight head of leaves, is ready for harvesting approximately 75 days after planting.
As their name implies, loose-leaf lettuces don't form a head and are ready in as little as 45 days.
Butterhead varieties, which soft heads of loose leaves, are ready in 55 to 75 days.
Romaine varieties grow into tall, cylindrical heads of folded leaves and take approximately 70 days to mature.
Pick It Early
Pick lettuce in the early morning before the heat of the day causes the lettuce leaves to lose their crispness. Lettuce is fresher and crisper at this time and also tastes sweeter.
Test for Readiness
For loose-leaf lettuce varieties, the outer leaves can be harvested on a continuous basis when the plant reaches its harvest-ready date. As you pick the outer leaves, the plant continues to grow from the middle. These leaves should be full sized and tender. Woody leaves were left on the plant too long and will taste bitter.
Butterhead lettuce and other head varieties are ready for harvesting when the inner leaves have formed a head and the plants approach their variety-specific maturity date. To test if the head is ready, gently push down with the back of your hand. It should feel firm and crisp.

Harvest Methods
Harvest methods differ depending on the type of lettuce you're picking. For loose-leaf varieties, use your fingers to pinch off individual lettuce leaves at the base of the plant. For lettuce heads, use a sharp knife or pruning shears and cut off the entire head at its base, approximately 1 inch above soil level. Use cutting tools that have been wiped with a cloth soaked in rubbing alcohol. This helps prevent the spread of disease.
Cleaning and Storing Lettuce
Refrigerate lettuce leaves immediately after picking, as unrefrigerated leaves can wilt within 15 minutes of harvesting. Place the lettuce in a loose plastic bag, unwashed. Washed lettuce deteriorates quickly, but dry, unwashed lettuce can last for up to 14 days in your fridge's crisper drawer. When you're ready to use the lettuce, rinse each leaf under cold running water to get rid of dirt and any other debris.

Check Your Calendar
How long it is since you sowed the seeds provides a quick way to estimate when lettuce should be ready for harvesting.
A crisphead lettuce variety, which grows into a hard, tight head of leaves, is ready for harvesting approximately 75 days after planting.
As their name implies, loose-leaf lettuces don't form a head and are ready in as little as 45 days.
Butterhead varieties, which soft heads of loose leaves, are ready in 55 to 75 days.
Romaine varieties grow into tall, cylindrical heads of folded leaves and take approximately 70 days to mature.
Pick It Early
Pick lettuce in the early morning before the heat of the day causes the lettuce leaves to lose their crispness. Lettuce is fresher and crisper at this time and also tastes sweeter.
Test for Readiness
For loose-leaf lettuce varieties, the outer leaves can be harvested on a continuous basis when the plant reaches its harvest-ready date. As you pick the outer leaves, the plant continues to grow from the middle. These leaves should be full sized and tender. Woody leaves were left on the plant too long and will taste bitter.
Butterhead lettuce and other head varieties are ready for harvesting when the inner leaves have formed a head and the plants approach their variety-specific maturity date. To test if the head is ready, gently push down with the back of your hand. It should feel firm and crisp.

Harvest Methods
Harvest methods differ depending on the type of lettuce you're picking. For loose-leaf varieties, use your fingers to pinch off individual lettuce leaves at the base of the plant. For lettuce heads, use a sharp knife or pruning shears and cut off the entire head at its base, approximately 1 inch above soil level. Use cutting tools that have been wiped with a cloth soaked in rubbing alcohol. This helps prevent the spread of disease.
Cleaning and Storing Lettuce
Refrigerate lettuce leaves immediately after picking, as unrefrigerated leaves can wilt within 15 minutes of harvesting. Place the lettuce in a loose plastic bag, unwashed. Washed lettuce deteriorates quickly, but dry, unwashed lettuce can last for up to 14 days in your fridge's crisper drawer. When you're ready to use the lettuce, rinse each leaf under cold running water to get rid of dirt and any other debris.
1
0
文章
Miss Chen
2018年04月16日

Growing vegetables in your home garden requires a certain amount of attention to soil condition and pH level. The pH level of soil can critically affect the growth of vegetables, allowing (or preventing) roots to take up sufficient nutrition for the production of the flowers and fruit. If you live in a region with acidic soil, selecting vegetables that thrive in acidic soil will bring you a better harvest.

Potatoes
Potatoes (both Irish potatoes and sweet potatoes) prefer acidic soil conditions. The ideal pH range for this crop is 4.8 to 5.5, according to the Cornell University Vegetable Growing Guide. Potatoes need a light, loose, well-draining soil that is high in organic matter. To add nutrients and help aerate the soil, work in soil amendment such as peat moss, compost or manure at planting time. Avoid adding too much nitrogen-rich fertilizer, which will encourage the potato plants to grow foliage at the expense of tuber production.
Eggplant
Eggplants also grow well in slightly acidic soil (pH level between 5.5 and 7.5). The eggplant is a heat-loving plant that requires full sun and frost-free temperatures. The crop will benefit from the addition of compost or manure to increase the amount of organic matter in the soil. Mulching plants helps to keep down weeds and retain moisture.
Tomatoes
Tomatoes prefer a slightly acidic soil with a pH range of 6.2 to 6.8, according to the University of Rhode Island Landscape Horticulture Program. A loamy, well-draining soil that is rich in organic matter will help tomato plants grow and produce. Tomatoes also benefit from the application of fertilizer that contains phosphorus, but fertilizer with too much nitrogen can inhibit fruit production. A 5-10-10 or 5-20-20 fertilizer is recommended. These numbers designate the percentages of nitrogen, phosphorus and potassium in the fertilizer formula. Nitrogen is always the first number in the formula, phosphorus is the second and potassium is the third.

Green Peppers
Green peppers can be grown in slightly acidic soil in the range of 6.0 to 6.8. They require well-draining soil with moderate fertility for best results. Peppers are warm season vegetables that will experience blossom drop if exposed to night temperatures below 60 degrees Fahrenheit. They will also suffer from poor fruiting if the blossoms develop into the fruit (called "fruit setting") when temperatures are above 80 degrees Fahrenheit during the day, according to Ohio State horticulturist Marianne Riofrio.
Squash
Squash will grow in acidic soils with a pH range of 5.5 to 6.8, according to the University of Connecticut website. Add compost or manure at planting time to condition the soil and retain moisture. Mulching helps to control weeds that compete for nutrients with the squash plants. Do not mulch with grass clippings from lawns that have been treated with an herbicide.
Kale
Kale prefers soil in the pH range of 6.0 to 7.0 for best growth, according to the University of Rhode Island Landscape Horticulture Program. Kale is a cool weather crop that prefers daytime temperatures of 65 to 80 degrees Fahrenheit. Mulching will help to keep roots cool and free of weeds.

Potatoes
Potatoes (both Irish potatoes and sweet potatoes) prefer acidic soil conditions. The ideal pH range for this crop is 4.8 to 5.5, according to the Cornell University Vegetable Growing Guide. Potatoes need a light, loose, well-draining soil that is high in organic matter. To add nutrients and help aerate the soil, work in soil amendment such as peat moss, compost or manure at planting time. Avoid adding too much nitrogen-rich fertilizer, which will encourage the potato plants to grow foliage at the expense of tuber production.
Eggplant
Eggplants also grow well in slightly acidic soil (pH level between 5.5 and 7.5). The eggplant is a heat-loving plant that requires full sun and frost-free temperatures. The crop will benefit from the addition of compost or manure to increase the amount of organic matter in the soil. Mulching plants helps to keep down weeds and retain moisture.
Tomatoes
Tomatoes prefer a slightly acidic soil with a pH range of 6.2 to 6.8, according to the University of Rhode Island Landscape Horticulture Program. A loamy, well-draining soil that is rich in organic matter will help tomato plants grow and produce. Tomatoes also benefit from the application of fertilizer that contains phosphorus, but fertilizer with too much nitrogen can inhibit fruit production. A 5-10-10 or 5-20-20 fertilizer is recommended. These numbers designate the percentages of nitrogen, phosphorus and potassium in the fertilizer formula. Nitrogen is always the first number in the formula, phosphorus is the second and potassium is the third.

Green Peppers
Green peppers can be grown in slightly acidic soil in the range of 6.0 to 6.8. They require well-draining soil with moderate fertility for best results. Peppers are warm season vegetables that will experience blossom drop if exposed to night temperatures below 60 degrees Fahrenheit. They will also suffer from poor fruiting if the blossoms develop into the fruit (called "fruit setting") when temperatures are above 80 degrees Fahrenheit during the day, according to Ohio State horticulturist Marianne Riofrio.
Squash
Squash will grow in acidic soils with a pH range of 5.5 to 6.8, according to the University of Connecticut website. Add compost or manure at planting time to condition the soil and retain moisture. Mulching helps to control weeds that compete for nutrients with the squash plants. Do not mulch with grass clippings from lawns that have been treated with an herbicide.
Kale
Kale prefers soil in the pH range of 6.0 to 7.0 for best growth, according to the University of Rhode Island Landscape Horticulture Program. Kale is a cool weather crop that prefers daytime temperatures of 65 to 80 degrees Fahrenheit. Mulching will help to keep roots cool and free of weeds.
0
0


