求助
Ksturd11
2018年06月25日

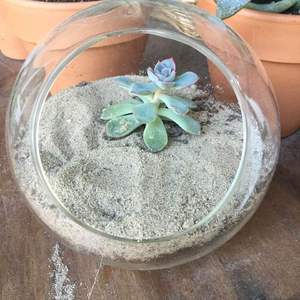
Need ID. This is my first succulent and ive had him for almsot a year. He is quite small and hasnt dont much growing!

1
0
Fion:Echeveria desmetiana De Smet(皮氏蓝石莲)🤓
Lucky Coyote:It looks like my echeveria pellucida, do it's leaves feel like peach fuzz?
成长记
2B_BotanicalFie
2018年06月24日

“Molly” is growing and growing @Plantlin


0
0
Plantlin:Molly the melon🍉 :)
文章
Miss Chen
2018年06月20日

Broccoli (Brassica oleracea var. italica) and cauliflower (Brassica oleracea) grow during the cool season, growing from seed to harvest size in as little as 65 days. Although both plants can survive a freeze, extended periods of cold can slow growth or damage the plants. Waiting to plant until the temperatures are right for the best growth, and providing some protection from extreme cold, keeps the plants healthy and productive.

The Big Freeze
Broccoli and cauliflower can usually survive temperatures as low as 26 degrees Fahrenheit with only minor damage to the leaves. They may survive even lower temperatures if they are acclimated, but usually anything below 26 F will kill the plants if the weather was warmer leading up to the cold snap. Temperatures between 31 and 33 F rarely cause any damage to broccoli or cauliflower, although growth may slow if temperatures remain near or below freezing for an extended period.
A Happy Medium
Cauliflower and broccoli grow best between 65 and 80 F. Broccoli grows well when planted in late winter or early spring for an early summer harvest, or in late summer or fall for a late fall or early winter harvest. Cauliflower is more heat sensitive, so it grows better when planted in mid- to late-summer for a fall harvest. Temperatures above 80 F can cause both broccoli and cauliflower to slow their growth, or they may go to seed prematurely without forming large heads.
Hardening Off
Taking a week to harden off new broccoli or cauliflower transplants in spring makes them better able to survive freezing temperatures. Seedlings started indoors are used to warmer temperatures, so a cold snap in the garden is more likely to damage them if they aren't acclimated. Set the seedlings outside in a protected area, such as on a covered patio, seven days before transplanting. Leave the seedlings outside for only four hours the first day, but gradually increase the time outdoors each day until they stay out all day and night by the final day in the hardening off period. If a hard freeze is expected, bring the seedlings indoors and resume hardening off when the temperatures rise.

Protection Pointers
If your broccoli or cauliflower plants are recently transplanted, or if temperatures below 31 F are expected, you can provide protection to prevent freeze damage or plant death. Planting in a cold frame works, because you can close the glass lid on the frame during freezes and then reopen it when the temperature inside the frame rises above 60 F. For a brief cold snap, place an upturned pot over the plants or mulch around the plants with straw to provide some insulation.

The Big Freeze
Broccoli and cauliflower can usually survive temperatures as low as 26 degrees Fahrenheit with only minor damage to the leaves. They may survive even lower temperatures if they are acclimated, but usually anything below 26 F will kill the plants if the weather was warmer leading up to the cold snap. Temperatures between 31 and 33 F rarely cause any damage to broccoli or cauliflower, although growth may slow if temperatures remain near or below freezing for an extended period.
A Happy Medium
Cauliflower and broccoli grow best between 65 and 80 F. Broccoli grows well when planted in late winter or early spring for an early summer harvest, or in late summer or fall for a late fall or early winter harvest. Cauliflower is more heat sensitive, so it grows better when planted in mid- to late-summer for a fall harvest. Temperatures above 80 F can cause both broccoli and cauliflower to slow their growth, or they may go to seed prematurely without forming large heads.
Hardening Off
Taking a week to harden off new broccoli or cauliflower transplants in spring makes them better able to survive freezing temperatures. Seedlings started indoors are used to warmer temperatures, so a cold snap in the garden is more likely to damage them if they aren't acclimated. Set the seedlings outside in a protected area, such as on a covered patio, seven days before transplanting. Leave the seedlings outside for only four hours the first day, but gradually increase the time outdoors each day until they stay out all day and night by the final day in the hardening off period. If a hard freeze is expected, bring the seedlings indoors and resume hardening off when the temperatures rise.

Protection Pointers
If your broccoli or cauliflower plants are recently transplanted, or if temperatures below 31 F are expected, you can provide protection to prevent freeze damage or plant death. Planting in a cold frame works, because you can close the glass lid on the frame during freezes and then reopen it when the temperature inside the frame rises above 60 F. For a brief cold snap, place an upturned pot over the plants or mulch around the plants with straw to provide some insulation.
0
0
文章
Miss Chen
2018年06月19日

Asparagus is a perennial vegetable plant that can be a long-lasting, permanent addition to a home garden. This vegetable requires well-draining soil to thrive, as waterlogged soil causes root rot. Growing asparagus in raised beds offers them proper drainage and an easier planting bed that doesn't require deep tilling.

Preparing a Raised Bed
Prepare the raised bed before the last frost of the season ends. Though asparagus can tolerate some light shade, it's best to locate the raised bed in an area that gets six to eight hours of sunlight each day. Raise the bed to at least 12 inches in height to accommodate drainage and growth.
Use a good-quality topsoil that is blended with compost or other organic matter such as manure or peat moss. Laying black plastic over the entire raised bed helps to retain heat within the soil for an early spring planting.
Remove the black plastic when there's no more danger of frost and dig trenches six inches deep and five feet apart with a garden trowel. In each trench, sprinkle one pound of triple superphosphate (0-46-0) for every 50 feet of soil.
Planting Asparagus
Purchase 1-year-old asparagus crowns. For the best harvest, ensure the asparagus crowns are healthy and male. Female asparagus use too much energy on producing seeds, leaving a less-than-desirable crop production. To tell the difference, look at the seeds and size of each plant. The female asparagus plant bears berry-like seeds, while the male produces thicker spears and larger flowers. Soak the asparagus crowns in a bucket filled with warm water for one hour before planting.
Plant the asparagus crowns into the trenches, about 12 inches apart, and cover with dirt. Water the plantings until the soil is moist, taking care not to saturate. Continue to water the crop once or twice per week to keep the soil moist.
Spread two to three inches of peat moss throughout the asparagus bed when the tips begin to emerge from the soil, usually in one to two weeks. This will help the soil to retain more moisture and will act as a weed barrier within the raised bed.

Keep the asparagus bed free of weeds, pulling them out regularly by hand. A weedy bed means both weeds and vegetables are competing for the same nutrients and water and can cause a weak crop for future growing seasons.
Harvesting Asparagus
Leave the asparagus crowns to grow tall and ferny their first growing season within the raised bed. This first season will provide the asparagus crowns the energy they need to grow a more productive harvest in the years to come.
Harvest a few asparagus spears when the plants are in their second growing season and reach heights of seven to nine inches tall. Cut the spears off the plant at soil level with a sharp knife. Leave half of the asparagus spears on the plant to provide energy for the third season's crop.

Preparing a Raised Bed
Prepare the raised bed before the last frost of the season ends. Though asparagus can tolerate some light shade, it's best to locate the raised bed in an area that gets six to eight hours of sunlight each day. Raise the bed to at least 12 inches in height to accommodate drainage and growth.
Use a good-quality topsoil that is blended with compost or other organic matter such as manure or peat moss. Laying black plastic over the entire raised bed helps to retain heat within the soil for an early spring planting.
Remove the black plastic when there's no more danger of frost and dig trenches six inches deep and five feet apart with a garden trowel. In each trench, sprinkle one pound of triple superphosphate (0-46-0) for every 50 feet of soil.
Planting Asparagus
Purchase 1-year-old asparagus crowns. For the best harvest, ensure the asparagus crowns are healthy and male. Female asparagus use too much energy on producing seeds, leaving a less-than-desirable crop production. To tell the difference, look at the seeds and size of each plant. The female asparagus plant bears berry-like seeds, while the male produces thicker spears and larger flowers. Soak the asparagus crowns in a bucket filled with warm water for one hour before planting.
Plant the asparagus crowns into the trenches, about 12 inches apart, and cover with dirt. Water the plantings until the soil is moist, taking care not to saturate. Continue to water the crop once or twice per week to keep the soil moist.
Spread two to three inches of peat moss throughout the asparagus bed when the tips begin to emerge from the soil, usually in one to two weeks. This will help the soil to retain more moisture and will act as a weed barrier within the raised bed.

Keep the asparagus bed free of weeds, pulling them out regularly by hand. A weedy bed means both weeds and vegetables are competing for the same nutrients and water and can cause a weak crop for future growing seasons.
Harvesting Asparagus
Leave the asparagus crowns to grow tall and ferny their first growing season within the raised bed. This first season will provide the asparagus crowns the energy they need to grow a more productive harvest in the years to come.
Harvest a few asparagus spears when the plants are in their second growing season and reach heights of seven to nine inches tall. Cut the spears off the plant at soil level with a sharp knife. Leave half of the asparagus spears on the plant to provide energy for the third season's crop.
0
0
文章
Miss Chen
2018年06月19日

Ohio has a mild climate, with U.S. hardiness zones of 5a to 6a. Certain micro-climates exist around the state, so growing seasons vary slightly. Plant seed potatoes in Ohio that mature in the time frame for your climate.

Varieties
Early season varieties good for Ohio include superior and norland, which mature in 90 to 100 days and 80 to 90 days respectively. Planting four weeks before your expected frost date allows early harvesting of these potatoes.
Hardiness Zones
The southern part of Ohio warms up a few weeks earlier than the northern areas. You can plant seed potatoes in Ohio as soon as the soil is dry in your area. Select a time when no rainfall is expected. This generally happens in mid-March for southern Ohio and late April for northern Ohio.

Diseases
Potatoes are not without problems and late blight has affected Ohio when spring weather is extremely wet. Control late blight disease by selecting certified seed potatoes, properly drying the potatoes before planting and waiting until the soil is dry. Northern areas of Ohio still yield an abundant harvest even when delaying planting until mid-June.

Varieties
Early season varieties good for Ohio include superior and norland, which mature in 90 to 100 days and 80 to 90 days respectively. Planting four weeks before your expected frost date allows early harvesting of these potatoes.
Hardiness Zones
The southern part of Ohio warms up a few weeks earlier than the northern areas. You can plant seed potatoes in Ohio as soon as the soil is dry in your area. Select a time when no rainfall is expected. This generally happens in mid-March for southern Ohio and late April for northern Ohio.

Diseases
Potatoes are not without problems and late blight has affected Ohio when spring weather is extremely wet. Control late blight disease by selecting certified seed potatoes, properly drying the potatoes before planting and waiting until the soil is dry. Northern areas of Ohio still yield an abundant harvest even when delaying planting until mid-June.
0
0
文章
Miss Chen
2018年06月19日

Zucchini are summer garden favorites, growing quickly and easily and producing such abundant crops that they inspire the old joke that you'll run out of friends before you run out of extra zucchini. After you sow your zucchini seeds into your garden, you will watch the plant grow, emerging as a tiny seedling and, within a few months, sprawling as a long vine across your garden, producing flowers and, eventually, fruits.

Germination
Hold a zucchini seed in your hand and you are holding the raw materials for one of your garden's largest and most productive plants. The zucchini's life begins with germination, when soil temperatures warm to about 70 degrees Fahrenheit, causing the seed to absorb large quantities of water. Water triggers the embryo to begin growing, and soon, it exceeds the tight confines of the seed coat and bursts free. The root emerges first, correctly orienting and anchoring the seed in the soil. Next, the primitive leaves, called cotyledons, stretch upward, pushing aside the soil and reaching for the light.
Growth
Zucchini grow in two forms: bush, or determinate, and vining, or indeterminate. Growth from a tiny seedling into these large forms requires rapid mitosis, a process during which cells make an extra copy of their genetic material and split into two cells. Growth occurs in a part of the plant called the meristem, which you can find at the growing end of a zucchini vine, the tips of the roots and in the nodes, points along the stem that develop into leaves and flowers. The ability of the zucchini plant to produce so many different structures from a single type of cell allows the plant to grow rapidly, producing edible fruits within a matter of a few months.

Reproduction
During the final stage of the zucchini's life, it concentrates its energy on producing seeds to ensure the survival of the next generation. When the days lengthen in midsummer, meristems along the vine grow into flower buds. Zucchini, like all members of the squash family, produce male and female flowers separately on a single vine and rely on bees to carry pollen from male flowers to female flowers. Once pollination occurs, the pollen grows into a tube that enters the ovary of the female flower and deposits sperm cells where they can fertilize the egg within. Each ovule within the ovary develops into a separate seed, and the wall of the ovary thickens into a fleshy fruit coat, the tasty green fruit that you recognize as zucchini.

Germination
Hold a zucchini seed in your hand and you are holding the raw materials for one of your garden's largest and most productive plants. The zucchini's life begins with germination, when soil temperatures warm to about 70 degrees Fahrenheit, causing the seed to absorb large quantities of water. Water triggers the embryo to begin growing, and soon, it exceeds the tight confines of the seed coat and bursts free. The root emerges first, correctly orienting and anchoring the seed in the soil. Next, the primitive leaves, called cotyledons, stretch upward, pushing aside the soil and reaching for the light.
Growth
Zucchini grow in two forms: bush, or determinate, and vining, or indeterminate. Growth from a tiny seedling into these large forms requires rapid mitosis, a process during which cells make an extra copy of their genetic material and split into two cells. Growth occurs in a part of the plant called the meristem, which you can find at the growing end of a zucchini vine, the tips of the roots and in the nodes, points along the stem that develop into leaves and flowers. The ability of the zucchini plant to produce so many different structures from a single type of cell allows the plant to grow rapidly, producing edible fruits within a matter of a few months.

Reproduction
During the final stage of the zucchini's life, it concentrates its energy on producing seeds to ensure the survival of the next generation. When the days lengthen in midsummer, meristems along the vine grow into flower buds. Zucchini, like all members of the squash family, produce male and female flowers separately on a single vine and rely on bees to carry pollen from male flowers to female flowers. Once pollination occurs, the pollen grows into a tube that enters the ovary of the female flower and deposits sperm cells where they can fertilize the egg within. Each ovule within the ovary develops into a separate seed, and the wall of the ovary thickens into a fleshy fruit coat, the tasty green fruit that you recognize as zucchini.
0
0
成长记
kensong
2018年06月17日

Repotted my Phal because it was leaning too much. New leaves are growing well.


0
0
CiaraCrearions
2018年06月14日

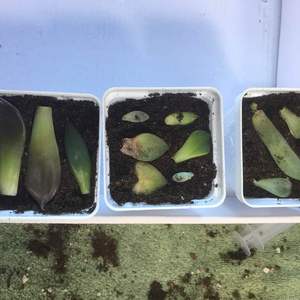
My first propigation leaves are ready for growing! I hope they succeed! #Succulent #leaf ##Popigation

0
0
成长记
Cam Ying Luo
2018年06月14日

It’s growing bigger....and greener😂😂how can i get the vibrant colour bcak?? 😅


1
0


