文章
Miss Chen
2017年08月11日

It is time to transplant your orchid when the roots are growing over the side of the pot or the lower leaves have died and weakened the center stem. The plant has either become too big for the container or the potting medium has broken down and no longer supports the plant. Always wait for an orchid to finish blooming before transplanting.

Transplanting Materials
Gather together new potting medium, hand-held pruners and a pot one size bigger than its present container. The potting medium must be fast-draining and also water-retentive. Commercial orchid potting medium contains volcanic rock, coconut fiber, tree bark, charcoal or a combination of these. Aliflor is an expanding clay medium that is often used in orchid mixes. Bark-based potting medium drains well but breaks down easily. Peat-based material retains moisture well but must be replaced yearly. Choose either clay or plastic pots for your orchid. Ensure the hand-held pruners are sterilized with alcohol before using, to prevent the spread of harmful bacteria.
Remove Orchid From Pot
Grasp the orchid plant by the main stem and gently remove it from the overturned pot. A very root-bound plant will be difficult to shake loose, and sometimes the pot needs to be broken. Remove all of the old potting medium by shaking the plant and picking the medium out from between the roots. Do not reuse any of this material in the transplant process. Gently wash off the orchid roots with water to remove fine particles. Pull off dead or weak lower leaves and pull off plant tissue at the leaf juncture. Prune all shriveled roots carefully with hand-held pruners, being careful not to cut healthy growth. Dead tissue is hollow when squeezed or wiry looking.
New Pot
Choose a plastic or clay pot that will accommodate the entire root system comfortably. Cover the bottom of the pot with a thin layer of potting mix. Place the plant in the pot with the lower leaves slightly above the rim. Place and push potting material in the spaces between the roots, pressing gently as you go. Ensure the bottom leaves remain slightly above the pot rim. Tap the pot gently to settle the materials and add more if needed to fill the space. Experienced orchid gardeners add a label to each plant indicating its name and bloom time.
Water and Ongoing Care
An orchid needs to be soaked thoroughly after it has been transplanted to a new pot. Always use tepid water and soak long enough so all the planting material is wet. Allow the pot to drain completely and empty the drip pan so the roots do not continue to absorb water through the drainage hole. Orchids are watered once a week after the transplant. Fertilize monthly with 1/2-strength commercial orchid fertilizer during summer and fall. Do not fertilize during the spring flowering cycle.
0
0
文章
Miss Chen
2017年08月11日
Contrary to popular belief, orchids are not difficult to grow as houseplants. However, these exotic plants have different cultural needs than most varieties of houseplants. Prematurely wilting flowers are frequently a sign of incorrect growing conditions that affect the overall health of the plant. Providing the proper care encourages the growth of healthy foliage and abundant blossoms.

Blossoms
Depending on the variety of orchid, the average blossom season lasts one to two months. During this time, numerous buds open and wilt until the end of the blossoming season. Some varieties, such as Phalaenopsis, produce a continual supply of blossoms for a period up to three months. Most varieties produce new blossoms the following year although some orchids bloom two or three times each year. Negligence can cause plants to stop flowering prematurely or wilt suddenly.
Environment
Orchids need a controlled environment to produce healthy blossoms. Nighttime temperatures between 55 and 65 degrees Fahrenheit are ideal for orchids, while daytime temperatures between 65 and 75 degrees Fahrenheit provide the best environment for orchids. These plants prefer about a 10-degree difference between the daytime and nighttime temperatures. Orchids require at least eight hours of sunlight each day. Inadequate light is one of the main reasons for depleted blossoms and reluctance to bloom. These plants flourish in sunny windowsills as long as the heat remains near 75 degrees. However, moving a wilting plant from a shady location directly into full sunlight can shock the plant. Gradually acclimate a wilting orchid by placing it in sunlight for a few hours each day.
Moisture
Like many tropical exotics, orchids require even soil moisture at all times. Orchids in full bloom tend to require more water than orchids with only foliage. Providing additional water during the flowering season discourages wilting due to dehydration. A pot with good drainage holes and a layer of sphagnum moss over the loamy soil ensures sufficient moisture and adequate drainage.

Nutrients
Although most orchids come from the nursery potted in rich, nutritious orchid media, continued growth can deplete the soil of nutrients. Applying a diluted fertilizer once each week during the flowering season will encourage healthy, long-lived blossoms. Select a fertilizer labeled for use on orchids and follow the label instructions for mixing and applying the plant food.
Blossoms
Depending on the variety of orchid, the average blossom season lasts one to two months. During this time, numerous buds open and wilt until the end of the blossoming season. Some varieties, such as Phalaenopsis, produce a continual supply of blossoms for a period up to three months. Most varieties produce new blossoms the following year although some orchids bloom two or three times each year. Negligence can cause plants to stop flowering prematurely or wilt suddenly.
Environment
Orchids need a controlled environment to produce healthy blossoms. Nighttime temperatures between 55 and 65 degrees Fahrenheit are ideal for orchids, while daytime temperatures between 65 and 75 degrees Fahrenheit provide the best environment for orchids. These plants prefer about a 10-degree difference between the daytime and nighttime temperatures. Orchids require at least eight hours of sunlight each day. Inadequate light is one of the main reasons for depleted blossoms and reluctance to bloom. These plants flourish in sunny windowsills as long as the heat remains near 75 degrees. However, moving a wilting plant from a shady location directly into full sunlight can shock the plant. Gradually acclimate a wilting orchid by placing it in sunlight for a few hours each day.
Moisture
Like many tropical exotics, orchids require even soil moisture at all times. Orchids in full bloom tend to require more water than orchids with only foliage. Providing additional water during the flowering season discourages wilting due to dehydration. A pot with good drainage holes and a layer of sphagnum moss over the loamy soil ensures sufficient moisture and adequate drainage.
Nutrients
Although most orchids come from the nursery potted in rich, nutritious orchid media, continued growth can deplete the soil of nutrients. Applying a diluted fertilizer once each week during the flowering season will encourage healthy, long-lived blossoms. Select a fertilizer labeled for use on orchids and follow the label instructions for mixing and applying the plant food.
0
0
文章
Miss Chen
2017年08月11日
Growing orchids is much easier than most people believe. Orchids are perfectly happy to stay rootbound in the same pot for years. As long as you provide water, bright filtered light and the right temperature range, your orchid will bloom. After the orchid finishes blooming and the flower stem is completely dead, it should be carefully pruned back, encouraging the plant to produce new flowers.

Step 1
Determine the species of your orchid. While it is safe to prune most orchids, Dendrobiums rebloom from the leafless stems; do not remove a Dendrobium orchid's flower stalk. Dendrobiums are one of the most commonly sold orchids. With over 1,500 species and thousands of hybrids, any prolifically blooming but unknown variety of orchid with a long, arching stem should be considered a Dendrobium.
Step 2
Inspect your orchid. Look carefully at the spent flower stem. If it is brown and dried up, it is ready for pruning.

Step 3
Cut the stem with the hand pruner, leaving at least 1 inch of the stem extending above the base of the plant. If your orchid has nodules on the flower stem, cut the stem 1/4 inch above one of the leaf-like bumps.
Step 1
Determine the species of your orchid. While it is safe to prune most orchids, Dendrobiums rebloom from the leafless stems; do not remove a Dendrobium orchid's flower stalk. Dendrobiums are one of the most commonly sold orchids. With over 1,500 species and thousands of hybrids, any prolifically blooming but unknown variety of orchid with a long, arching stem should be considered a Dendrobium.
Step 2
Inspect your orchid. Look carefully at the spent flower stem. If it is brown and dried up, it is ready for pruning.
Step 3
Cut the stem with the hand pruner, leaving at least 1 inch of the stem extending above the base of the plant. If your orchid has nodules on the flower stem, cut the stem 1/4 inch above one of the leaf-like bumps.
0
0
文章
Miss Chen
2017年08月11日
Orchids have an undeserved reputation for being difficult to grow and easy to kill, which, unfortunately, causes many people to shy away from growing them in their homes. In reality, you can grow many popular orchid species, such as Cattleya, Phalaenopsis and Dendrobium, at home with simple, common-sense care. Overwatering is a common concern when growing orchids; the ice cube watering method is a simple trick that you can use to avoid over-irrigating your new houseplant.

Sunlight
Orchids require just the right amount of sunlight in order to grow successfully. If provided too little sunlight, the plant will fail to blossom; if provided too much sunlight, the blossoms will fade and the foliage will burn. The best way to expose your orchid to the sunlight it needs is to place it within 4 feet of a sunny south-facing window where it can receive filtered light for at least four hours each day.
Water
If it's your first time growing an orchid, knowing just how much water to give your new houseplant may seem a bit tricky. Fortunately, using the ice cube watering method takes all the guesswork out of irrigating your orchid. Simply arrange three standard-size ice cubes on the surface of the potting mix around the plant; avoid letting the ice touch the orchid directly. As the ice cubes melt, they will slowly and evenly moisten the potting mix. Water your orchid once a week using this method.
Fertilize
When grown in their native climates, orchids use their thick, fleshy roots to draw nutrients from the air around them. When you grow them indoors as houseplants, you must provide nutrients for your orchids by following a regular fertilization schedule. Feed the orchid with weekly applications of a specially formulated orchid fertilizer from early spring through summer. Cease fertilization during the fall and winter months; the plant is not actively growing and doesn't need the steady stream of supplemental nutrients.

Re-pot
Occasional re-potting is essential to maintaining the long-term health of your orchid. The University of Tennessee recommends re-potting indoor orchids every one to three years to replace the potting mix and to trim out any problematic roots. Gently remove the orchid from its planting container and rinse its roots under warm running water. Feel the roots with your fingertips; healthy roots will feel stiff and turgid. Use a sharpened and sterilized gardening knife to cut out any roots that are brown or mushy. Repot the orchid in a well-draining potting mix composed of equal parts peat moss, redwood bark, charcoal and volcanic rock.
Sunlight
Orchids require just the right amount of sunlight in order to grow successfully. If provided too little sunlight, the plant will fail to blossom; if provided too much sunlight, the blossoms will fade and the foliage will burn. The best way to expose your orchid to the sunlight it needs is to place it within 4 feet of a sunny south-facing window where it can receive filtered light for at least four hours each day.
Water
If it's your first time growing an orchid, knowing just how much water to give your new houseplant may seem a bit tricky. Fortunately, using the ice cube watering method takes all the guesswork out of irrigating your orchid. Simply arrange three standard-size ice cubes on the surface of the potting mix around the plant; avoid letting the ice touch the orchid directly. As the ice cubes melt, they will slowly and evenly moisten the potting mix. Water your orchid once a week using this method.
Fertilize
When grown in their native climates, orchids use their thick, fleshy roots to draw nutrients from the air around them. When you grow them indoors as houseplants, you must provide nutrients for your orchids by following a regular fertilization schedule. Feed the orchid with weekly applications of a specially formulated orchid fertilizer from early spring through summer. Cease fertilization during the fall and winter months; the plant is not actively growing and doesn't need the steady stream of supplemental nutrients.
Re-pot
Occasional re-potting is essential to maintaining the long-term health of your orchid. The University of Tennessee recommends re-potting indoor orchids every one to three years to replace the potting mix and to trim out any problematic roots. Gently remove the orchid from its planting container and rinse its roots under warm running water. Feel the roots with your fingertips; healthy roots will feel stiff and turgid. Use a sharpened and sterilized gardening knife to cut out any roots that are brown or mushy. Repot the orchid in a well-draining potting mix composed of equal parts peat moss, redwood bark, charcoal and volcanic rock.
0
1
文章
Miss Chen
2017年08月11日
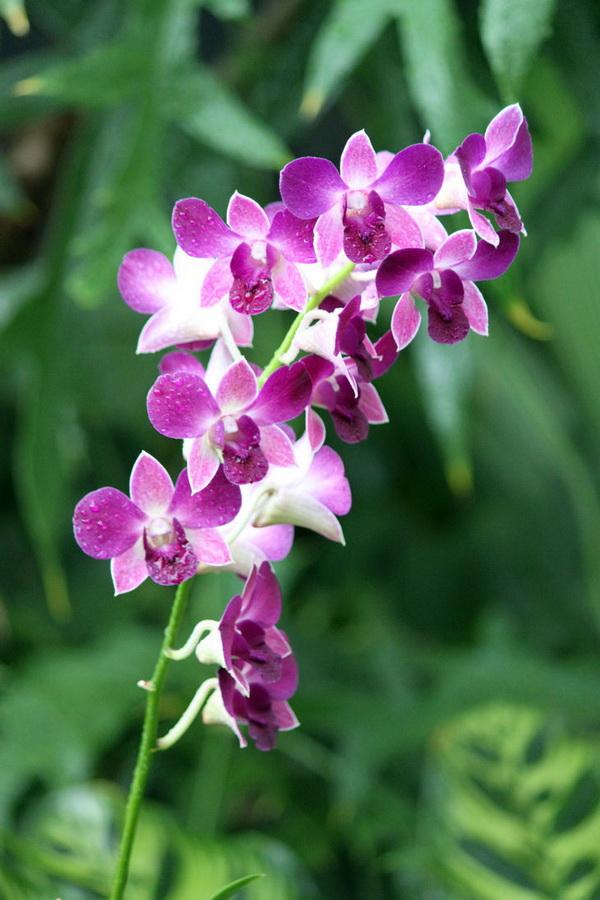
Orchids (Orchidaceae) first appeared on Earth about 100 million years ago and adapted over time to include both terrestrial types growing in soil and epiphytic types thriving on only air and water. Close to 25,000 naturally occurring orchid species exist on every continent, and all have their own distinctive characteristics or adaptations. Even though they have diversity among their species, orchids share common strategies that ensure their survival.

Flower Pollination
Orchids developed a variety of unusual flowers that attract the creatures that pollinate them. Some flowers resemble their pollinators, such as those of moth orchids (Phalaenopsis group), which are hardy in U.S. Department of Agriculture plant hardiness zones 10 through 12. The wide petals at the top of those flowers are reminiscent of moth wings. The flowers of Venus' slipper orchids (Paphiopedilum group) each has a pouch-shaped petal that directs bees and birds straight to the source of pollen. Venus' slipper orchids are perennial in USDA zones 9 through 12.
Fungal Relationship
The ghost orchid (Dendrophylax lindenii), an endangered species that is hardy in only southern Florida in USDA zone 10a, is a leafless orchid that relies on a symbiotic relationship with fungi to move nutrients throughout the plant. A specific fungus lives inside this orchid's roots and also protrudes outside the roots and gathers nutrients from soil.
Multipurpose Roots
Epiphytic orchids' roots have evolved to serve multiple functions. Such an orchid's roots work as roots normally do by transferring water and nutrients to the rest of the plant, but they also anchor the air plant to a tree and perform the photosynthesis that leaves normally do on other kinds of plants. An epiphytic orchid's roots also can store water in the same way as a succulent plant's stems, allowing the orchid to exist high in a tree top to get more sunlight than plants living below.

Stem Pseudobulbs
Because epiphytic orchids live above soil level, they developed bulblike structures that perform the same work of storing water and nutrients that underground bulbs perform for other types of plants. In an epiphytic orchid, one or more sections of a stem bulge outward and become darkened areas, which are the pseudobulbs. Orchids with pseudobulbs can thrive in regions that have dry months between times of seasonal rainfalls.
Flower Pollination
Orchids developed a variety of unusual flowers that attract the creatures that pollinate them. Some flowers resemble their pollinators, such as those of moth orchids (Phalaenopsis group), which are hardy in U.S. Department of Agriculture plant hardiness zones 10 through 12. The wide petals at the top of those flowers are reminiscent of moth wings. The flowers of Venus' slipper orchids (Paphiopedilum group) each has a pouch-shaped petal that directs bees and birds straight to the source of pollen. Venus' slipper orchids are perennial in USDA zones 9 through 12.
Fungal Relationship
The ghost orchid (Dendrophylax lindenii), an endangered species that is hardy in only southern Florida in USDA zone 10a, is a leafless orchid that relies on a symbiotic relationship with fungi to move nutrients throughout the plant. A specific fungus lives inside this orchid's roots and also protrudes outside the roots and gathers nutrients from soil.
Multipurpose Roots
Epiphytic orchids' roots have evolved to serve multiple functions. Such an orchid's roots work as roots normally do by transferring water and nutrients to the rest of the plant, but they also anchor the air plant to a tree and perform the photosynthesis that leaves normally do on other kinds of plants. An epiphytic orchid's roots also can store water in the same way as a succulent plant's stems, allowing the orchid to exist high in a tree top to get more sunlight than plants living below.
Stem Pseudobulbs
Because epiphytic orchids live above soil level, they developed bulblike structures that perform the same work of storing water and nutrients that underground bulbs perform for other types of plants. In an epiphytic orchid, one or more sections of a stem bulge outward and become darkened areas, which are the pseudobulbs. Orchids with pseudobulbs can thrive in regions that have dry months between times of seasonal rainfalls.
1
1
文章
Miss Chen
2017年08月11日
Orchids bloom at various times throughout the year depending on the species and growing conditions. Cattleyas and phalaenopsis, for instance, tend to bloom in the spring while cymbidiums and oncidiums generally bloom in the winter. The flower stems will dry up and turn brown after the flowers fall, at which time they can be cut off. Where the stem or spike should be cut depends on the type, health and maturity of the orchid.

Orchids in General
The general rule of thumb when cutting spent flower stems or spikes from orchids is to cut them off at the base. This should be done on cattleyas, cymbidiums, dendrobiums, epidendrums, paphiopedilums, phragmipediums and vandas. After these orchids have bloomed, they will not produce any more flowers on the flower spike. There is no need to leave the spike on the orchid until the whole thing turns brown. It can be removed as soon as the flowers drop and the tip of the spike turns brown. As long as the orchid is healthy and growing conditions are right, it will put out a new spike for the next bloom season.
Phalaenopsis Orchids
Phalaenopsis orchids produce multiple blooms on the same spike. Most types of phalaenopsis can have the spike cut back to just above a healthy growth node when the flowers drop and the spike begins to turn brown. Growth nodes are raised triangular flaps of plant tissue on the flower spike. The healthy phal will grow new spikes from the growth node and bloom from those. Small, young phals that are less than 1 foot tall or those that are not growing vigorously should not be allowed to try to rebloom. Their flower spikes should be removed at the base of the spike as soon as the blooms drop. Some orchid growers always cut the spike off at the base to prevent reblooming regardless of the size, health or maturity of the orchid. Blooming saps energy from the plant, resulting in slower plant growth.
Amboninsis, Cornu-cervi and Violacia
Descendants
Phalaenopsis orchids that are descendants of amboninsis, cornu-cervi, violacia and similar orchids bloom continuously from the same flower spike. The spikes on these phals should not be cut unless they grow too long. If the spike has grown so long that it has become unsightly, it can be cut back to just above a growth node. It can also be removed at the base in the spring to give the orchid a rest and encourage new plant growth.

Oncidiums (Psychopsis)
Some types of oncidiums (psychopsis), such as papilio or butterfly orchid, should not have the flower spikes cut when the blooms drop. These orchids will bloom on the same spike for years. The spikes can grow to 2 feet long. The flower spike should be removed at the base when the orchid is repotted to reduce stress while it becomes re-established. Use a good potting medium that breaks down very slowly to allow as much time as possible between repottings.
Orchids in General
The general rule of thumb when cutting spent flower stems or spikes from orchids is to cut them off at the base. This should be done on cattleyas, cymbidiums, dendrobiums, epidendrums, paphiopedilums, phragmipediums and vandas. After these orchids have bloomed, they will not produce any more flowers on the flower spike. There is no need to leave the spike on the orchid until the whole thing turns brown. It can be removed as soon as the flowers drop and the tip of the spike turns brown. As long as the orchid is healthy and growing conditions are right, it will put out a new spike for the next bloom season.
Phalaenopsis Orchids
Phalaenopsis orchids produce multiple blooms on the same spike. Most types of phalaenopsis can have the spike cut back to just above a healthy growth node when the flowers drop and the spike begins to turn brown. Growth nodes are raised triangular flaps of plant tissue on the flower spike. The healthy phal will grow new spikes from the growth node and bloom from those. Small, young phals that are less than 1 foot tall or those that are not growing vigorously should not be allowed to try to rebloom. Their flower spikes should be removed at the base of the spike as soon as the blooms drop. Some orchid growers always cut the spike off at the base to prevent reblooming regardless of the size, health or maturity of the orchid. Blooming saps energy from the plant, resulting in slower plant growth.
Amboninsis, Cornu-cervi and Violacia
Descendants
Phalaenopsis orchids that are descendants of amboninsis, cornu-cervi, violacia and similar orchids bloom continuously from the same flower spike. The spikes on these phals should not be cut unless they grow too long. If the spike has grown so long that it has become unsightly, it can be cut back to just above a growth node. It can also be removed at the base in the spring to give the orchid a rest and encourage new plant growth.
Oncidiums (Psychopsis)
Some types of oncidiums (psychopsis), such as papilio or butterfly orchid, should not have the flower spikes cut when the blooms drop. These orchids will bloom on the same spike for years. The spikes can grow to 2 feet long. The flower spike should be removed at the base when the orchid is repotted to reduce stress while it becomes re-established. Use a good potting medium that breaks down very slowly to allow as much time as possible between repottings.
0
0
文章
Miss Chen
2017年08月10日

Floribunda roses present clusters of two to three blooms on each cane, growing from 2 to 4 feet tall. These lovely specimens are a hybrid created by crossing hybrid tea roses with polyanthas. Bred to be hardy and disease-resistant, they require minimal maintenance. With just a little effort, you can have glorious blooms all season long.
Floribunda Rose Care
Step 1
Prune canes once leaf buds appear in the spring to stimulate plant growth. Cut each cane back by half. Use sharp scissors or clippers.
Step 2
Fertilize floribunda roses each spring once new growth appears. Use a rose-specific fertilizer and follow label directions carefully. Rose fertilizer is available as a liquid concentrate and as pellets. Liquid concentrate is mixed with water and poured at the base of the plant. Pellet form fertilizer is shaken on the soil around the plant. Either application is effective; pellets are applied less often than the liquid concentrate.
Step 3
Work shredded leaves, compost or other organic material into the ground around the rose bush. Do not disturb the plant's roots.

Step 4
Shovel a 1- to 3-inch layer of mulch on top of the soil surrounding the floribunda rose; this helps the plant retain moisture and limits weed growth. Avoid laying mulch up against the base of plant as that could cause stem rot.
Step 5
Water plant once or twice a week, supplementing the natural rainfall. Water deeply and aim for the base of the plant. Roses require 4-5 gallons of water per week during the growing season. Shallow watering may cause the development of weak roots.
Step 6
Prune the rose bush as flowers finish blooming. This will stimulate new growth. Once a flower is done blooming, cut back that cane. Perform the cut with sharp scissors or clippers and aim for a spot directly above a leaf bud. New growth will appear just below the cut.
0
0
文章
Miss Chen
2017年08月10日
Growing roses from cuttings is relatively simple. However, not all roses are appropriate for dividing. Some of the newer hybrid roses must be grafted by a professional. Antique or "old roses" are especially easy to propagate. Late summer and early fall are the ideal times to make cuttings, but almost any time of the year will work.

Step 1
Choose a strong cane that has four to five leaves. The cane should be disease-free and insect-free. The cutting needs to be 6 to 8 inches. Trim the top of the cutting at a 45-degree angle and at the bottom of the cutting trim another 45-degree angle just below a side branch, leaving a "heel" at the base. Place in water.
Step 2
Mix one part perlite or vermiculite and one part potting soil, and fill a peat pot or 6-inch plastic container.
Step 3
Remove the lower leaves and keep at least two at the top. With a gloved hand, press against each thorn and pop it off, careful not to damage the buds. Make a narrow, 1-inch wound on each side of the base of the cutting.

Step 4
Punch a hole in the center of the prepared pot. Dip the cutting in the rooting hormone, and insert it into the pot. Firm the soil and water with a fine spray. Label the cutting with the name of the rose and date.
Step 5
Cut two lengths of wire long enough to make an arch over the pot and form a frame for your "greenhouse." Insert the pot into the plastic bag and secure it with a tie.
Step 6
Place the pot in a warm, bright location, but avoid direct sunlight. Keep the soil moist. When new leaves appear, you will know that the cutting has grown roots. This process usually takes five to eight weeks.
Step 7
Transfer the rooted cutting to an 8-inch or larger pot filled with organic potting soil. Make sure all the roots are covered. Add a slow-release fertilizer to the soil. Keep the plant in cool shade for one to two weeks, then gradually expose it to direct sunlight for several hours a day. Make several slits in the plastic bag and expose the plant for a few days, allowing it to become slightly dryer before transplanting. Transplant to your garden in about six months.
Step 1
Choose a strong cane that has four to five leaves. The cane should be disease-free and insect-free. The cutting needs to be 6 to 8 inches. Trim the top of the cutting at a 45-degree angle and at the bottom of the cutting trim another 45-degree angle just below a side branch, leaving a "heel" at the base. Place in water.
Step 2
Mix one part perlite or vermiculite and one part potting soil, and fill a peat pot or 6-inch plastic container.
Step 3
Remove the lower leaves and keep at least two at the top. With a gloved hand, press against each thorn and pop it off, careful not to damage the buds. Make a narrow, 1-inch wound on each side of the base of the cutting.
Step 4
Punch a hole in the center of the prepared pot. Dip the cutting in the rooting hormone, and insert it into the pot. Firm the soil and water with a fine spray. Label the cutting with the name of the rose and date.
Step 5
Cut two lengths of wire long enough to make an arch over the pot and form a frame for your "greenhouse." Insert the pot into the plastic bag and secure it with a tie.
Step 6
Place the pot in a warm, bright location, but avoid direct sunlight. Keep the soil moist. When new leaves appear, you will know that the cutting has grown roots. This process usually takes five to eight weeks.
Step 7
Transfer the rooted cutting to an 8-inch or larger pot filled with organic potting soil. Make sure all the roots are covered. Add a slow-release fertilizer to the soil. Keep the plant in cool shade for one to two weeks, then gradually expose it to direct sunlight for several hours a day. Make several slits in the plastic bag and expose the plant for a few days, allowing it to become slightly dryer before transplanting. Transplant to your garden in about six months.
0
1
文章
Miss Chen
2017年08月10日
Growing roses from cuttings is an inexpensive and easy way to grow a new rose. It is also the best way to replicate a favorite or antique rose, as the new rose will be identical to the parent plant. Increase your chances of success by taking four or five cuttings, as not all cuttings will root successfully. Take rose cuttings any time of year from stems that have just finished blooming.

Step 1
Use clean, sharp pruners to cut a to 8-inch tip from a rose stem that has recently finished blooming. Remove the wilted bloom or hip and strip off all the leaves. Cut the bottom of the stem at an angle to remind you which end should be planted. Keep the cuttings in a cool, shady place until you're ready to plant them.
Step 2
Fill a container with commercial potting soil that has been dampened ahead of time. Any container will work, as long as the container has drainage holes in the bottom.
Step 3
Dip the angled end of the stem in powdered rooting hormone. Plant the stem in the potting mixture, with the bottom half of the stem buried in the soil. Several stem cuttings can be planted in the same container, as long as they aren't touching.
Step 4
Put a clear plastic bag over the container and secure the bag around the container with a rubber band. Place a bent wire clothes hanger or some small sticks in the bag to prevent the bag from dropping down on the cuttings.

Step 5
Place the container in bright sunlight away from hot, sunny windows. Check the potting soil daily. Although the plastic will keep the environment in the bag damp for up to several weeks, the potting soil should be misted immediately whenever it feels dry to the touch. The soil should be damp, but never dripping.
Step 6
Allow the cuttings to grow until the following spring. At that time, plant each cutting in a 5 to 6-inch pot and allow the cuttings to grow for a few more weeks, or plant them directly into the garden. The rose cuttings should be planted where they will be in sunlight for at least six to eight hours per day. Keep the soil damp.
Step 1
Use clean, sharp pruners to cut a to 8-inch tip from a rose stem that has recently finished blooming. Remove the wilted bloom or hip and strip off all the leaves. Cut the bottom of the stem at an angle to remind you which end should be planted. Keep the cuttings in a cool, shady place until you're ready to plant them.
Step 2
Fill a container with commercial potting soil that has been dampened ahead of time. Any container will work, as long as the container has drainage holes in the bottom.
Step 3
Dip the angled end of the stem in powdered rooting hormone. Plant the stem in the potting mixture, with the bottom half of the stem buried in the soil. Several stem cuttings can be planted in the same container, as long as they aren't touching.
Step 4
Put a clear plastic bag over the container and secure the bag around the container with a rubber band. Place a bent wire clothes hanger or some small sticks in the bag to prevent the bag from dropping down on the cuttings.
Step 5
Place the container in bright sunlight away from hot, sunny windows. Check the potting soil daily. Although the plastic will keep the environment in the bag damp for up to several weeks, the potting soil should be misted immediately whenever it feels dry to the touch. The soil should be damp, but never dripping.
Step 6
Allow the cuttings to grow until the following spring. At that time, plant each cutting in a 5 to 6-inch pot and allow the cuttings to grow for a few more weeks, or plant them directly into the garden. The rose cuttings should be planted where they will be in sunlight for at least six to eight hours per day. Keep the soil damp.
0
0
文章
Dummer. ゛☀
2017年08月10日

You may already be growing a dracaena plant as part of your houseplant collection; in fact, you may have several of the easy-care houseplant dracaena. If so, you have probably learned that dracaena plant care is fairly simple. Colorful strap-like foliage appears on many dracaena houseplant varieties. Many cultivars are large, tree-like plants while others are smaller. The houseplant dracaena exhibits an upright form no matter the cultivar.
Growing a Dracaena Plant
Stems of the houseplant dracaena are called canes and can be pruned at any point to keep plants under control. Dracaena houseplant varieties D. fragrans and D. deremensis have cultivars that can reach from 6 to 10 feet, so height control by pruning canes of older plants is useful when growing a dracaena plant. New foliage will sprout just below the cut in a few weeks. Propagate the removed cane for another plant. Dracaena plant care involves keeping the soil of houseplant dracaena moist, but never soggy. Drooping or yellowing leaves indicates over-watering or poor drainage. Learning how to care for a dracaena includes finding well-draining soil in which to grow your houseplant dracaena. Appropriate fertilization is also a part of how to care for a dracaena. Feed every two weeks in spring and summer with a balanced houseplant fertilizer. Reduce fertilization to once a month during fall. When growing a dracaena plant, stop feeding during winter months, as the plant benefits from a period of dormancy.
When growing a dracaena plant, locate it in brightly filtered light, such as through a sheer curtain in front of a sunny window. Room temperatures of 60-70 F. (15-21 C.) are best during the day, with night temperatures about 10 degrees cooler. However, the dracaena is forgiving of temperatures, as long as they are not too cold. Now that you know the basics of dracaena plant care, why not grow one of the many dracaena houseplant varieties in your home today?
1
1
文章
Miss Chen
2017年08月10日

If you live in a growing zone where the ground freezes, you'll need to cover your Knock Out roses (Rosa 'Radrazz') with protective materials to get them ready for winter. Knock Out roses, including other varieties such as Double Knock Out (Rosa hybrida 'Radtko'), are hardy in United States Department of Agriculture plant hardiness zones 5 to 9. In those warmer zones where the ground doesn't freeze, you might find that the bushes are some of the most carefree plants you have because they won't require deadheading or much special winter care.
Water in Late Fall
The time to start thinking about the winterizing process is long before winter actually arrives. As the temperatures start to drop in the autumn, but before the first hard freeze -- which will be at different times, depending on your growing zone -- give your roses a good, deep watering. Knock Out roses need about 1 inch per week on a regular basis. Moist soil will help protect the plant's roots from damage. Also stop feeding the plants additional nitrogen as the days get cooler.
Tie Canes Together
Knock Out roses can grow as high as 5 to 8 feet tall, possibly putting them in danger of breakage from the weight of winter snow -- but since they're an "own root" species that grow from their own roots, they're vigorous plants that will survive the onslaught. Fall pruning is not recommended, suggests University of Illinois Extension Master Gardener Judy Penticoff on the Rockford Register Star website.
For bush or shrub-type roses -- including Knock Outs -- the Ohio State University Extension recommends loosely tying the canes together near their tops with string, taking care not to bend the canes.

Add Protective Layers
If you live in USDA zone 5 or lower, take additional steps to protect your Knock Out roses. As a general rule, roses need additional protection from the winter cold when the temperatures drop to 20 degrees Fahrenheit for a few days on end, suggests Colorado State University Extension. After tying the canes together, place 8 to 10 inches of garden soil around the bottom of the shrub, or use other types of mulch. Leaves, shredded newspaper, pine needles or other organic matter are all suitable choices. To further protect your roses, cover the entire shrub with burlap material, or purchase winterizing cylinders from a garden supply store. Pile mulch around the shrub, cover with the cone, and then place a heavy rock or brick on top to keep the cylinder from blowing away in the winter winds.
Care for Knock Outs in Warmer Climates
Knock Out roses were designed to be winter-hardy and low-maintenance, so in warm growing zones without a hard frost and plant dieback, you may be tempted to simply leave them to do their thing. But low-maintenance doesn't mean no-maintenance, reminds University of Florida master gardener Paula Wetherby of the Florida Times-Union. In warm climates, you still need to plant your Knock Out roses in an area that gets good soil drainage and air flow and at least four to six hours of sunlight. Wherever you live, your "winterizing" tasks will also include pruning your Knock Out roses in late winter, before new growth appears. Using pruning tools that you've wiped down with a solution of 1 part bleach to 2 parts water, cut the shrub back to half its height and width, making cuts at a 45-degree angle just above a bud nodule.
0
0
文章
Miss Chen
2017年08月10日
Life may not be a bed of roses, but growing a bed of roses (Rosa spp.) captures life's hopes and disappointments more than most gardening experiences. Not many plants trigger such anticipation with their burgeoning buds or bring such heartbreak when their buds fade to brown, taking the hope of headily fragrant blooms with them. In order to spare yourself from this fate, keep your roses' buds warm, dry and bug-free, and your rose bed clean. Depending on their variety, roses are hardy in U.S. Department of Agriculture plant hardiness zones 2 through 10.

Frost Damage
Where mild winters keep rose buds coming, a few hours of frost can shrivel and brown them. Even worse, frost-injured rose stems, or canes, may develop a canker fungus infection. Avert disaster by watering your roses as soon as the forecast calls for frost. Moist soil retains heat during the day and releases it to the plants after dark. Cocooning the plants in bedsheets before the temperature dips below 40 degrees Fahrenheit minimizes their frost injury. Uncover them in the morning before they overheat.
Gray Mold Infection
Rose buds deteriorating into brownish-gray mush have Botrytis blight, better known as gray mold. Moist, mild weather with temperatures are 62 to 72 F encourages the fungal disease. The drooping buds may not open; if they do, the blooms may resemble brown pulp. As the infection moves down the canes, cankers mark its progress.
Cultural Gray Mold Control
Mail-order, bare-root roses often arrive with stowaway gray mold spores. Remove such roses from their packaging sleeves immediately, and plant them far enough apart so they have good air circulation. Keeping their leaves dry when you water the plants helps because gray mold spores need moisture to germinate. Remove old or damaged blooms promptly, along with the diseased plant parts and soil debris. Disinfect your pruning tools in a solution that is one part household bleach and nine parts water between cuts and after you finish pruning. The infected plant material should be disposed of in sealed plastic bags.

Fungicide Option
Chronic gray mold in roses can be treated by spraying the plants with a premixed, ready-to-use chlorothalonil fungicide as soon as their buds break in spring. On a cool, overcast day with calm rather than breezy conditions, put on clothing that covers all of your skin, closed-toe shoes, a face mask, gloves and goggles, and spray the fungicide until it drips from the rose bushes. Repeat the application weekly while cool, damp conditions persist. Each time you use the spray, keep the area around your roses off-limits to people and pets during spraying and until the spray dries.
Sap-Thieving Thrips
Thrips insects invade rose buds with ease; placed end-to end, 25 of the yellowish-brown or black bugs stretch less than 1 inch. After overwintering as pupae in grass and soil debris, they ride spring breezes to plants, tunnel deep into developing buds and feed on sap or pollen. Brown-scarred bud sepals -- the narrow, green outer petals -- indicate the presence of thrips. The buds either remain closed or open with brown-streaked petals. In mild-winter locations, thrips may breed all year.
Thrips Control
Treating developing rose buds with ready-to-use insecticidal soap prevents damage from thrips. Unless the insecticidal soap's label indicates otherwise, spray the product every other day, coating only the buds until they drip. After drying, the soap won't harm lacewing larvae and other thrips predators. Flooding the soil around your plants periodically in late spring and summer drowns thrips pupae and interrupts the insects' breeding cycle.
Frost Damage
Where mild winters keep rose buds coming, a few hours of frost can shrivel and brown them. Even worse, frost-injured rose stems, or canes, may develop a canker fungus infection. Avert disaster by watering your roses as soon as the forecast calls for frost. Moist soil retains heat during the day and releases it to the plants after dark. Cocooning the plants in bedsheets before the temperature dips below 40 degrees Fahrenheit minimizes their frost injury. Uncover them in the morning before they overheat.
Gray Mold Infection
Rose buds deteriorating into brownish-gray mush have Botrytis blight, better known as gray mold. Moist, mild weather with temperatures are 62 to 72 F encourages the fungal disease. The drooping buds may not open; if they do, the blooms may resemble brown pulp. As the infection moves down the canes, cankers mark its progress.
Cultural Gray Mold Control
Mail-order, bare-root roses often arrive with stowaway gray mold spores. Remove such roses from their packaging sleeves immediately, and plant them far enough apart so they have good air circulation. Keeping their leaves dry when you water the plants helps because gray mold spores need moisture to germinate. Remove old or damaged blooms promptly, along with the diseased plant parts and soil debris. Disinfect your pruning tools in a solution that is one part household bleach and nine parts water between cuts and after you finish pruning. The infected plant material should be disposed of in sealed plastic bags.
Fungicide Option
Chronic gray mold in roses can be treated by spraying the plants with a premixed, ready-to-use chlorothalonil fungicide as soon as their buds break in spring. On a cool, overcast day with calm rather than breezy conditions, put on clothing that covers all of your skin, closed-toe shoes, a face mask, gloves and goggles, and spray the fungicide until it drips from the rose bushes. Repeat the application weekly while cool, damp conditions persist. Each time you use the spray, keep the area around your roses off-limits to people and pets during spraying and until the spray dries.
Sap-Thieving Thrips
Thrips insects invade rose buds with ease; placed end-to end, 25 of the yellowish-brown or black bugs stretch less than 1 inch. After overwintering as pupae in grass and soil debris, they ride spring breezes to plants, tunnel deep into developing buds and feed on sap or pollen. Brown-scarred bud sepals -- the narrow, green outer petals -- indicate the presence of thrips. The buds either remain closed or open with brown-streaked petals. In mild-winter locations, thrips may breed all year.
Thrips Control
Treating developing rose buds with ready-to-use insecticidal soap prevents damage from thrips. Unless the insecticidal soap's label indicates otherwise, spray the product every other day, coating only the buds until they drip. After drying, the soap won't harm lacewing larvae and other thrips predators. Flooding the soil around your plants periodically in late spring and summer drowns thrips pupae and interrupts the insects' breeding cycle.
0
0
文章
Dummer. ゛☀
2017年08月10日
Coffee plants produce not only the all important coffee bean, but they make terrific houseplants too. In their native tropical habitat, coffee plants grow up to 15 feet or more, so pruning a coffee plant is integral when growing them indoors.
Information on Coffee Plants
Before we explore how to prune a coffee plant, a little background on Coffea arabica is in order. A member of the Ruiaceae family, one of 90 in the genus Coffea, coffee plant is an evergreen, perennial shrub with dark green, glossy leaves decorated with ruffled edges and pleasantly aromatic white blossoms. Grow this specimen as an attractive houseplant, or if you aren’t shy on patience, for its fruit, which will take about four years to produce anything approximating a decent cup of coffee.
Hailing from Southern Asia and tropical regions of Africa, temperatures should be kept at 70 F. (21 C.) or higher during daylight hours and in the mid to lower 60’s (15-20 C.) at night with a good dose of humidity. Make sure the plant has well-draining soil, filtered sun and moderate (never soggy) irrigation. Although coffee plants will produce fruit without fertilization, for the most optimal fruiting and quality, they should be fed every two weeks from March to October and thereafter each month. A soluble, all purpose type of fertilizer is recommended for use. Coffee plants can be obtained through most online nurseries. Purchase the cultivar Coffea arabica ‘Nana’ if you desire a plant with more compact growth, thus reducing the necessity and frequency of cutting back coffee plant.
How to Prune a Coffee Plant
Due to their ability to attain a height of between 10 and 15 feet, not manageable in most homes, pruning of coffee houseplants is a necessity, not an option. Never fear; pruning coffee plants indoors is a simple process. When cutting back coffee plant, remember this plant is very forgiving and pruning back harshly won’t harm the plant at all. When pruning a coffee plant on a commercial plantation, trees are kept down to an easy-to-harvest 6 feet. This may be too large for your home and may necessitate more severe pruning of coffee plants indoors. Pruning a coffee plant may only require minimal pinching of new growth or it may involve cutting the plant way back. Pinching back the plant will not only restrain the tree’s height, but will encourage a bushier appearance. Coffee plant should be pruned back during the spring months to maintain a fuller, bushy appearance and generally shape the plant. Using clean, sharp pruning shears, cut the stem at a 45-degree angle, ¼-inch above where the leaf attaches to the stem (axil), paying attention to top growth to retard size. Remove any suckers at this time as well as any dead or dying limbs while leaving the largest branches.
Cuttings taken from the plant during pruning are difficult to propagate; however, if you want to make the attempt, use the young stems prior to hardening. Coffee plants make an easy, attractive plant that with a minimum of care you will be enjoying for many years.
0
0
文章
Dummer. ゛☀
2017年08月10日
While most houseplants require a bit of effort in providing appropriate growing conditions (light, temperature, humidity, etc.), growing Chinese evergreens can make even the novice indoor gardener look like an expert. This tropical foliage plant is one of the most durable houseplants you can grow, tolerating poor light, dry air and drought.
Tips for Growing Chinese Evergreens Indoors
Growing Chinese evergreens (Aglaonema) is easy. This gem of a plant is one of the most popular houseplants grown in the home due to its ease of care. You can find Chinese evergreen plants in many varieties, including variegated forms. Although they are tolerant of many growing conditions, following certain recommendations will yield greater results. This includes placing them in well-draining soil, preferably an equal mix of potting soil, perlite and sand. Chinese evergreen plants thrive in medium to low light conditions, or indirect sunlight. Wherever you place it in the home, you should make sure that the plant receives warm temps and somewhat humid conditions. However, this flexible plant will tolerate less than ideal conditions if necessary. These plants prefer temperatures no lower than 60 F. (16 C.) with average indoor temps ranging between 70-72 F. (21-22 C.) being most favorable, but they can tolerate temps around 50-55 F.(10-13 C.). Keep Chinese evergreen plants away from drafts, which can cause browning of the foliage.
Chinese Evergreen Care
Caring for Chinese evergreen houseplants requires little effort when given the proper growing conditions. They enjoy moderate watering—not too much, not too little. Allow the plant to dry out some between watering. Overwatering will lead to root rot. As part of your Chinese evergreen care, you should fertilize older Chinese evergreens once or twice yearly using a water-soluble houseplant fertilizer. If your Chinese evergreen plant becomes too large or leggy, give the plant a quick trim. It’s also possible to save cuttings during the process for propagating new plants. Cuttings root easily in water. Older plants will sometimes produce flowers reminiscent of calla or peace lilies. This occurs in spring to summer. Most people choose to cut the blooms prior to seed productions, though you may choose to keep them and try your hand at seed growing them. Keep in mind, however, that this will take much longer.
To limit the accumulation of dust build-up, clean the leaves occasionally by wiping them down with a soft, damp rag or simply place them in the shower and allow them to air dry. Chinese evergreen houseplants can be affected by spider mites, scale, mealybugs, and aphids. Routinely checking the leaves for signs of pests will help limit problems later. While it may seem overwhelming at first, especially if you are new at growing Chinese evergreens indoors, it’s actually easier than you may think.
0
0
文章
Dummer. ゛☀
2017年08月10日
The cast iron plant (Aspidistra elatior), also known as iron plant and ballroom plant, is an extremely hardy houseplant and a perennial favorite in some regions. Growing cast iron plants is especially favored by those who don’t have a lot of time for plant care, as this species can survive even the most extreme conditions where other plants would shrivel and die, which makes cast iron plant care a snap. Keep reading to learn more about how to grow a cast iron plant indoors or using cast iron plants in the landscape.
How to Grow a Cast Iron Plant Indoors
Growing cast iron indoors is extremely easy and rewarding. This China native is a member of the lily family. The plant has small purple flowers that only appear near the soil surface and are hidden in its foliage. For what this plant may lack in glitz, however, it makes up for in robust, healthy dark green leaves. The cast iron plant grows well in low light indoors and is not finicky about regular water either. Although a slow grower, this reliable performer will live for many years, reaching a mature height of around 2 feet.
Growing Cast Iron Plants Outdoors
Various cast iron cultivars succeed where other vegetation will not. Using cast iron plant in the landscape is common as a ground cover under trees where other plants fail to thrive and in other hard-to-grow areas. You can also use is as a background plant in your flower bed or along with azaleas for a nice in-between filler plant.
Cast Iron Plant Care
Although the cast iron plant will tolerate extreme conditions, it’s always a good idea to provide plenty of water, especially during very dry periods. This plant also responds well to organic soil and an annual dose of all-purpose fertilizer. Propagate cast iron plants by division. Although new plants are slow to grow, with some patience and time, the new plant will thrive. This hardy plant thrives in very hot, dry summers and isn’t easily damaged by cold winters. Insects seem to leave it alone, and it very rarely is bothered by disease of any kind. When you want a plant with such ease of care and flexibility or when all else fails, give this easy-care plant a try. Grow cast iron indoors or try your hand at using cast iron plant in the landscape for a unique look.
0
0

