文章
Dummer. ゛☀
2017年08月15日

Anthracnose of agaves is bad news to be sure. The good news, however, is that although the fungus is unsightly, anthracnose on agave plants isn’t an automatic death sentence. The key is to improve growing conditions, and to treat the plant as soon as possible. Read on to learn how to prevent and control anthracnose of agaves.

What is Agave Anthracnose?
Like other agave fungal diseases, anthracnose of agaves generally occurs when growing conditions are wet and humid. While this may be due to the moods of Mother Nature, including splashing rain, it can also be the result of too much shade or excessive irrigation, especially via overhead sprinklers. The primary sign of anthracnose of agaves include unsightly sunken lesions on the crown and sword-like leaves, often with a visible, reddish-brown spore mass. The disease spores spread from plant to plant via splashing water or wind-blown rain.

Agave Anthracnose Treatment and Prevention
When it comes to anthracnose of agaves, prevention is definitely the best means of control, as fungicides aren’t always effective. Plant agaves in full sunlight, always in well-drained soil. Irrigate the plant using drip irrigation or a soaker hose and avoid overhead sprinklers. Never water overhead if the disease is present. Disinfect garden tools by spraying them with isopropyl rubbing alcohol or a mixture of 10 parts water to one part household bleach. If you’re in the market for new agave plants, look for healthy, disease-resistant cultivars. Allow generous distance between plants to provide adequate air circulation. Part of agave anthracnose treatment involves the immediate removal of growth with active lesions. Destroy infected plant parts carefully to avoid spread of disease. Never compost diseased plant parts. Apply sulfur powder or copper spray weekly, beginning in spring and continuing every couple of weeks throughout the growing season, but not during hot weather. Alternatively, neem oil spray applied every couple of weeks may also be an effective preventive measure. Spray agave plants and the surrounding soil with a broad-spectrum fungicide during wet, humid weather. Products containing Bacillus subtilis are non-toxic to bees and other beneficial insects.
What is Agave Anthracnose?
Like other agave fungal diseases, anthracnose of agaves generally occurs when growing conditions are wet and humid. While this may be due to the moods of Mother Nature, including splashing rain, it can also be the result of too much shade or excessive irrigation, especially via overhead sprinklers. The primary sign of anthracnose of agaves include unsightly sunken lesions on the crown and sword-like leaves, often with a visible, reddish-brown spore mass. The disease spores spread from plant to plant via splashing water or wind-blown rain.
Agave Anthracnose Treatment and Prevention
When it comes to anthracnose of agaves, prevention is definitely the best means of control, as fungicides aren’t always effective. Plant agaves in full sunlight, always in well-drained soil. Irrigate the plant using drip irrigation or a soaker hose and avoid overhead sprinklers. Never water overhead if the disease is present. Disinfect garden tools by spraying them with isopropyl rubbing alcohol or a mixture of 10 parts water to one part household bleach. If you’re in the market for new agave plants, look for healthy, disease-resistant cultivars. Allow generous distance between plants to provide adequate air circulation. Part of agave anthracnose treatment involves the immediate removal of growth with active lesions. Destroy infected plant parts carefully to avoid spread of disease. Never compost diseased plant parts. Apply sulfur powder or copper spray weekly, beginning in spring and continuing every couple of weeks throughout the growing season, but not during hot weather. Alternatively, neem oil spray applied every couple of weeks may also be an effective preventive measure. Spray agave plants and the surrounding soil with a broad-spectrum fungicide during wet, humid weather. Products containing Bacillus subtilis are non-toxic to bees and other beneficial insects.
0
0
文章
Miss Chen
2017年08月15日

With their showy flowers and low-maintenance needs, bottlebrush trees (Callistemon spp.) are often chosen in warm growing zones for hedges or statement plants. They grow best in full sun and soil with low alkalinity, but other than that aren't very picky about where you plant them.
Soil Preparation
Bottlebrush thrive in a wide variety of soil conditions, except for highly alkaline soil. They will tolerate slightly alkaline soils, but high alkalinity results in chlorosis, which turns the plant's leaves yellow. Soils with a pH higher than 7.5 have moderate or high alkalinity. You should test the soil pH before planting bottlebrush plants.
You can stabilize the pH of some soil types, but there is no way to permanently lower the alkalinity of soils with a high concentration of lime. Test lime content by placing about 1 tablespoon of dry soil in a cup and moistening it with white vinegar. If the soil bubbles, it contains too much lime to amend the soil sufficiently. If it does not bubble, regularly adding organic amendments can decrease the alkalinity enough to grow bottlebrushes.
Amend soils before planting with an organic amendment low in mineral salts, such as plant-based composts and sphagnum peat moss. This will help stabilize the soil pH and improve soil texture, even in soils that do not test as alkaline. Spread a layer of amendment 2 to 3 inches deep over the planting surface, and work it in to a depth of 6 to 8 inches. If you're using organic matter to lower soil pH, apply this same amount each year for the next three years, then apply 1 to 2 inches each year after that.

Planting Tips
Dig a planting hole 1 to 2 inches shallower than the rootball and three times as wide. This prevents trees from settling too deep in the soil after planting and provides loose soil on either side for new roots to grow. Remove the container and set the tree in the hole, then fill in around the plant with the same soil you dug out of the planting hole. When you're done, you want the tree at the same depth it was previously growing or slightly higher than the surrounding soil, with the soil sloped up to meet the top of the rootball.
When digging planting holes for multiple trees, space far enough apart to allow for the tree's mature size. For instance, red bottlebrush (Callistemon citrinus, U.S. Department of Agriculture plant hardiness zones 9a through 11) grows 10 to 15 feet tall and wide, and weeping bottlebrush (Callistemon viminalis, USDA zones 9b through 11) grows 15 to 20 feet. Spacing them 4 to 9 feet apart gives them room to grow with some overlap. Dwarf bottlebrush (Callistemon citrinus 'Little John,' USDA zones 8 through 11) grows only 5 feet wide so you can plant them 2 feet apart.
In their preferred growing zones, bottlebrush can be planted year-round. You'll just have to make sure that you can supply adequate water for the new roots. In Florida, for example, it's easier to plant during the cooler fall, winter and spring than trying to supply enough water to keep the soil moist during hot summers.

After-Planting Care
Right after planting, water thoroughly to settle the soil. If the soil level drops after watering, add more soil and water again. For the first year after planting, water regularly to keep the soil moist. Bottlebrush are native to damp locations and are more likely to establish deep root systems if you give them plenty of water.
After they are well-established, most bottlebrush varieties are drought tolerant and need very little supplemental watering. The exception is weeping bottlebrush, which requires plenty of water to keep the soil moist.
To keep them growing and flowering well, fertilize bottlebrush with a low-phosphorous fertilizer. Phosphorous is represented by the middle number in a fertilizer's N-P-K ratio, so look for fertilizers with a lower number in the middle. For example, apply a dry slow-release fertilizer with an N-P-K ratio of 12-4-8 by scattering 1 tablespoon per square foot of soil surface. Do this twice a year, once in the spring and once in the fall.
Soil Preparation
Bottlebrush thrive in a wide variety of soil conditions, except for highly alkaline soil. They will tolerate slightly alkaline soils, but high alkalinity results in chlorosis, which turns the plant's leaves yellow. Soils with a pH higher than 7.5 have moderate or high alkalinity. You should test the soil pH before planting bottlebrush plants.
You can stabilize the pH of some soil types, but there is no way to permanently lower the alkalinity of soils with a high concentration of lime. Test lime content by placing about 1 tablespoon of dry soil in a cup and moistening it with white vinegar. If the soil bubbles, it contains too much lime to amend the soil sufficiently. If it does not bubble, regularly adding organic amendments can decrease the alkalinity enough to grow bottlebrushes.
Amend soils before planting with an organic amendment low in mineral salts, such as plant-based composts and sphagnum peat moss. This will help stabilize the soil pH and improve soil texture, even in soils that do not test as alkaline. Spread a layer of amendment 2 to 3 inches deep over the planting surface, and work it in to a depth of 6 to 8 inches. If you're using organic matter to lower soil pH, apply this same amount each year for the next three years, then apply 1 to 2 inches each year after that.
Planting Tips
Dig a planting hole 1 to 2 inches shallower than the rootball and three times as wide. This prevents trees from settling too deep in the soil after planting and provides loose soil on either side for new roots to grow. Remove the container and set the tree in the hole, then fill in around the plant with the same soil you dug out of the planting hole. When you're done, you want the tree at the same depth it was previously growing or slightly higher than the surrounding soil, with the soil sloped up to meet the top of the rootball.
When digging planting holes for multiple trees, space far enough apart to allow for the tree's mature size. For instance, red bottlebrush (Callistemon citrinus, U.S. Department of Agriculture plant hardiness zones 9a through 11) grows 10 to 15 feet tall and wide, and weeping bottlebrush (Callistemon viminalis, USDA zones 9b through 11) grows 15 to 20 feet. Spacing them 4 to 9 feet apart gives them room to grow with some overlap. Dwarf bottlebrush (Callistemon citrinus 'Little John,' USDA zones 8 through 11) grows only 5 feet wide so you can plant them 2 feet apart.
In their preferred growing zones, bottlebrush can be planted year-round. You'll just have to make sure that you can supply adequate water for the new roots. In Florida, for example, it's easier to plant during the cooler fall, winter and spring than trying to supply enough water to keep the soil moist during hot summers.
After-Planting Care
Right after planting, water thoroughly to settle the soil. If the soil level drops after watering, add more soil and water again. For the first year after planting, water regularly to keep the soil moist. Bottlebrush are native to damp locations and are more likely to establish deep root systems if you give them plenty of water.
After they are well-established, most bottlebrush varieties are drought tolerant and need very little supplemental watering. The exception is weeping bottlebrush, which requires plenty of water to keep the soil moist.
To keep them growing and flowering well, fertilize bottlebrush with a low-phosphorous fertilizer. Phosphorous is represented by the middle number in a fertilizer's N-P-K ratio, so look for fertilizers with a lower number in the middle. For example, apply a dry slow-release fertilizer with an N-P-K ratio of 12-4-8 by scattering 1 tablespoon per square foot of soil surface. Do this twice a year, once in the spring and once in the fall.
0
0
文章
Miss Chen
2017年08月15日
Portulaca grandiflora, also called moss rose, tends to self-seed, but harvesting seeds from this annual plant helps keep it where you want it. Moss rose quickly spreads in full-sun, dry areas when seed capsules are left on the plant. Growing 4 to 8 inches tall and 6 to 24 inches wide, moss rose varieties include the early-flowering Margarita series, "Sundial," which produces early, double flowers in sunset colors, and "Calypso," which features white, yellow, orange, pink or purple double flowers.

Moss Rose Varieties
Suppliers sell moss rose cultivars, hybrids, strains, heirlooms and mixes, and only some of these come true from seed. Cultivars and hybrids are specially bred to have certain characteristics, such as flower color, shape or performance, but they don't pass on these characteristics to their offspring. Some cultivar and hybrid seeds may not even sprout. Strains and heirloom plants are often older varieties, and these are more reliable in producing plants that are similar to themselves. Mixes are different varieties mixed together, and these may cross-fertilize, producing unpredictable results. Moss rose cultivars and hybrids are often more expensive than other varieties. If you aren't sure what type of moss rose you're growing, ask the garden center where you bought it.
Harvesting Seed
Moss rose seeds are fine as dust and develop inside seed capsules, which you can harvest. Moss rose flowers in summer. The seed capsules are 1/8 to 1/4 inch long, and they develop after the flowers are pollinated. When the seed capsules are ripe, they turn dry and papery and split open. Inside are many tiny, blue-gray seeds.

Harvest ripe moss rose seed capsules on a dry, sunny day. If you aren't sure whether the capsules are ripe, gently rub one between your thumb and forefinger. To avoid spilling the seeds on the soil, where they may sprout the following year, take a seed capsule indoors before testing it. Pinch off the ripe capsules and put them in a paper bag.
Separating Seed
Moss rose seeds should be separated from the seed capsules and dried before storing. Crush the seed capsules over a sheet of newspaper in a draft-free place. Place a colander on another sheet of newspaper, and pour the the crushed seed capsules into the colander. Gently shake the colander so that the seeds fall through but the capsule debris is left behind.
Moss rose seeds must be stored in an airtight container. Lift the newspaper and close it along its crease. Place one edge of the crease at the lip of an open airtight container, and lift the newspaper so the seeds slide into the container. Flick the newspaper once or twice with your finger to loosen any remaining seeds, put the newspaper down, then seal the container.
Storing Seed
A refrigerator is the best place for storing moss rose seeds, where they will remain fresh for sowing the following year. Put moss rose seeds in their sealed, airtight container in a refrigerator or similar cool, dry place such as a basement or cellar. Don't place the container in direct light, and don't open the container to check on the seeds until it's time to sow them. Direct light warms up the inside of the container, damaging the seeds, and opening the container allows moisture inside, which encourages the seeds to rot.
Moss Rose Varieties
Suppliers sell moss rose cultivars, hybrids, strains, heirlooms and mixes, and only some of these come true from seed. Cultivars and hybrids are specially bred to have certain characteristics, such as flower color, shape or performance, but they don't pass on these characteristics to their offspring. Some cultivar and hybrid seeds may not even sprout. Strains and heirloom plants are often older varieties, and these are more reliable in producing plants that are similar to themselves. Mixes are different varieties mixed together, and these may cross-fertilize, producing unpredictable results. Moss rose cultivars and hybrids are often more expensive than other varieties. If you aren't sure what type of moss rose you're growing, ask the garden center where you bought it.
Harvesting Seed
Moss rose seeds are fine as dust and develop inside seed capsules, which you can harvest. Moss rose flowers in summer. The seed capsules are 1/8 to 1/4 inch long, and they develop after the flowers are pollinated. When the seed capsules are ripe, they turn dry and papery and split open. Inside are many tiny, blue-gray seeds.
Harvest ripe moss rose seed capsules on a dry, sunny day. If you aren't sure whether the capsules are ripe, gently rub one between your thumb and forefinger. To avoid spilling the seeds on the soil, where they may sprout the following year, take a seed capsule indoors before testing it. Pinch off the ripe capsules and put them in a paper bag.
Separating Seed
Moss rose seeds should be separated from the seed capsules and dried before storing. Crush the seed capsules over a sheet of newspaper in a draft-free place. Place a colander on another sheet of newspaper, and pour the the crushed seed capsules into the colander. Gently shake the colander so that the seeds fall through but the capsule debris is left behind.
Moss rose seeds must be stored in an airtight container. Lift the newspaper and close it along its crease. Place one edge of the crease at the lip of an open airtight container, and lift the newspaper so the seeds slide into the container. Flick the newspaper once or twice with your finger to loosen any remaining seeds, put the newspaper down, then seal the container.
Storing Seed
A refrigerator is the best place for storing moss rose seeds, where they will remain fresh for sowing the following year. Put moss rose seeds in their sealed, airtight container in a refrigerator or similar cool, dry place such as a basement or cellar. Don't place the container in direct light, and don't open the container to check on the seeds until it's time to sow them. Direct light warms up the inside of the container, damaging the seeds, and opening the container allows moisture inside, which encourages the seeds to rot.
0
0
文章
Miss Chen
2017年08月15日
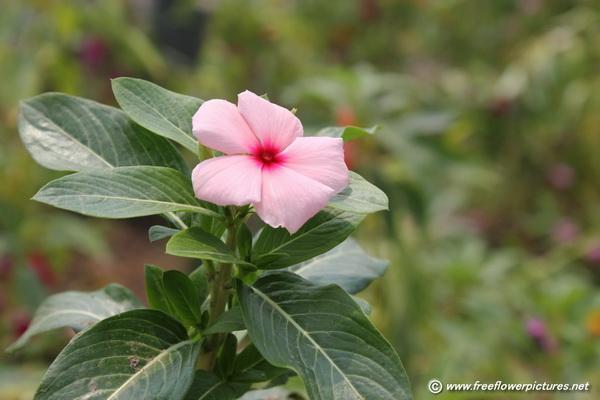
Vinca, also known as catharanthus or Madagascar periwinkle, is a popular annual flower. Growing upwards to 10 to 16 inches tall, with dark green leaves and five-petal blossoms in pink, mauve or white, these flowers spread quickly and require little care. While vincas have few problems, occasionally they will suddenly wilt and die.

Symptoms and Causes
According to the Alabama Agricultural Experiment Station and Clemson University Extension, there are several diseases and fungus that can cause vincas to wilt, including phytophthora stem blight and root rot, pythium root rot, rhizoctonia stem and root rot, gray mold and the tomato spotted wilt virus. Symptoms of these diseases and fungus include dark colored lesions on the stems and branches, yellowing leaves with stunted growth, spots on the foliage, gray mold on the plant or black concentric rings on the leaves.
Many of these diseases and fungus are prevalent in soil that has poor drainage or gardens that have been watered incorrectly.
Prevention and Treatment
Select healthy vinca to plant in the garden. Enrich the garden's soil with well-rotted manure or compost before planting to help increase the soil's moisture-retention. Do not plant the vinca deeply and space 8 to 12 inches apart to allow for air circulation. Vincas need about 1 inch of water each week; if rainfall is insufficient, avoid overhead irrigation systems and water deeply in the early morning to allow the plants time to dry before nightfall.
Remove and destroy any affected plants. Treat the remaining plants with a fungicide; contact your local extension office to determine which fungicide is needed.
0
0
文章
Miss Chen
2017年08月15日
Petunias are lively, flowering annuals that come in a variety of colors. Keeping your petunias blooming is fairly straightforward as long as you know what to do and when to do it. Petunias do require regular maintenance throughout the growing season.

Step 1
Plant petunias in full sun. They love the sun and as a result will produce more flowers.
Step 2
Fertilize petunias once every three weeks. They like fertilizers that are balanced like 8-8-8 or 10-10-10. Before applying a liquid fertilizer make sure the plants are well watered. Never fertilize petunias that aren't properly hydrated. Use time-release fertilizer granules in potted plants. This will ensure they are getting a little extra nourishment every time they're watered.
Step 3
Examine the petunia plants to see if they are end-of-stem bloomers. If they are, you have to cut the stems back. Otherwise the stems will keep growing longer, get leggy and won't produce flowers. If the stem is 8 inches or longer, start clipping. Pick three or four stems each week to cut back. Clip the stems in half. This will cause the remaining stem portion to grow two branches just below the cut. Each branch will becoming a blooming tip.

Step 4
Look at the dying blooms on the petunia plant. If there is a bulge developing at the base of the bloom it means this variety of petunia plant is a seed producer. Dead head (pinch or cut off the dead flower below the bloom). Make sure the seed bulge is cut off with the flower. This stops the plant from sending its energy to the growing of seeds and instead will use its energy to start producing more flowers.
Step 5
Cut back long stemmed petunias that have stopped producing flowers altogether by 2/3 and add fertilizer. Again clip randomly over a seven- to 10-day period. After clipping it'll take the stems three or four weeks to start blooming again.
Step 1
Plant petunias in full sun. They love the sun and as a result will produce more flowers.
Step 2
Fertilize petunias once every three weeks. They like fertilizers that are balanced like 8-8-8 or 10-10-10. Before applying a liquid fertilizer make sure the plants are well watered. Never fertilize petunias that aren't properly hydrated. Use time-release fertilizer granules in potted plants. This will ensure they are getting a little extra nourishment every time they're watered.
Step 3
Examine the petunia plants to see if they are end-of-stem bloomers. If they are, you have to cut the stems back. Otherwise the stems will keep growing longer, get leggy and won't produce flowers. If the stem is 8 inches or longer, start clipping. Pick three or four stems each week to cut back. Clip the stems in half. This will cause the remaining stem portion to grow two branches just below the cut. Each branch will becoming a blooming tip.
Step 4
Look at the dying blooms on the petunia plant. If there is a bulge developing at the base of the bloom it means this variety of petunia plant is a seed producer. Dead head (pinch or cut off the dead flower below the bloom). Make sure the seed bulge is cut off with the flower. This stops the plant from sending its energy to the growing of seeds and instead will use its energy to start producing more flowers.
Step 5
Cut back long stemmed petunias that have stopped producing flowers altogether by 2/3 and add fertilizer. Again clip randomly over a seven- to 10-day period. After clipping it'll take the stems three or four weeks to start blooming again.
0
0
文章
Dummer. ゛☀
2017年08月15日
It's always fun as well as very interesting to find growing in the wild a plant that we buy when back at home in order to have it in the gardens! Aubrieta is one of our favourites. It manages to bloom early, even in gardens in the UK, and this is because, in the wild, it grows high up in the mountains and is used to inhospitable conditions like the English spring, which punishes so many of the other early-flowering plants.

Distribution
This neat plant with its beautiful muve flowers can be found in Crete, where the plants shown on this page were photographed. We have also seen wild Aubrieta in the Gargano Peninsula in Italy.

Habitat and Blooming Times
Aubrieta deltoidea grows in rocky habitats high up in the mountains, where it forms pretty cushions of flowers from March to early June.

Etymology
Aubrieta, the genus name, honours the 17th century French artist Claude Aubriet, who had held the post of Royal Botanical Painter at the French Royal Garden.
The specific epithet deltoidea means triangular (shaped like a delta).
In the past the common name given to this flower was Aubretia, but nowadays Aubrieta, spelt exactly as in the genus name, is more commonly used.
Distribution
This neat plant with its beautiful muve flowers can be found in Crete, where the plants shown on this page were photographed. We have also seen wild Aubrieta in the Gargano Peninsula in Italy.
Habitat and Blooming Times
Aubrieta deltoidea grows in rocky habitats high up in the mountains, where it forms pretty cushions of flowers from March to early June.
Etymology
Aubrieta, the genus name, honours the 17th century French artist Claude Aubriet, who had held the post of Royal Botanical Painter at the French Royal Garden.
The specific epithet deltoidea means triangular (shaped like a delta).
In the past the common name given to this flower was Aubretia, but nowadays Aubrieta, spelt exactly as in the genus name, is more commonly used.
0
0


文章
Dummer. ゛☀
2017年08月15日
Anyone who says they love the scent of spring flowers obviously hasn't caught a whiff of these stinkers, especially when they are fading.
Identification
Smyrnium olusatrum is a hairless biennial umbellifer growing to a height of 1.5m. The yellowish-green glossy leaves are divided and bluntly toothed. Young stems are solid but become hollow when old; the upper branches are usually opposite.
Borne in dense umbels, the yellowish Flowers of Alexanders are hermaphrodite (having both male and female reproductive organs); they have no sepals. The seeds change colour from light green to black as they ripen during July and August..

Distribution
This Mediterranean plant was probably introduced to Britainby the Romans, who may have used it as a general-purpose vegetable. (The leaves and young shoots can be eaten either raw or cooked, although the bitter taste is not universally popular.) Alexanders grows wild in most coastal parts of Britain and Ireland, and in southern and central Britain it is also found in many inland locations. Further north this warm-climate cannot cope inland with winter's extreme cold, and it is confined to sheltered coastal areas.
Smyrnium olusatrum is common throughout central and southern mainland Europe
Habitat
Particularly were the soil is enriched and has been disturbed, Alexanders colonises waste land, roadside verges, woodland edges, scrub and and cliff tops.
Although mainly coastal, this umbellifer seems to have benefited from the salting of roads, and so has moved inland nearly always on or near roadside verges.
Blooming Times
This mainly coastal plant is a very early blooming member of the family Apiaceae, and you will see swathes of it in springtime along hedgerows and onthe slopes leading down to sheltered coves.
The umbrella-like yellow flower heads open in April, and by July the seeds are beginning to ripen and turn dark brown.

Uses
All parts of this plant are considered edible, but older leaves and stems are usually cooked; only young leaves and shoots are worth adding raw to salads. The first new leaves appear during winter, before many other edible wild plants are available. In the distant past Smyrnium olusatrum was used in many herbal remedies, but nowadays other plants are generally considered superior. (We strongly advise against eating or using as medicines any plants without first obtaining qualified professional advice.)
Etymology
The generic botanical name Smyrnium comes from the Greek word smyrnion, which means myrrh. It suggests that the smells of Alexanders and of myrrh may be similar.The specific epithet olusatrum comes from the Latin olus-, a garden herb, and -ater, black - referring to the seeds.
Identification
Smyrnium olusatrum is a hairless biennial umbellifer growing to a height of 1.5m. The yellowish-green glossy leaves are divided and bluntly toothed. Young stems are solid but become hollow when old; the upper branches are usually opposite.
Borne in dense umbels, the yellowish Flowers of Alexanders are hermaphrodite (having both male and female reproductive organs); they have no sepals. The seeds change colour from light green to black as they ripen during July and August..
Distribution
This Mediterranean plant was probably introduced to Britainby the Romans, who may have used it as a general-purpose vegetable. (The leaves and young shoots can be eaten either raw or cooked, although the bitter taste is not universally popular.) Alexanders grows wild in most coastal parts of Britain and Ireland, and in southern and central Britain it is also found in many inland locations. Further north this warm-climate cannot cope inland with winter's extreme cold, and it is confined to sheltered coastal areas.
Smyrnium olusatrum is common throughout central and southern mainland Europe
Habitat
Particularly were the soil is enriched and has been disturbed, Alexanders colonises waste land, roadside verges, woodland edges, scrub and and cliff tops.
Although mainly coastal, this umbellifer seems to have benefited from the salting of roads, and so has moved inland nearly always on or near roadside verges.
Blooming Times
This mainly coastal plant is a very early blooming member of the family Apiaceae, and you will see swathes of it in springtime along hedgerows and onthe slopes leading down to sheltered coves.
The umbrella-like yellow flower heads open in April, and by July the seeds are beginning to ripen and turn dark brown.
Uses
All parts of this plant are considered edible, but older leaves and stems are usually cooked; only young leaves and shoots are worth adding raw to salads. The first new leaves appear during winter, before many other edible wild plants are available. In the distant past Smyrnium olusatrum was used in many herbal remedies, but nowadays other plants are generally considered superior. (We strongly advise against eating or using as medicines any plants without first obtaining qualified professional advice.)
Etymology
The generic botanical name Smyrnium comes from the Greek word smyrnion, which means myrrh. It suggests that the smells of Alexanders and of myrrh may be similar.The specific epithet olusatrum comes from the Latin olus-, a garden herb, and -ater, black - referring to the seeds.
0
0
文章
Dummer. ゛☀
2017年08月15日
Dianthus caryophyllus, carnation or clove pink, is a species of Dianthus. It is probably native to the Mediterranean region but its exact range is unknown due to extensive cultivation for the last 2,000 years.
It is a herbaceous perennial plant growing to 80 cm tall. The leaves are glaucous greyish green to blue-green, slender, up to 15 cm long. The flowers are produced singly or up to five together in a cyme; they are 3–5 cm diameter, and sweetly scented; the original natural flower colour is bright pinkish-purple, but cultivars of other colours, including red, white, yellow and green, have been developed.

Cultivation and uses
Growing
Carnations require well-drained, neutral to slightly alkaline soil, and full sun. Numerous cultivars have been selected for garden planting.[4] Typical examples include 'Gina Porto', 'Helen', 'Laced Romeo', and 'Red Rocket'.
Colombia is the largest carnation producer in the world.

Traditional meanings
For the most part, carnations express love, fascination, and distinction, though there are many variations dependent on colour.
Along with the red rose, the red carnation can be used as a symbol of socialism and the labour movement, and historically has often been used in demonstrations on International Workers' Day (May Day).
In Portugal, bright red carnations represent the 1974 coup d'etat that ended the Estado Novo regime.
Light red carnations represent admiration, while dark red denote deep love and affection.
White carnations represent pure love and good luck, while striped (variegated) carnations symbolise regret that a love cannot be shared.
White carnations, in the Netherlands are associated with HRH prince Bernhard. He wore one during World War II and in a gesture of defiance some of the Dutch population took up this gesture. After the war the white carnation became a sign of the Prince, veterans and remembrance of the resistance.
Purple carnations indicate capriciousness. In France, it is a traditional funeral flower, given in condolence for the death of a loved one.
According to a Christian legend, carnations first appeared on Earth as Jesus carried the Cross. The Virgin Mary shed tears at Jesus' plight, and carnations sprang up from where her tears fell. Thus the pink carnation became the symbol of a mother's undying love.
It is a herbaceous perennial plant growing to 80 cm tall. The leaves are glaucous greyish green to blue-green, slender, up to 15 cm long. The flowers are produced singly or up to five together in a cyme; they are 3–5 cm diameter, and sweetly scented; the original natural flower colour is bright pinkish-purple, but cultivars of other colours, including red, white, yellow and green, have been developed.
Cultivation and uses
Growing
Carnations require well-drained, neutral to slightly alkaline soil, and full sun. Numerous cultivars have been selected for garden planting.[4] Typical examples include 'Gina Porto', 'Helen', 'Laced Romeo', and 'Red Rocket'.
Colombia is the largest carnation producer in the world.
Traditional meanings
For the most part, carnations express love, fascination, and distinction, though there are many variations dependent on colour.
Along with the red rose, the red carnation can be used as a symbol of socialism and the labour movement, and historically has often been used in demonstrations on International Workers' Day (May Day).
In Portugal, bright red carnations represent the 1974 coup d'etat that ended the Estado Novo regime.
Light red carnations represent admiration, while dark red denote deep love and affection.
White carnations represent pure love and good luck, while striped (variegated) carnations symbolise regret that a love cannot be shared.
White carnations, in the Netherlands are associated with HRH prince Bernhard. He wore one during World War II and in a gesture of defiance some of the Dutch population took up this gesture. After the war the white carnation became a sign of the Prince, veterans and remembrance of the resistance.
Purple carnations indicate capriciousness. In France, it is a traditional funeral flower, given in condolence for the death of a loved one.
According to a Christian legend, carnations first appeared on Earth as Jesus carried the Cross. The Virgin Mary shed tears at Jesus' plight, and carnations sprang up from where her tears fell. Thus the pink carnation became the symbol of a mother's undying love.
0
0
文章
Miss Chen
2017年08月14日
Impatiens (Impatiens wallerana) is an annual flower that thrives in partial to full shade. They produce colorful blooms from early summer to fall. Their leaves are an attractive dark green color, though under the wrong growing conditions, they may turn yellow.

Considerations
Downy mildew is a fungus disease that affects impatiens. In addition to premature leaf fall and stunting, other symptoms include yellowing leaves. Other diseases affecting impatiens include verticillium wilt and botrytis blight. Both diseases also cause leaves to turn yellow. Fungicides may help treat the impatiens in the early stages of any of these plant diseases.
Significance
Over-watering impatiens may cause leaves to turn yellow. To prevent this, keep the soil moist between waterings. Alternatively, too little water may cause impatiens' leaves to turn yellow as well. If the soil is dry and yellow leaves appear, it's time to water the impatiens.

Nutrient Deficiency
Impatiens requires a monthly application of a water-soluble fertilizer. Not getting the correct amount of fertilizer may stunt plant growth and turn leaves yellow. Always follow the recommended application rate when applying fertilizer to impatiens.
Considerations
Downy mildew is a fungus disease that affects impatiens. In addition to premature leaf fall and stunting, other symptoms include yellowing leaves. Other diseases affecting impatiens include verticillium wilt and botrytis blight. Both diseases also cause leaves to turn yellow. Fungicides may help treat the impatiens in the early stages of any of these plant diseases.
Significance
Over-watering impatiens may cause leaves to turn yellow. To prevent this, keep the soil moist between waterings. Alternatively, too little water may cause impatiens' leaves to turn yellow as well. If the soil is dry and yellow leaves appear, it's time to water the impatiens.
Nutrient Deficiency
Impatiens requires a monthly application of a water-soluble fertilizer. Not getting the correct amount of fertilizer may stunt plant growth and turn leaves yellow. Always follow the recommended application rate when applying fertilizer to impatiens.
0
0
文章
Miss Chen
2017年08月14日
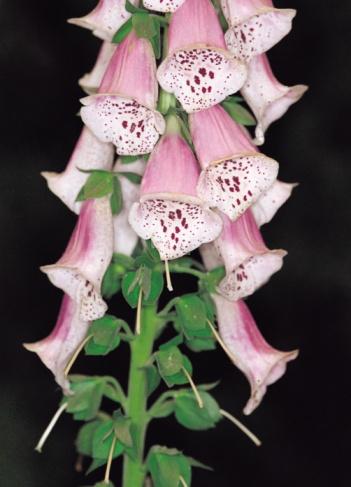
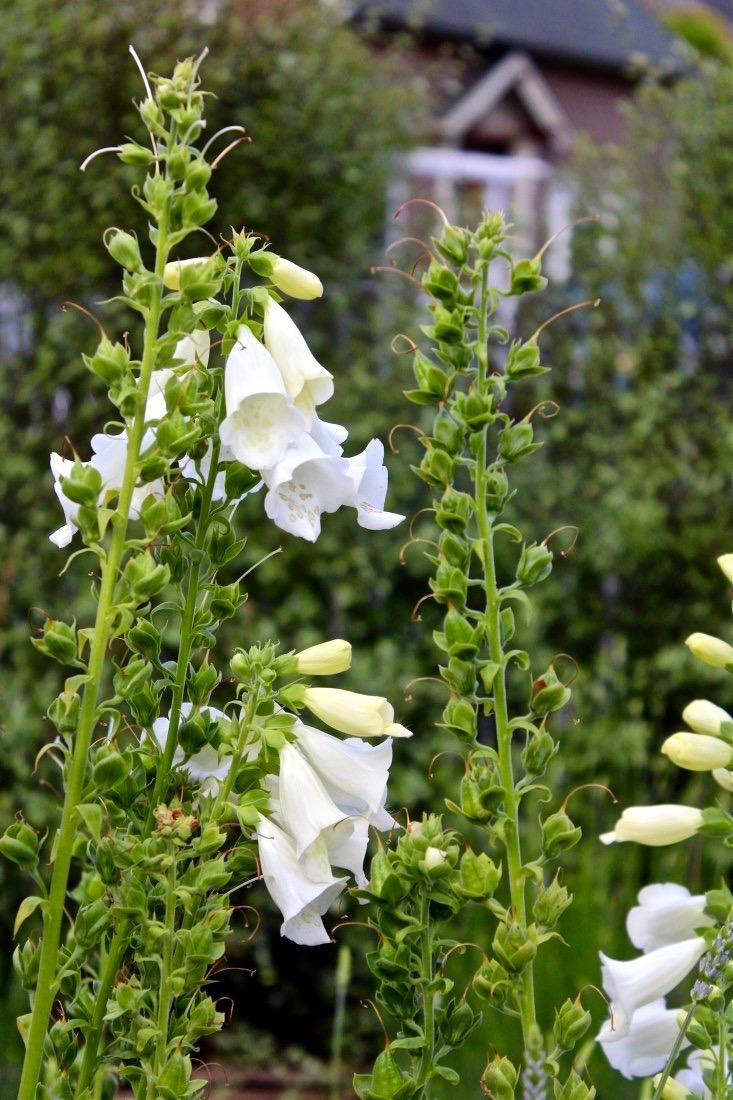
Deadheading or pinching back spent blossoms is a simple and effective pruning technique. By deadheading, you encourage both perennial and annual flowers to put forth continued blossoms throughout the growing season, as they are not expending energy on producing seed. Foxglove plants, growing energetically to fill in shady garden areas, blooms with tall spires of pink and yellow flowers in the first part of the summer. Foxglove may respond to deadheading by blooming again later in the season.
Step 1
Watch the foxglove blossoms as they begin to die back in early to mid summer.
Step 2
Clip off the spent blossoms with the pruning shears or pinch them off with your thumb and forefinger. Remove the blossoms at the point of the first set of leaves on the stems.
Step 3
Discard the blossoms into the bucket as you remove them. Throw away the blossoms in the bucket in a compost pile or in the trash. Never leave clipped blossoms on the soil beneath plants because this can lead to fungal infections.
Step 4
Watch for a second bloom. Because you clipped the blossoms off at the leaf intersection, new stem growth may occur with new blossoms.
Step 5
Allow the second bloom to wither and go to seed on the plants, if you wish to propagate volunteer plants for the next growing season.
0
1
文章
Dummer. ゛☀
2017年08月13日
Lilium (members of which are true lilies) is a genus of herbaceous flowering plants growing from bulbs, all with large prominent flowers. Lilies are a group of flowering plants which are important in culture and literature in much of the world. Most species are native to the temperate northern hemisphere, though their range extends into the northern subtropics. Many other plants have "lily" in their common name but are not related to true lilies.
Distribution and habita
The range of lilies in the Old World extends across much of Europe, across most of Asia to Japan, south to India, and east to Indochina and the Philippines. In the New World they extend from southern Canada through much of the United States. They are commonly adapted to either woodland habitats, often montane, or sometimes to grassland habitats. A few can survive in marshland and epiphytes are known in tropical southeast Asia. In general they prefer moderately acidic or lime-free soils.

Ecology
Lilies are used as food plants by the larvae of some Lepidoptera species including the Dun-bar.

Cultivation
Many species are widely grown in the garden in temperate and sub-tropical regions. They may also be grown as potted plants. Numerous ornamental hybrids have been developed. They can be used in herbaceous borders, woodland and shrub plantings, and as patio plants. Some lilies, especially Lilium longiflorum, form important cut flower crops. These may be forced for particular markets; for instance, Lilium longiflorum for the Easter trade, when it may be called the Easter lily.
Lilies are usually planted as bulbs in the dormant season. They are best planted in a south-facing (northern hemisphere), slightly sloping aspect, in sun or part shade, at a depth 2½ times the height of the bulb (except Lilium candidum which should be planted at the surface). Most prefer a porous, loamy soil, and good drainage is essential. Most species bloom in July or August (northern hemisphere). The flowering periods of certain lily species begin in late spring, while others bloom in late summer or early autumn.They have contractile roots which pull the plant down to the correct depth, therefore it is better to plant them too shallowly than too deep. A soil pH of around 6.5 is generally safe. The soil should be well-drained, and plants must be kept watered during the growing season. Some plants have strong wiry stems, but those with heavy flower heads may need staking.
Distribution and habita
The range of lilies in the Old World extends across much of Europe, across most of Asia to Japan, south to India, and east to Indochina and the Philippines. In the New World they extend from southern Canada through much of the United States. They are commonly adapted to either woodland habitats, often montane, or sometimes to grassland habitats. A few can survive in marshland and epiphytes are known in tropical southeast Asia. In general they prefer moderately acidic or lime-free soils.
Ecology
Lilies are used as food plants by the larvae of some Lepidoptera species including the Dun-bar.
Cultivation
Many species are widely grown in the garden in temperate and sub-tropical regions. They may also be grown as potted plants. Numerous ornamental hybrids have been developed. They can be used in herbaceous borders, woodland and shrub plantings, and as patio plants. Some lilies, especially Lilium longiflorum, form important cut flower crops. These may be forced for particular markets; for instance, Lilium longiflorum for the Easter trade, when it may be called the Easter lily.
Lilies are usually planted as bulbs in the dormant season. They are best planted in a south-facing (northern hemisphere), slightly sloping aspect, in sun or part shade, at a depth 2½ times the height of the bulb (except Lilium candidum which should be planted at the surface). Most prefer a porous, loamy soil, and good drainage is essential. Most species bloom in July or August (northern hemisphere). The flowering periods of certain lily species begin in late spring, while others bloom in late summer or early autumn.They have contractile roots which pull the plant down to the correct depth, therefore it is better to plant them too shallowly than too deep. A soil pH of around 6.5 is generally safe. The soil should be well-drained, and plants must be kept watered during the growing season. Some plants have strong wiry stems, but those with heavy flower heads may need staking.
0
0
文章
Dummer. ゛☀
2017年08月13日
Peace lilies (Spathiphyllum), also known as closet plants, are a popular choice for offices and homes. When it comes to indoor plants, peace lily plants are some of the easiest to care for. But, while peace lily plant care is easy, proper growing conditions are still important. Let’s take a look at the care of peace lilies.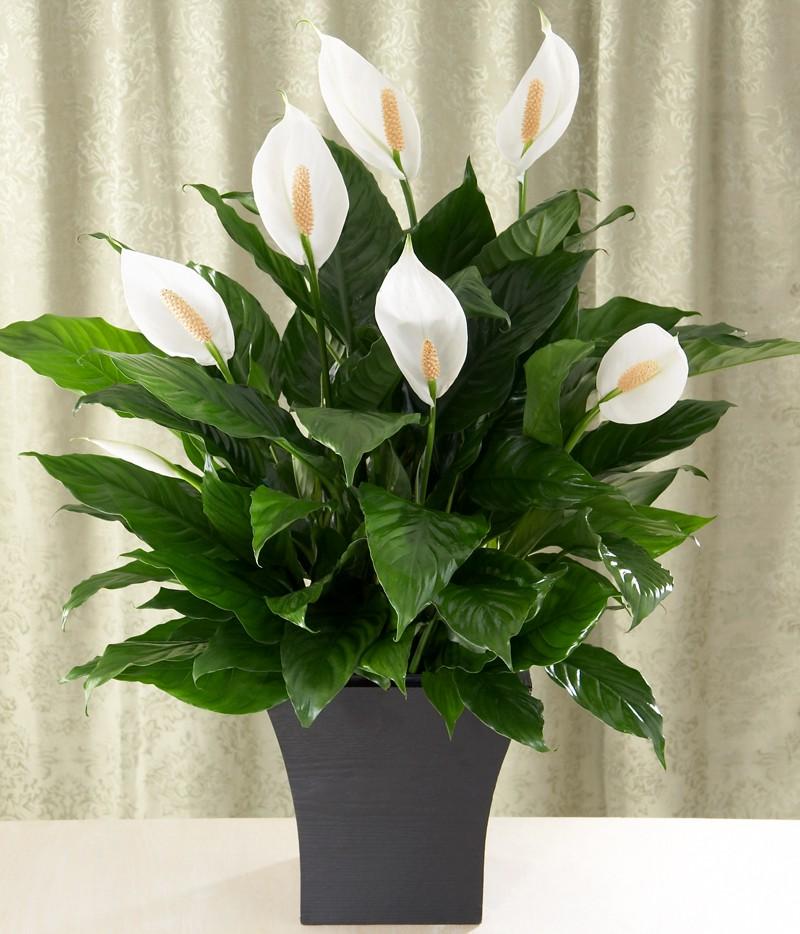
Growing Peace Lily As Houseplants
Peace lilies make excellent houseplants for the home or office. These lovely plants not only brighten up a living space, but are also excellent at cleaning the air of the room they are in. Most commonly, these plants have dark green leaves and white “flowers.” But what most people think of as the flower is actually a specialized leaf bract that grows hooded over the flowers. Like many popular indoor plants, peace lilies enjoy medium to low light. Which kind of light you need to provide will depend more on what you want your peace lily plant to look like. Peace lilies that are placed in more light tend to produce the lovely white spathes and flowers more, while peace lilies in low light will bloom less and will look more like a traditional foliage plant.
Peace Lily Plant Care
One of the most common mistakes in the care of peace lilies is overwatering. Peace lilies are far more tolerant of underwatering than overwatering, which is one of the most common reasons for a peace lily to die. Because of this, you should never water peace lily plants on a schedule. Rather, you should check them once a week to see if they need to be watered. Simply touch the top of the soil to see if it is dry. If it is, water your peace lily. If the soil is still damp, the plant does not need to be watered. Some people will go so far as to wait until their peace lily is starting to droop before watering their plant. As these plants are very drought tolerant, this method does not harm the plant and will prevent overwatering. Peace lilies do not need frequent fertilizing. Fertilizing with a balanced fertilizer one to two times per year will be enough to keep the plant happy.
Peace lilies also benefit from repotting or dividing when they outgrow their containers. Signs that a peace lily plant has outgrown its container include drooping less than a week after being watered and crowded, deformed leaf growth. If you are repotting, move the plant into a pot that is at least 2 inches larger than its current pot. If you are dividing, use a sharp knife to cut through the center of the rootball and replant each half in its on container. Since the wide leaves on peace lilies tend to be a dust magnet, you should either wash or wipe down the leaves at least once a year. This will help it process sunlight better. Washing the plant can be done by either setting it in the bath and giving it a short shower or by placing it in a sink and letting the tap run over the leaves. Alternatively, the leaves of your peace lily plant can also be wiped down with a damp cloth. Avoid using commercial leaf shine products, however, as these can clog the pores of the plant.
0
0
文章
Dummer. ゛☀
2017年08月13日
For unique interest in the home, look for the Fittonia nerve plant. When purchasing these plants, be aware it may also be called the mosaic plant or painted net leaf. Growing nerve plants is easy and so is nerve plant care.
Fittonia Nerve Houseplants
The nerve plant, or Fittonia argyroneura, from the Acanthaceae (Acanthus) family, is a tropically found plant with striking leaves of pink and green, white and green, or green and red. Foliage is primarily olive green with veining taking on the alternate hue. For specific color characteristics, look for other Fittonia nerve houseplant, such as F. argyroneura with silver white veins or F. pearcei, the carmine pink-veined beauty.
Named for its 19th century discoverers, the botanists Elizabeth and Sarah May Fitton, the Fittonia nerve plant does indeed flower. The blooms are insignificant reddish to white spikes and tend to blend in with the remainder of the foliage. The blooms of the nerve plant are rarely seen when it is grown indoors as a houseplant. Hailing from Peru and other areas of the South American rain forest, this colorful houseplant craves high humidity but not too much irrigation. This little beauty does well in terrariums, hanging baskets, dish gardens or even as a ground cover in the right climate. The foliage is low growing and trailing with oval-shaped leaves on rooting mat forming stems. To propagate the plant, these rooted stem pieces may be divided or tip cuttings may be taken to create new Fittonia nerve houseplants.
Nerve Plant Care
As the nerve plant originates in a tropical setting, it flourishes within a high humidity environment. Misting may be required to maintain humid-like conditions. Fittonia nerve plant likes well drained moist soil, but not too wet. Water moderately and let growing nerve plants dry out between waterings. Use room temperature water on the plant to avoid shock. Growing about 3 to 6 inches by 12 to 18 inches or longer, the Fittonia nerve plant tolerates bright light to shade conditions but will truly flourish with bright, indirect light. Low light exposure will cause these plants to revert to green, losing the veins vibrant splashes of color. Growing nerve plants should be placed in a warm area, avoiding drafts which will shock the plant just as water that is too cold or hot. Think rain forest conditions and treat your Fittonia nerve houseplants accordingly. Feed as recommended for tropical houseplants per the instructions of your fertilizer brand. The trailing nature of the plant can lead to a straggly appearance. Prune the tips of the nerve plant to create a bushier plant.
Nerve Plant Problems
Nerve plant problems are few; however, as mentioned above, avoid overwatering as this can lead to root rot. Xanthomonas leaf spot, which causes necropsy of the veins, and mosaic virus may also afflict the plant. Pests may include aphids, mealybugs and thrips.
2
2
文章
Dummer. ゛☀
2017年08月13日
It’s not only attractive and easy to grow, but the miracle plant produces a very interesting berry that upon eating makes things taste sweeter. Learning more about growing miracle berries can make it easier for you to experience this unusual phenomenon for yourself. Keep reading to learn about caring for a miracle fruit plant.
Miracle Plant Info: What Is a Miracle Berry?
Miracle berry (Synsepalum dulcificum) is an evergreen shrub that is native to tropical West Africa. Outside of the tropics, it is a houseplant that is also known as sweet berry and miracle fruit. This interesting plant bears attractive and edible red fruit that are ¾ to 1 inch long with a seed surrounded by fleshy pulp.
The miracle that this fruit performs is to make everything taste sweet. When you eat the fruit and allow the pulp to coat the inside of your mouth, it masks the real taste of bitter foods for a few minutes to several hours, depending on how much fruit you eat. This includes foods that are normally very sour, such as vinegar or lemons. Scientists are still unsure of how the fruit alters a food’s taste, but they think that it may have something to do with a protein with sugar molecules attached. The receptors on the taste buds seem to be temporarily altered when the fruit is eaten as a result of these molecules.
Miracle Berry Growing
In its native environment, the plant will reach up to 20 feet in height at maturity but only 5 feet when grown indoors, so make sure to locate it in a suitable area to accommodate this fairly large size. Growing miracle berries indoors requires a room with very bright light. However, it can be placed outside in a shady location when the weather is warm. This humidity-loving plant thrives when placed in a room with a humidifier or with a clear plastic bag wrapped around it to conserve moisture. Misting daily with water or setting the plant on a water-filled pebble tray can also help with raising humidity. Use only well drained, slightly acidic soil whenever you are growing miracle berries.
Caring for a Miracle Fruit Plant
Caring for a miracle fruit plant is not difficult as long as you keep the soil acidity constant. This can be done by using peat and perlite planting mediums and providing a fertilizer for acid-loving plants. Water the plant regularly but do not let the plant sit in water or it may become waterlogged and may develop root rot. Always feel the soil before watering. Now that you the answer to, “What is miracle berry?” you can begin your own miracle berry growing and explore the wonder of this interesting fruit.
0
0

