文章
Dummer. ゛☀
2017年08月25日

Growing bay leaf trees have been cultivated for centuries for their subtle flavor, aroma and medicinal uses. Sweet bay leaf spots may make one cringe regarding the wisdom of using them in culinary creations such as soups, stews, brines, shellfish boils and teas let alone for ornamental uses such as herbal wreaths, topiaries or potpourri. So let’s take a look at the causes and care of bay leaf tree problems, such as black spots on bay leaves.
Bay Leaf Tree Care
Growing bay leaf trees require a little patience as they are slow growing evergreens, although they may live for 40 years or longer and attain a height of 10 feet (or up to 23 feet in the wild). Care of bay leaf trees is minimal when bearing in mind that Laurus nobilis is hardy in USDA zone 8, thrives in rich, well-drained soil (pH 6.2), dislikes overwatering and should be brought indoors when the temperature dips in the fall months.
Sweet Bay Leaf Spots by Insects
A plague in the care of bay tree leaf problems are aphids, mites and hard shelled scales. Their honeydew causes sooty mold, giving the appearance of black spots when growing bay leaf trees. Care of bay tree leaf problems of this ilk require a strong blast of water to dislodge some of the marauders, followed by a treatment of insecticidal soap or neem oil. Both insecticidal soap and neem oil are safe to use and can be easily rinsed off the leaves before using in food. Several weekly applications may be needed to resolve black spots on bay leaves caused by insects.
Other Causes of Black Spots on Bay Leaves
If no evidence of insects is to be found, another cause for black spots on bay leaves may be leaf spot disease. Care of bay tree leaf problems caused by this involve primarily removing all the affected leaves and allowing the soil to dry between watering. Make sure the plant is not sitting in water and water at the base of the plant to allow leaves to remain dry. A bacterial or fungal infection such as phytophthora ramorum may additionally be creating sweet bay leaf spots. Care of bay leaf tree problems of this type again involves removing any infected leaves from the plant and surrounding area and burn or seal in a plastic bag for dispatch. Take care to have leaves dry by mid morning, thereby discouraging a hospitable environment for spores to take hold. A sulfur spray may discourage any further infection and black spots on bay leaves. Although chemical control is not usually warranted, if you do decide to spray, spring is the optimal time at bud break during the growing season in 12 to 14 day intervals. Lastly, a possible cause of black spots on bay leaves may simply be sunburn. Moving the plant from indoors back outside too suddenly may burn the leaves as may a reflection from glass indoors. Always look into the simplest solution first such as too much sun or water or the need for repotting.
0
0
文章
Dummer. ゛☀
2017年08月25日
Bay leaves add their essence and aroma to our soups and stews, but did you ever wonder how to grow a bay leaf tree? The seasoning is so commonplace it is easy to forget that the leaves are from a growing tree. The sweet bay leaf tree (Laurus nobilis) is a 40- to 50-foot tall tree native to the Mediterranean region. It was once made into a wreath to crown the winners of ancient Greek games. The tree is considered to be one of the oldest cultivated tree species.
About Sweet Bay Leaf Trees
Sweet bay leaf tree is frost tender and is only hardy to USDA plant hardiness zone 7. It prefers a full sun exposure and blooms in spring to summer. The leaves are leathery and stiff with a strong mid-rib. Crushing the leaf releases aromatic oil that is the source of the flavoring for foods. Bay tree care is very simple and straightforward but protection must be given to these trees in cold climates.
How to Grow a Bay Leaf Tree
Sweet bay trees should be planted in well drained soil with an incorporation of generous amounts of compost. The trees can be kept at a smaller growth habit if grown in a container, which also allows the gardener to bring the tree indoors or to a sheltered location when cold temperatures threaten. Plant the trees at the same level in soil that they were grown in their nursery pot. Planting bay trees is best done in early spring when they are semi-dormant.
You can grow a bay tree simply as an ornamental plant or as part of your culinary arsenal. Growing a bay tree from cuttings or air layering is the common form of propagation. Cuttings should be taken in late summer and set into a soil-less medium. Air layering requires the gardener to wound the tree and pack it with sphagnum moss until roots form in the wound. The stem or branch can then be cut off and planted. Protect sweet bay trees from heavy winds, which are damaging to the weak wood. Bay trees do not need feeding or supplemental watering in winter. Bay trees can be trained to a topiary or other form with careful management when the plant is young. Place a potted plant in an area where temperatures range from 45 to 64 F. (7 to 17 C.) and where sunlight is from a southern or eastern direction.
Harvest and Use of Sweet Bay Leaf Tree
Leaves may be harvested at any time but the best flavor can be had from larger, mature leaves. Lay the leaves out to dry and crush them or use them whole but remove before eating. The leaves are a common ingredient in the French seasoning packet, bouquet garni, which is wrapped in cheesecloth and steeped in soups and sauces. It is worth learning how to grow a bay leaf tree for ornamentation and fresh wholesome seasoning.
0
0
文章
Dummer. ゛☀
2017年08月25日
There are many varieties of Artemisia, also known as mugwort and wormwood plant. One of the most common varieties grown for its sweet-smelling, silvery foliage is sweet wormwood (A. annua) or sweet Annie plant. Growing sweet Annie and other wormwood plants is easy. They make interesting additions to nearly any garden as they’re quite adaptable and hardy plants. In fact, some varieties are even considered invasive if not kept properly maintained. Let’s look at how to grow wormwood plant in your garden.
How to Grow Wormwood Plant
Grow wormwood or sweet Annie plant in a sunny location and well-drained soil. This plant doesn’t like being overly wet. Wormwood is generally planted in spring. If starting plants from seeds, sow the small seeds in flats and set the seedlings out in the garden well after the last frost in spring.
Once established, wormwood plants require little care. In addition to occasional watering, these plants can be fertilized once a year. Light pruning can be performed to help keep these plants from becoming unruly, especially the spreading varieties. Wormwood plants are not typically affected by many disease problems, other than root rot from overly wet soil. Their scented foliage also deters many garden pests.
Growing Sweet Annie Plant
Sweet Annie is typically grown in the garden for its feathery, sweet-smelling foliage and yellow blooms, which are often used in floral decorations and wreaths. Although this variety is considered an annual, sweet Annie generally reseeds itself readily in the garden and in some cases, can become a nuisance. The feathery, fern-like foliage appears in spring and blooms in late summer. As sweet Annie takes up space in the garden, growing to about 2 feet tall, allow plenty of room for it in the garden.
Harvest sweet Annie plant just as its blooms begin to appear in late summer for use in floral arrangements or wreaths. When drying sweet Annie, place branches in small bundles and hang upside down in a dark, well-ventilated area for about two to three weeks or until dry. When collecting seeds, cut the foliage to the ground (leave some plants remaining for self-seeding) and place in a paper bag. Allow to dry and then gently shake the seeds loose. Growing sweet Annie plants, like all other wormwood varieties, is easy. These plants make great additions to many gardens and can even be grown in containers. Their attractive, sweet-smelling foliage provides year-round interest and also deters many common garden pests. Best of all, sweet Annie plants require little maintenance once established.
0
0
文章
Dummer. ゛☀
2017年08月24日
Growing lemon thyme plants (Thymus x citriodus) are a lovely addition to an herb garden, rock garden or border or as container plants. A popular herb grown not only for its culinary uses but for its attractive foliage, lemon thyme plants can be planted to form a ground cover or among pavers along a path or patio. The tiny flowers are a bee attractor, aiding in the pollination of surrounding plants.
How to Grow Lemon Thyme Plants
Growing lemon thyme plants appear as a low growing evergreen shrub with small lemon scented foliage. They are an easy plant to grow with endless gastronomic uses in any dish requiring citrus and savory notes.
How to grow lemon thyme is pretty straightforward. This little Thymus variety will flourish in USDA plant hardiness zones 5 through 9, remaining an evergreen in zones 8 and 9. Plant lemon thyme plants in the spring in a full sun setting and space them 12 inches apart. These herbs enjoy well-drained soil and minimal irrigation.
Lemon Thyme Care
Attaining a height of 12 to 15 inches, this herb is extremely tolerant of poor soil and drought conditions. It is also resistant to deer and has no major insect or disease issues. So, lemon thyme care is as simple as planting in full sun and avoiding over watering or sitting in drenched soil, as it is prone to root rot. A hybrid thyme (T.vulgaris x T. pulegioides), lemon thyme is an erect woody based plant with a spreading habitat and thus, may need to be cut back in order to control the spread or remove unsightly woody stems. Lemon thyme plants will thrive when pruned and can even be trimmed into tiny hedges.
Harvesting Lemon Thyme
The strong lemon aroma of lemon thyme plants is at its apex just before the flowering of its tiny purple blooms. Lemon thyme’s flavor is at its peak, just as that of all herbs, in the morning when the essential oils of the plant are most abundant. Therefore, harvesting lemon thyme is best during the early morning hours of the day to reap maximum flavor. That said, any time you trim back or prune lemon thyme is a good time to use these aromatic leaves. The oils of lemon thyme plants also make an excellent mosquito repellent when crushed; useful when outside in the evening puttering in the garden. Lemon thyme is best used fresh. Chop lemon thyme leaves just before use and add at the very end of the cooking process before they lose flavor and color. Lemon thyme may be added to poultry, seafood, vegetable, marinades, stews, soups, sauces and stuffing while fresh sprigs of this herb make a lovely garnish. A beautiful varietal, golden lemon thyme adds a nice touch in the garden with its yellow-gold variegated foliage although it has a less intense lemon scent than its green counterpart.
0
0
文章
Dummer. ゛☀
2017年08月24日
There are plants you just want to touch and woolly thyme plants (Thymus pseudolanuginosus) are just one of them. Woolly thyme is a perennial herb, with medicinal and culinary uses in addition to ornamental use. Try growing woolly thyme in the cracks between paving stones, along a gravel path or as part of a xeriscape or drought tolerant garden. The herb doesn’t mind a bit of rough handling and can be trod upon with no ill effects. In fact, when stepped on, woolly thyme ground cover emits a pleasant fragrance. Here is more information on how to grow woolly thyme so your toes can enjoy the soft furriness and your nose the sweet scent of this magical little plant.
Woolly Thyme Plant Information
Thyme is one of the more hardy herbs perfect for hot sunny locations. Once established, it tolerates dry conditions and spreads slowly, eventually creating a thick mat of foliage. Tiny leaves on woolly thyme ground cover are green and often edged with gray to silver. In summer the plant adds a bonus and produces sweet little pink to purple flowers. The plants are low growing, rarely getting higher than 12 inches and spreading out to 18 inches in width. Woolly thyme plants are perennial and survive in USDA zones 4 to 7 but sometimes up to zone 9 with sheltered locations during the heat of the day. Little is needed from the gardener with woolly thyme care. This almost self-sustaining plant is a treat for the unmotivated or the just plain too busy gardener.
Growing Woolly Thyme
Thyme is a member of the mint family and as tenacious and sturdy as other members of the group, so when planting woolly thyme, put it in an area where spread is desirable. Woolly thyme plants can be easily started from seed indoors or from small plugs that are readily available at your local nursery. Keep in mind, however, that those started from seed could take up to a year before they are ready for transplant outdoors. This herb prefers full sun, but will perform in partial shade. When growing woolly thyme ground cover, plant in well draining soil. Preparation of the soil is important. Rake out rocks and impurities and ensure proper drainage. If your soil is suspiciously boggy, amend it with generous amounts of sand or gravel worked into the top 6 to 8 inches. Plant the thyme in early spring after all danger of frost has passed for the best results with spacing of 12 inches. Don’t worry if they look sparse at first. It will soon fill in to a thick carpet of softness.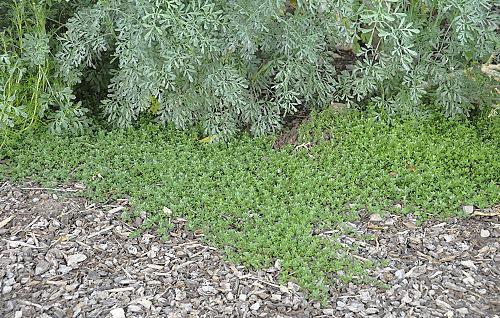
Woolly Thyme Care
Once established, woolly thyme is drought resistant and care is minimal when plants are grown in soil with the right drainage. Woolly thyme ground cover may become snack food for aphids and spider mites. Protect it with frequent spraying of an organic horticultural soap. Other than that and the occasional supplemental watering in the hottest months, the herb is best ignored. It is almost a “plant it and forget it” type of herb. Woolly thyme care doesn’t necessarily include fertilization, although an all purpose food may help specimens that are not responding to pruning or that are turning brown. More likely, browning of this plant is because of poor soil drainage. Remove the plant if possible, and amend the soil or plant in a different area. Learning how to grow woolly thyme successfully and how to properly care for woolly thyme will include clipping and trimming. Trim back edges of the woolly thyme plant to encourage it to grow thicker. Be sure to use the clippings for cooking, potpourri or in the bath. Hardy herbs are one of the best kept secrets for the novice gardener. Woolly thyme ground cover complements upright herbs and can help keep weeding to a minimum by shading out their seeds. Woolly thyme also grows well in mixed containers, cascading down the sides of the pot. Woolly thyme attracts pollinators too. In fact, bees will line up to sample the sweet flowers.
0
0


文章
Dummer. ゛☀
2017年08月24日
The thyme herb (Thymus vulgaris) is frequently used for both culinary and decorative uses. The thyme plant is a versatile and lovely plant to grow both in an herb garden and in your garden in general. Growing thyme isn’t hard, and with the correct knowledge, this herb will flourish in your yard.
Growing Thyme Seeds
The thyme plant can be grown from seed, but frequently people choose to avoid growing thyme seeds. Thyme seeds are difficult to germinate and can take a long time to sprout. If you would like to grow thyme from seeds, follow these steps for growing thyme seeds: Gently scatter seeds over the soil in the container you will be planting thyme seeds. Next, gently scatter soil over the seeds. Water thoroughly. Cover with plastic wrap. Place the container in a warm location. Seeds will germinate in one to 12 weeks. Once thyme seedlings are 4 inches high, plant them where you will be growing thyme in your garden.
Planting Thyme from Divisions
Normally, a thyme plant is grown from a division. Thyme is easy to divide. In the spring or fall, find a mature thyme plant. Use a spade to gently lift the clump of thyme up from the ground. Tear or cut a smaller clump of thyme from the main plant, making sure there is a root ball intact on the division. Replant the mother plant and plant the division where you would like to grow the thyme herb.
Tips for Growing Thyme
The flavor of the thyme plant benefits from active neglect. Growing thyme in poor soil with little water will actually cause the thyme to grow better. For this reason, thyme herb is an excellent choice for xeriscaping or low water landscapes. In the late fall, if you live in an area that freezes, you’ll want to mulch the thyme plant. Be sure to remove the mulch in the spring.
Harvesting Thyme Herb
Harvesting thyme is easy. Simply snip off what you need for your recipe. Once a thyme plant is established (about a year), it’s very hard to over-harvest the plant. If you have just planted your thyme, cut back no more than one-third of the plant.
0
0
文章
Dummer. ゛☀
2017年08月24日
Growing tarragon indoors allows you easy access to the herb and gives the plant protection from cold temperatures. Tarragon is only half hardy and doesn’t perform well when exposed to winter chill. There are a few tips to learning how to grow tarragon indoors. Herbs generally like dry soil, bright light and temperatures near 70 F. (21 C.). Growing tarragon inside is easy if you just follow a few simple requirements.
How to Grow Tarragon Indoors
Tarragon is an attractive herb with slender, slightly twisted leaves. The plant is a perennial and will reward you will many seasons of flavor if you care for it well. Tarragon grows as a many stemmed bush that can get semi-woody as it ages. While most herbs thrive in full sun, tarragon seems to perform best in a lower or diffused light situation. Allow a location of at least 24 inches height for growing tarragon inside. If your kitchen has a window facing anywhere but south, you can successfully grow tarragon. The leaves are the useful part of the plant and are best used fresh. They add a light anise flavor to foods and are good paired with fish or chicken. Tarragon leaves also impart their flavor to vinegar and lends its flavor to sauces, dressings and marinades. Planting tarragon indoors in the kitchen herb garden is an excellent way to take advantage of this fresh herb.
Herbs need good drainage so the choice of pot is important. A clay pot that is not glazed will allow excess moisture to evaporate. The pot also needs several drainage holes and should be at least 12 to 16 inches deep. Use three parts of a good potting soil with the addition of one part sand to give the mixture good tilth and enhance draining. Add other herbs with similar requirements when planting tarragon indoors. This will give you many flavors and textures to chose from when cooking. Give tarragon growing indoors at least six to eight hours of light. Fertilize the herb with a dilution of fish fertilizer every two weeks. Don’t overwater when growing tarragon inside. Indoor herbs should be kept on the dry side. Provide a thorough watering and then allow the plant to dry out between periods of irrigation. Provide humidity by spritzing the plant with water every couple of days.
Moving Tarragon Outside
Tarragon can get almost 2 feet in height and may require pruning or division. If you want to just move the plant outside and get a smaller one for indoors, you need to acclimate it first by moving the plant outdoors for gradually longer periods over two weeks. You can also cut the root ball of the tarragon in half and replant both halves in different locations for more plants. If the tarragon growing indoors is well cared for, it will need pruning. Prune back to a growth node or remove entire stems back to the primary stem.
0
0
文章
Dummer. ゛☀
2017年08月24日
Tutsan is the larger flowered variety of Hypericum, or St. John’s Wort. It is native to western and southern Europe and from the Mediterranean to Iran. It was a common medicinal plant. Regional gardeners were growing Tutsan shrubs to make tinctures that cured all sorts of ills. Today, it is a spectacular deciduous flowering shrub that makes its best showing in June to August with large attractive berries following into September.
Tutsan Plant Info
If you are looking for an easy-to-grow, showy plant with several seasons of interest, look no further than Tutsan St. John’s Wort. The plant is fast growing and can even be sheared severely, giving it a refreshed look in spring. It is a high ground cover that may get 3 feet tall with a similar spread. Mass plantings of Tutsan flowers evoke woodsy appeal in even the most manicured of landscapes.
Tutsan St. John’s Wort is an ancient herb with ornamental appeal. Are Tutsan and St John’s Wort the same? They are both forms of Hypericum but Tutsan has larger floral displays than the Hypericum peiforatum, the wild form of the plant. Tutsan is classed as Hypericum androsaemum. An interesting bit of Tutsan plant info, states that this Hypericum’s leaves were apparently gathered and burned to ward off evil spirits on the eve of St. John’s Day. It has also been used since ancient times to treat wounds and inflammation. You can find it growing wild in damp woods and hedges, rambling around trees and other taller bushes. Tutsan comes from the French words “tout” (all) and “sain” (healthy), an apparent reference to the plant’s use as a healing compound.
Growing Tutsan Shrubs
Tutsan shrubs produce oval to oblong, 4-inch long leaves of glossy green often adorned with rusty hues. Tutsan flowers are 5 petaled, golden yellow and star shaped with bushy yellow stamens. These give way to small round, red fruits that become black with age. Flowers, seeds and leaves have a camphor-like odor when crushed or bruised. Tutsan seems to take to any soil type so long as it is well draining and any pH, even alkaline. It prefers shady to semi-shaded locations that mimic its natural positioning at the base of woods but can also thrive in sun. Plant seeds in fall or take hardwood cuttings in summer.
Tutsan Care
Hypericum are hardy plants suitable for USDA plant hardiness zones 5 to 10. Keep this species moist but not boggy. Rust is a common issue but it is relatively unbothered by insects and other disease. Cut the plant back hard in fall for better spring displays. In cold regions, apply a few inches of mulch around cut plants to protect roots from freezes. Other than that, Tutsan care is practically effortless. Enjoy the frilled golden blooms and bright berries as another performance winner and seasonal eye candy.
0
0
文章
Dummer. ゛☀
2017年08月24日
Growing savory (Satureja) in the home herb garden isn’t as common as growing other kinds of herbs, which is a shame as both fresh winter savory and summer savory are excellent additions to the kitchen. Planting savory is easy and rewarding. Let’s look at how to grow savory in your garden.
Two Types of Savory
The first thing to understand before you start planting savory in your garden is that there are two kinds of savory. There is winter savory (Satureja montana), which is a perennial and has a more intense flavor. Then there is summer savory (Satureja hortensis), which is an annual and has a more subtle flavor. Both winter savory and summer savory are tasty, but if you are new to cooking with savory, it is generally recommended that you start growing the summer savory first until you feel comfortable with your cooking savory.
Tips for Growing Summer Savory
Summer savory is an annual and must be planted every year. Plant seeds outdoors right after the last frost has past. Plant seeds 3 to 5 inches apart and about an 1/8 of an inch down in the soil.. Allow plants to grow to a height of 6 inches before you start to harvest leaves for cooking. While savory plant is growing and when you are using fresh savory for cooking, use only the tender growth on the plant. At the end of the season, harvest the entire plant, both woody and tender growth, and dry the leavesher of the plant for so that you can use the herb over the winter as well.
Tips for Growing Winter Savory
Winter savory is the perennial version of the savory herb. Seeds of the winter savory plant can be planted indoors or outdoors. If planting outdoors, plant the seeds right after the last frost If planting indoors, start the savory seeds two to six weeks before the last frost. Plant seeds or transplanted seedlings into your garden 1 to 2 feet apart and an 1/8 inch down in the soil. The plants will get large. Use the tender leaves and stems for fresh herb cooking and harvest the leaves from woody stems for drying and use later.
Other Tips for Growing Savory
Both kinds of savories are from the mint family but are not invasive like many other mint herbs.
0
0
文章
Dummer. ゛☀
2017年08月24日
Summer savory (Satureja hortensis) may not be as well known as some of its herb counterparts, but it’s a serious asset to any herb garden. Keep reading to learn more about growing summer savory herbs, including summer savory plant care.
Summer Savory Uses in the Garden
What is summer savory? It’s the annual equivalent of its close perennial cousin winter savory. While summer savory lasts for only one growing season, it’s thought to have the most superior flavor. It’s a popular ingredient in meat recipes, as well as oil, butter and vinegar infusions. Its flavor shines the most in bean dishes, however, earning it the name “the bean herb.” Summer savory plants grow in a mound-like formation and tend to reach a foot in height. The plant has many thin, branching stems with a purple cast that are covered in fine hairs. The inch long leaves are much longer than they are wide and have a gray green color to them.
How to Grow Summer Savory Plants
Growing summer savory herbs is very easy. The plant likes rich, moist, well-drained soil and full sun. It also grows quickly and easily enough that it’s not at all a hassle to start a new crop each spring. Summer savory plants can be sown as seed directly into the ground after all danger of frost has passed. The seeds can also be started indoors about 4 weeks before the last frost, then transplanted out in warmer weather. It can even be grown indoors during the winter.
Little summer savory plant care is necessary, other than watering. Harvest your summer savory by cutting off the tops when buds are just beginning to form. In order to have summer savory all summer long, sow new seeds once per week. This will allow you to have a constant supply of plants that are ready to harvest. Savory herb plants, both summer and winter types, can provide your garden (and food dishes) with that extra pizazz.
0
0
文章
Dummer. ゛☀
2017年08月24日
Saffron (Crocus sativus) is easily the most expensive spice on the market, which is why it might be a good idea to learn about growing saffron indoors. The care of saffron crocus is no more difficult than that of any other type of bulb. A saffron crocus is just your garden variety autumn crocus; the expense comes in the labor intensive harvesting of the stigmas or saffron threads. Each thread must be handpicked at just the most opportune moment; too late and the stigmas will degrade.
How to Grow Saffron Indoors
First, when growing saffron indoors, you’ll want to acquire the bulbs. Make sure you buy from a reputable seed house and that the bulbs are saffron crocus and not autumn meadow crocus — Crocus sativus, not Colchicum autumnale.
Note: To figure out how many corms to order, the general rule of thumb is three threads per person times the number of people in the family times the number of saffron dishes made per year. For example, if a family of four has saffron dishes once every two months or so, they need 24 plants. Crocus of any sort will rot if planted in wet soil, so planting saffron crocuses inside will ensure the bulb or corms do not rot. Your bulb purveyor will send them to you at the correct time for planting and/or consult with them regarding your climate and location, but they should be planted in the fall.
Lay 1 to 2 inches of either fine gravel or coarse sand at the bottom of a 6-inch planter. Fill the remainder of the container with rich, well-draining potting medium. Dig a 2 to 3 inch hole and place the corm root side down (points facing up!) into it then cover with soil. Space the bulbs 2 to 3 inches apart. Situate the saffron crocuses inside in a cold room of between 35-48 F (2-9 C.), where they will get four to six hours of sun each day. Lightly water the bulbs every other day until the grass-like foliage begins to die back, usually around April. At this time, move the container to a warmer area to simulate spring temps of between 50-70 F (10-21 C.).
Additional Indoor Saffron Care
Watering care of saffron crocus at this stage should be re-initiated. Restart the every other day watering regime. Stigmas from the flowers — there will be three per flower — must be harvested from the blooms the same day they open. Snip open flowers from their stems and tweeze the saffron thread from the bloom, then lay the thread on a paper towel to dry (watch out for breezes or drafts!). Store the threads in an airtight container devoid of moisture. To use your saffron, either toast the strands and then grind into a powder or infuse them in a liquid for use in your favorite paella. Trim back the foliage only when you are positive the plant is no longer flowering. New buds should break the soil within one to seven days after the first bloom. On occasion, a second (rarely a third) may arise from the same plant. At this point, stop any irrigation and move the containers of crocus back into the cold room while dormant from April through September. While dormant, do not water the crocus. Remember, the corms will multiply each year, so eventually you may have more than you need. Give them to another saffron-lover as a gift. The plants can live up to 15 years, but it’s best to “refresh” them by digging up, dividing and replanting every four to five years. Be patient; it takes an entire year before the first flowers appear.
0
0
文章
Dummer. ゛☀
2017年08月24日
A lot of people enjoy having small kitchen window sill plants like rosemary. However, although they are easy to grow, they aren’t without faults. Often, you’ll find there are problems with growing rosemary, one of them being a common fungus.
Powdery Mildew on Rosemary
Perhaps you’ve noticed a white powder on your rosemary plants in your kitchen. If so, you aren’t alone. The white powder is actually powdery mildew on rosemary, a common plant ailment. It is caused by many different fungi that are closely related. This is one of the most common problems with growing rosemary plants, and all indoor plants actually. Each indoor plant has a white powdery mildew that is specific to that particular plant. Rosemary is no different. Powdery mildew won’t kill the rosemary plant, but it will weaken it. This is one of the easiest plant diseases to diagnose. Powdery mildew appears as a white powder on rosemary, which coats the leaves of the plant. The powder is actually thousands of little spores and can spread to other plants if severe enough.
How to Get Rid of Powdery Mildew on Rosemary
Powdery mildew can be partially removed if you rub the leaves of your rosemary plant carefully. If you don’t try to remove some of it, the white powder on rosemary can result in leaf drop. The powdery mildew on rosemary can rob the plants of the nutrients they need to grow. Powdery mildew on rosemary can definitely make the plant look a little ragged, but it shouldn’t kill it. Pick up any infected leaves that have fallen off the plant. Also, take infected plants out of high humidity rooms, like the bathroom or kitchen. Finally, spraying the white powder on rosemary with a fungicide such as neem oil will help to kill the fungus. You might want to try spraying water on it first every few days to knock the mildew off before resorting to fungicide. You may need to repeat this every few days for it to be effective, but be careful not to overwater the plant itself or you will end up with root rot, another of the common problems for rosemary plants or other indoor houseplants.
Preventing Powdery Mildew on Rosemary
One of the best ways to treat white powder on rosemary is to prevent it in the first place. Even if you still have an outbreak, with a few precautions beforehand, the powdery mildew will not have as good a stronghold, making it’s treatment even easier.
When it comes to the prevention of powdery mildew, the use of bicarbonates seems promising, at least for many people. Since powdery mildew fungus thrives in moist, humid conditions, ensure that your plant has plenty of light and well-draining soil. Only water the plant as needed to avoid overly saturated soil and keep the water off the foliage. Keep your rosemary plants well ventilated too, meaning do not overcrowd them with other plants. This only creates a moist environment for the fungus to thrive in. Oftentimes, powdery mildew attacks new growth, so avoiding excessive use of nitrogen fertilizers should help limit this growth. Purchasing plants that are resistant to the disease, whenever available, is a good idea too. Now that you know what the white powder on rosemary is, and how to treat or prevent it, you can go back to enjoying your rosemary plant.
0
0
文章
Dummer. ゛☀
2017年08月24日
Growing rosemary indoors is sometimes a tricky thing to do. Many good gardeners have tried, and despite their best efforts, end up with a dry, brown, dead rosemary plant. If you know the secrets to proper care of rosemary plants growing inside, you can keep your rosemary plants growing happily indoors all winter long.
Tips for Growing Rosemary Indoors
Most often, there are four things on the list of what kills rosemary plants indoors. These are:
lack of sunlight
poor watering practices
powdery mildew
pests
If you can avoid these issues, your rosemary plant will live happily inside. Let’s look at how to avoid each.
Lack of Sunlight
Most people aren’t aware that the lack of sunshine is the most common reason for a rosemary plant growing indoors to die. Often, rosemary plants are brought indoors without any acclimation. They go from six to eight hours of strong, direct light to four to six hours of weak or indirect light. The rosemary plant is unable to produce enough energy to stay alive on this amount of weak light and simply dies. The first step to preventing rosemary light starvation is to put your rosemary on a sunlight diet before you bring it indoors. Several weeks before you plan on bringing the rosemary inside, move the plant to gradually shadier areas of your yard. This will force the rosemary plant to grow leaves that are more efficient at turning light into energy, which will help it cope with weaker indoor light when it moves inside. Once your rosemary moves indoors, make sure that you place it in the brightest window in your house, which is normally a south facing window. If your rosemary plant is not getting at least six to eight hours of light a day, place a lamp with a fluorescent light bulb as close as possible to the plant to supplement the sunlight.
Poor Watering
Practices The second most common reason for an indoor rosemary dying is watering practices. Often, indoor rosemary plants are watered too little or too much. Make sure that the drainage on the container with the rosemary is excellent. Only water the soil when the top of the soil is dry to the touch. But, that being said, never let the soil dry out completely. In the winter, rosemary plants grow much more slowly and need much less water than they do in the summer. Watering too often will cause root rot, which will kill the plant. On the other side, if the soil of the rosemary plant is allowed to dry out completely, the roots will die back and the plant will not have enough roots to support itself.
Powdery Mildew
Indoors or outdoors, rosemary plants are very susceptible to powdery mildew. Most homes don’t have the same air circulation as the outside world does, which makes this an even worse problem for the plant inside. The best way to drive away powdery mildew on rosemary plants is to increase the air circulation around it. Letting a fan blow on it for a few hours a day or taking it out of more high humidity rooms like the bathroom or kitchen, will help improve the air circulation. You can also treat the plant with a fungicide to help keep away the powdery mildew.
Pests
To be honest, while pests may get the blame for killing a rosemary plant, most pests will only infest a plant that is already weakened. Unfortunately, most rosemary growing indoors, despite all best efforts, are growing in a somewhat weakened state. The stricter you are with yourself about making sure that your rosemary plant is watered properly and gets enough light, the less likely pests will bother the plant. But, if your rosemary is infected with pests, use a houseplant pesticide to remove them. Since rosemary is an herb and it is mainly grown to be eaten, look for organic pesticides. One that is growing in popularity is neem oil, as it is very effective against pests but is completely harmless to humans and pets.
1
1
文章
Dummer. ゛☀
2017年08月24日
Rosemary (Rosmarinus officinalis) is a savory kitchen herb with a pungent flavor and attractive, needle-like leaves. Growing rosemary in pots is surprisingly simple and you can use the herb to add flavor and variety to a number of culinary dishes. Read on for tips about growing potted rosemary herbs.
Planting Rosemary in a Pot
Rosemary in a pot requires a good quality commercial potting mixture with ingredients such as fine pine bark or peat moss with vermiculite or perlite.
Growing rosemary in a pot with a diameter of at least 12 inches allows enough space for the roots to grow and expand. Be sure the container has a drainage hole because rosemary grown in containers will rot in soggy, poorly drained soil. The easiest way to grow rosemary in a pot is to start with a small bedding plant from a garden center or nursery, as rosemary is difficult to grow from seed. Plant the rosemary at the same depth it is planted in the container since planting too deeply may suffocate the plant. Rosemary is a Mediterranean plant that will thrive in a sunny location on your porch or patio; however, rosemary isn’t cold hardy. If you live in a climate with chilly winters, bring the plant indoors before the first frost in autumn. If you prefer not to grow rosemary indoors, you can grow the herb as an annual and start with a new rosemary plant every spring.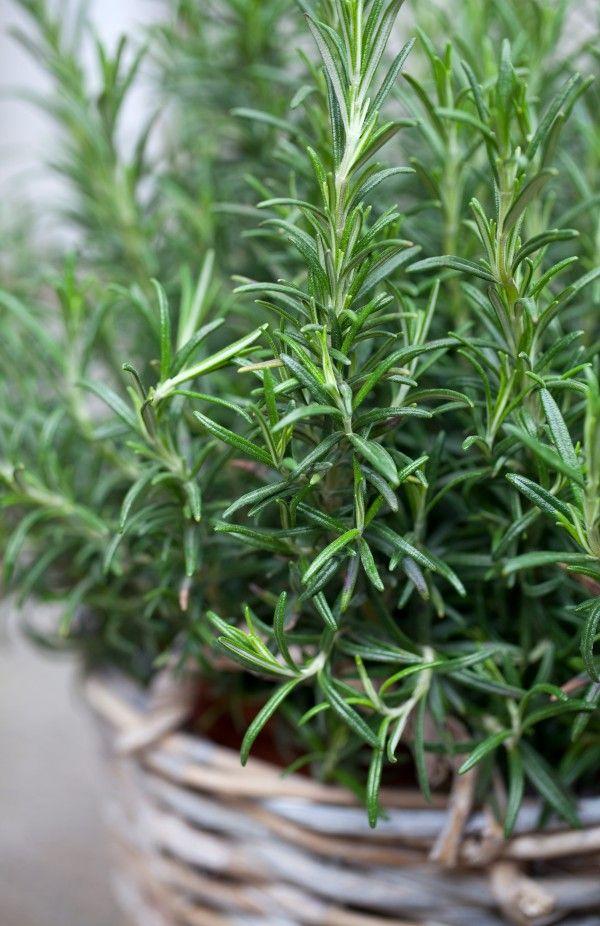
Rosemary Container Care
Caring for rosemary grown in containers is easy enough. Proper watering is the key to growing potted rosemary herbs, and the best way to determine if the plant needs water is to insert your finger into the soil. If the top 1 to 2 inches of soil feels dry, it’s time to water. Water the plant deeply, then let the pot drain freely and never let the pot stand in water. Use care, as overwatering is the most common reason rosemary plants don’t survive in containers. Rosemary in pots generally doesn’t require fertilizer, but you can use a dry fertilizer or a dilute solution of a water-soluble liquid fertilizer if the plant looks pale green or growth is stunted. Again, use care, as too much fertilizer may damage the plant. Too little fertilizer is always better than too much. Always water the rosemary immediately after applying fertilizer. Be sure to apply fertilizer to the potting soil – not the leaves.
Maintaining Potted Rosemary Herbs in Winter
Keeping a rosemary plant alive during the winter can be tricky. If you decide to bring your plant indoors during the winter, it will need a bright location. A sunny windowsill is a good place as long as the plant won’t be chilled by cold air. Be sure the plant has good air circulation and that it isn’t crowded with other plants. Be careful not to overwater.
0
0

