文章
Dummer. ゛☀
2017年08月23日

Growing cacti and other succulent plants can be an addictive pastime! Cacti are collectible and are ideal for nice, sunny windowsills as are many of their succulent counterparts. Read on to learn more about growing cactus and succulent plants indoors.

Cacti and Succulent Info
Cacti are associated with the desert, and many thrive in regions of Central and South America. Other cacti, though, come from as far north as Canada, and many are even native to the rainforests. Like bromeliads, a lot of cacti are epiphytes, and the cacti that are forest dwelling species grow over forest trees. The desert-dwelling variety of cacti can survive for really long periods of time without rainfall. They get their moisture from dew or mist and store nutrients and moisture in their tissues.
The word “succulent” means “juicy.” Succulent plants have leaves or stems that are filled with juices, the stored water and nutrients that allow the plant to grow. These leaves allow the plant to withstand harsh conditions all over the world. Normally, these leaves have a glossy or leathery appearance, and the texture actually helps protect them from excessive moisture loss. Storing moisture the way they do is what defines cacti as succulents. What makes a cactus a cactus is that they grow growths, known as areoles. These are cushioned growing points that are technically compressed branches. Spines, “wool” flowers and offsets all grow from the areoles. A lot of succulents resemble cacti in every way except they don’t grow spines. This is what makes a succulent a succulent and not a cactus. In all but one genus of cactus, the Pereskia, the plants do not have leaves. The bodies of cacti are usually globular or cylindrical in shape. Opuntias have round, segmented stems. Epiphyllums have stems that look more like strap-shaped leaves. A lot of cacti have prominent spines, barbs or bristles and some have woolly hair. In fact, all cacti have spines even though they might be so small they’re insignificant. It’s not always appreciated that all cacti flower, and flower regularly if they are well-looked after.

Cacti and Succulents in the Home
There are a lot of succulent plants that can be grown in your home, and some of them are among the easiest plants to care for. They are actually great plants for beginners, but as with any gardening and houseplant growing, you have to know what you’re doing and dealing with in order to do well at growing them. Cacti and succulents make a great display, from the beautiful Nopalxochia ackermanii and the large flowers of the Epiphyllums (orchid cactus) to the weird and wonderful Astrophytum asterias (sea urchin cactus) or the hairy Cephalocereus senilis (old man cactus). It’s a shame that these plants are not cultivated more often! They are undemanding and will withstand most maltreatment except for overindulgence. Overindulgence accounts for those that are sitting around all dusty on people’s windowsills or those that are mushy and rotting from overwatering. They need bright light and fresh air, and they need a cool, dry winter rest as well. Forest cacti tend to trail and have large flowers. This makes them perfect for individual displays in hanging baskets. The desert types have interesting shapes and textures and can be highlighted in a grouped display. Planting a group of succulents or cacti in one larger bowl is very effective. Larger plants like aloes and agaves look best in a pot of their own. Any large shallow pot can be used as an excellent pot for a cacti or succulent garden. You want to select plants all about the same size with similar care requirements. These plants all require a lot of light, so make sure the container you select fits near a window. A layer of fine grit over the compost gives an attractive, yet, dry surface for the cacti in the pot. You can place clean pebbles between the plants to increase the desert effect. Some cacti look attractive in little pots all in a row. The mutant cultivars of Gymnocalycium mihanovichii is great this way because they have different colored heads.

Caring for Succulents and Cacti Plants
Most succulents and cacti require a lot of light. They are suitable for the sunniest of spots in your home. If you build some shelves across a sunny window you will be providing them with what they love. You want to be sure to turn the plants regularly to make sure all sides of the plant get equal sunny exposure. Every garden center has a great collection of cacti and succulents you can grow in your home. Some cacti, like the forest-growing Schlumbergera x buckleyi (Christmas cactus), are sold a seasonal plants or gift plants in department stores. It’s best to buy cacti that are already in flower because it takes years for this to happen. You should check them over and make sure they are sound with no trace of rot or areas that are shriveled or dry. They should be just the right size for their pot and you should make sure that they are not exposed to drafts when you get them home. If you purchase desert cacti, make sure they are planted in well-drained compost. They should be well watered with tepid water in spring and summer. However, the compost should be allowed to almost completely dry in winter months, especially if they are in cool conditions. This allows the cacti to go dormant. During periods of active growth, cacti should be fed about once every three weeks. You can use well-diluted tomato fertilizer for this purpose. Also, desert cacti like temperatures of 50-55 F. (10-13 C.). in the winter. You only need to repot desert cacti when the roots completely fill the pot. Forest cacti are very different. They usually have beautiful hanging flowers that grow from the tips of segmented stems. These stems look like chains of fleshy leaves. They grow this way because they’ve been trained to grow over trees. They are used to shade, but they do need some bright light. They need lime-free, light compost that is well drained and should be misted with tepid, soft water. They can be rested in 50-55 F. (10-13 C.). Water them moderately and feed them weekly with a weak fertilizer after winter and place them in a room with higher temperatures. There are 50 or more families of plants that can be considered succulents. They should be watered freely in the summer but only when their compost becomes dry. In the winter, they tolerate temperatures around 50 F. (10 C.). In the summer you should fertilize with well-diluted fertilizer every few weeks and they prefer fresh air instead of humidity. Desert cacti, forest cacti and succulents can all be grown together. They make stunning displays for your houseplant collection. They don’t take a lot of care, but you still need to know what they like and need.
Cacti and Succulent Info
Cacti are associated with the desert, and many thrive in regions of Central and South America. Other cacti, though, come from as far north as Canada, and many are even native to the rainforests. Like bromeliads, a lot of cacti are epiphytes, and the cacti that are forest dwelling species grow over forest trees. The desert-dwelling variety of cacti can survive for really long periods of time without rainfall. They get their moisture from dew or mist and store nutrients and moisture in their tissues.
The word “succulent” means “juicy.” Succulent plants have leaves or stems that are filled with juices, the stored water and nutrients that allow the plant to grow. These leaves allow the plant to withstand harsh conditions all over the world. Normally, these leaves have a glossy or leathery appearance, and the texture actually helps protect them from excessive moisture loss. Storing moisture the way they do is what defines cacti as succulents. What makes a cactus a cactus is that they grow growths, known as areoles. These are cushioned growing points that are technically compressed branches. Spines, “wool” flowers and offsets all grow from the areoles. A lot of succulents resemble cacti in every way except they don’t grow spines. This is what makes a succulent a succulent and not a cactus. In all but one genus of cactus, the Pereskia, the plants do not have leaves. The bodies of cacti are usually globular or cylindrical in shape. Opuntias have round, segmented stems. Epiphyllums have stems that look more like strap-shaped leaves. A lot of cacti have prominent spines, barbs or bristles and some have woolly hair. In fact, all cacti have spines even though they might be so small they’re insignificant. It’s not always appreciated that all cacti flower, and flower regularly if they are well-looked after.
Cacti and Succulents in the Home
There are a lot of succulent plants that can be grown in your home, and some of them are among the easiest plants to care for. They are actually great plants for beginners, but as with any gardening and houseplant growing, you have to know what you’re doing and dealing with in order to do well at growing them. Cacti and succulents make a great display, from the beautiful Nopalxochia ackermanii and the large flowers of the Epiphyllums (orchid cactus) to the weird and wonderful Astrophytum asterias (sea urchin cactus) or the hairy Cephalocereus senilis (old man cactus). It’s a shame that these plants are not cultivated more often! They are undemanding and will withstand most maltreatment except for overindulgence. Overindulgence accounts for those that are sitting around all dusty on people’s windowsills or those that are mushy and rotting from overwatering. They need bright light and fresh air, and they need a cool, dry winter rest as well. Forest cacti tend to trail and have large flowers. This makes them perfect for individual displays in hanging baskets. The desert types have interesting shapes and textures and can be highlighted in a grouped display. Planting a group of succulents or cacti in one larger bowl is very effective. Larger plants like aloes and agaves look best in a pot of their own. Any large shallow pot can be used as an excellent pot for a cacti or succulent garden. You want to select plants all about the same size with similar care requirements. These plants all require a lot of light, so make sure the container you select fits near a window. A layer of fine grit over the compost gives an attractive, yet, dry surface for the cacti in the pot. You can place clean pebbles between the plants to increase the desert effect. Some cacti look attractive in little pots all in a row. The mutant cultivars of Gymnocalycium mihanovichii is great this way because they have different colored heads.
Caring for Succulents and Cacti Plants
Most succulents and cacti require a lot of light. They are suitable for the sunniest of spots in your home. If you build some shelves across a sunny window you will be providing them with what they love. You want to be sure to turn the plants regularly to make sure all sides of the plant get equal sunny exposure. Every garden center has a great collection of cacti and succulents you can grow in your home. Some cacti, like the forest-growing Schlumbergera x buckleyi (Christmas cactus), are sold a seasonal plants or gift plants in department stores. It’s best to buy cacti that are already in flower because it takes years for this to happen. You should check them over and make sure they are sound with no trace of rot or areas that are shriveled or dry. They should be just the right size for their pot and you should make sure that they are not exposed to drafts when you get them home. If you purchase desert cacti, make sure they are planted in well-drained compost. They should be well watered with tepid water in spring and summer. However, the compost should be allowed to almost completely dry in winter months, especially if they are in cool conditions. This allows the cacti to go dormant. During periods of active growth, cacti should be fed about once every three weeks. You can use well-diluted tomato fertilizer for this purpose. Also, desert cacti like temperatures of 50-55 F. (10-13 C.). in the winter. You only need to repot desert cacti when the roots completely fill the pot. Forest cacti are very different. They usually have beautiful hanging flowers that grow from the tips of segmented stems. These stems look like chains of fleshy leaves. They grow this way because they’ve been trained to grow over trees. They are used to shade, but they do need some bright light. They need lime-free, light compost that is well drained and should be misted with tepid, soft water. They can be rested in 50-55 F. (10-13 C.). Water them moderately and feed them weekly with a weak fertilizer after winter and place them in a room with higher temperatures. There are 50 or more families of plants that can be considered succulents. They should be watered freely in the summer but only when their compost becomes dry. In the winter, they tolerate temperatures around 50 F. (10 C.). In the summer you should fertilize with well-diluted fertilizer every few weeks and they prefer fresh air instead of humidity. Desert cacti, forest cacti and succulents can all be grown together. They make stunning displays for your houseplant collection. They don’t take a lot of care, but you still need to know what they like and need.
0
1
文章
Dummer. ゛☀
2017年08月22日
Hyssop (Hysoppus officinalis) is an attractive flowering herb commonly grown for its flavorful leaves. Growing a hyssop plant is easy and makes a lovely addition to the garden. The spikes of blue, pink, or red flowers are great for attracting important pollinators to the landscape as well.
Growing Hyssop as a Garden Plant
Although most hyssop plants are grown in herb gardens, they also have their place in flower gardens as border plants. Hyssop makes a great edging plant when grown in masses as well, but did you know that hyssop plants can also be grown in containers? When you grow hyssop in containers, make sure the pot is large enough to accommodate the large root systems. Hyssop plants prefer to be grown in areas with full sun or partial shade. They need well-drained soil, a bit on the dry side, amended with organic matter.
How to Plant Hyssop Seed
The most common way to plant hyssop is by sowing seeds. Sow hyssop seeds indoors or directly in the garden about eight to 10 weeks before the last frost. Plant hyssop just beneath the soil’s surface or about a quarter inch deep. Hyssop seeds usually take between 14 and 21 days to germinate and can be transplanted (if sown indoors) in the garden after the threat of frost has ended in spring. Space hyssop plants about 6 to 12 inches apart. Once blooming has ceased and seed capsules have completely dried, they can be collected and stored for growing hyssop the next season. In some areas, however, hyssop plants will self-seed readily. In addition, the plants can be divided in fall.
Harvesting & Pruning Hyssop Plants
If growing hyssop for use in the kitchen, it is best used fresh. However, it can be dried or frozen and stored for later use. When harvesting a hyssop plant, cut it in the morning hours once any dew has dried. Hang the plants upside down in small bunches to dry in a dark, well-ventilated area. Alternatively, you can place the leaves in a plastic bag after removing them from the stems and place in the freezer until ready to use. When you grow hyssop as a garden plant, trim back established hyssop plants heavily in early spring and again after flowering to prevent them from becoming too spindly. Cutting back the foliage also encourages bushier plants. Growing hyssop as a garden plant is not only easy but can also attract wildlife like butterflies and hummingbirds to the garden. In addition, hyssop leaves can be harvested for use in salads, soups and other dishes.
0
0
文章
Dummer. ゛☀
2017年08月22日
Agastache is a perennial plant with lovely flower spires that bloom all season long. The Agastache flower is commonly found in purple to lavender but may also bloom in pink, rose, blue, white and orange. Growing Agastache as a drought-loving perennial actually produces the best plants. Agastache plant is tolerant of low water and poor nutrient conditions but provides you with a color display and enduring greenery for months. Learning how to grow Agastache requires no special skills or care.
What is Agastache Plant?
Agastache is in the Hyssop family of herbs and makes a flavorful tea. It is a striking plant that has many varieties, some of which are hardy and others that are frost tender and grown as annuals in most cooler climates. Growing Agastache requires sun and well drained soil. The leaves resemble catmint and are a dull green with heavy veining. The plants can grow 2 to 6 feet tall and produce the showy Agastache flowers until the first frost. Agastache flowers come in a variety of colors and rise up off of stiff triangular stems. The blooms have the appearance of being coated with fuzz because they are comprised of many tiny florets. The entire flower may be 3 to 4 inches long and begin to bloom from the top down. This means that the florets at the crown of the flower die out first, leaving tips that look slightly burnt. This just adds more interest to the Agastache plant.
How to Grow Agastache
Growing Agastache can be done indoors as starts or you may direct seed into the garden in spring. Flowers will be produce quickly on plants that are started indoors in May and transplanted in early summer. Agastache plant is hardy in USDA plant hardiness zones 4 to 10. Most plants can survive temperatures down to 10 F. (-12 C.) if heavily mulched. Provide plenty of water when plants are establishing but they can mostly fend for themselves thereafter.
Agastache Varieties
There are many types of Agastache. The genus represents 30 different plants, each with different flower color, height, foliage, aroma and hardiness. Giant hyssop is a perennial garden favorite that tops 6 feet in height. Anise hyssop or Anise Agastache (Agastache foeniculum) is a licorice flavored and scented plant that makes an excellent tea. There is even a bubble gum scented cultivar. ‘Golden Jubilee’ bears golden yellow foliage with blue flowers. There are new cultivars of Agastache flowers bred every year. It is easy to find Agastache varieties for every garden.
Agastache Uses
Agastache are usually tall plants and their lengthy stalks show best at the back of a perennial border or lining a fence. They can be used in container gardens or in cut flower gardens, as the Agastache flowers are long lasting. Growing Agastache in the butterfly garden not only attracts those beautiful insects but pollinators and hummingbirds. Deer and rabbits do not seem to enjoy Agastache, which makes it ideal for the woodland garden.
0
0
文章
Dummer. ゛☀
2017年08月22日
If you’re looking for a little something different to add some zip to your favorite Mexican dishes, then epazote herb growing may be just what you need. Keep reading to learn more about epazote uses for your herb garden palette.
What is Epazote?
Epazote (Dysphania ambrosioides, formerly Chenopodium ambrosioides), is an herb in the Chenopodium family, along with lambsquarters and pigweeds. Although often thought of as a weed, epazote plants actually have a long history of both culinary and medicinal use. This adaptable plant is native to tropical Americas, and is commonly found throughout Texas and the Southwestern United States. Common names include paico macho, hierba homigero, and yerba de Santa Maria. The plant is drought resistant and grows to 3 feet high at maturity. It has soft leaves that are notched and small flowers that are hard to see. Epazote can usually be smelled before it is seen, as it has a very pungent odor. In large doses, the flowers and seeds are poisonous and may cause nausea, convulsions and even coma.
Epazote plants were brought to Europe from Mexico in the 17th century where they were used in a number of medicines. The Aztecs used the herb as both a culinary and medicinal herb. Epazote herbs contain anti-gas properties that are thought to reduce flatulence. Also known as wormseed, this herb is often added to animal food and is thought to prevent worms in livestock. Southwest dishes commonly use epazote plants to flavor black beans, soups, quesadillas, potatoes, enchiladas, tamales and eggs. It has a distinct flavor that some even call a cross between pepper and mint. Young leaves have a mild flavor.
How to Grow Epazote
Epazote herb growing is not difficult. This plant is not picky about soil conditions but does prefer full sun. It is hardy in USDA plant hardiness zone 6 to 11. Plant seeds or seedlings in the early spring once the ground can be worked. In warm areas, epazote is a perennial. Because of its invasive nature, however, it is best grown in containers.
0
0
文章
Dummer. ゛☀
2017年08月22日
Growing cilantro indoors can be as successful and flavorful as growing cilantro in your garden if you give the plant a little extra care. When planting cilantro indoors, it’s best not to transplant plants from your garden. Cilantro does not transplant well. When you grow cilantro indoors, start with seeds or starter plants. Ultimately, make sure that your plants are 3 to 4 inches apart.
Tips for Growing Cilantro Indoors
It’s best to use an unglazed terra cotta container when growing cilantro inside because it allows for greater moisture and air to pass through the roots. Make sure that you have plenty of drainage holes in the bottom of the container. Cilantro growing indoors needs more nutrition because the root system range is limited and can’t access as much soil for nutrients as it would in your garden. The soil when planting cilantro indoors should be a mixture of potting soil and sand to allow water to move freely. In addition, you can use a fertilizer of liquid fish emulsion or chemical formulation of 20-20-20 to add additional nutrients. Use half concentrations of the fertilizers bi-weekly during the active growing periods.
Thorough watering is more important than frequent watering when growing cilantro inside. Water the plants until the water comes out the drainage holes. Check the soil frequently, but cilantro growing indoors should only be watered when the soil is dry to the touch. This will be more often in the summer months. To grow cilantro indoors, it’s important that the plant have full sun four to five hours per day. If you also use a growing light, growing the cilantro inside will be more successful.
Harvesting Cilantro Growing Indoors
When you grow cilantro indoors, it’s important to harvest it with care. Indoor herbs naturally reach for the light and can, therefore, become spindly. Pinch them at the growing tips to force a bushier plant. Keep in mind when planting cilantro indoors that it will grow less abundantly than when grown outside in your garden. However, with added care and attention to sun exposure, soil mixture, moisture and gentle harvesting, you will be rewarded with this flavorful and aromatic herb year round.
0
1
文章
Dummer. ゛☀
2017年08月22日
Cilantro (Coriandrum sativum) is used in a great many different dishes, particularly Mexican and Asian dishes, but despite the growing popularity for this dish in cooking, you don’t see cilantro growing in the home garden as much as you do other popular herbs. This may be due to the fact that many people think that growing cilantro is difficult. This is not the case at all. If you follow these few tips for growing cilantro, you will find that you will be successfully growing cilantro in no time at all.
Cilantro Seeds
In cooking, cilantro seeds are called coriander. The “seeds” are actually two cilantro seeds encased in a husk. The husk is hard, round and is light brown or grey in color. Before you plant them in the ground, you need to prepare the cilantro seeds to increase the chances that they will germinate. Gently crush the seed husk holding the two seeds together. Soak the cilantro seeds in water for 24 to 48 hours. Remove from the water and allow to dry.
How to Plant Cilantro
Once you have prepared the cilantro seeds, you need to plant the seeds. You can either start cilantro indoors or outdoors. If you’re starting the seeds indoors, you’ll be transplanting cilantro to the outdoors later on. Put the seeds in the soil and then cover them with about a 1/4-inch layer of soil. Leave the cilantro growing until it is at least 2 inches tall. At this time, thin the cilantro to be about 3 to 4 inches apart. You want to grow cilantro in crowded conditions because the leaves will shade the roots and help to keep the plant from bolting in hot weather. If you’re transplanting cilantro into your garden, dig holes 3 to 4 inches apart and place the plants in them. Water thoroughly after transplanting.
Cilantro Growing Conditions
The most important thing to remember when growing cilantro is that it doesn’t like hot weather. Cilantro growing in soil that reaches 75 F. (24 C.) will bolt and go to seed. This means that the ideal cilantro growing conditions are cool but sunny. You should be growing cilantro where it will get early morning or late afternoon sun, but be shaded during the hottest part of the day.
Additional Tips for Growing Cilantro
Even with ideal cilantro growing conditions, this is a short lived herb. Taking the time to prune cilantro frequently will help delay bolting and prolong your harvest time, but no matter how much you prune cilantro, it will still eventually bolt. Plant new seeds about every six weeks to keep a steady supply throughout the growing season. Cilantro will also reseed in many zones. Once the cilantro plant bolts, let it go to seed and it will grow again for you next year, or collect the cilantro seeds and use them as coriander in your cooking. So as you can see, with just a few tips for growing cilantro you can have a steady supply of this tasty herb growing in your garden.
0
1
文章
Dummer. ゛☀
2017年08月22日
Chicory plant (Cichorium intybus) is an herbaceous biennial that is not native to the United States but has made itself at home. The plant can be found growing wild in many areas of the U.S. and is used both for its leaves and its roots. Chicory herb plants are easy to grow in the garden as a cool season crop. Seeds and transplants are the primary means of growing chicory.
Varieties of Chicory Herb Plants
There are two types of chicory plant. Whitloof is grown for the large root, which is used to make a coffee supplement. It can also be forced to use the tender white leaves called Belgian endive. Radicchio is grown for the leaves, which may be in a tight head or a loosely packed bunch. Radicchio is best harvested very young before it turns bitter.
There are many varieties of each type of chicory.
Whitloof chicory plants to grow are: Daliva
Flash
Zoom
Varieties for planting chicory for leaves only include: Rossa di Treviso
Rossa di Verona
Giulio
Firebird
Planting Chicory
Seeds can be started indoors five to six weeks before they are moved outdoors. In warm climates, sowing outdoors or transplanting occurs September through March. Planting chicory in cooler climates should be done three to four weeks before the danger of frost has passed. Sow chicory seeds 6 to 10 inches apart in rows that are 2 to 3 feet apart. You can always thin the plants if they crowd each other but close planting discourages weeds. The seeds are planted ¼ inch deep and thinning is done when the plants have three to four true leaves. You can also sow a crop for fall harvest if you choose a variety that has an early maturation date. Planting chicory seed 75 to 85 days before anticipated harvest will ensure a late crop. Chicory herb plants that are to be forced for blanched leaves will need to have the roots dug up before the first frost. Cut the leaves to 1 inch and store the roots for three to seven weeks in the refrigerator before forcing. Plant the roots individually after chilling to force the leaves to grow in a tight, blanched head.
How to Grow Chicory
Learning how to grow chicory is similar to learning how to grow most lettuces or greens. The cultivation is very similar. Chicory requires well drained soil with plenty of organic matter. It performs best when temperatures are below 75 degrees F. (24 C.). Extended care of the chicory crop requires vigilant weeding and a mulch to prevent moisture loss and further weed growth. Chicory plant requires 1 to 2 inches of water per week or enough to keep the soil evenly moist and reduce the chance of drought stress.
The herb is fertilized with ¼-cup of nitrogen based fertilizer such as a 21-0-0 per 10 feet of row. This is applied approximately 4 weeks after transplant or once the plants have been thinned. Growing chicory as a forced vegetable necessitates row covers or individual plantings that are kept from light.
0
0
文章
Dummer. ゛☀
2017年08月22日
When you’re starting your indoor herb garden for convenient culinary use, be sure to include some indoor chervil plants. Growing chervil indoors provides you an abundance of the delicately scented, annual herb for cooking. Chervil is an integral part of the “fines herbes” blend (a combination of finely chopped herbs) used in French cooking. Growing the plant indoors is an optimum use of the herb, as it does not flourish outside in hot summer heat and sun. When growing chervil indoors or outside, plants prefer light shade and cool temperatures. Garden chervil (Anthriscus cerefolium) should not be confused with turnip rooted chervil. Rooted chervil is obscure in American and British food, but is still sometimes used in French cuisine. The chervil discussed here is similar in appearance to flat leaved parsley, with a more delicate flavor and demeanor. It is sometimes called gourmet’s parsley.
How to Grow Chervil Indoors
Seeds of indoor chervil plants should be planted into their permanent container or started in biodegradable seed starting pots that can go directly into rich, organic soil. The tap-rooted plant does not transplant well. Plant the small seeds shallowly. Keep the soil moist, but not soggy, to avoid the seeds rotting or damping off after germination.
Caring for Chervil Plants
Chervil plants reach 12 to 24 inches in height. Caring for indoor chervil plants should include frequent clipping of the new growth on the top of the plant. Clippings of the plant are best used fresh. Regular trimming of top leaves makes the plant bushier and more attractive and slows the tendency of growing chervil indoors to bolt. If bolting happens often when growing chervil indoors, start new plantings every few weeks to maintain a continuous supply. When plants seem to be going to seed quickly, decrease the sunlight and move the container to a cooler location. Use fresh seed for the best germination rate when growing indoor chervil plants. Companion plants for growing chervil indoors can include tarragon, chives and parsley, also used in the French fine herbes mix. Locate indoor chervil plants in the container so they can be shaded by the other herbs.
Uses for Indoor Chervil Plants
Growing chervil indoors, in or near the kitchen, makes it convenient to use the herb in many dishes you may be preparing. Now that you’ve learned how to grow chervil indoors, use clippings often. The frilly leaves of chervil plants may be finely chopped and added to omelets or other egg dishes. Chervil flavors young vegetables, soups, salads, casseroles and a variety of other recipes.
0
0
文章
Dummer. ゛☀
2017年08月22日
Chervil is one of the lesser known herbs that you can grow in your garden. Because it is not often grown, many people wonder, “What is chervil?” Let’s take a look at the chervil herb, how to keep chervil growing in your garden and how to use chervil.
What is Chervil Herb?
Chervil (Anthriscus cerefolium) is an annual herb that is best known for being a “sweet” herb. Many people grow chervil to be used in desserts and drinks. The flavor is often described as a combination of parsley and licorice. The chervil herb is also known as gourmet parsley or French parsley.
Best Conditions to Grow Chervil
Chervil is one of the few herbs that grows best in shade and moist soil. Much like cilantro, chervil will bolt quickly in heat, so keep it away from full sun. Chervil also prefers rich soil.
Start Chervil Growing from Seed
Chervil is a delicate plant and does not like to be disturbed once it starts growing. Because of this, chervil should be sown directly where it will be growing in the garden. The best time when to plant chervil is after all threat of frost has passed. Chervil herb can tolerate some frost, but grows best in the cool season right after frost has passed.
To keep chervil growing consistently, you’ll need to do successive plantings. As you grow chervil, start new seeds about every two weeks to ensure continuous harvest until the end of the season. We hope that now that you know what is chervil and when to plant chervil, you will start growing chervil in your garden. You will be tastily rewarded.
0
0
文章
Dummer. ゛☀
2017年08月22日
Caraway is a flavorful and aromatic herb. The caraway seed is the most used part of the plant and can be used in baking, soups, stews and other foods but all parts of the plant are edible. Growing caraway seeds requires some patience, as the caraway plant is a biennial and doesn’t do more than grow vegetatively in the first season. The caraway plant resembles a carrot and sets seed in its second year.
Learn About the Caraway Plant
The caraway plant (Carum carvi) is an herbaceous biennial that will mature to 30 inches tall. The plant is only about 8 inches tall in the first season with carrot-like foliage and a long taproot. By the second year, the plant will triple in size and the foliage becomes more feathery with stout stems. Tiny white flowers appear on the umbrels, which begin in May and last until the end of summer. The spent flowers yield small hard brown seeds– the caraway spice that is an important part of many regional cuisines.
How to Grow Caraway
Caraway spice is an under-used and infrequently grown plant in most herb gardens. It is native to Europe and Western Asia where it thrives in full sun and well drained soil with pH ranges of 6.5 to 7.0. It isn’t a good plant for hot, humid climates and prefers cool temperate zones. Sow the seeds 1/2-inch deep in fall or spring. Once seed germinates, thin the caraway plant to 8 to 12 inches apart. In colder climates, mulch the roots of the plant heavily with straw or organic mulch, which will add nutrients to the soil. Germination is slow and sporadic when growing caraway seeds, and the herb may be intercropped to help prevent weeds and manage soil conditions. Very little cultivation is required in caraway growing, but adequate moisture is an important component in the first year. The foliage of caraway plants need to be kept dry during irrigation, so a drip hose is an excellent way to keep the soil moisture level up. Cut the plant back in the fall as it will die back and re-sprout in spring. Caraway has few pests or disease problems. Plant a second crop a year after the first for consistent production.
Harvesting Caraway
Caraway growing provides you with a fresh source of spice that is adaptable and stores well. All parts of the caraway plant are edible. Harvest the leaves in the first or second years to add flavor to salads. When the plant has produced seed, dig up the taproot and use it as you would any root vegetable. The seeds are harvested when they turn a rich deep brown color. Cut the umbels off the plant and put them in a paper bag. Let them dry in an open bag for a few days and then shake the bag to remove the caraway spice. Herb gardens are more complete when you grow caraway and add the characteristic flavor to your spice rack.
0
0
文章
Dummer. ゛☀
2017年08月22日
Burdock is a native of Eurasia but has quickly become naturalized in North America. The plant is an herbaceous biennial with a long history of edible and medicinal use by native people. For gardeners who wish to try growing burdock plants, seed is available from numerous sources and the plant is adaptable to any light level and most soils. This is an easy plant to grow either as an herbal medicine or as an interesting vegetable. As a part of your medicinal or edible garden, very little burdock plant care is necessary once established.
About Burdock Plants
Burdock occurs in undisturbed sites where the plant forms a rosette the first year and a flowering spike the second. Both the roots and young leaves and shoots are edible. The plant is easy to grow and can produce roots up to 2 feet long in 100 days or less. Gardeners who want to know how to grow burdock should know that it is easier to harvest roots if planted in sandy, loose soil.
Burdock may reach 2 to 9 feet in height and produces rough, sticky burred fruits. From these fruits comes its scientific name, Articum lappa. In Greek, ‘arktos’ means bear and ‘lappos’ means seize. This refers to the fruits or seed capsules which are barbed with spurs that grab onto animal fur and clothing. In fact, from these fruit, it is said the idea from Velcro was developed. The flowers are bright pinkish-purple and similar to many thistle species. The leaves are broad and lightly lobed. The plant will self-seed readily and can become a nuisance if not managed. This should pose no problem if you are continually deadheading the plant or if you intend to use it as a root vegetable. Another way to contain the plant is by growing burdock in pots.
Burdock Plant Uses
Among the many burdock plant uses is in the treatment of scalp and skin problems. It is also known to be a liver treatment and stimulates the digestive system. It is a detoxifying herb and diuretic and has also been used as an antidote in some cases of poisoning. In China, the seeds are used to treat colds and cough. Medical uses of burdock stem from the plant’s use in tinctures and decoctions resulting in salves, lotions and other topical applications. It is also a popular food plant, known as gobo, in Asian cooking. Roots are eaten either raw or cooked, and leaves and stems are used like spinach. Indigenous Americans were growing burdock plants in their own vegetable gardens before the country was settled by Europeans.
How to Grow Burdock
Burdock prefers loamy soil and a neutral pH in areas with average water. Seeds should be stratified and germinate at 80 to 90 % when sown directly in spring after all danger of frost has passed. Plant seeds 1/8 inch under the soil and keep evenly moist. Germination takes place in 1-2 weeks. Once seed has germinated, young plants grow quickly but it takes some time to establish a taproot of sufficient size to harvest. Plants should be spaced at least 18 inches apart. For the most part, burdock has no significant pest or disease issues. Continued burdock plant care is minimal but steps may have to be taken to manage the spread of the plant. Harvest leaves when young and tender and wait a year before taking the root.
0
0
文章
Dummer. ゛☀
2017年08月22日
The borage herb is an old fashioned plant that can get up to 2 feet or more. It is native to the Middle East and has an ancient history in war as an enhancement for bravery and courage. Growing borage provides the gardener with cucumber-flavored leaves for tea and other beverages as well as bright starry blue flowers for decorating salads. All parts of the plant, except the roots, are flavorful and have culinary or medicinal uses.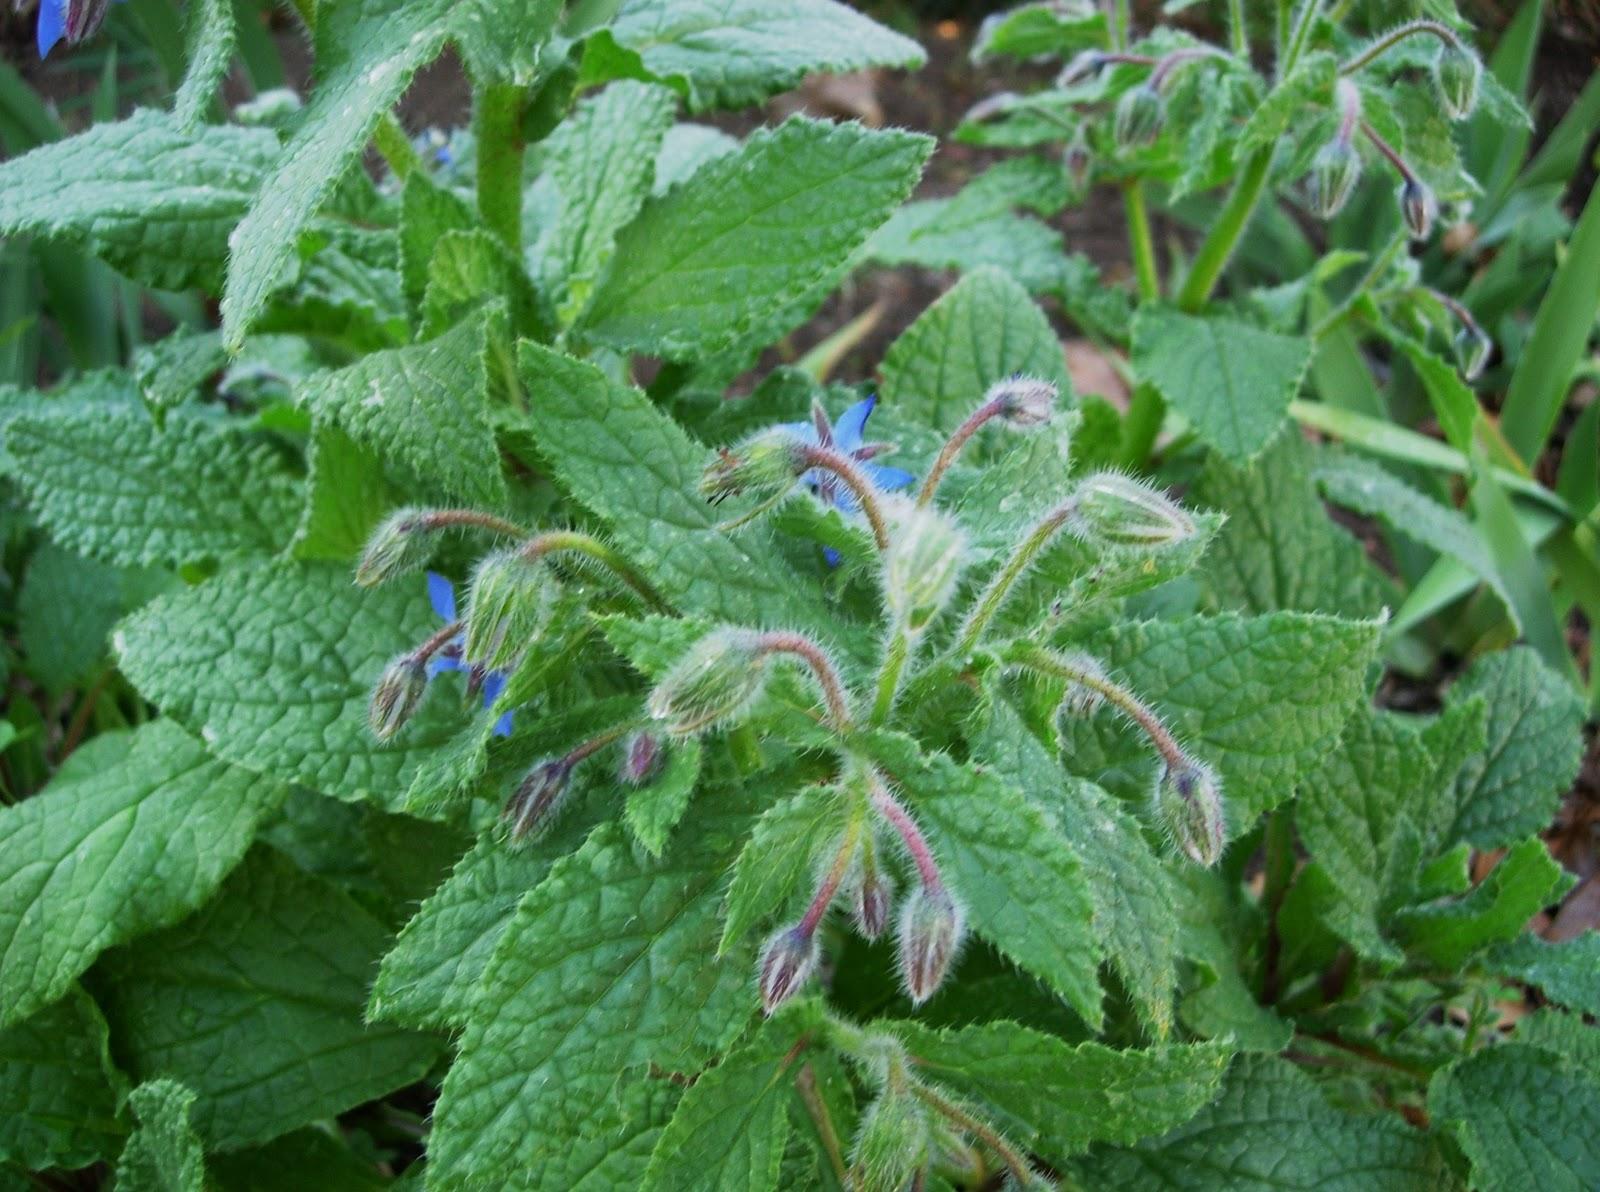
Borage Plant Info
While not as common as thyme or basil, borage herb (Borago officinalis) is a unique plant for the culinary garden. It grows quickly as an annual but will colonize a corner of the garden by self-seeding and reappearing year after year. June and July are heralded by the presence of the borage flower, an appealing, small, brilliant blue bloom with attracting qualities. Indeed, the plant should be include in the butterfly garden and brings pollinators to your veggies. The oval leaves are hairy and rough with the lower foliage pushing 6 inches in length. The borage plant may grow 12 or more inches wide in a tall bushy habit.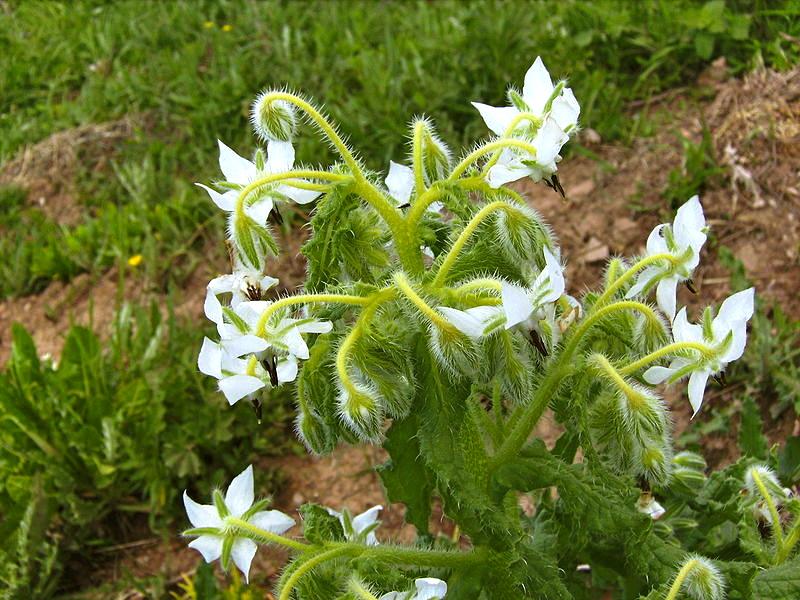
Growing Borage
Herb cultivation just takes a little gardening know how. Grow borage in an herb or flower garden. Prepare a garden bed that is well tilled with average organic matter. Ensure that the soil is well drained and in a medium pH range. Sow seeds directly into the garden after the last date of frost. Plant seeds ¼ to ½ inch under the soil in rows 12 inches apart. Thin the borage herb to at least 1 foot when the plants measure 4 to 6 inches tall. Planting borage with strawberries attracts bees and increases the yield of fruit. It has limited culinary use in today’s foods, but the borage flower is often used as a garnish. Traditionally the borage plant was used to treat many ailments, from jaundice to kidney problems. In medicinal use today it is limited, but the seeds are a source of linolenic acid. Borage flowers are also used in potpourris or candied for use in confections. Borage can be perpetuated by allowing the flowers to go to seed and self sow. Pinching the terminal growth will force a bushier plant but may sacrifice some of the flowers. Borage herb is not a fussy plant and has been known to grow in refuse piles and highway ditches. Be assured you want the plant to regrow annually or remove the flowers before it seeds. Growing borage requires a dedicated space in the home garden.
Borage Herb Harvest
Sowing the seeds every four weeks will ensure a ready supply of borage flowers. The leaves may be picked at any time and used fresh. Dried leaves have little of the characteristic flavor so the plant is best consumed after harvest. Leave the flowers alone if you are hosting a honeybee colony. The blooms produce an excellent flavored honey.
0
0
文章
Dummer. ゛☀
2017年08月22日
Herb growing requires a minimum of care, as the plants are normally fast growing and many of them already have some insect resistance due to the high amounts of essential oil in the leaves. Still, even these rather trouble-free plants can end up with issues. One such problem is bitter basil leaves. 
Bitter Tasting Basil Leaves
A member of the Lamiaceae (mint) family, basil (Ocimum basilicum) is renowned for its aromatic and sweet tasting leaves. The herb is cultivated for the use of these leaves, which are high in essential oils and impart delicate flavor and aroma to a multitude of cuisines. It can be used either fresh or dried, although most people agree that dried basil doesn’t hold a candle to fresh basil. The most common basil grown is Sweet or Italian basil and is responsible for one of the great sauces of the world — pesto. However, there are many varieties of basil to choose from, imparting unique flavor such as cinnamon, anise and lemon to the evening’s menu. Since basil is usually a fairly mild, sweet tasting herb, what would cause bitter tasting basil?
Reasons for Basil Going Bitter
Basil is a tender annual best grown in a sunny area with six to eight hours of direct sun exposure per day. Plant basil in well-drained soil amended with organic compost. Basil seeds can be sown directly into the garden after all danger of frost has passed or started indoors in trays to be transplanted when the seedlings have at least two leaf sets. Seeds should be barely set beneath the soil, about ¼ inch deep and lightly covered. Water the seeds in. Germination takes place within five to seven days. Thin or transplant basil seedlings so they have a space of between 6 to 12 inches between individual plants. Container grown basil needs to be watered more frequently, but garden or container grown basil should be kept moist. Feed your basil herb with an organic fertilizer.
If you have followed the above instructions and still have bitter basil plants, the following causes could be to blame:
Pruning
The primary culprit is lack of pruning. Basil needs regular pruning or cutting back to facilitate a robust, bushy plant with plenty of aromatic leaves. Another reason for pruning is to prevent the herb from blooming. Although blooming basil has ornamental value, in culinary terms it can be a disaster. Be vigilant and, at the first sign that the plant is trying to bloom, pinch the flowers off. Basil that is allowed to flower and form seed stops producing foliage and results in bitter tasting basil leaves. Pruning can be fairly aggressive, down to just above the lowest two sets of leaves. Snip at the node, just above a pair of leaves. Aggressive pruning will prevent the plant from trying to flower as well as engendering more flourishing foliage. You can prune this severely every three to four weeks.
Variety
If your basil plant is bitter, another reason may just be the variety. With over 60 varieties of basil available, it is possible, especially if you are not sure of the cultivar, that you may have planted one with unexpected flavor profiles. For instance, a cinnamon basil or spicy globe basil may yield a totally unexpected flavor, especially when your taste buds were expecting sweet basil.
0
0
文章
Dummer. ゛☀
2017年08月22日
Versatile and easy to grow, basil is an attractive culinary herb valued for its aromatic leaves, which are used either dry or fresh. Although basil is usually grown as an annual, it is suitable for growing year round in USDA plant hardiness zones 10 and above. Although the herb is relatively trouble-free, it is susceptible to certain pests and diseases that can cause yellowish leaves on basil plants.
What Causes Basil Leaves to Turn Yellow?
There are a number of reasons for a basil plant turning yellow, and determining the reason isn’t always easy.
Improper watering – Root rot, a result of too much water, is one of the most common reasons for yellow leaves on basil plants. Water basil only when the top 1 to 2 inches of soil is dry, and remember that slightly dry soil is healthier than soggy soil. As a general rule, one deep watering every seven to 10 days is adequate. If you grow basil in a container, be sure the pot has at least one drainage hole. Fungal disease – Although several fungal diseases can cause yellow leaves on basil plants, downy mildew is one of the most common. Downy mildew is a fast-spreading fungus recognized by yellowish basil leaves and a fuzzy, gray or brown growth. If you catch the problem early, you may be able to stop the spread by clipping affected growth. However, badly affected plants should be removed and disposed of carefully.
Growing conditions – Chilly temperatures are another reason for yellowish basil leaves. Basil prefers daytime temps above 70 F. (21 C.). Nighttime temperatures should be above 50 F. (10 C.) Lack of sun is yet another common cause of yellowish basil leaves. Basil prefers bright sunlight for six to eight hours per day. Basil grown indoors will likely need artificial light during the winter, ideally for 10 to 12 hours per day. Aphids – Aphids are tiny pests that suck the juice from tender foliage, thus causing yellow leaves on basil plants. Look for aphids on the undersides of leaves and on the joints of stems and leaves. Aphids are easy to control with insecticidal soap, but be careful not to apply the soap when the sun is directly on the leaves or on hot days, as the soap can scorch the plant.
Root knot nematodes – These small, soil-dwelling pests can cause yellowish basil leaves and small galls on the roots. The best recourse is to harvest the plant and use the healthy leaves. Next time, plant resistant varieties in soil not affected by nematodes. Lack of nutrients – Basil is a hardy plant that does well in poor soil, but it still requires nutrients in order to thrive. Fertilize basil regularly to prevent yellowish basil leaves, using an all-purpose balanced fertilizer.
0
0
文章
Dummer. ゛☀
2017年08月22日
Basil (Ocimum basilicum) is often referred to as the king of herbs. Basil plants are certainly one of the most popular herbs grown in the home garden. Growing basil outdoors or in a container is very easy to do if you follow these simple steps for how to grow basil.
Tips for Growing Basil
Choose a location with great drainage. Whether you’re growing basil outdoors in the ground or in a container, the drainage needs to be excellent.
Choose a location with good sun. Another important thing to remember for basil plant care is to choose a spot where the basil plants will get plenty of good sunlight. Choose growing basil seeds or plants. Will you start by growing basil seeds or basil plants? Either option is very easy to do when growing basil outdoors.
Choose a location with good sun. Another important thing to remember for basil plant care is to choose a spot where the basil plants will get plenty of good sunlight. Choose growing basil seeds or plants. Will you start by growing basil seeds or basil plants? Either option is very easy to do when growing basil outdoors. If you choose growing basil seeds, scatter the seeds over the location that you have chosen and lightly cover with dirt. Water thoroughly. Thin to 6 inches apart once the seedling come up. If you choose growing basil plants, dig a small hole, tease out the root ball some and plant the basil plant in the ground. Water thoroughly. Wait till the temperature is right. When growing basil outdoors, it is very important to remember that basil is very sensitive to cold and even a light frost will kill it. Do not plant seeds or basil plants until all danger of frost has passed.
Harvest often. The trick to how to grow basil that is large and abundant is to harvest often. The more you harvest basil, the more the plant will grow. When harvesting, pinch off the stem right above where a pair of leaves are growing. After you harvest, two more stems will start to grow, which means twice the leaves next time you harvest! Remove flowers. Once a basil plant flowers, the leaves start to lose their good flavor. If you remove any flowers, the leaves will get their good flavor back in just a day or so. As you can see, proper basil plant care is easy. Knowing how to grow basil will provide you with large amounts of this tasty herb.
1
1

