文章
Dummer. ゛☀
2017年08月13日

Sometimes called Rose Grape, Philipinne Orchid, Pink Lantern plant or Chandelier tree, Medinilla magnifica is small evergreen shrub native to the Philippines where it is usually found growing on trees in tropical forests. However, Medinilla has been grown for hundreds of years as an exotic houseplant, once prized in Belgium by the wealthy and noble. Learn how you, too, can grow this exotic species.
Medinilla Information
Medinilla is a tropical shrub that can grow up to 4 ft. tall. It grows like epiphytic orchids, in holes and crotches of trees. Unlike orchids, though, Medinilla does not absorb atmospheric moisture and nutrients via velamen (corky epidermis of aerial roots). Instead, the plant has large succulent green leaves, which hold onto or store moisture similar to other succulent plants. In late spring to early summer, the plant is covered by drooping clusters of delicate pink flowers that look somewhat like grapes or wisteria flowers. These flowers are what gives the plant all its folk names.
How to Grow Medinilla Plants
Medinilla needs a warm and humid environment to survive. It cannot tolerate temperatures below 50 degrees F. (10 C.). In fact, 63-77 degrees F. (17-25 C.) is ideal for proper Medinilla plant care. It prefers warm days in high but filtered light, and cooler nights in the 60s. Cooler nights help the plant to send out more flowers. Before purchasing Medinilla, be sure you can give it the warm, humid conditions it needs year round. As a succulent, Medinilla does not need to be watered often, usually just thoroughly once a week. It does enjoy being misted by water often, especially in the dry winter months. If you have Medinilla as a houseplant, you may need to run a humidifier in the home during winter. Also, be sure to keep Medinilla plants away from air ducts and drafty windows.
Medinilla Plant Care Instructions
Caring for Medinilla plants isn’t difficult once you know what it needs. Grow the plant in filtered shade to full sun, though it prefers to avoid direct afternoon sun. During the flowering period, deadhead spent blooms to promote new flowers and keep the plant healthy looking. After the flowering period, give Medinilla regular houseplant or orchid fertilizer. At this point, your Medinilla can be cut back to keep under control and create bushier new growth. Be sure to leave at least one leaf set on each stalk you cut, or that stalk will die back completely. If you need to repot your Medinilla, do it after the flowering season. Repotting is an excellent time for Medinilla plant propagation, as the easiest way to create new Medinilla plants is by dividing an existing plant. When the time comes that your Medinilla has out grown its pot, just divide the plant in to several new pots.
0
0
文章
Dummer. ゛☀
2017年08月13日
Usually, when people ask about growing bamboo indoors, what they are really asking about is lucky bamboo care. Lucky bamboo is not a bamboo at all, but rather a type of Dracaena. Regardless of the mistaken identity, the proper care of a lucky bamboo plant (Dracaena sanderiana) is important to the long term health of indoor bamboo. Keep reading to learn a little about the care of a lucky bamboo plant.
Lucky Bamboo Indoor Plant Care
Often, you will see people growing lucky bamboo indoors in their offices or low light parts of their homes. This is because lucky bamboo needs very little light. It grows best in low, indirect light. That being said, when you grow lucky bamboo inside, it does need some light. It will not grow well in near darkness.
Most people growing lucky bamboo indoors will also have their lucky bamboo growing in water. If your lucky bamboo is growing in water, make sure to change the water every two to four weeks.
The lucky bamboo plant will need at least 1 to 3 inches of water before it has grown roots. Once it has grown roots, you will need to make sure that the roots are covered by the water. As your lucky bamboo grows, you can increase the amount of water it grows in. The higher up the stalk the water goes, the higher up the stalk the roots will grow. The more roots the lucky bamboo has, the more lush the top foliage will grow. In addition, try adding a small drop of liquid fertilizer when changing the water to help the lucky bamboo grow.
In addition, try adding a small drop of liquid fertilizer when changing the water to help the lucky bamboo grow. When you grow lucky bamboo inside, you can also choose to transplant it into soil. Make sure that the container you will be growing the lucky bamboo in has good drainage. Water the plant frequently, but do not allow it to become waterlogged. Growing lucky bamboo indoors is easy with just a little lucky bamboo care. You can grow lucky bamboo inside and help get your Feng Shui a boost in your home or office.
1
1
文章
Dummer. ゛☀
2017年08月13日
Are you looking to create a tropical oasis in your living room or spruce up a corner of your patio? The Kentia palm (Howea forsteriana) is a popular choice among interior decorators because it is well suited for container growing. This elegant palm does very well indoors since it is extremely durable and slow growing. The Kentia palm is native to Lord Howe Island (off the eastern Australian coast) where it can reach an impressive height of 60 feet. For indoor containerized growing, heights can fall anywhere between 5 to 12 feet. Kentias have upright slender trunks and long arching, feathered, dark green leaves (also known as fronds).
General Kentia Palm Care
As with other indoor plants, Kentia palm care requires the right watering and lighting levels for a long life. Fortunately, because the Kentia palm is so forgiving, it will tolerate low-light and low-humidity conditions, as well as dust, heat, and general neglect. Plant your Kentia in fast draining potting mix, preferably on the sandy side. Find an area in your home that receives indirect light through a window; it does not necessarily need to be an extremely bright spot. Water Kentias only when the top inch of soil starts to dry out. Over watering can lead to root rot if the soil mix does not drain fast enough.
Kentia Palm Care for Pests and Other Issues
Plant diseases are rarely a problem with indoor grown palms. Under and over watering, along with insects and mites, are usually the main issues of these plants. There are a couple small-scale insects that attack palms: mealybugs and mites. Neem oil can be used to discourage such pests from feeding on your Kentia palm. Neem oil is pressed from the fruits and seeds of Neem (Azadirachta indica), an evergreen tree which is native to India. Kentia fronds should be healthy and dark green. Excessive fertilization may cause the tips of lower leaves to turn brown and die. Browning of leaves can also be caused by dry air and/or lack of water. Be sure to mist your Kentia palm with a water bottle ever so often to provide some humidity and to remove any dust build-up.
The trunk of the Kentia palm should appear strong and sturdy. If you notice any splitting or unevenness, check for decay, as this is the main reason the trunk may split. Too much decay or splitting does indicate a dying palm. Palms, in general, require minimal pruning. Over pruning may cause irreversible damage to the trunk. All in all, the Kentia palm (Howea forsteriana) will be a welcome addition to your home creating a relaxing, tropical atmosphere. The easy nature of Kentia palm care makes it a perfect choice for a novice.
0
0
文章
Dummer. ゛☀
2017年08月13日
The indoor panda plant is a hardy succulent that makes an interesting addition to the houseplants you grow indoors. Often a favorite of children, growing Kalanchoe panda plants are a good specimen to locate in a child’s room as part of the décor. Keep reading to answer the question of what is Kalanchoe tormentosa and how to grow a panda plant indoors.
What is a Panda Plant (Kalanchoe Tomentosa)?
More than 100 varieties of Kalanchoe grow in the wilds of Africa and other parts of the Old World. Kalanchoe tomentosa grows wild on the island of Madagascar. In its native environment, growing Kalanchoe panda plants have a woody base and reach several feet. As an indoor plant, however, panda plant growth is limited by the size of the container, usually reaching only 1 to 2 feet in height and 2 feet around. Further information on growing Kalanchoe panda plants says the velvety appearance of the leaves is created by hairs that spring up in trichomes, deflecting light and limiting transpiration. Brownish red markings on leaf edges, along with the white-silvery hairs, are similar to the fur of a panda bear. Tomentosa means densely woolly or velvety. The plant is also commonly called pussy ears as well.
How to Grow a Panda Plant
Locate the indoor panda plant in medium to bright light. As with most succulents, soil should be allowed to dry between waterings. In fact, watering is a limited part of panda plant care. When you do water, do so completely while giving the plant the infrequent drink. You’ll find humidity is not an issue when learning how to grow a panda plant successfully. The average room provides enough humidity for this easy-care, furry plant. The indoor panda plant can live for many years in these conditions. Move it outside during spring and summer, if desired, but provide protection from hot afternoon sun. Fertilize during these months with a balanced houseplant food mixed at half strength as a part of panda plant care.
Propagating Indoor Panda Plant
When you’re growing Kalanchoe panda plants, you’ll likely find more areas in the home that would benefit from one of these plants. Propagation of the indoor panda plant is easy and an inexpensive way to get more of the plants. Root leaves of the plant in spring or summer in a sandy potting soil or a perlite mixture. New roots develop and the plant will grow new leaves, at which time it should be transferred into a new container. Blooms are rare when growing Kalanchoe panda plants indoors. If you wish to grow a Kalanchoe with regular indoor blossoms, look to the cultivar Kalanchoe blossfeldiana hybrids.
4
4
文章
Dummer. ゛☀
2017年08月13日
It is easy to grow the Kalanchoe chandelier plant — so easy, in fact, you have to learn to control its spread as a part of caring for chandelier plants. Growing Kalanchoe delagoensis can be worth all this trouble when you learn how to keep it under control, especially when the orange blooms appear. Kalanchoe delagoensis, also known as Kalanchoe chandelier or mother of millions (and is often confused with mother of thousands, Kalanchoe daigremontiana), is an upright succulent with creeping tendrils bunching together on a single stem. This offers an unusual effect in the container or even in a portion of the sunny garden. Kalanchoe chandelier is hardy in drought stricken, desert areas where thriving plant life may be limited. This Kalanchoe species can exist on limited seasonal rainfall, storing water for existence due to succulent capabilities.
How to Grow Kalanchoe
For those with more hospitable conditions, learning how to grow Kalanchoe and keep it within bounds may include growing it in a large container or even as a houseplant. While drought and heat resistant, the plant is also adaptable to moist growing conditions and will often recover from a mild winter freeze. Chandelier plant care often includes removing small plants that have jumped from the container into the ground or another pot. This happens because Kalanchoe chandelier forms small plantlets at the ends of the leaves. When these are dislodged, they immediately take root and begin growing in any available soil. Removing them from unwanted areas is an integral part of caring for chandelier plants. Propagating Kalanchoe delagoensis is simple. In the event you don’t have more new starts than you need, new plants can be easily started from almost any part of the mother plant.
Dangers of Growing Kalanchoe Delagoensis
A danger when growing Kalanchoe chandelier is primarily to pets and wildlife because of toxins, called bufadienolides, that can cause heart failure when ingested. Animals not accustomed to the specimen may not realize the potential danger and test the plant for its culinary properties. Some gardeners find the attractive, orange blossoms worth the risk. If you choose to grow this unusual plant in a container or as part of an outdoor display, keep it out of reach of your pets or behind a small fence to discourage harm to your animals and visiting wildlife.
When not properly kept under control, this plant can quickly become invasive in southern parts of the United States and more southern areas, taking area that should be left for native plants. The responsible gardener will practice appropriate chandelier plant care when choosing to grow this specimen. Container growing is often the safest and easiest way to grow this plant. Now that you’ve learned how to grow this Kalanchoe and how to keep it in bounds and under control, make an informed decision before adding it to your landscape.
0
0
文章
Dummer. ゛☀
2017年08月13日
Growing mother of thousands (Kalanchoe daigremontiana) provides an attractive foliage houseplant. Though rarely blooming when kept indoors, the flowers of this plant are insignificant, with the most interesting feature being the baby plantlets continually appearing on the tips of the large leaves. When growing mother of thousands as an outdoor plant in USDA hardiness zones 9 -11, it may bloom with small, grayish lavender flowers in late winter. The mother plant then dies, but is replaced by tiny plantlets thatcan drop and cause the plant to be considered invasive. For this reason, most gardeners find growing mother of thousands works best in a container.Mother of Thousands Plant Info
Mother of thousands is of the Crassulaceae family and is related to jade plant and Flaming Katy (Kalanchoe blossfeldiana). It is often confused with the chandelier plant (Kalanchoe delagoensis) but shares similar growing conditions and traits. According to mother of thousands plant info, Kalanchoe daigremontiana has lost the ability to produce seeds and only reproduces from plantlets. As it is an abundant producer, it can quickly get out of hand when dropping these baby plantlets. While this provides numerous plants for the propagating gardener, those uninterested in the addition of more plants may find caring for mother of thousands a bit tedious. Don’t worry about disposing of the plantlets though, because more are sure to appear on the healthy, still growing mother of thousands. This succulent plant can resist drought, though performance is better when regularly watered. Like its relatives, Kalanchoe daigremontiana, does not need frequent fertilization. If you wish to feed when experimenting with how to grow Kalanchoe plants, do so only once every few months.
Caring for a Mother of Thousands
This plant does need good drainage and is best potted in a commercial cactus soil mix. If using standard potting soil, sand can be added for sharper drainage. When learning how to grow Kalanchoe indoors, locate the plant in bright, but indirect light for several hours per day. When growing Kalanchoe outdoors, avoid direct afternoon sun. Houseplants will benefit from spending the summer outside; just make sure to introduce them to the outside atmosphere gradually and begin their outdoor stay with limited morning sun. Too much direct sunlight may cause leaves to become sunburned. Remember to move the plant back inside before outdoor temperatures drop to the 40 degree F. range. (4 C.).
You’ll find that growing mother of thousands is simple and mostly carefree – a worthwhile gardening experience with limited care to keep it under control.
2
0
文章
Dummer. ゛☀
2017年08月13日
Ivy can make a wonderful, bright light houseplant. It can grow long and lush and bring a bit of the outdoors inside. Growing ivy indoors is easy as long as you know what makes an ivy plant happy. Let’s learn a little bit more about ivy and proper ivy plant care.
About Ivy Houseplants
Ivy houseplants can actually be one of several different varieties. These include:
English ivy (Hedera helix)
Irish ivy (Hedera hibernica)
Japanese ivy (Hedera rhombea)
Algerian ivy (Hedera canariensis)
Persian ivy (Hedera colchica)
Nepal ivy (Hedera nepalensis)
Russian ivy (Hedera pastuchovii)
English ivy cultivars are the most common type of ivy grown in the home, but all can be found if you look hard enough. Each of the varieties of inside ivy plants also come in several different cultivars. This means that there is a dizzying array of ivies that you can choose for your home, depending on your preference for color (all shades of green or variegated with white, yellow, gray, black and cream), leaf shape and growth habits.
Growing Ivy Indoors
Growing ivy indoors isn’t difficult as long as you provide what the plant needs. The most important part of indoor ivy plant care is light. All true ivies need bright light. Variegated cultivars can take medium light, but be aware that their variegation will become less pronounced in less light. Without enough light, inside ivy plants will become leggy and sickly looking. They will also be more prone to pests.
Indoor Ivy Plant Care
When watering your ivy, always check the soil before adding water. Ivies prefer to be kept slightly on the dry side, so let the soil dry out some (dry to the touch on top) before you water your ivy plant again. Also, make sure that your plant has excellent drainage, as ivy does not like to be in standing water or overly wet soil. Caring for ivy plants should also include regular fertilizing. Fertilize your ivy about once a month in the spring, summer and fall with a water soluble, nitrogen-rich fertilizer. Do not fertilize in the winter, as this is the ivy’s dormant period and the fertilizer may do more harm than good at this time. Ivy houseplants benefit from periodic washing to remove dust and pests from their leaves. To wash your ivy plant, simply place the plant in the shower and allow the water to run over the plant for a few minutes. If you find the plant has a serious pest infestation, you may need to bring the spray closer to the plant to help knock off all the pests. Caring for ivy plants is easy and rewarding. You will enjoy not only growing ivy indoors, but will also have fun with the wide selection of ivy plants available to do so.
0
0
文章
Dummer. ゛☀
2017年08月13日
Gardeners who have an ugly wall or underused vertical space may want to try growing Arizona grape ivy. What is Arizona grape ivy? This attractive, ornamental vine can get between 15 and 30 feet in height and self-attaches with small tendrils that bear suction cups on the ends. These “feet” cement themselves to structures and can be damaging if removal is necessary. In some zones, this plant is considered invasive so check with your local extension office before purchase. Otherwise, throw caution to the wind and check out Arizona grape ivy plants (Cissus trifoliata).
What is Arizona Grape Ivy?
Vertical spaces with green vines spilling over them accent the garden and lend lushness that bare wall or trellis simply can’t fake. Arizona grape ivy plants are fast growing, easy care vines with tiny flowers and pretty lobed leaves. They are mostly herbaceous but develop a woody base and numerous stems. Another name for the plant is possum grape vine.
Those of us not from Mexico or the American South may wonder, what are Arizona grape ivy plants? This North American native is a fast-growing vine that climbs into trees in its wild range. The plant is remarkably adaptable to almost any lighting because of its nature as an understory tree. In the wild, the tree starts life either in a sunny clearing or in a crowded forest with no light. As the plant grows upward, it reaches brighter and brighter conditions. In cultivation, the vine thrives in partial to full sun or even shade. In its habitat, the plant grows in stream banks, rocky ravines, and roadsides.
Possum Grape Vine Info
Possum or grape ivy is a hardy, herbaceous vine. It has three-lobed rubbery leaves nearly 4 inches long with grayish green color. The plant produces 2-inch wide small greenish flat clusters of blooms which become tiny, grape-like fruits. These are green but mature to a rich bluish black. The stems have tendrils which coil around any object to help pull the plant up as it grows. Reportedly, the leaves produce a rather nasty odor when crushed. The plant is attractive to bees and butterflies. Birds eat the fruits. Basic possum grape vine info must include the fact that the plant is semi-evergreen. In warmer climates, the plant tends to keep its leaves, but in temperate zones it will drop leaves in fall.
Growing Arizona Grape Ivy
This is one of the easiest plants to grow and is suitable for USDA hardiness zones 6 to 11. Once established, care of Arizona grape ivy is negligible. Choose a well-drained site where soil has been loosened and amended with compost or other organic material. The plant can tolerate either acidic to mildly alkaline soil. Provide a vertical structure for support as the plant grows and help it along at the beginning with plant ties. Possum vine is drought tolerant and resistant to deer, but it will need water during establishment. It also self-sows, so you may wish to remove the seed heads before they ripen. Care of Arizona grape ivy may require occasional pruning to keep the plant in habit.
0
0
文章
Dummer. ゛☀
2017年08月13日
Golden trumpet vine is a common sight in gardens with year-round warmth and plenty of sun. These needs make growing Allamanda indoors ideal where there is good southern or western exposure. Even the northernmost gardener can enjoy an indoor Allamanda flowering vine. You may have to invest in a good plant light and turn up the thermostat, but it’s worth it to bring the rich yellow flowers and lovely formed foliage. Allamanda plant care is similar to most tropical houseplants and can be mastered with a few tricks.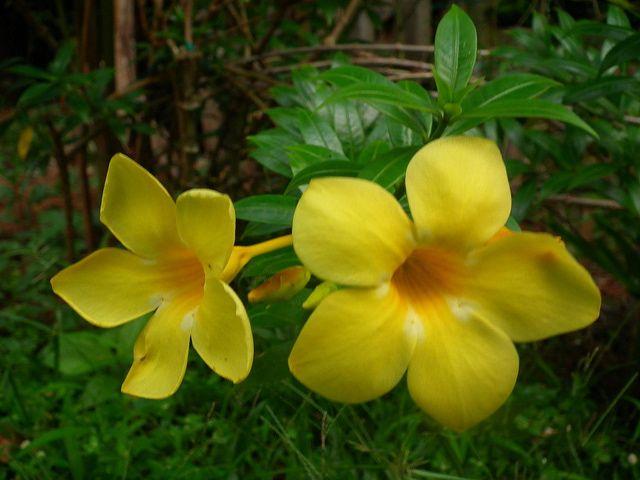
Golden Trumpet Flower
Allamanda is native to northern South America. As such it requires high light, consistently warm temperatures and humidity of at least 50 percent. These conditions are hard to simulate in the average home without grow lights, humidifiers and heaters. Greenhouse conditions are often ideal for Allamanda plant care. Indoors, we tend to have less moisture in the air and sun doesn’t penetrate the interior for as many hours as the plant needs. You can overwinter the vine and bring it out into the bright rays of light in spring and summer. There golden trumpet houseplants can recharge and produce the amazing bright yellow 5-inch blooms characteristic of the Allamanda.
Growing Allamanda Indoors
It can be quite tricky to mimic the native growing conditions of golden trumpet plants as indoor specimens. Indoor Allamanda flowering vine needs structural support for the rambling stems. You can keep it pruned for a more compact plant. Good care of Allamanda golden trumpet starts with the planting medium. Use a potting soil with equal parts peat, compost and sand. Golden trumpet houseplants need four hours or more of direct bright sunlight. The container should be at least a gallon with drainage holes. An unglazed pot is best since it will promote evaporation of excess moisture. Place the pot on a saucer filled with pebbles and water. This will create a humid atmosphere which is required for a healthy Allamanda. You can also use a humidifier. Keep the plant away from drafty doors and windows and several feet away from a heater.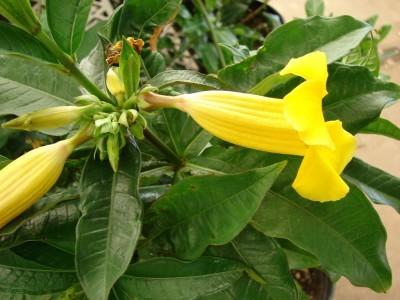
Care of Allamanda Golden Trumpet
Water deeply until the excess moisture runs out of the drainage holes but then wait until the top surface of the soil dries out before you irrigate again. Allamanda doesn’t like wet feet. Fertilize in spring through summer every two to three weeks with a good blooming plant food. Allow the plant to rest in winter. Suspend fertilizing in winter as part of good Allamanda plant care. Restart fertilizing in April and move the plant outside as soon as temperatures are above 60 F. (16 C.). Prune in early spring and cut stems back to pone to two nodes to promote tighter new growth. This plant is prone to spider mites and whiteflies, so watch carefully for these pests. At the first sign put the plant in the shower and hose off as many of the little guys as you can, then follow with daily applications of horticultural soap or a Neem spray.
0
0
文章
Dummer. ゛☀
2017年08月13日
Giving potted plants as gifts is growing in popularity, and with good reason. Potted plants are rarely more expensive than cut flowers, but they last much longer. With the right kind of care, they can even last for years. That said, not all potted plants are good gift ideas and, unfortunately, not all potted plant gifts can be persuaded to bloom again. Keep reading to learn about giving potted plants as gifts and caring for gifted container plants.
Ideas for Potted Plant Gifts
When you’re looking to give flowering plants as gifts, you want to choose something that’s easy to care for. Unless you know your recipient to be an avid gardener who likes a challenge, you should opt for something that’s very low maintenance. Remember, you want to give a decoration, not a responsibility.
There are a few especially popular potted plant gifts that are known for their ease of care. African violets are an excellent choice for low light, and they’ll keep flowering almost year round. Clivia is a very hardy houseplant that blooms red and orange around Christmas and can last for years and years with little care. Small herbs, like lavender and rosemary, are the whole package: easy to care for, fragrant, and useful.
Potted Plants vs. Cut Flowers
If you’ve been given flowering plants as gifts, you may be at a loss as to what to do with them. Cut flowers, of course, will only last so long and then must be tossed. Most potted plants, however, can be replanted in the garden or left to grow in their pots. Unfortunately, some potted plants, like mums, are likely to last only one season. Flowering bulb plants, like tulips and hyacinths, can be saved for years. After they’re done blooming, place the pots outdoors or in a sunny window and keep watering them. They won’t bloom again this season, but the foliage will continue to grow. Later, when the foliage withers and yellows naturally, cut it off and dig up the bulbs. Dry them in a cool dark place and store them until the fall, when you can plant them in another pot or directly in your garden. They should come up naturally in the spring.
Azaleas and African violets can be kept in their pots to bloom for years. Hydrangeas, lily of the valley, and begonias can be transplanted out into the garden.
0
0
文章
Dummer. ゛☀
2017年08月12日
Traditional healers have used plants medicinally since time began, and modern herbalists continue to rely on herbs for treating a number of maladies. If you’re interested in growing plants with medicinal properties but you lack growing space for an outdoor herb garden, you can grow a variety of medicinal houseplants. Read on for a short list of houseplants that heal.
Growing Houseplants for Medicine
Healing houseplants can be found in the most common of plant species. Below are five plants that can be grown indoors and used medicinally.
One of the most popular medicinal houseplants, aloe vera leaves are handy for soothing minor burns, sunburn, rashes, and other skin conditions, thanks to its generous anti-inflammatory properties. The juice of an aloe plant may even brighten the skin and help prevent wrinkles. Basil is appreciated for its beautiful, bright green leaves, but basil tea may be an effective treatment for fever, coughs, and stomach complaints, including nausea, stomach cramps, constipation and gas. Basil leaves and juice have significant insecticidal qualities; just rub them on your skin to keep pests away. You can also chew basil leaves to strengthen your immune system or minimize the duration of a cold.
Peppermint is aggressive and can be difficult to control outdoors, but this easy-to-grow plant is one of the best healing houseplants for minor digestive complaints, including infant colic. The flavorful tea made from fresh or dried peppermint leaves isn’t only good for the tummy; it also purifies the blood, and of course, freshens the breath. Traditionally, lemon balm has been used to calm the nerves, reduce tension, relieve headaches, and treat mild insomnia and minimize symptoms of cold and flu. Some herbalists believe lemon balm is an effective treatment for mild depression and anxiety.
Thyme is valued for its culinary benefits, but thyme tea may relieve coughs, asthma and bronchitis, as well as sore throat, heartburn, arthritis, bad breath and gum disease. Thyme has powerful antifungal properties and a lotion or poultice made of the leaves will sooth athlete’s foot, ringworm and insect bites. Disclaimer: The contents of this article is for educational and gardening purposes only. Before using ANY herb or plant for medicinal purposes, please consult a physician or a medical herbalist for advice.
0
0
文章
Dummer. ゛☀
2017年08月12日
Growing flame violets (Episcia cupreata) is a great way to add color to an indoor space. Episcia flame violet houseplants have attractive, velvety foliage and flowers similar to their cousin, the African violet. Episcia flame violet care isn’t complicated when you understand the basics. Your reward is an elegant, indoor flowering specimen.
Flame Violet Plant Info
There are several cultivars of the flame violet plant. Many trail down the sides of hanging baskets. North and South American natives, foliage of Episcia flame violet houseplants is green to bronze, red or even chocolate. Oval shaped leaves may have silvery edges, veins or margins. Their habit is low-growing and they flower in colors of red, pink, orange, yellow, lavender, or white throughout the year.
Episcia Flame Violet Care
Plant the flame violet plant in well-draining soil and place it where humidity is high. The velvety leaves of Episcia flame violet houseplants do not take well to misting or any contact with water. Instead, provide humidity with a pebble tray, a small decorative fountain or a humidifier in the area. As with most houseplants, indoor humidity is a challenge in winter, but high humidity greatly improves plant appearance when growing flame violets.
Watering Flame Violet Plant
Soil of the flame violet plant should remain moist. Bottom watering is a means of making sure the roots get necessary moisture without the chance of damaging the delicate leaves. Fill the plant saucer with water, then add the potted flame violet plant. Keep the plant in the water filled saucer until all water is absorbed or 30 minutes. If water remains, pour it out. If the water is absorbed quickly, try adding a little more, but don’t exceed the 30 minute limit. Water this way once a month in combination with top watering. Use warm to lukewarm water, not cold, when watering this plant.
Blooms of Episcia Flame Violet Houseplants
The right lighting encourages blooms on the flame violet. Keep this plant in bright, indirect light for at least 8 hours a day. Avoid direct sunlight. Fluorescent lighting can also be used. When growing this houseplant for blooms under fluorescent lights, increase the time to 12 hours.
0
0
文章
Dummer. ゛☀
2017年08月12日
Weeping figs (Ficus benjamina) are elegant trees with slender gray trunks and a profusion of green leaves. Weeping fig tree care depends on whether you are growing weeping fig trees indoors or outdoors. Let’s learn more about outdoor care for weeping figs.
Weeping Fig Plant Information
Growing weeping fig trees indoors and growing weeping fig trees outdoors are completely different endeavors. It is almost as if indoor and outdoor weeping figs are different species.
Indoors, weeping figs are attractive container plants that rarely grow above 6 to 8 feet. Outdoors, however, the trees grow into huge specimens (up to 100 feet tall and 50 feet wide) and are often used for hedges. That being said, weeping figs only thrive outdoors in USDA plant hardiness zones 10 to 11. Therefore, most weeping figs are grown as indoor plants. If you are fortunate enough to live in one of these warm, tropical-like areas though, caring for weeping figs outdoors is something you need to know.
Weeping Fig Tree Care Outdoors
As indoor container plants, weeping figs grow quite slowly, but outside, it’s a different story. This plant can quickly become a monster of a tree if not kept pruned, which it tolerates well. In fact, with regards to weeping fig tree pruning, it readily accepts severe pruning, so don’t hesitate to remove any dead foliage when you see it. If you want to do weeping fig tree pruning to shape or reduce the size of the tree, you can take off up to one-third of the outer growth of the canopy at a time. Caring for weeping figs indoors is a matter of selecting an appropriate location. As its roots spread just as fast as it grows tall, the tree can potentially damage foundations. So, if choosing to grow outdoors, plant it well away from the home, at least 30 feet. If you read up on weeping fig plant information, you find that the plant prefers well-drained, moist, loamy soil and thrives in a location with bright, indirect sunlight indoors. Outdoors is pretty much the same with a few exceptions. The tree can grow well in full sun to shade.
Once established, creeping figs are fairly drought and heat tolerant. They are said to be hardy to 30 F. (-1 C.) but just one hard frost can cause severe damage to the tree. However, when grown in areas with less harsh winters, most will rebound provided the roots are protected. Adding a 3- to 4-inch layer of mulch can help. Outdoor problems with creeping figs include freezing temps; severe drought; high winds; and insect pests, especially thrips. Weeping fig tree care can be tricky since issues are often hard to diagnose. No matter what the problem, the tree reacts the same way: it drops leaves. Most experts agree that the number one cause of leaf drop in weeping fig is overwatering (especially indoors). A good rule of thumb is to keep your tree’s soil moist but never wet, backing off in the winter. You can provide the tree with liquid fertilizer about once a month during the growing season, but outdoors this isn’t usually necessary or advisable due to its faster growth.
0
0
文章
Dummer. ゛☀
2017年08月12日
Not everyone has the right growing conditions in which to enjoy a taste of the tropics in their garden. However, this doesn’t stop gardeners from enjoying the relaxed, yet elegant feel of tropical plants. Fan palm trees are among the most popular of indoor tropical plants and require bright light conditions and ample space to thrive. Keep reading for tips on growing fan palms.
Types of Fan Palms
Chinese fan palms (Livistona chinensis) are very popular in the Florida landscape but also make an excellent indoor plant for a sunny room. This neat palm is slow growing and has a single, upright trunk and large leaves that can reach up to 6 feet in length. The European fan palm (Chamaerops humilis) is an attractive, multi stemmed palm for indoor use. Fronds are fan-shaped and sit atop a 4-foot stem. Leaves are grayish-green in color and about 2 feet across at maturity.
Choosing Your Fan Palm Houseplant
The healthier your plant is when you bring it home, the likelier it is to thrive when given the correct attention. Don’t choose plants with extremely dry soil, browning leaves or apparent damage. Fan palms should have rich green foliage and an upright, healthy habit. Starting with a healthy plant will make it much easier to care for your new potted fan palm.
How to Grow Fan Palm Plants
Potting soil used for palm plants should be well draining and any container used for the plant should have ample drainage holes in the bottom. Soil should be moist at all times during the growing season, although it is essential to avoid over-saturation, which can lead to root rot. Growing fan palms isn’t difficult as long as you provide a room temperature of 55-60 F. (13-16 C.). Keep indoor palm plants away from heating or cooling vents or ceiling fans that may cause temperature fluctuations. Unlike many other types of palms, fan palms do best with at least four hours of direct sunlight daily. A south or west-facing window is best.
Fan Palm Care Tips
Allow the plant soil to dry out a little more in the winter than in the summer. A daily mist of water helps to keep humidity levels high. If frond tips become brown, the humidity is too low. A light fertilizer application from late winter through early fall helps fan palm plants remain vital. Spider mites like dusty foliage, so it is critical that fronds are wiped clean on a regular basis. If mites become a problem, use a soapy water mixture to control infestation.
0
0
文章
Miss Chen
2017年08月11日

Growing orchids indoors brings a touch of the tropics into your home. These perennial beauties crave the humidity and light of their native jungle environments, but they're far from fussy when grown inside. Species from the Phalaenopsis, Cattleya and Dendrobium genus are commonly grown as houseplants. It's smart to start with an established plant, which should be planted in a pot with drainage holes containing fir tree bark chips, sphagnum moss, tree fern fiber or other similar materials suited for tropical orchid growth. Provide them with warmth, sunlight, and a regular watering schedule to ensure these exotic flowers thrive and bloom in your home.

Increase Humidity
Place an established, potted orchid on a tray of pebbles covered to the top in water. This increases humidity for the orchid, which is necessary for successful blooming. Alternatively, keep a humidifier in the room near the orchid. Humidity should be around 50 percent for epiphytic orchids.
Provide Lots of Light
Place the orchid in a well-lit window, preferably facing east or south to let in the ideal light intensity. Watch the leaf color to determine whether your orchid is receiving too much or too little light; dark green indicates that the orchid needs more light, while yellow leaves are receiving too much sun. Orchids may be protected from intense light with a sheer curtain.
You can also grow orchids under artificial light -- specifically four fluorescent tubes that are 4 feet long and placed 6 inches apart. Set the orchids 6 to 8 inches under the tubes, and keep the tubes lit for 14 to 16 hours every day.
Keep the Temperature Comfortable
Keep the temperature range between 50 and 90 degrees Fahrenheit for the orchid. The good news is that this is a typical room temperature comfortable for humans, so it shouldn't be hard to live with your orchid. Just make sure the orchid doesn't become overheated or chilled next to the window glass during the heat of midday or on cold nights.
Water Once a Week
Water the orchid thoroughly in tepid water once a week, preferably by the afternoon to allow the foliage to dry before nightfall in case it accidentally gets splashed. Allow the water to drain afterwards; waterlogging can kill orchids faster than a period of mild drought.
In between waterings, let the orchid's potting materials dry out until they feel almost dry to the touch. This is important for all kinds of orchids, including black orchids (Coelogyne pandurata).
Fertilize Once or Twice a Month
As a general rule, fertilize twice a month during growth periods and once a month during rest periods. Choose a water-soluble, balanced fertilizer formulated specifically for orchids, such as a 20-20-20 blend which has an equal ratio of nitrogen, phosphorus and potassium. Orchids grown in bark need a higher ratio of nitrogen, such as a 30-10-10 or 15-5-5 blend. One orchid fertilizer recommends 1/4 teaspoon per gallon of water, but always follow label directions.
Every month, water pot thoroughly to flush out any accumulated salts.
0
0

