文章
Miss Chen
2017年08月08日


Aloe vera soothes burns and skin irritations and works as a moisturizer for dry skin. To get the most benefit from your plant, harvest all of the gel from a leaf at one time, and then refrigerate it and use as needed.
Storing Leaves
You can wrap whole leaves in plastic wrap or store them in sealable plastic bags and then refrigerate them for several days. Whole aloe vera leaves may also be wrapped and then frozen.

Storing Gel
Stand your aloe leaf cut side down in a glass for 15 minutes to allow the sap to drain naturally. Discard the sap. Place the leaf on a cutting board and cut your aloe leaf in half horizontally. Scoop out the gel with a spoon. Place the sap in a jar, seal the jar and store it in the refrigerator, using it as you need it.
Considerations
The gel will naturally turn brown over time. To prevent discoloration, cut a vitamin E gel capsule in half and squish the vitamin into the gel. Stir the substances together. If you're storing a whole leaf, the plant will wither and mold, so use it within a week.
1
1
文章
Miss Chen
2017年08月08日


Cacti are fleshy, succulent plants that mostly come from the American continent. They store water in their stems that they use sparingly, and therefore, rarely need watering. They acquire water from their extensive, fibrous root systems that draw moisture from the soil through exceptional suction pressure. Cacti are flowering plants that differ greatly in shape and size. Spines, which are cacti's most notable feature, also vary greatly, with some species have long, brightly colored spines and others having short, sparse spines.
Rainforest Cacti
While the majority of cactus species are found in the hot, arid desert, a few species exist in rainforests. Orchid cacti have flat stems that resemble leaves and big bright flowers that vary in color. Holiday cacti bloom small flowers from long branching stems at Easter, Thanksgiving and Christmas. Rainforest cacti prefer cooler, shadier, wetter conditions than desert cacti.
Prickly Pear Cacti
Prickly pear cacti encompasses the largest genus with over 300 species growing in a wide range of regions from Canada to Argentina. They have flat, paddle-like stems with spines that can be short or long. Prickly pear cacti flower in a variety of colors that are large and wide and bear edible fruits. Light, nutrient-rich soil keeps prickly pear cacti happy, as well as a bright, warm area.

Columnar Cacti
Columnar cacti have tall, narrow, cylindrical-shaped stems with vertical ribs. Spike density, size and flowering varies with each species. As with other arid cacti, columnar cacti prefer dry, warm, bright conditions and little moisture.
Barrel Cacti
Barrel cacti are cylindrical, resembling the shape of barrels native to the American Southwest and high limestone altitudes of Mexico. They have strong, colorful, showy spines and flowers, and can grow up to 10 feet tall. They prefer loamy, slightly acidic soil and a warm sunny location. Barrel cacti also grow very slow and don't need much fertilizing.
Hedgehog Cacti
Hedgehog cacti get their name from their globular shapes that are densely covered in spines that make them resemble hedgehogs. Native to Mexico and the southwestern U.S., they have cup-shaped flowers that, unlike other cacti, don't close up at night. Hedgehog cacti like sunny, warm areas and are sensitive to moisture and should only be watered from the bottom.
Pincushion Cacti
The majority of pincushion cacti are found in Mexico, but also grow in other parts of Central America and areas of the U.S. This small, ball-like cactus puts on a magnificent display of star-shaped flowers and has a thick coat of spines. Pincushion cacti are tolerant of a variety of different soils and prefer dry conditions.
1
0
文章
Dummer. ゛☀
2017年08月07日

Freesia is a genus of about 14 species. Freesia bulbs are usually grown for use asCut Flowers. All the 14 species of Freesia are African in origin. Of The 14 Freesia species, 12 are native to Cape Province, South Africa, the remaining two to tropical Africa, with one these species extending north of the equator to Sudan. Freesia flowers are very fragrant, typically white or yellow, and are borne in spikelike racemes. This blooming beauty captures your heart and is a springtime favorite.
Freesia plants grow from a corm (a solid bulb, as in Gladiolus). The Freesia orm sends up a tuft of long narrow leaves and a slightly branched stem. Freesia Flowers are borne as loose one-sided spikes of narrowly funnel-shaped flowers along a side few leaves. Some excellent Freesia varieties (old-fashioned) for fragrance include: Athene, Allure, Demeter, Excelsior, Golden Wave, Mirabel, Pink Westlind, Snowdon, and Welkin.
The tender, cormous plant, Freesia originated in South Africa. The leaves on Freesia are sword shaped and light green and may be up to 1 feet high. Freesia Flower stalks are slender and about the same height. As many as 8 funnel-shaped Freesia flowers form a loose cluster at the top of each stalk. Where the flowers begin, the stem makes a sharp bend so that the Freesia flowers face upward.
Facts About Freesia
Freesia bloom was named by Dr. Freese (1785-1876) , a native of Kiel, Germany.
The flowers come in a great variety of colors - white, golden yellow, orange, red, pink, mauve, lavender, purple and bicolors.
Freesia perfume has a light, sweet, soap-like floral scent - trendy in soaps, lotions and so forth.
Freesia flower bouquets are also used for gifting on special occassions. Freesia flowers are symbolic of innocence.
Freesia are very poularly used in the perfume, scented oils and baths and other related industries.
Freesia Fragrance Oil
Fragrance Oils are artificially created fragrances, which contain artificial substances. Freesia fragrance oil is suitable for use in oil burners and vapourisers. It can also be used to refragrance pot pourries. Freesia fragrance oil can also be used in any of the vapourisers, such as the ceramic lamp ring, drivetime car vapouriser, radiator vapouriser or mini vaporiser.
Freesia essence oil is uncut, undiluted, alcohol free, long lasting, high grade essence oil. The oil is excellent for aromatherapy uses - to scent candles, freshen potpourri, in soap making, massage oils, bath oil and of course, as a Freesia perfume body oil - to smell just truly great.
Growing Freesia Flowers
The corms should be planted close - six will do nicely in a 5 inch pot.
Soil should be light and should be drained well.
Place the top of the corm, 1 inch below the soil.
For winter flowers, plant freesia in late summer or early fall and keep them cool until frosts are due.
During winter, bring freesia bulbs in and keep them in a sunny window.
Plant Care
Freesias are propagated by offsets of bulbs and seeds.
Freesia plants need full sun and cool night temperatures, preferably between 45 and 40 degrees.
Keep the plants well watered while the leaves and flowers are developing.
When the leaves begin to brown after the flowers have faded, the plants may be gradually dried off and the corms saved for the following year.

Freesia plants grow from a corm (a solid bulb, as in Gladiolus). The Freesia orm sends up a tuft of long narrow leaves and a slightly branched stem. Freesia Flowers are borne as loose one-sided spikes of narrowly funnel-shaped flowers along a side few leaves. Some excellent Freesia varieties (old-fashioned) for fragrance include: Athene, Allure, Demeter, Excelsior, Golden Wave, Mirabel, Pink Westlind, Snowdon, and Welkin.
The tender, cormous plant, Freesia originated in South Africa. The leaves on Freesia are sword shaped and light green and may be up to 1 feet high. Freesia Flower stalks are slender and about the same height. As many as 8 funnel-shaped Freesia flowers form a loose cluster at the top of each stalk. Where the flowers begin, the stem makes a sharp bend so that the Freesia flowers face upward.

Facts About Freesia
Freesia bloom was named by Dr. Freese (1785-1876) , a native of Kiel, Germany.
The flowers come in a great variety of colors - white, golden yellow, orange, red, pink, mauve, lavender, purple and bicolors.
Freesia perfume has a light, sweet, soap-like floral scent - trendy in soaps, lotions and so forth.
Freesia flower bouquets are also used for gifting on special occassions. Freesia flowers are symbolic of innocence.
Freesia are very poularly used in the perfume, scented oils and baths and other related industries.
Freesia Fragrance Oil
Fragrance Oils are artificially created fragrances, which contain artificial substances. Freesia fragrance oil is suitable for use in oil burners and vapourisers. It can also be used to refragrance pot pourries. Freesia fragrance oil can also be used in any of the vapourisers, such as the ceramic lamp ring, drivetime car vapouriser, radiator vapouriser or mini vaporiser.
Freesia essence oil is uncut, undiluted, alcohol free, long lasting, high grade essence oil. The oil is excellent for aromatherapy uses - to scent candles, freshen potpourri, in soap making, massage oils, bath oil and of course, as a Freesia perfume body oil - to smell just truly great.

Growing Freesia Flowers
The corms should be planted close - six will do nicely in a 5 inch pot.
Soil should be light and should be drained well.
Place the top of the corm, 1 inch below the soil.
For winter flowers, plant freesia in late summer or early fall and keep them cool until frosts are due.
During winter, bring freesia bulbs in and keep them in a sunny window.
Plant Care
Freesias are propagated by offsets of bulbs and seeds.
Freesia plants need full sun and cool night temperatures, preferably between 45 and 40 degrees.
Keep the plants well watered while the leaves and flowers are developing.
When the leaves begin to brown after the flowers have faded, the plants may be gradually dried off and the corms saved for the following year.
1
1
文章
Dummer. ゛☀
2017年08月06日

BOTANICAL NAME: Cucurbita maxima, C. moschata, C. argyrosperma
PLANT TYPE: Vegetable
SUN EXPOSURE: Full Sun
SOIL TYPE: Any
Whether you use them for carving or cooking, pumpkins do not disappoint. Here’s how to grow your own supply of pumpkins.
Note that pumpkins do require a lot of food and a long growing season (generally from 75 to 100 frost-free days) so you need to plant them by late May in northern locations to early July in extremely southern states.
Do not plant this tender vegetable until all danger of frost has passed and the soil is warmed, as the seedlings will be injured or rot.
PLANTING
SELECTING A SITE
Pick a site with full sun (to light shade) and lots of space for sprawling vines. Vine varieties need 50 to 100 square feet per hill.
However, if your garden space is limited, no worries! Plant pumpkins at the edge of the garden and direct vine growth across the lawn or sidewalk. The vines will only be bothersome for a few weeks. You can also grow pumpkins in big 5 to 10 gallon buckets! Or, try miniature varieties.
Pumpkins are big, greedy feeders. They prefer very rich soil that is well-drained and not too soggy. Mix lots of compost and aged mature into the planting site before you sow seeds or transplant.
PLANTING BY SEED
Pumpkins do best when the seeds are planted directly in the ground.
If your growing season is very short, seed indoors in peat pots about 2 to 4 weeks before last spring frost. Be sure to harden off before transplanting.
Wait until the plant soil is 70ºF or more before sowing seeds. Optimum soil temperature is 95ºF. Pumpkins are very sensitive to the cold.
Plant seeds in rows or “pumpkin hills” which are the size of small pitcher mounds. With hills, the soil will warm more quickly and the seeds will germinate faster. This also helps with drainage and pest control.
Prepare the hills in advance with an abundance of old manure dug deep into the ground (12 to 15 inches). If you don’t have manure, loosen the soil and mix in a 2- to 4-inch layer of compost
Plant the seeds 1 inch deep into the hills (4 to 5 seeds per hill). Space hills 4 to 8 feet apart.
Your plants should germinate in less than a week with the right soil temperature (70 degrees F) and emerge in 5 to 10 days.
When the plants are 2 to 3 inches tall, thin to 2 to 3 plants per hill by snipping off unwanted plants without disturbing the roots of the remaining ones.
In rows, sow seeds 6 to 12 inches apart in rows 6 to 10 feet apart. Snip off plants to thin to one plant every 18 to 36 inches.
CARE
Use row covers to protect plants early in the season and to prevent insect problems. However, remember to remove covers before flowering to allow pollination by insects!
Pumpkins are very thirsty plants and need lots of water. Water one inch per week. Water deeply, especially during fruit set.
When watering: Try to keep foliage and fruit dry unless it’s a sunny day. Dampness will make rot more likely.
Add mulch around your pumpkins to keep in moisture, suppress weeks, and discourage pests.
Remember that pumpkins are tender from planting to harvest. Control weeds with mulch. Do not overcultivate, or their very shallow roots may be damaged.
Most small vine varieties can be trained up a trellis.
Larger varieties can be trained upward on a trellis, too—though it is an engineering challenge to support the fruit—usually with netting or old stockings.
If your first flowers aren’t forming fruits, that’s normal. Both male and female blossoms need to open. Be patient.
Bees are essential for pollination, so be mindful when using insecticides to kill pests. If you must use, apply only in late afternoon or early evening, when blossoms are closed for the day.
Pumpkin vines, though obstinate, are very delicate. Take care not to damage vines, which reduces the quality of fruit.
Pump Up Your Pumpkins!
Pumpkins are HEAVY feeders. Regular treatments of manure or compost mixed with water will sustain good growth.
Fertilize on a regular basis. Use a high nitrogen formula in early plant growth. Fertilize when plants are about one foot tall, just before vines begin to run. Switch over to a fertilizer high in phosphorous just before the blooming period.
Pinch off the fuzzy ends of each vine after a few pumpkins have formed. This will stop vine growth so that the plant’s energies are focused on the fruit.
Pruning the vines may help with space, as well as allow the plant’s energy to be concentrated on the remaining vines and fruit.
Gardeners who are looking for a “prize for size” pumpkin might select the two or three prime candidates and remove all other fruit and vines.
As the fruit develops, they should be turned (with great care not to hurt the vine or stem) to encourage an even shape.
Slip a thin board or a piece of plastic mesh under the pumpkins.
PESTS/DISEASES
Squash bugs and cucumber beetles are common, especially later in summer. Contact your local Cooperative Extension for potential controls.
Aphids
Squash Vine Borer
Powdery Mildew
Anthracnose
Poor light, too much fertilizer, poor weather at bloom time, and reduced pollinating insect activity can negatively impact fruit set.
PLANT TYPE: Vegetable
SUN EXPOSURE: Full Sun
SOIL TYPE: Any
Whether you use them for carving or cooking, pumpkins do not disappoint. Here’s how to grow your own supply of pumpkins.
Note that pumpkins do require a lot of food and a long growing season (generally from 75 to 100 frost-free days) so you need to plant them by late May in northern locations to early July in extremely southern states.
Do not plant this tender vegetable until all danger of frost has passed and the soil is warmed, as the seedlings will be injured or rot.

PLANTING
SELECTING A SITE
Pick a site with full sun (to light shade) and lots of space for sprawling vines. Vine varieties need 50 to 100 square feet per hill.
However, if your garden space is limited, no worries! Plant pumpkins at the edge of the garden and direct vine growth across the lawn or sidewalk. The vines will only be bothersome for a few weeks. You can also grow pumpkins in big 5 to 10 gallon buckets! Or, try miniature varieties.
Pumpkins are big, greedy feeders. They prefer very rich soil that is well-drained and not too soggy. Mix lots of compost and aged mature into the planting site before you sow seeds or transplant.
PLANTING BY SEED
Pumpkins do best when the seeds are planted directly in the ground.
If your growing season is very short, seed indoors in peat pots about 2 to 4 weeks before last spring frost. Be sure to harden off before transplanting.
Wait until the plant soil is 70ºF or more before sowing seeds. Optimum soil temperature is 95ºF. Pumpkins are very sensitive to the cold.
Plant seeds in rows or “pumpkin hills” which are the size of small pitcher mounds. With hills, the soil will warm more quickly and the seeds will germinate faster. This also helps with drainage and pest control.
Prepare the hills in advance with an abundance of old manure dug deep into the ground (12 to 15 inches). If you don’t have manure, loosen the soil and mix in a 2- to 4-inch layer of compost
Plant the seeds 1 inch deep into the hills (4 to 5 seeds per hill). Space hills 4 to 8 feet apart.
Your plants should germinate in less than a week with the right soil temperature (70 degrees F) and emerge in 5 to 10 days.
When the plants are 2 to 3 inches tall, thin to 2 to 3 plants per hill by snipping off unwanted plants without disturbing the roots of the remaining ones.
In rows, sow seeds 6 to 12 inches apart in rows 6 to 10 feet apart. Snip off plants to thin to one plant every 18 to 36 inches.

CARE
Use row covers to protect plants early in the season and to prevent insect problems. However, remember to remove covers before flowering to allow pollination by insects!
Pumpkins are very thirsty plants and need lots of water. Water one inch per week. Water deeply, especially during fruit set.
When watering: Try to keep foliage and fruit dry unless it’s a sunny day. Dampness will make rot more likely.
Add mulch around your pumpkins to keep in moisture, suppress weeks, and discourage pests.
Remember that pumpkins are tender from planting to harvest. Control weeds with mulch. Do not overcultivate, or their very shallow roots may be damaged.
Most small vine varieties can be trained up a trellis.
Larger varieties can be trained upward on a trellis, too—though it is an engineering challenge to support the fruit—usually with netting or old stockings.
If your first flowers aren’t forming fruits, that’s normal. Both male and female blossoms need to open. Be patient.
Bees are essential for pollination, so be mindful when using insecticides to kill pests. If you must use, apply only in late afternoon or early evening, when blossoms are closed for the day.
Pumpkin vines, though obstinate, are very delicate. Take care not to damage vines, which reduces the quality of fruit.
Pump Up Your Pumpkins!
Pumpkins are HEAVY feeders. Regular treatments of manure or compost mixed with water will sustain good growth.
Fertilize on a regular basis. Use a high nitrogen formula in early plant growth. Fertilize when plants are about one foot tall, just before vines begin to run. Switch over to a fertilizer high in phosphorous just before the blooming period.
Pinch off the fuzzy ends of each vine after a few pumpkins have formed. This will stop vine growth so that the plant’s energies are focused on the fruit.
Pruning the vines may help with space, as well as allow the plant’s energy to be concentrated on the remaining vines and fruit.
Gardeners who are looking for a “prize for size” pumpkin might select the two or three prime candidates and remove all other fruit and vines.
As the fruit develops, they should be turned (with great care not to hurt the vine or stem) to encourage an even shape.
Slip a thin board or a piece of plastic mesh under the pumpkins.

PESTS/DISEASES
Squash bugs and cucumber beetles are common, especially later in summer. Contact your local Cooperative Extension for potential controls.
Aphids
Squash Vine Borer
Powdery Mildew
Anthracnose
Poor light, too much fertilizer, poor weather at bloom time, and reduced pollinating insect activity can negatively impact fruit set.
0
0
文章
Dummer. ゛☀
2017年08月05日

BOTANICAL NAME: Artemisia dracunculus
PLANT TYPE: Herb
SUN EXPOSURE: Full SunFull SunPart Sun
SOIL TYPE: LoamySandy
Tarragon is a perennial herb with long, light green leaves and tiny greenish or yellowish white flowers. For cooking, use French tarragon. Russian tarragon can easily be mistaken for French, but Russian tarragon is coarser and less flavorful than French tarragon.
PLANTING
You can’t grow French tarragon from seeds. You must purchase the plants or take an established plant from a friend’s garden. Get the transplants in the spring or fall.
Plant the transplants in well-drained soil about 2 to 3 feet apart in order to give each plant room to grow. A full-grown plant should cover about 12 inches of soil.
The plants should grow to around 2 or 3 feet in height.
Tarragon is a good companion to most vegetables in the garden.
CARE
Be sure to prune the plant regularly to prevent flowering and to keep the height to around 2 feet (otherwise the plant will fall over).
If you live in a colder climate, be sure to put mulch around the plants in late fall in order to protect the roots during the winter.
To help keep your plants healthy, divide them every 3 to 4 years in the spring or fall. New plants can grow from stem cuttings or root cuttings.
PESTS/DISEASES
Many rusts, including white rust
Downy mildew
Powdery mildew
Various fungal leaf and stem diseases
PLANT TYPE: Herb
SUN EXPOSURE: Full SunFull SunPart Sun
SOIL TYPE: LoamySandy
Tarragon is a perennial herb with long, light green leaves and tiny greenish or yellowish white flowers. For cooking, use French tarragon. Russian tarragon can easily be mistaken for French, but Russian tarragon is coarser and less flavorful than French tarragon.

PLANTING
You can’t grow French tarragon from seeds. You must purchase the plants or take an established plant from a friend’s garden. Get the transplants in the spring or fall.
Plant the transplants in well-drained soil about 2 to 3 feet apart in order to give each plant room to grow. A full-grown plant should cover about 12 inches of soil.
The plants should grow to around 2 or 3 feet in height.
Tarragon is a good companion to most vegetables in the garden.

CARE
Be sure to prune the plant regularly to prevent flowering and to keep the height to around 2 feet (otherwise the plant will fall over).
If you live in a colder climate, be sure to put mulch around the plants in late fall in order to protect the roots during the winter.
To help keep your plants healthy, divide them every 3 to 4 years in the spring or fall. New plants can grow from stem cuttings or root cuttings.

PESTS/DISEASES
Many rusts, including white rust
Downy mildew
Powdery mildew
Various fungal leaf and stem diseases
0
0
文章
Dummer. ゛☀
2017年07月31日

Family - Linaceae
Stems - To +/-60cm tall, erect, herbaceous, from a taproot, ribbed from decurrent leaf tissue, glabrous, glandular (use lens to see), mostly simple but branching near apex, purplish at base, single or multiple from base.

Leaves - Alternate, sessile, linear-oblong, entire, acuminate, to 2cm long, +2mm broad, with single midrib, glabrous, glandular (use lens to see), with pair of opposing blackish glands at leaf base.

Inflorescence - Terminal and axillary loose panicles or racemes. Each flower subtended by a foliaceous bract. Bracts glandular-serrulate. Pedicels glabrous, 2-3mm in flower, slightly elongating in fruit to 4-5mm.
Flowers - Corolla yellow, +1cm broad, 7-8mm long. Petals 5, glabrous externally, pubescent near base internally, rounded at apex, with short basal retrorse lobes (lobes acute and triangular), connate basally for 1-2mm. Stamens 5, erect. Filaments scarious, compressed and united at base into short tube under the ovary, glabrous, 4mm long, slightly yellowish near the apex. Styles 5, 3mm long, united at base, glabrous, whitish-yellow. Ovary superior, green, 5-locular, (1-2 ovules per locule), glabrous, globose-ovoid, 1.5mm in diameter. Sepals 5, ovate-lanceolate, scarious but with a green midrib, glandular-serrulate, glabrous, to 4mm long, 1.5mm broad, acuminate, persistent in fruit. Capsule globose, glabrous, 3mm in diameter, 5-valved, dehiscing into 5, 2-parted segments.

Flowering - May - September.
Habitat - Glades, prairies, sometimes in open woods.
Origin - Native to U.S.
Other info. - This little plant is inconspicuous when not in flower but is still easy to identify because of the pair of opposing, blackish glands at the base of each leaf. The plant is common throughout most of Missouri except in the extreme southeastern and northwestern corners of the state.
Stems - To +/-60cm tall, erect, herbaceous, from a taproot, ribbed from decurrent leaf tissue, glabrous, glandular (use lens to see), mostly simple but branching near apex, purplish at base, single or multiple from base.

Leaves - Alternate, sessile, linear-oblong, entire, acuminate, to 2cm long, +2mm broad, with single midrib, glabrous, glandular (use lens to see), with pair of opposing blackish glands at leaf base.

Inflorescence - Terminal and axillary loose panicles or racemes. Each flower subtended by a foliaceous bract. Bracts glandular-serrulate. Pedicels glabrous, 2-3mm in flower, slightly elongating in fruit to 4-5mm.
Flowers - Corolla yellow, +1cm broad, 7-8mm long. Petals 5, glabrous externally, pubescent near base internally, rounded at apex, with short basal retrorse lobes (lobes acute and triangular), connate basally for 1-2mm. Stamens 5, erect. Filaments scarious, compressed and united at base into short tube under the ovary, glabrous, 4mm long, slightly yellowish near the apex. Styles 5, 3mm long, united at base, glabrous, whitish-yellow. Ovary superior, green, 5-locular, (1-2 ovules per locule), glabrous, globose-ovoid, 1.5mm in diameter. Sepals 5, ovate-lanceolate, scarious but with a green midrib, glandular-serrulate, glabrous, to 4mm long, 1.5mm broad, acuminate, persistent in fruit. Capsule globose, glabrous, 3mm in diameter, 5-valved, dehiscing into 5, 2-parted segments.

Flowering - May - September.
Habitat - Glades, prairies, sometimes in open woods.
Origin - Native to U.S.
Other info. - This little plant is inconspicuous when not in flower but is still easy to identify because of the pair of opposing, blackish glands at the base of each leaf. The plant is common throughout most of Missouri except in the extreme southeastern and northwestern corners of the state.
0
0
文章
Abigal
2017年07月28日
If you are looking for a way to add some whimsy or character to your garden, you have a pretty safe bet if you use windows and doors to amp up the pretty. Windows and doors both add a sense of mystery to a garden, a wonder of what surprises lie just beyond where the eye can see. Add some vintage age, and you have a recipe for a delightful space that lures in even the most cynical garden visitor. You can use them as actual gateways to other garden spaces, or as garden decor that only leads to another space in ones’ imagination. (I kinda like those even better!) Take these great ideas and find an inexpensive door in the home improvement center, pick up a vintage window at the salvage yard, or create your own door and window “look” with an element of new construction. But bring in a “passage-way” to your garden, (whether real or implied) and you will have a hard time keeping visitors out! Our feature photo below, is from ‘Paintbox Garden‘ via ‘Houzz’. This would be an easy way to mount a freestanding door as a gate in the garden, by sinking two large wood poles as a doorframe.

These two wood doors were repurposed by ‘BHG‘ to create this fresh take on a garden arbor. You could also use wood posts behind the doors as support here. We would recommend using a quick setting concrete to set the posts into their holes, then screw the doors into the posts.

These next two ideas are doors in the garden from ‘Gardening with Grace‘. The first shows an old door simply leaning against a fence as pretty decor, the second shows a very vintage door being hung from the roof overhang with two simple eye hooks. Easy! (You get doors and windows from these two ideas!)
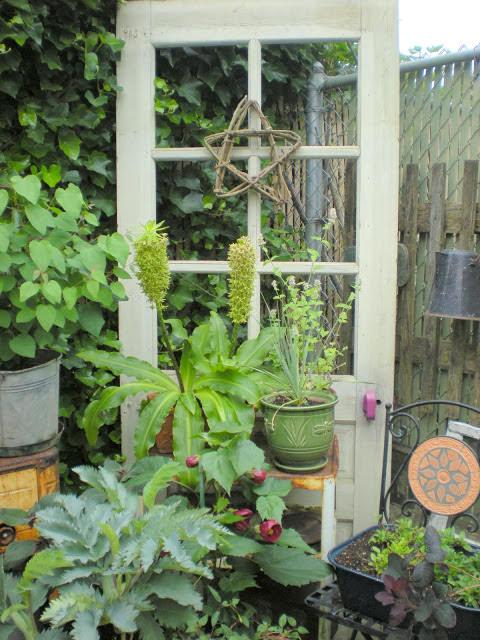

From ‘Flea Market Gardening‘, this pretty chalkboard door is from Gail Brunkes. We love this door, not only does is make a pretty focal point in the garden, it’s a great way to share your thoughts with visitors! We like how she used hinges to add on a second door, creating more of a garden screen. This could easily be moved around the garden to shield a garden bed out of season or a not so pretty view when all the leaves fall. And the branches and wreath? Love this! You can buy chalkboard paint at any craft store…

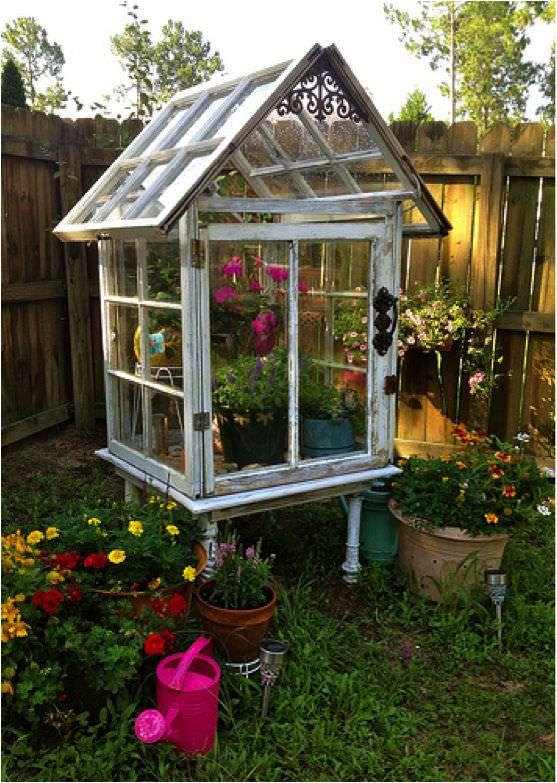
Wanna know something cool to do with windows? Build a greenhouse that looks like one from an old English garden! This is a DIY tutorial on how to build a greenhouse with windows from ‘”Global Garden Friends’.
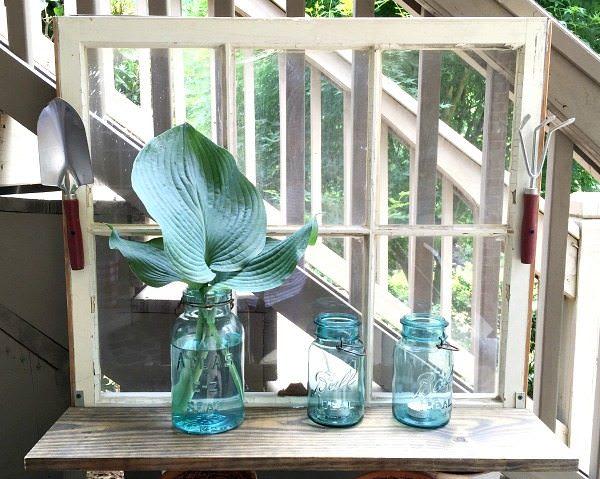
Lovin’ this repurposed window garden shelf tutorial from Debbie at ‘Refresh, Restyle’! Easy project and the garden tool handles made me smile, I love the whimsy.
Want a cute garden decor piece? Love birds, like I do? Then try this quick and easy tutorial from Teri at ‘Hometalk‘. She got the window frame for free, then cut and painted the birds herself from plywood. Could you find some precut versions at the craft store?

From ‘Goessling Design‘ via ‘Houzz’, this homeowner had a window like structure made to act as both an arbor and a patio fence as well.

We saved the most amazing for last! From ‘Country Living‘, this “chic shed” from Donna Jenkins, owner of ‘Tinkerhouse Trading Company‘ is awwwww-some! Sorry, I just ran out of words cool enough for this garden! The greenhouse shed is made up entirely of windows, and there are a couple of vintage doors making this one of the most enviable gardens we’ve seen this season! Check out the whole article,and watch for the opening of her online shop. Photos by Gridley and Graves.


These two wood doors were repurposed by ‘BHG‘ to create this fresh take on a garden arbor. You could also use wood posts behind the doors as support here. We would recommend using a quick setting concrete to set the posts into their holes, then screw the doors into the posts.

These next two ideas are doors in the garden from ‘Gardening with Grace‘. The first shows an old door simply leaning against a fence as pretty decor, the second shows a very vintage door being hung from the roof overhang with two simple eye hooks. Easy! (You get doors and windows from these two ideas!)


From ‘Flea Market Gardening‘, this pretty chalkboard door is from Gail Brunkes. We love this door, not only does is make a pretty focal point in the garden, it’s a great way to share your thoughts with visitors! We like how she used hinges to add on a second door, creating more of a garden screen. This could easily be moved around the garden to shield a garden bed out of season or a not so pretty view when all the leaves fall. And the branches and wreath? Love this! You can buy chalkboard paint at any craft store…

Wanna know something cool to do with windows? Build a greenhouse that looks like one from an old English garden! This is a DIY tutorial on how to build a greenhouse with windows from ‘”Global Garden Friends’.

Lovin’ this repurposed window garden shelf tutorial from Debbie at ‘Refresh, Restyle’! Easy project and the garden tool handles made me smile, I love the whimsy.

Want a cute garden decor piece? Love birds, like I do? Then try this quick and easy tutorial from Teri at ‘Hometalk‘. She got the window frame for free, then cut and painted the birds herself from plywood. Could you find some precut versions at the craft store?

From ‘Goessling Design‘ via ‘Houzz’, this homeowner had a window like structure made to act as both an arbor and a patio fence as well.

We saved the most amazing for last! From ‘Country Living‘, this “chic shed” from Donna Jenkins, owner of ‘Tinkerhouse Trading Company‘ is awwwww-some! Sorry, I just ran out of words cool enough for this garden! The greenhouse shed is made up entirely of windows, and there are a couple of vintage doors making this one of the most enviable gardens we’ve seen this season! Check out the whole article,and watch for the opening of her online shop. Photos by Gridley and Graves.


2
1
文章
Dummer. ゛☀
2017年07月27日

Family - Lamiaceae
Stems - Multiple from the base, erect to ascending, from fibrous roots, 4-angled, typically purple at the base and nodes, glabrous, branching, to +/-15cm tall, herbaceous, glandular punctate (use a lens to see). Entire plant has a strong mint fragrance.

Leaves - Opposite, decussate, sessile, linear to linear-spatulate, to 1.5cm long, 3mm broad, entire, glabrous, rounded to subacute at the apex, densely glandular punctate on both surfaces.
Inflorescence - Single axillary flowers. Pedicels to +/-5mm long, glabrous.

Flowers - Corolla purplish (very rarely all white), bilabiate, 1.2cm long, pubescent externally, contracted and brown at the base in the calyx-covered portion. Upper lip single-lobed. The lobe deflexed, 3-4mm broad, 2-3mm long, emarginate. Lower lip 3-lobed. Lobes rounded, 2mm long and broad. The center lobe slightly larger than the laterals. Stamens 4, didynamous, 2 attached in the basal 1/4 of the corolla tube, 2 attached in the apical 1/4 of the corolla tube and slightly exserted. Filaments whitish and glabrous, to +3mm long. Anthers lilac, bilobed, 1mm long. Style white (lilac at the apex), glabrous, to 1cm long. Stigma unequally 2-lobed. Ovary green, glabrous, deeply 4-parted, .5mm long. Calyx bilabiate. Calyx tube to 4mm long, glandular punctate, with 13 ribs, greenish-purple. Upper lip 3-lobed. Lobes acuminate, 1.1-1.2mm long. Lower lip 2-lobed, lobes equal or slightly longer than upper lobes, acuminate. Calyx with a ring of floccose hairs at the summit of the tube internally.

Flowering - May - October.
Habitat - Limestone glades and knobs, rocky open ground, wet meadows along spring branches, gravel bars, bluffs escarpments.
Origin - Native to U.S.
Other info. - This little species is very common in the Ozarks of Missouri. The plant is more often smelled than seen. Plant hunters strolling through the glades of Missouri often step on the plant releasing a very strong mint flavor into the air. The smell is unmistakable. Because the plant has thin stems and thin leaves it often gets overlooked until that smell fills the air. Chewing on the plant gives you fresh breath that will last for hours.
Stems - Multiple from the base, erect to ascending, from fibrous roots, 4-angled, typically purple at the base and nodes, glabrous, branching, to +/-15cm tall, herbaceous, glandular punctate (use a lens to see). Entire plant has a strong mint fragrance.

Leaves - Opposite, decussate, sessile, linear to linear-spatulate, to 1.5cm long, 3mm broad, entire, glabrous, rounded to subacute at the apex, densely glandular punctate on both surfaces.
Inflorescence - Single axillary flowers. Pedicels to +/-5mm long, glabrous.

Flowers - Corolla purplish (very rarely all white), bilabiate, 1.2cm long, pubescent externally, contracted and brown at the base in the calyx-covered portion. Upper lip single-lobed. The lobe deflexed, 3-4mm broad, 2-3mm long, emarginate. Lower lip 3-lobed. Lobes rounded, 2mm long and broad. The center lobe slightly larger than the laterals. Stamens 4, didynamous, 2 attached in the basal 1/4 of the corolla tube, 2 attached in the apical 1/4 of the corolla tube and slightly exserted. Filaments whitish and glabrous, to +3mm long. Anthers lilac, bilobed, 1mm long. Style white (lilac at the apex), glabrous, to 1cm long. Stigma unequally 2-lobed. Ovary green, glabrous, deeply 4-parted, .5mm long. Calyx bilabiate. Calyx tube to 4mm long, glandular punctate, with 13 ribs, greenish-purple. Upper lip 3-lobed. Lobes acuminate, 1.1-1.2mm long. Lower lip 2-lobed, lobes equal or slightly longer than upper lobes, acuminate. Calyx with a ring of floccose hairs at the summit of the tube internally.

Flowering - May - October.
Habitat - Limestone glades and knobs, rocky open ground, wet meadows along spring branches, gravel bars, bluffs escarpments.
Origin - Native to U.S.
Other info. - This little species is very common in the Ozarks of Missouri. The plant is more often smelled than seen. Plant hunters strolling through the glades of Missouri often step on the plant releasing a very strong mint flavor into the air. The smell is unmistakable. Because the plant has thin stems and thin leaves it often gets overlooked until that smell fills the air. Chewing on the plant gives you fresh breath that will last for hours.
0
0
文章
Dummer. ゛☀
2017年07月17日

Family - Polygonaceae
Stems - Multiple from base, erect to ascending, translucent lepidote (use a lens to see), suffrutescent at the base, herbaceous above, resembling a small cedar when not in flower.
Leaves - Alternate, thin, scalelike to subulate, sessile, to +1cm long, +/-1mm broad, translucent lepidote (use a lens to see), subsucculent, often lighter colored and rounded at the apex. Ocrea with a lighter green to yellowish apical margin.
Inflorescence - Dense terminal and axillary racemes to +/-4cm long. Pedicels white, glabrous, 3-4mm long. Each flower arising from the axil of a reduced leafy bract. Bracts scalelike, enclosing the stem, acute to acuminate at the apex, with a whitish apical margin, glabrous, with white speckling (use a lens to see). The apex of one bract enclosing the base of the leaf above it.
Flowers - Perianth whitish. Outer two sepals white with a green midrib, cupped at the apex, 2mm long, +1.7mm broad, glabrous, often somewhat folded, broadly ovate. Inner sepals 3, white, spreading, orbicular, 2-3mm long and broad, glabrous. Stamens +/-8, erect, exserted. Filaments white, glabrous, broadened in the basal 1/2, +/-2mm long. Anthers white to pinkish, .6mm long. Ovary superior, white, 3-angled, glabrous, white with minute pinkish tips. Receptacle with a reddish rim surrounding a green nectary.
Flowering - July - October.
Habitat - Dry sandy ground.
Origin - Native to U.S.
Other info. - This attractive little species is uncommon in Missouri, only being found in a handful of counties which contain parts of Crowleys Ridge. It can also be found in Iron County in one or two select locations.
The plant is very easy to identify because of its large numbers of small white flowers and because it resembles a small cedar or juniper when not in flower. Nothing else in the states flora really resembles it.
P. americana would make a fine garden plant if sandy, acidic conditions could be provided. It grows well from seed.
Stems - Multiple from base, erect to ascending, translucent lepidote (use a lens to see), suffrutescent at the base, herbaceous above, resembling a small cedar when not in flower.

Leaves - Alternate, thin, scalelike to subulate, sessile, to +1cm long, +/-1mm broad, translucent lepidote (use a lens to see), subsucculent, often lighter colored and rounded at the apex. Ocrea with a lighter green to yellowish apical margin.
Inflorescence - Dense terminal and axillary racemes to +/-4cm long. Pedicels white, glabrous, 3-4mm long. Each flower arising from the axil of a reduced leafy bract. Bracts scalelike, enclosing the stem, acute to acuminate at the apex, with a whitish apical margin, glabrous, with white speckling (use a lens to see). The apex of one bract enclosing the base of the leaf above it.

Flowers - Perianth whitish. Outer two sepals white with a green midrib, cupped at the apex, 2mm long, +1.7mm broad, glabrous, often somewhat folded, broadly ovate. Inner sepals 3, white, spreading, orbicular, 2-3mm long and broad, glabrous. Stamens +/-8, erect, exserted. Filaments white, glabrous, broadened in the basal 1/2, +/-2mm long. Anthers white to pinkish, .6mm long. Ovary superior, white, 3-angled, glabrous, white with minute pinkish tips. Receptacle with a reddish rim surrounding a green nectary.

Flowering - July - October.
Habitat - Dry sandy ground.
Origin - Native to U.S.
Other info. - This attractive little species is uncommon in Missouri, only being found in a handful of counties which contain parts of Crowleys Ridge. It can also be found in Iron County in one or two select locations.
The plant is very easy to identify because of its large numbers of small white flowers and because it resembles a small cedar or juniper when not in flower. Nothing else in the states flora really resembles it.
P. americana would make a fine garden plant if sandy, acidic conditions could be provided. It grows well from seed.
0
0
文章
Dummer. ゛☀
2017年07月12日

Family - Verbenaceae
Stems - Erect to ascending, rooting at nodes, to +/-45cm tall, herbaceous, (4)-angled, green to purple and often with purple vertical striations, appearing glabrous but with malpighian trichomes (use lens to see).
Leaves - Opposite, decussate, tapering to the base, lanceolate, serrate, +/-5cm long, +/-2cm broad, with impressed veins above, expressed veins below, strigillose on both surfaces.
Inflorescence - Dense globose to cylindric capitate clusters of flowers on a long axillary peduncle. Peduncles from the upper leaf axils, to +/-9cm long, pubescent as the stem, expanding just below the flower cluster. Each flower subtended by one bract. Bracts to 3mm long, acute, broadest in the middle, tapering to the base, glabrous internally, strigose externally, often purplish in the apical half, to -3mm broad.
Flowers - Corolla white, glabrous, 4-lobed, +/-4mm long. The upper and lower lobes more or less truncate at the apex. The lateral lobes slightly more rounded. Lobes to 1.5mm long, 1mm broad, unequal. Stamens 4, included, didynamous, adnate near the middle of the corolla tube. Filaments wanting. Anthers yellow, .3-.4mm broad. Ovary superior, greenish, glabrous, .5mm long in flower. Style short, green, glabrous, .5mm long. Stigma green, sub-globose, .3mm in diameter, slightly nodding or facing "forward." Calyx 2-lobed. The tube whitish, 1mm long. The lobes opposing, to 1.4mm long, cupped, whitish, acute, with short hairs on the outer surfaces and longer hairs on the midrib, glabrous internally.
Flowering - May - September.
Habitat - Moist to wet soils.
Origin - Native to U.S.
Other info. - The actual flowers and racemes of the plant are small but the plant forms colonies and is easily found in wet, muddy areas. Close inspection of the flowers reveals that they are typical of the family Verbenaceae with a mostly irregular corolla and 4 stamens borne on and included within the corolla. This species is very common.
A synonym is Phyla lanceolata (Michx.) Greene-Rydberg.
Stems - Erect to ascending, rooting at nodes, to +/-45cm tall, herbaceous, (4)-angled, green to purple and often with purple vertical striations, appearing glabrous but with malpighian trichomes (use lens to see).

Leaves - Opposite, decussate, tapering to the base, lanceolate, serrate, +/-5cm long, +/-2cm broad, with impressed veins above, expressed veins below, strigillose on both surfaces.

Inflorescence - Dense globose to cylindric capitate clusters of flowers on a long axillary peduncle. Peduncles from the upper leaf axils, to +/-9cm long, pubescent as the stem, expanding just below the flower cluster. Each flower subtended by one bract. Bracts to 3mm long, acute, broadest in the middle, tapering to the base, glabrous internally, strigose externally, often purplish in the apical half, to -3mm broad.
Flowers - Corolla white, glabrous, 4-lobed, +/-4mm long. The upper and lower lobes more or less truncate at the apex. The lateral lobes slightly more rounded. Lobes to 1.5mm long, 1mm broad, unequal. Stamens 4, included, didynamous, adnate near the middle of the corolla tube. Filaments wanting. Anthers yellow, .3-.4mm broad. Ovary superior, greenish, glabrous, .5mm long in flower. Style short, green, glabrous, .5mm long. Stigma green, sub-globose, .3mm in diameter, slightly nodding or facing "forward." Calyx 2-lobed. The tube whitish, 1mm long. The lobes opposing, to 1.4mm long, cupped, whitish, acute, with short hairs on the outer surfaces and longer hairs on the midrib, glabrous internally.
Flowering - May - September.
Habitat - Moist to wet soils.
Origin - Native to U.S.
Other info. - The actual flowers and racemes of the plant are small but the plant forms colonies and is easily found in wet, muddy areas. Close inspection of the flowers reveals that they are typical of the family Verbenaceae with a mostly irregular corolla and 4 stamens borne on and included within the corolla. This species is very common.
A synonym is Phyla lanceolata (Michx.) Greene-Rydberg.
0
0
sarajordan2993
2017年06月09日

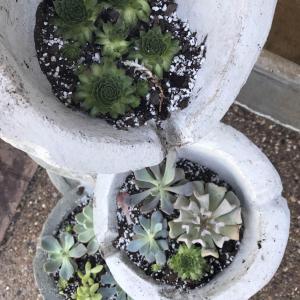
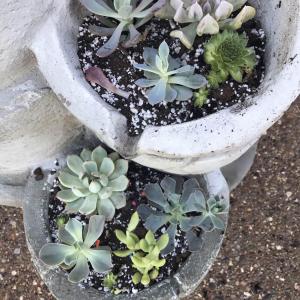
One of my newest arrangements I made with the use of an old garden fountain . #succulent #cactus ##NorthAmerica #garden #planter


3
0
文章
Gina
2017年05月27日

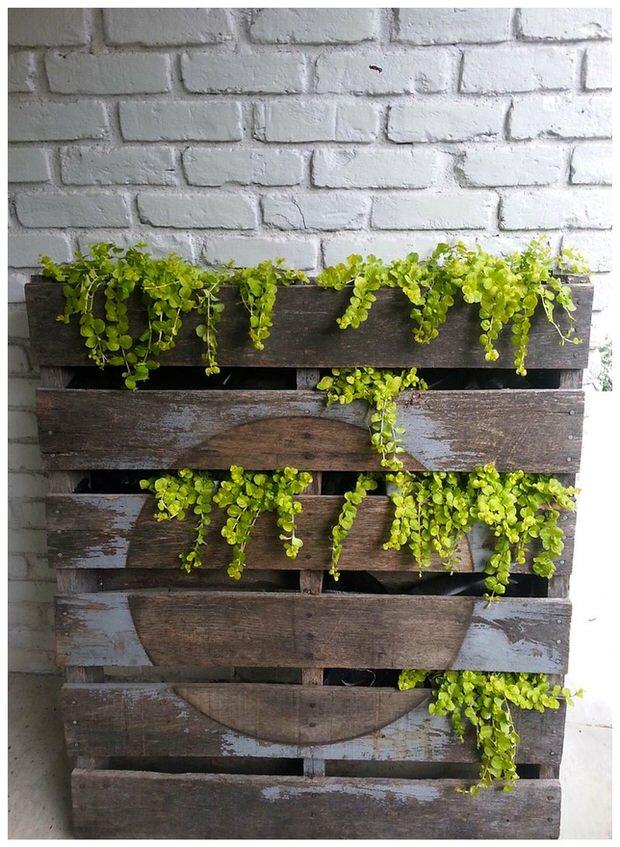
We’ve seen pallets turned into about every DIY project possible, and it’s good… they are cheap or free, we recycle when we create a pallet project, and I just love the organic feel to such a simple thing. My favorite use of pallets however, is pallet planters. They just fit in a garden, ya know?
So here are TGG’s fav five of the week, Pallet Planters!
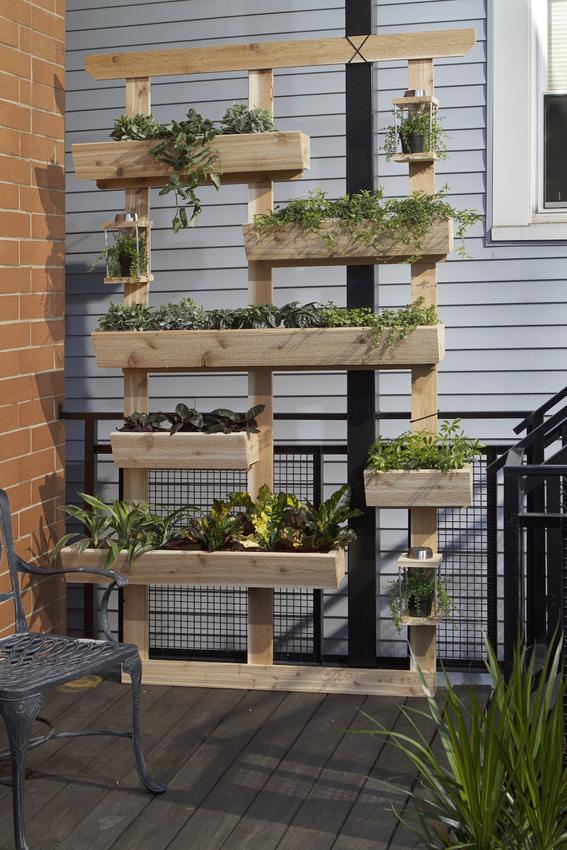
This living wall was created by Dremel Weekends.
Love this plant stand created with a pallet from At Home with Kelsey.
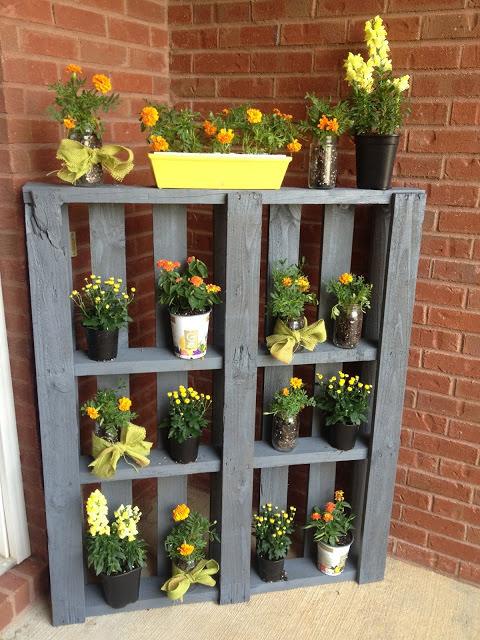
I love the more modern, fresh look of this pallet planter from A Storied Style.

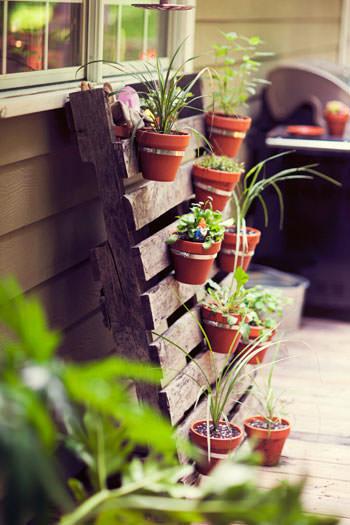
For those of you who don’t want to use hammer and nails to switch up a pallets configuration, this is a great example from Young House Love on attaching pots to the pallet! Love this look!
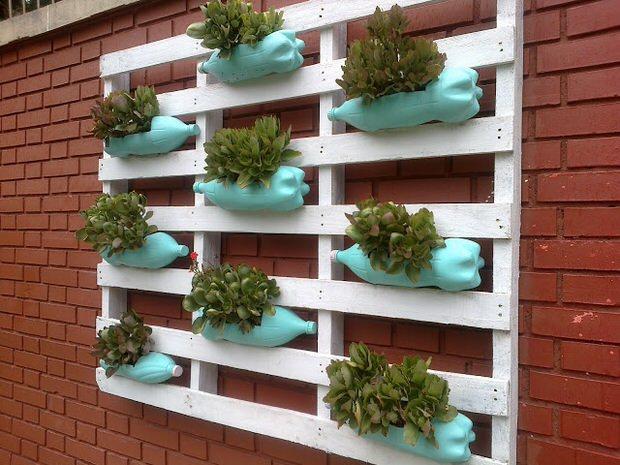
Lastly, this example perfects Reduce, Reuse, Recycle! Love it!
1
0
文章
粉团
2017年05月23日

After all the fun and excitement of Christmas, the time comes when you need to dispose of your Christmas tree and here’re the 9 ideas to recycle it!

1. Create a brush pile for birds and wildlife
Use your dead Christmas tree to create a brush pile, you can find twigs, leaves, and logs in your garden, the Christmas tree can be used as its base. It’ll help and redirect the small animals and birds towards during the wintry months. The dead tree will not only offer the much-needed protection from chill to the animals but also act as a source of food.
2. Create a DIY bird sanctuary

It’s a nice idea if you keep the tree at a strategic point in the garden and place some birdhouses and feeders on or in it. This way, the birds can appreciate your tree, too. You can also go a step further and decorate it, and fill bird feeders with edible seeds and hang them from the branches/boughs to attract the birds to their new home.
3. Replant it for the next Christmas
If you’ve bought a living Christmas tree with the root ball intact, it’s a good idea to replant it for the next Christmas, it might be more than 11 months from now but that only gives us all the more reasons to start early. The Gardening Know How has a good article on it, take a look!
4. Edge flowerbeds and walkways
Instead of using it for bonfire, slice up the trunk of your Christmas tree into thin discs and use them to edge walkways and flowerbeds. This is a not only a good way to use your Christmas tree but also beautiful and functional.
5. Keep your perennials warm
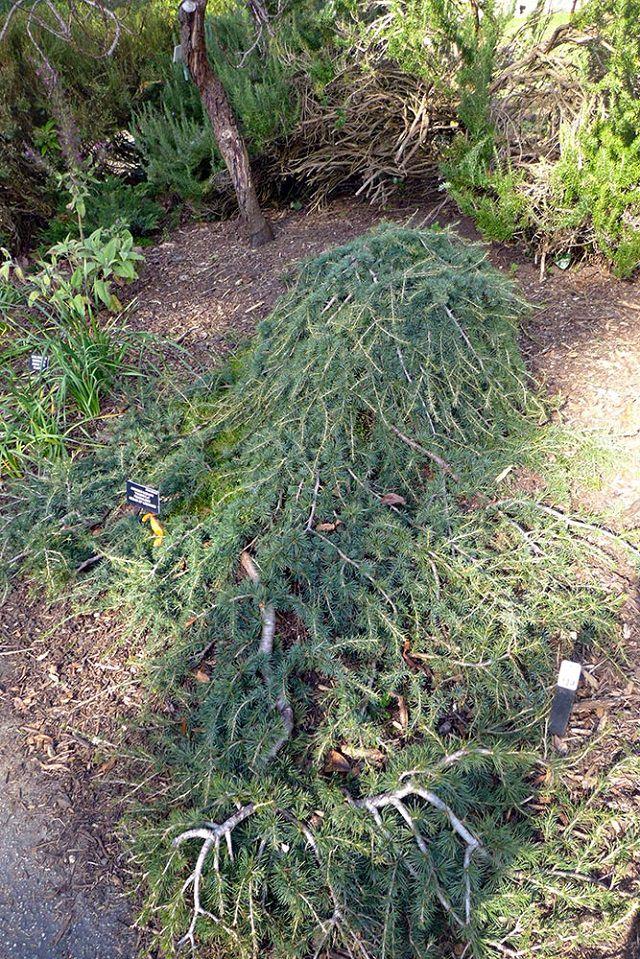
You can cut off the boughs from the Christmas tree and lay them around the root of the perennial plants, this mulching will protect them from cold temperature and also reduce the chances of frost heaving.
6. As pot risers
If you have a decent size Christmas tree, you can cut the trunk into pieces of different lengths and use them as pot risers or you can get creative with it and make a rolling plant stand out of it. If you’re not satisfied with the natural looks and want to protect the wood from deterioration, varnish or paint the tree stump pieces.
7. Suppressing the weeds
Instead of sawing and splitting it, you can rent a chipper and mash up the trunk into chips. During the next season, you can spread these wood chips as a mulch under your plants, this will suppress the growth of weeds. Also, remember that when decomposed, this wood chip mulch will enrich your soil.
8. Use it to stake plants
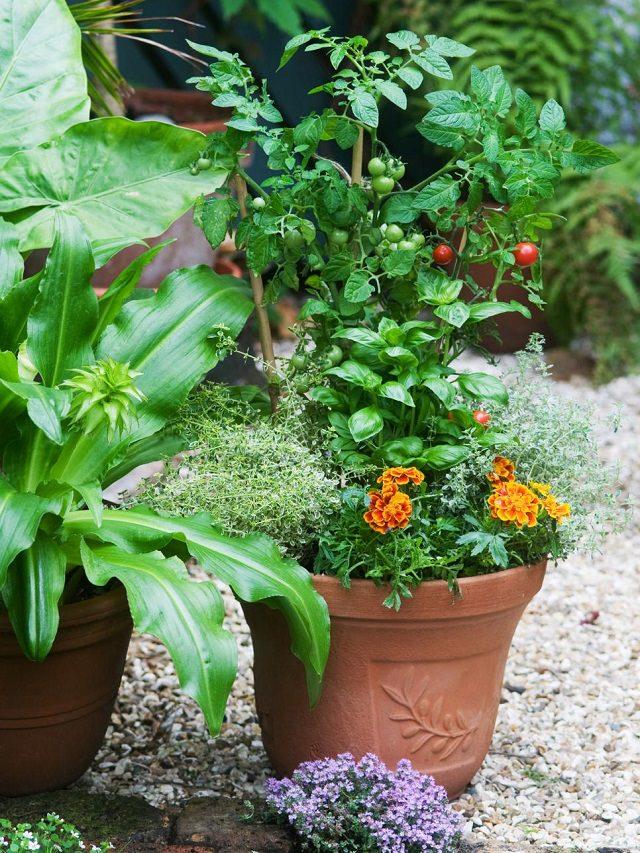
A majority of dead Christmas trees varieties are typically sturdy in nature. And you can use this to your advantage. Strip away the branches and use them to support your plants.
9. Create habitat for the fishes
If you or your neighbor has a pond or if you live near a lake, give your Christmas tree a proper send off by tossing its branches in the water. But before you do this— Remove all the needles and tie something into the middle, like a cinder block, a stone or something as heavy. During the harsh winter months, the fish can find warm refuge beneath the branches. Nonetheless, make sure that the dead tree is chemical free before throwing it overboard.

1. Create a brush pile for birds and wildlife
Use your dead Christmas tree to create a brush pile, you can find twigs, leaves, and logs in your garden, the Christmas tree can be used as its base. It’ll help and redirect the small animals and birds towards during the wintry months. The dead tree will not only offer the much-needed protection from chill to the animals but also act as a source of food.
2. Create a DIY bird sanctuary

It’s a nice idea if you keep the tree at a strategic point in the garden and place some birdhouses and feeders on or in it. This way, the birds can appreciate your tree, too. You can also go a step further and decorate it, and fill bird feeders with edible seeds and hang them from the branches/boughs to attract the birds to their new home.
3. Replant it for the next Christmas
If you’ve bought a living Christmas tree with the root ball intact, it’s a good idea to replant it for the next Christmas, it might be more than 11 months from now but that only gives us all the more reasons to start early. The Gardening Know How has a good article on it, take a look!
4. Edge flowerbeds and walkways
Instead of using it for bonfire, slice up the trunk of your Christmas tree into thin discs and use them to edge walkways and flowerbeds. This is a not only a good way to use your Christmas tree but also beautiful and functional.
5. Keep your perennials warm

You can cut off the boughs from the Christmas tree and lay them around the root of the perennial plants, this mulching will protect them from cold temperature and also reduce the chances of frost heaving.
6. As pot risers
If you have a decent size Christmas tree, you can cut the trunk into pieces of different lengths and use them as pot risers or you can get creative with it and make a rolling plant stand out of it. If you’re not satisfied with the natural looks and want to protect the wood from deterioration, varnish or paint the tree stump pieces.
7. Suppressing the weeds
Instead of sawing and splitting it, you can rent a chipper and mash up the trunk into chips. During the next season, you can spread these wood chips as a mulch under your plants, this will suppress the growth of weeds. Also, remember that when decomposed, this wood chip mulch will enrich your soil.
8. Use it to stake plants

A majority of dead Christmas trees varieties are typically sturdy in nature. And you can use this to your advantage. Strip away the branches and use them to support your plants.
9. Create habitat for the fishes
If you or your neighbor has a pond or if you live near a lake, give your Christmas tree a proper send off by tossing its branches in the water. But before you do this— Remove all the needles and tie something into the middle, like a cinder block, a stone or something as heavy. During the harsh winter months, the fish can find warm refuge beneath the branches. Nonetheless, make sure that the dead tree is chemical free before throwing it overboard.
1
1
文章
扭扭
2017年05月23日

Growing strawberries in gutters is the best way to use up your vertical space smartly. Strawberries are super easy fruits to grow in gutters, it also saves them from diseases like crown rot and fruit rot.
You can try to grow strawberries upside down too, learn here.
Things You’ll Need for Growing Strawberries in Gutters
A simple PVC pipe with a diameter of 10 cm., hole saw to make holes. You will also need something to clog pipe from both sides.
1. Step One
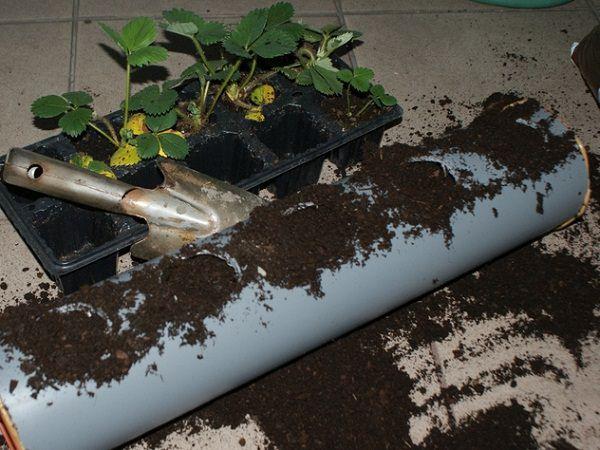
Image Credit: ogrodwcentrum
Divide PVC pipes into equal sizes as many you want and make holes according to the size of pipe (approx. 5 cm). Use hole saw to make holes. You’ll also need to make a few hole for drainage on the bottom. Then clog pipe from both sides.
2. Step Two

Image Credit: ogrodwcentrum
Now fill up the soil in the holes you made and plant strawberry plants carefully in each hole. Take care that the crown of strawberry plants should not be covered in soil.
3. Step Three

You can try to grow strawberries upside down too, learn here.
Things You’ll Need for Growing Strawberries in Gutters
A simple PVC pipe with a diameter of 10 cm., hole saw to make holes. You will also need something to clog pipe from both sides.
1. Step One

Image Credit: ogrodwcentrum
Divide PVC pipes into equal sizes as many you want and make holes according to the size of pipe (approx. 5 cm). Use hole saw to make holes. You’ll also need to make a few hole for drainage on the bottom. Then clog pipe from both sides.
2. Step Two

Image Credit: ogrodwcentrum
Now fill up the soil in the holes you made and plant strawberry plants carefully in each hole. Take care that the crown of strawberry plants should not be covered in soil.
3. Step Three

1
0
文章
Colorful
2017年05月23日
There are herbs and vegetables that regrow in water INDOORS , you can grow them from scraps and use in salads and toppings. Take a look!
In this article, you’ll learn about the herbs and vegetables that can re-grow (for a while) without soil, using just water and water, good for those who have no space to grow their own food, growing plants in water also help if you want to grow the roots of these scrap food plants for propagation.
Growing your own fruits, vegetables and herbs is one of the trendiest thing in the gardening. Growing food generates anticipation, curiosity, and interest, as well as it is fundamentally healthy- organic and free from harmful chemicals that are often used in producing large crops.
In addition, it’s much more rewarding! There is nothing better than a meal made with organic fruits of your own.1. Carrot Greens
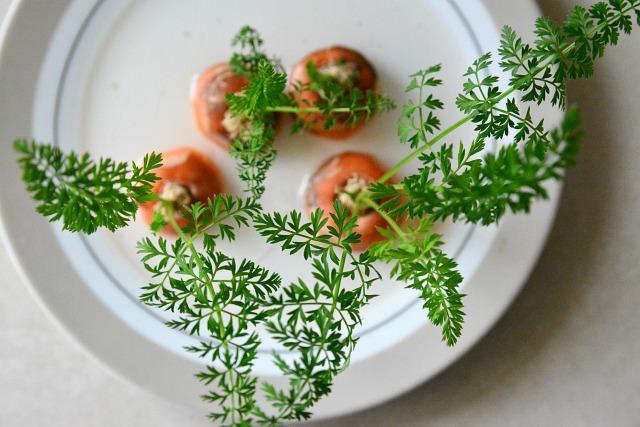
Although you can not bring back and GROW carrots in water but instead of throwing away the green ends from the top, put them in a shallow container of water in a bright spot to regrow the carrot greens. Keep changing the water every other day and in a few days, you’ll be able to see tiny green leaves, a wonderful addition to a salad, pesto or chutney.
2. Green Onion
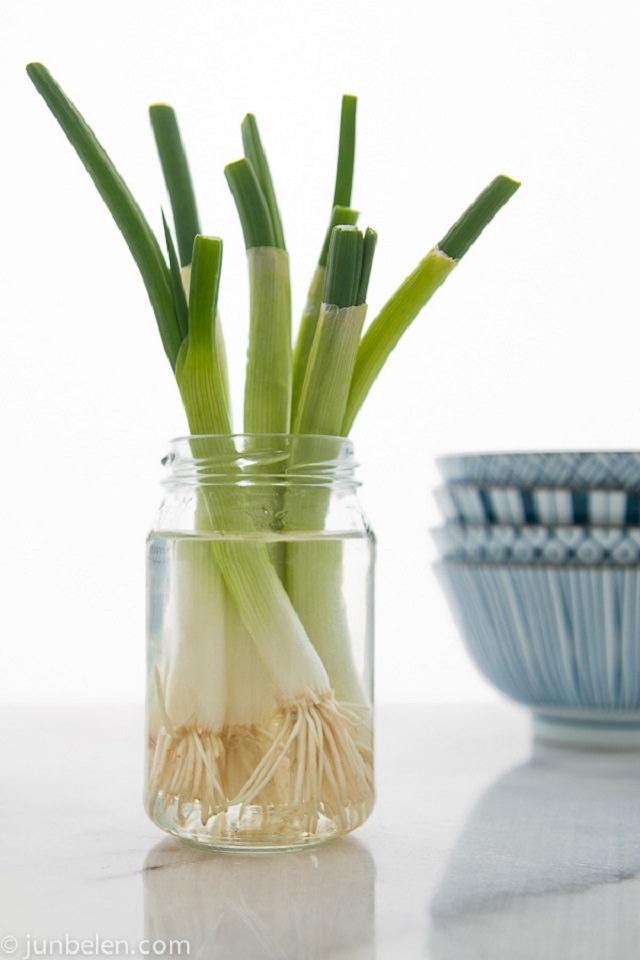
Noodles, Salads, and Pasta or even much more, there’re so many recipes in which you can try green onions. Isn’t it better to grow them fresh in your home?
Growing green onions in water is super easy, too. You don’t need a garden for this; all you need is a sunny windowsill, transparent jar or glass, and green onion bulbs. Read more about this here!
3. Bok Choi
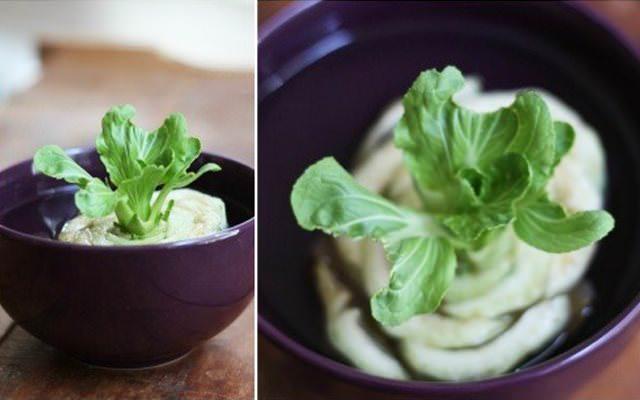
Bok choy, Bok Choi or Chinese cabbage is a green vegetable widely consumed in many Asian countries. Can be eaten raw, in salad and cooked. It contains lots of vitamins and minerals. To regrow again, cut the base of the stem and place this in a small bowl of water. It’s that simple! You will see how the new growth begins in only 2 days. See the tutorial! Either use the young leaves or transplant the regrowing Bok Choi in a container.
4. Celery

Celery is a herb that has been used since ancient times for its natural medicinal qualities. It is characterized by having a diuretic, digestive, purifying and anti-inflammatory action. To grow again, use the base! Place that in a small bowl of water. You will see how it grows back in 3 or 4 days. Young leaves can be used again or plant it if you have a small pot.
Also Read: Cool DIY Planter Ideas from Household Items
5. Fennel
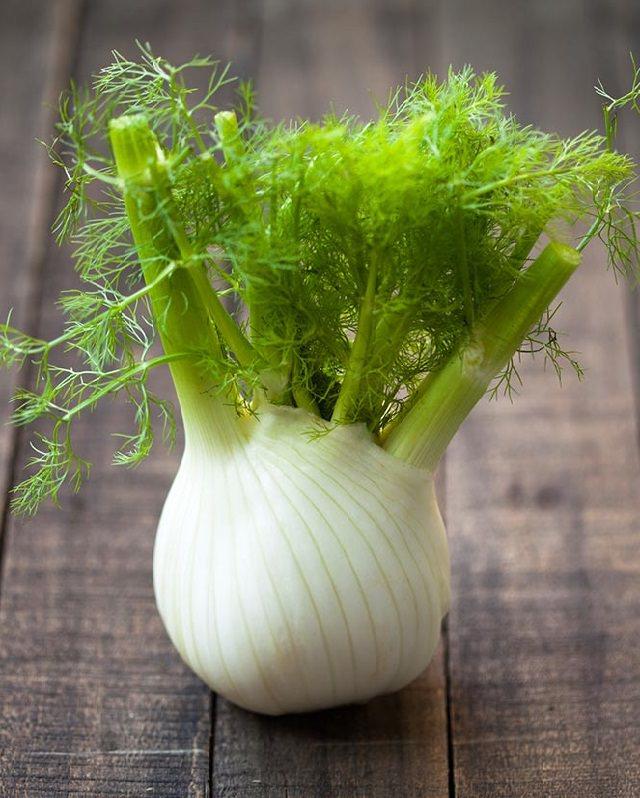
Fennel looks similar to dill, it can be a great addition to your cuisines. You can regrow it as easily as celery. Take a fennel bulb and set it in a cup or small bowl of clear water, a level of water should be at the level of the bulb. Keep the bowl in a spot that receives some sun and change the water in every couple of days.
6. Lettuce
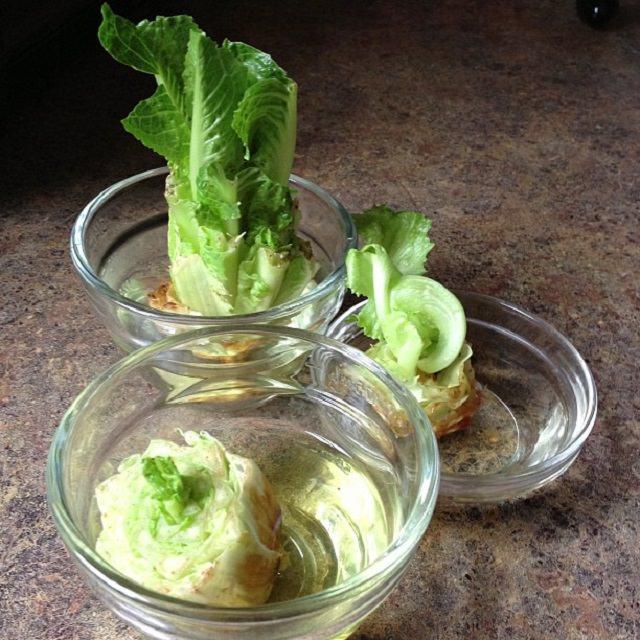
Lettuce taste best when fresh! However, growing lettuce in water won’t satiate your lettuce needs but you’ll love growing it that way. You can use this tiny supply in your salads or top the sandwiches with it. To regrow, eat your purchased lettuce, cutting the leaves at about 1 inch from the bottom. Place remaining stem in a shallow dish of water (about 1/2 inch). Now place that on a windowsill or under grow lights. Change water in a bowl every 1 to 2 days. Read more on Getty Stewart’s site!
7. Lemongrass
Get the lemongrass stalks and keep them in water in a bright spot that receives some sun, change the water every day, and watch as new leaves begin growing almost immediately. The roots start emerging after a week, and the stalk eventually divides itself (via offshoot stalks) after a few weeks. You can either use it or transplant that in pot.
8. Garlic Sprout

To make it grow, find a garlic clove with green sprout and keep it in a glass. Fill the water up to the level of clove. In 2-3 days the sprout will start to grow and the clove will produce roots. When the sprouts are 3 inches in height, you can cut it for use leaving 1/3 of the shoot. It can be used in salads baked potatoes, or to spice up any preparation, because it has an aroma and garlic-like flavor.
9. Beet Greens
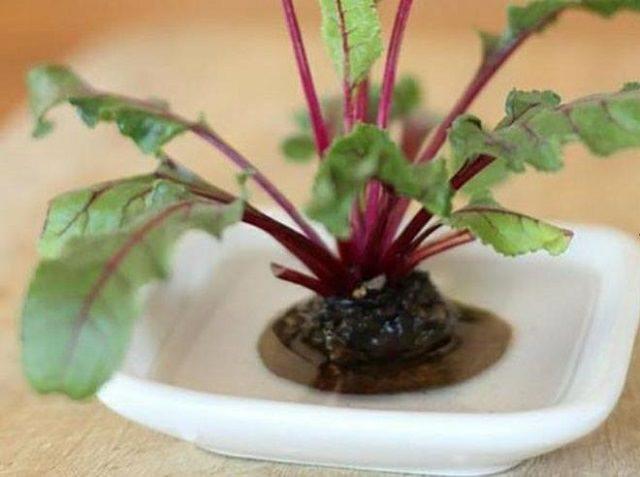
Beetroot is a highly nutritious vegetable, but its green part is also very healthy. It contains more iron than spinach, also the vitamin A that helps strengthen the immune system and stimulates the production of antibodies and white blood cells. To regrow, slice off the top portion of a beet with a knife. Take no more than one-third of the beet. Fill a glass, mug or bowl with water. Place the beet top into the water, with the cut side facing downward. Set the glass on a windowsill, counter or table that is close to the window, so the beet top will receive adequate sunlight. Read more of it here.
In this article, you’ll learn about the herbs and vegetables that can re-grow (for a while) without soil, using just water and water, good for those who have no space to grow their own food, growing plants in water also help if you want to grow the roots of these scrap food plants for propagation.
Growing your own fruits, vegetables and herbs is one of the trendiest thing in the gardening. Growing food generates anticipation, curiosity, and interest, as well as it is fundamentally healthy- organic and free from harmful chemicals that are often used in producing large crops.
In addition, it’s much more rewarding! There is nothing better than a meal made with organic fruits of your own.1. Carrot Greens

Although you can not bring back and GROW carrots in water but instead of throwing away the green ends from the top, put them in a shallow container of water in a bright spot to regrow the carrot greens. Keep changing the water every other day and in a few days, you’ll be able to see tiny green leaves, a wonderful addition to a salad, pesto or chutney.
2. Green Onion

Noodles, Salads, and Pasta or even much more, there’re so many recipes in which you can try green onions. Isn’t it better to grow them fresh in your home?
Growing green onions in water is super easy, too. You don’t need a garden for this; all you need is a sunny windowsill, transparent jar or glass, and green onion bulbs. Read more about this here!
3. Bok Choi

Bok choy, Bok Choi or Chinese cabbage is a green vegetable widely consumed in many Asian countries. Can be eaten raw, in salad and cooked. It contains lots of vitamins and minerals. To regrow again, cut the base of the stem and place this in a small bowl of water. It’s that simple! You will see how the new growth begins in only 2 days. See the tutorial! Either use the young leaves or transplant the regrowing Bok Choi in a container.
4. Celery

Celery is a herb that has been used since ancient times for its natural medicinal qualities. It is characterized by having a diuretic, digestive, purifying and anti-inflammatory action. To grow again, use the base! Place that in a small bowl of water. You will see how it grows back in 3 or 4 days. Young leaves can be used again or plant it if you have a small pot.
Also Read: Cool DIY Planter Ideas from Household Items
5. Fennel

Fennel looks similar to dill, it can be a great addition to your cuisines. You can regrow it as easily as celery. Take a fennel bulb and set it in a cup or small bowl of clear water, a level of water should be at the level of the bulb. Keep the bowl in a spot that receives some sun and change the water in every couple of days.
6. Lettuce

Lettuce taste best when fresh! However, growing lettuce in water won’t satiate your lettuce needs but you’ll love growing it that way. You can use this tiny supply in your salads or top the sandwiches with it. To regrow, eat your purchased lettuce, cutting the leaves at about 1 inch from the bottom. Place remaining stem in a shallow dish of water (about 1/2 inch). Now place that on a windowsill or under grow lights. Change water in a bowl every 1 to 2 days. Read more on Getty Stewart’s site!
7. Lemongrass
Get the lemongrass stalks and keep them in water in a bright spot that receives some sun, change the water every day, and watch as new leaves begin growing almost immediately. The roots start emerging after a week, and the stalk eventually divides itself (via offshoot stalks) after a few weeks. You can either use it or transplant that in pot.
8. Garlic Sprout

To make it grow, find a garlic clove with green sprout and keep it in a glass. Fill the water up to the level of clove. In 2-3 days the sprout will start to grow and the clove will produce roots. When the sprouts are 3 inches in height, you can cut it for use leaving 1/3 of the shoot. It can be used in salads baked potatoes, or to spice up any preparation, because it has an aroma and garlic-like flavor.
9. Beet Greens

Beetroot is a highly nutritious vegetable, but its green part is also very healthy. It contains more iron than spinach, also the vitamin A that helps strengthen the immune system and stimulates the production of antibodies and white blood cells. To regrow, slice off the top portion of a beet with a knife. Take no more than one-third of the beet. Fill a glass, mug or bowl with water. Place the beet top into the water, with the cut side facing downward. Set the glass on a windowsill, counter or table that is close to the window, so the beet top will receive adequate sunlight. Read more of it here.
3
0


